Page 32 of 425
315
Safety features of your vehicle
If the rear seat belt is disconnected when
you drive over 20km/h, the correspon-
ding seat belt warning light will blink for
35 seconds.
But, if one of the rear passenger's seat
belts are connected and disconnected
twice within 9 seconds after the belt is
fastened, the corresponding seat belt
warning light will not operate.
Lap/shoulder belt
To fasten your seat belt:
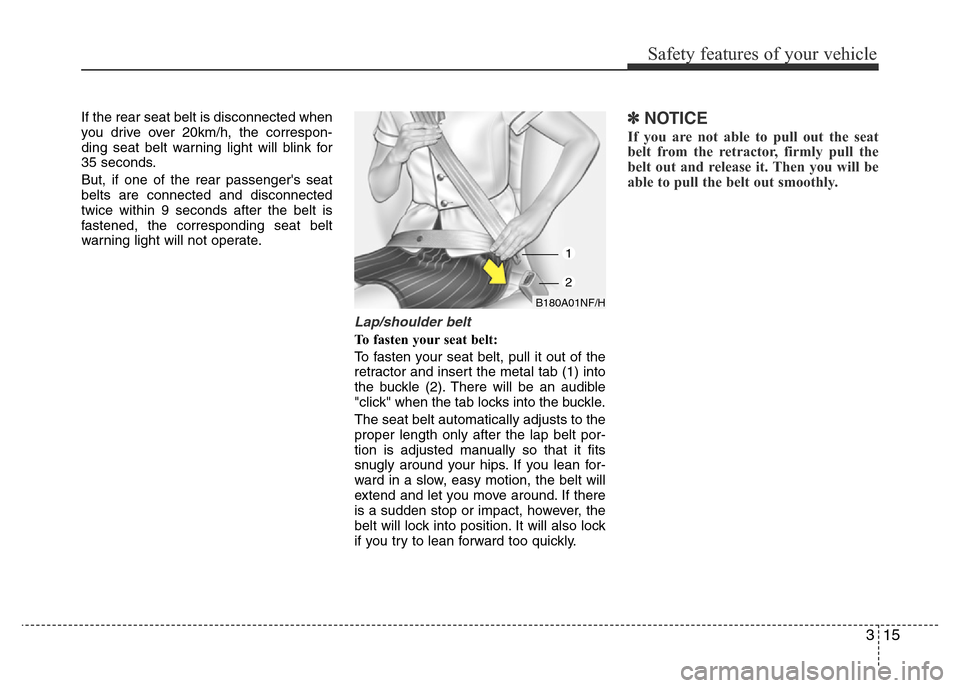
To fasten your seat belt, pull it out of the
retractor and insert the metal tab (1) into
the buckle (2). There will be an audible
"click" when the tab locks into the buckle.
The seat belt automatically adjusts to the
proper length only after the lap belt por-
tion is adjusted manually so that it fits
snugly around your hips. If you lean for-
ward in a slow, easy motion, the belt will
extend and let you move around. If there
is a sudden stop or impact, however, the
belt will lock into position. It will also lock
if you try to lean forward too quickly.
✽NOTICE
If you are not able to pull out the seat
belt from the retractor, firmly pull the
belt out and release it. Then you will be
able to pull the belt out smoothly.
B180A01NF/H
1
2
Page 35 of 425
Safety features of your vehicle
18 3
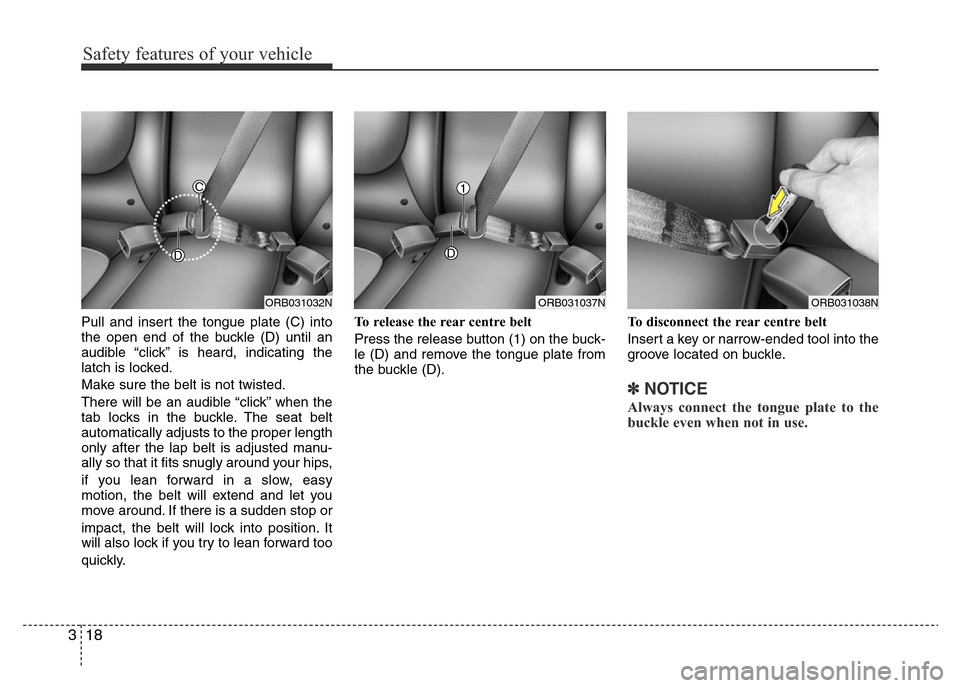
Pull and insert the tongue plate (C) into
the open end of the buckle (D) until an
audible “click” is heard, indicating the
latch is locked.
Make sure the belt is not twisted.
There will be an audible “click” when the
tab locks in the buckle. The seat belt
automatically adjusts to the proper length
only after the lap belt is adjusted manu-
ally so that it fits snugly around your hips,
if you lean forward in a slow, easy
motion, the belt will extend and let you
move around. If there is a sudden stop or
impact, the belt will lock into position. It
will also lock if you try to lean forward too
quickly.To release the rear centre belt
Press the release button (1) on the buck-
le (D) and remove the tongue plate from
the buckle (D).To disconnect the rear centre belt
Insert a key or narrow-ended tool into the
groove located on buckle.
✽NOTICE
Always connect the tongue plate to the
buckle even when not in use.
ORB031032N
D
C
ORB031037N
D
1
ORB031038N
Page 46 of 425
329
Safety features of your vehicle
Installing a child restraint system by
lap/shoulder belt
To install a child restraint system on the
outboard or centre rear seats, do the fol-
lowing:
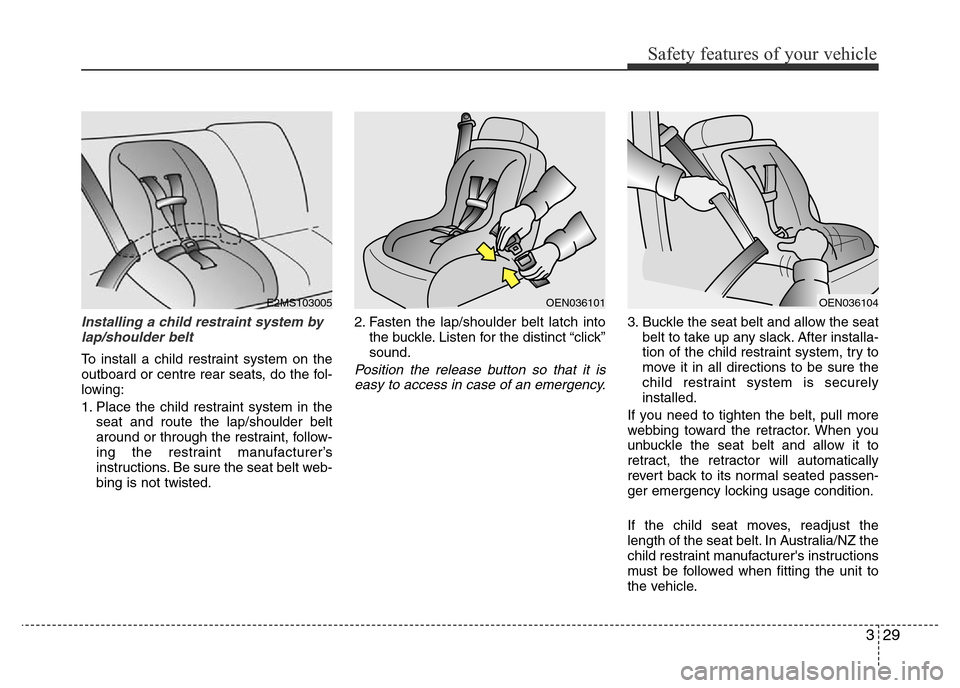
1. Place the child restraint system in the
seat and route the lap/shoulder belt
around or through the restraint, follow-
ing the restraint manufacturer’s
instructions. Be sure the seat belt web-
bing is not twisted.2. Fasten the lap/shoulder belt latch into
the buckle. Listen for the distinct “click”
sound.Position the release button so that it is
easy to access in case of an emergency.
3. Buckle the seat belt and allow the seat
belt to take up any slack. After installa-
tion of the child restraint system, try to
move it in all directions to be sure the
child restraint system is securely
installed.
If you need to tighten the belt, pull more
webbing toward the retractor. When you
unbuckle the seat belt and allow it to
retract, the retractor will automatically
revert back to its normal seated passen-
ger emergency locking usage condition.
If the child seat moves, readjust the
length of the seat belt. In Australia/NZ the
child restraint manufacturer's instructions
must be followed when fitting the unit to
the vehicle.
E2MS103005OEN036101OEN036104
Page 187 of 425
4117
Features of your vehicle
Mounting bracket for roof carrier
(if equipped)
To install or remove a roof carrier, you
can use the mounting bracket and cover
on the roof.
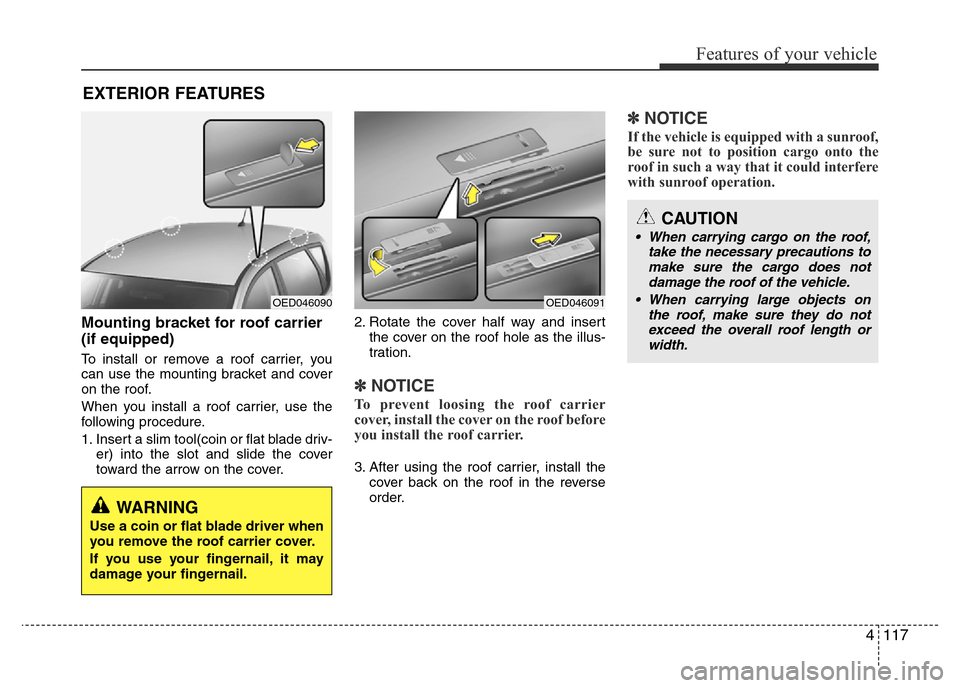
When you install a roof carrier, use the
following procedure.
1. Insert a slim tool(coin or flat blade driv-
er) into the slot and slide the cover
toward the arrow on the cover.2. Rotate the cover half way and insert
the cover on the roof hole as the illus-
tration.
✽NOTICE
To prevent loosing the roof carrier
cover, install the cover on the roof before
you install the roof carrier.
3. After using the roof carrier, install the
cover back on the roof in the reverse
order.
✽NOTICE
If the vehicle is equipped with a sunroof,
be sure not to position cargo onto the
roof in such a way that it could interfere
with sunroof operation.
EXTERIOR FEATURES
OED046090
WARNING
Use a coin or flat blade driver when
you remove the roof carrier cover.
If you use your fingernail, it may
damage your fingernail.
OED046091
CAUTION
• When carrying cargo on the roof,
take the necessary precautions to
make sure the cargo does not
damage the roof of the vehicle.
• When carrying large objects on
the roof, make sure they do not
exceed the overall roof length or
width.
Page 303 of 425
Driving your vehicle
66 5
Trailer brakes
If your trailer is equipped with a braking
system, make sure it conforms to your
country’s regulations and that it is prop-
erly installed and operating correctly.
If your trailer weighs more than the max-
imum trailer weight without trailer brakes
loaded, then it needs its own brakes and
they must be adequate. Be sure to read
and follow the instructions for the trailer
brakes so you’ll be able to install, adjust
and maintain them properly.
• Don’t tap into your vehicle's brake sys-
tem.
Driving with a trailer
Towing a trailer requires a certain
amount of experience. Before setting out
for the open road, you must get to know
your trailer. Acquaint yourself with the
feel of handling and braking with the
added weight of the trailer. And always
keep in mind that the vehicle you are
driving is now a good deal longer and not
nearly so responsive as your vehicle is
by itself.
Before you start, check the trailer towbar
and platform, safety chains, electrical
connector(s), lights, tyres and mirror
adjustment. If the trailer has electric
brakes, start moving your vehicle and
trailer and then apply the trailer brake
controller by hand to be sure the brakes
are working. This lets you check your
electrical connection(s) at the same time.
During your trip, occasionally check to be
sure that the load is secure, and that the
lights and trailer brakes are still working.
Following distance
Stay at least twice as far behind the vehi-
cle ahead as you would when driving
your vehicle without a trailer. This can
help you avoid situations that require
heavy braking and sudden turns.
Passing
You’ll need more passing distance up
ahead when you’re towing a trailer. And,
because of the increased vehicle length,
you’ll need to go much farther beyond the
passed vehicle before you can return to
your lane.
Backing up
Hold the bottom of the steering wheel
with one hand. Then, to move the trailer
to the left, just move your hand to the left.
To move the trailer to the right, move your
hand to the right. Always back up slowly
and, if possible, have someone guide
you.
Making turns
When you're turning with a trailer, make
wider turns than normal. Do this so your
trailer won't strike kerbs, road signs,
trees, or other objects. Avoid jerky or
sudden manoeuvres. Signal well in
advance.
WARNING- Trailer brakes
Do not use a trailer with its own
brakes unless you are absolutely
certain that you have properly set
up the brake system. This should
be performed by professionals who
are experienced in this field.
Page 418 of 425
Specifications & Consumer information
2 8
ENGINE
Item 4 Door5 Door
Overall length 4370 (172)
4115 (162)
Overall width 1700 (66.9)
1700 (66.9)
Overall height 1450 (57.1)
1450 (57.1)
Front tread175/70 R14 1507 (59.3)
1507 (59.3)
195/50 R16 1489 (58.6)
1489 (58.6)
Rear tread175/70 R14 1511 (59.5)
1511 (59.5)
195/50 R16 1493 (58.8)
1493 (58.8)
Wheelbase 2570 (101.2)
2570 (101.2)
DIMENSIONS
mm (in) Item
Petrol Kappa 1.4L Petrol Gamma 1.6L Diesel 1.6L
Displacement
cc (cu. in)
1368 (83.48) 1591 (97.09) 1582 (96.54)
Bore x Stroke
mm (in.)
72x84 (2.83x3.31) 77x85.44 (3.03x3.36) 77.2x84.5 (3.04x3.33)
Firing order
1-3-4-2 1-3-4-2 1-3-4-2
No. of cylinders
4, In-line 4, In-line 4, In-line