Page 41 of 80
*
Rear passengers can enjoy a different audio or entertainment source than\
front
passengers.
Rear")
74 || 75
AUDIO AND CONNECTIVITY
AUDIO AND CONNECTIVITY
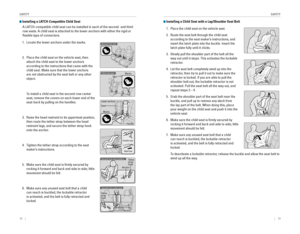
Rear Entertainment System (RES)*
Rear passengers can enjoy a different audio or entertainment source than\
front
passengers.
Rear audio display
DVD slot
REAR POWER button:
Turn the rear entertainment
system on or off. REAR AUDIO button:
Display rear audio information.
FRONT AUDIO button:
Display front audio information.
DVD eject button
Operating the System from the Front
You can operate the rear entertainment system using the front audio contr\
ols.
1. Press REAR POWER to turn the system on.
2. Press REAR AUDIO.
3. Use the front audio controls to choose a media source for the rear syste\
m.
4. Press FRONT AUDIO to return to the front audio source.
Playing a DVD
Insert a DVD into the DVD slot. It begins playing automatically. Use the front or
rear controls to navigate the DVD.
*if equipped
System ComponentsOpen the overhead screen to use the system.
9-inch screen*:
Pull down the bottom edge of the
screen, and extend it until it locks into place.
Ultrawide screen*:
Press OPEN. Extend the screen
until it locks into place.
Fold the screen back into the ceiling when not in
use.
Press the release button to detach the rear control
panel, if desired.
Wireless HeadphonesYour vehicle comes with two sets of wireless
headphones.
Pivot the left earpiece to turn on the headphones.
Turn the dial at the bottom of the right earpiece to
adjust the volume.
Overheadscreen Release
button
Auxiliary inputs can be used for video game systems and
other devices.
Wired headphones can also
be used.
Ultrawide RES*
HDMI input can be used for video game systems and
other devices.
Auxiliary input jackHeadphone jack
*if equipped
Volume
dial
Pivot to
turn on.
Page 42 of 80

76 || 77
AUDIO AND CONNECTIVITY
AUDIO AND CONNECTIVITY
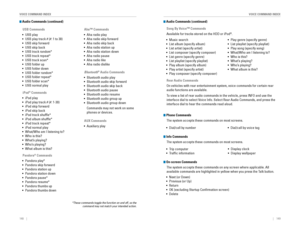
Remote Control and Rear Operation
You can operate the system using the rear control panel.
1. Make sure REAR POWER is turned on in the front audio controls.
2. From the rear control panel, press the desired audio source button (or the
SOURCE button for Ultrawide RES*).
3. Press the arrow/ENTER buttons to highlight options on the screen and select
them. Use the other rear control panel buttons to operate the system.
DVD/AUX button: Play a DVD, USB, iPod, or auxiliary
source. CD button: Play a CD.XM button*:
Play XM Radio.
FM/AM button:
Play FM or AM
Radio.MENU button: Display menu options.
SETUP button:
Display setup options.
Arrow/ENTER
button: Highlight
and select items.
CH/FOLDER
button:
Change
channels,
stations, or
folders.
Power button:
Turn the
system on or
off.
Light button:
Illuminate the remote buttons.
TUNE/SKIP
button: Change
DVD chapters, audio stations,
or tracks. Play/Pause
button (CD or DVD)
TITLE/SCROLL
button: Display the DVD status or CD titles.
CANCEL button: Go back to the previous display.
This vehicle’s overhead mounted display includes mercury-containing
components. Upon removal or replacement, please reuse, recycle, or dispo\
se of
as hazardous waste.
NOTICE
*if equipped
1. Connect a second source through the rear auxiliary or HDMI input (see
page 75).
2. From the rear control panel, press DUAL.
3. Select which side the second source plays on.
4. Press SOURCE to select AUX-VIDEO or AUX-HDMI.
SOURCE button: Display audio sources.
DUAL button: Display two sources side by side on the screen.
SINGLE button:
Display one source on the
entire screen.
SWAP button:
Switch the
sources to
opposite sides of
the screen.
Ultrawide Dual Screen Operation*
Play two different sources side by side on the ultrawide screen. One side of the
screen can play a source from the front audio system (FM, DVD, etc.). The other
side of the screen can play a connected device, such as a video game sys\
tem.
*if equipped
Page 43 of 80

78 || 79
Learn how to operate the vehicle’s hands-free calling system.
Basic HFL Operation
Make and receive phone calls using the vehicle’s audio system, without handling
your phone. Visit handsfreelink.honda.com (U.S.) or www.handsfreelink.ca (Canada)
to check phone compatibility.
HFL Controls
Use the controls to enter information and make selections.
BLUETOOTH® HANDSFREELINK® (HFL)
Selector knob: Rotate
and press to make
selections.
BACK button:
Go back to the previous display.
PHONE button: Display the phone screen.
SETTINGS button: Display phone settings.
MENU button: Display menu items.
HFL display
Pick-Up button: Answer an incoming call.
Hang-Up/Back button:
End or decline a call, or cancel an operation.
Talk button:
Make a call using a stored voice tag, phonebook name, or phone number.
Voice Recognition Tips On models with navigation, you can say voice commands to operate system
functions. Below are some helpful tips:
•
When using the Talk button, wait for a beep before saying a command.
• To bypass the system prompts, simply press the Talk button again to say your
command.
•
When the Talk button is pressed, all available voice commands are highlighted
in yellow.
• Speak in a clear, natural voice.
•
Reduce all background noise.
• Adjust the dashboard and side vents away from the microphone in the ceiling.
• Close the windows and moonroof.
To reduce the potential for driver distraction, certain manual functions \
may be
inoperable or grayed out while the vehicle is moving. Stop or pull over \
to perform
the function.
PHONE button: Display the phone screen. MENU button: Display menu items.
BACK button:
Go back to the previous display. SETTINGS button: Display phone settings.
Interface dial (from the Phone
screen): Rotate and press to make
selections in the upper display. Move
up, down, left, or right.
Models with one display Models with two displays
BLUETOOTH® HANDSFREELINK®BLUETOOTH® HANDSFREELINK®
Page 44 of 80

80 || 81
Pairing a Phone
To use hands-free phone and streaming audio functions, you must first p\
air your
phone to the system. This can only be done when the vehicle is stopped. Use the
selector knob or interface dial to make and enter selections.
1. Press SETTINGS.
2. Select Phone Settings.
3. Select Bluetooth Device List (if no phone has been
paired) or Connect Phone (if pairing an additional
phone).
4. Select Add Bluetooth Device.
5. Make sure your phone is in discovery mode.
6. HFL searches for your phone. Select your phone
when it appears on the list.
If your phone does not appear:
Select Phone Not Found and search for
HandsFreeLink from your phone.
7. HFL gives you a six-digit code. Compare it to the
code that appears on your phone. Connect to HFL
from your phone.
8. The system asks if you want to enable Phone
Synchronization, which imports your phone’s call
history and phonebook. Select On.
9. Press BACK to exit the menu.
State or local laws may prohibit the operation of handheld electronic devices while operating a vehicle.
Making a Call
You can make a call using several methods.
Dialing a Number
Enter a 10-digit phone number to call.
Using voice commands
Press the Talk button before you say each command.
1. Say “Dial by number.”
2. Say the phone number. For example,
“3-1-0-5-5-5-1-2-3-4.”
3. The system begins to dial.
Using the menu
Use the selector knob or interface dial to make and enter selections. This method
is inoperable while the vehicle is moving.
1. Press PHONE.
2. Press MENU.
3. Select Dial.
4. Enter the phone number. Select the green phone
icon to call.
Using the Phonebook
When your phone is paired, its entire phonebook can be automatically imported to
the system. Phone synchronization must be turned on.
Using voice commands
Press the Talk button before you say each command.
1. Say “Dial by name.”
2. Say the phonebook name and phone type. For
example, “John Smith mobile.”
Using the menu
Use the selector knob or interface dial to make and enter selections. This method
is inoperable while the vehicle is moving.
1. Press PHONE.
2. Press MENU.
3. Select Phonebook.
4. Scroll through the list to find the name and
number you want to call, and select it to call.
BLUETOOTH® HANDSFREELINK®BLUETOOTH® HANDSFREELINK®
Page 45 of 80

82 || 83
Storing Speed Dial Entries
Store up to 20 numbers for quick dialing. Use the selector knob or interface dial to
make and enter selections.
1. Press PHONE.
2. Press MENU.
3. Select Speed Dial, then select New Entry.
4. Select an entry method.
5. If desired, you can create a voice tag for the
number. Follow the prompts.
When a voice tag is created, you can press the Talk button and say “Call” and
the stored voice tag to quickly call the number.
Using Speed Dial and Call History
Make calls quickly using stored speed dial entries or call history numbers.
Using voice commands
Press the Talk button before you say each command.
1. Say “Dial by voice tag.”
2. Say the stored voice tag name. For example,
“
John Smith.”
Models with one display
Using the menu
1. Press PHONE.
2. Press MENU.
3. Select Speed Dial or Call History.
4. Scroll through the list to find the entry you want
to call, and select it to call.
Models with two displays
Using the phone screen
Use the interface dial to make and enter selections.
1. Press PHONE.
2. For Speed Dial, use the interface dial to scroll
through the list to find the entry you want to call,
and select it to call.
For Call History, move the interface dial to the
right and scroll through the list.
Mr.AAA111AAA####
555EEE#### 444DDD#### 333CCC####
222BBB####
Mr.EEE Mr.DDD
Mr.CCC
Mr.BBB
Mr.AAA111AAA####
555EEE#### 444DDD#### 333CCC####
222BBB####
Mr.EEE Mr.DDD
Mr.CCC
Mr.BBB
SMS Text Messaging and E-Mail*
Receive and send messages from your paired and connected phone. Visit
handsfreelink.honda.com (U.S.) or www.handsfreelink.ca (Canada) to check phone
compatibility. Standard message rates apply. This feature is limited while the vehicle
is moving.
Models with two displays
Receiving and Responding to Messages When you receive a new message, a pop-up appears on the display. Use the
selector knob or interface dial to view the message when the vehicle is stopped.
You can also reply to it using fixed phrases or call the sender.
1. When the prompt appears, select Read.
2. The message is displayed, and the system reads
it aloud.
On models with one display, press the selector
knob to display the options.
To reply: Select Reply, and choose one of the six
available responses. Select Send to send the
message. You cannot create a new text message.
To call the sender: Select Call.
Selecting an Account
If your phone has both text message and e-mail accounts, you can select only
one of them at a time to be active and receive notifications. Use the interface dial
make and enter selections.
1. Press SETTINGS.
2. Select Phone Settings.
3. Select Select Account.
4. Select Text Messages or an e-mail account.
*if equipped
BLUETOOTH® HANDSFREELINK®BLUETOOTH® HANDSFREELINK®
Page 46 of 80

84 || 85
NAVIGATION
NAVIGATION
Learn how to enter a destination and operate the navigation system.
Basic Navigation Operation
A real-time navigation system uses GPS and a map database to show your current
location and help guide you to a desired destination. You can operate the system
using voice commands or the system controls.
To reduce the potential for driver distraction, certain manual functions \
may be
inoperable or grayed out while the vehicle is moving. Voice commands are always
available.
Steering Wheel Controls
Use the steering wheel controls to give voice commands.
Voice Command Tips•
When using the Talk button, wait for a beep before saying a command.
• To bypass the system prompts, simply press the Talk button again to say your
command.
•
When the Talk button is pressed, all available voice commands are highlighted
in yellow.
• Speak in a clear, natural voice.
•
Reduce all background noise.
• Adjust the dashboard and side vents away from the microphone in the ceiling.
• Close the windows and moonroof.
BACK button: Press to cancel
a command or operation.
TALK button: Press to give
navigation commands.
Using the navigation system while driving can take your attention away f\
rom
the road, causing a crash in which you could be seriously injured or killed.
Operate system controls only when the conditions permit you to safely do\
so.
WARNING
NAVIGATION*
*if equipped
Navigation Display and Controls
Use the controls to enter information and make selections.
NAV
NAV button: Display the map screen or
directions when en
route.INFO button: Select
items such as calendar,
traffic incidents, and
more.
BACK button:
Go back to the previous display.
SETTINGS button:
Change settings for
map and routing
options.
MENU button: Enter destination information.
button: Change screen brightness. Use the interface dial to make
adjustments.
Interface dial (from the map
screen): Rotate to scroll the
map or menus. Move up,
down, left, or right. Press
ENTER to make a selection.
GPS signal
strength Traffic
incident icon
Traffic flow
Current
map scale
Current vehicle
position
Map
orientation
Current
street
Traffic
status Landmark
icon
Page 47 of 80

86 || 87
NAVIGATION
NAVIGATION
Interface Dial Feedback
Configure the system to read aloud selections made using the interface\
dial. Use
the interface dial to make and enter selections.
1. Press SETTINGS.
2. Select System Settings.
3. Select Interface Dial Feedback.
4. Select Off, Auto, or On.
ON: Always reads the selection.
AUTO: Reads the selection only when the vehicle is moving.
OFF: Turns interface dial feedback off.
System Guidance VolumeAdjust the navigation system volume. This does not affect audio or Bluetooth
®
HandsFreeLink® volume, which is controlled by the volume knob. Use the interface
dial to make and enter selections.
1. Press SETTINGS.
2. Select System Settings.
3. Select Volume.
4. Adjust the level, or select off.
Voice Prompt
Turn the voice feedback feature on or off. Use the interface dial to make and enter
selections.
1. Press SETTINGS.
2. Select System Settings.
3. Select Voice Rec.
4. Select Voice Prompt.
5. Select On or Off.
Voice Prompt Volume
Adjust the voice prompt volume when they are turned on. Use the interfac\
e dial to
make and enter selections.
1. Press SETTINGS.
2. Select System Settings.
3. Select Voice Rec.
4. Select Volume.
5. Adjust the level, or select Off.
Entering a Destination
Use multiple methods to enter a destination.
Home AddressStore your home address in the system so you can easily route to it. Use\
the
interface dial to make and enter selections.
1. Press SETTINGS.
2. Select Navi Settings.
3. Select Edit Go Home.
4. Enter the address, and select OK when complete.
When your home address is stored, you can press the Talk button and say “Go
home” at any time. You can also select Go home from the destination menu.
Street Address
Enter a street address using voice commands. Press the Talk button before saying
each command.
1. Say “Address.”
2. Say “Street,” then say the street name on the
next screen. For Canadian vehicles, spell the
street name one letter at a time. Do not include
the direction (N, S, E, W) or type (St., Ave., Blvd.,
etc.).
3. A list of street names appears. Say the number
next to the street you want to select.
4. Say the entire street address number. For
example, “1-2-3-4.” If necessary, say “OK” to
proceed.
5. If the street address is in more than one city, a
list of city names appears. Say the number next
to the city you want to select.
6. Say “Set as destination” to set the route.
Page 48 of 80

88 || 89
NAVIGATION
NAVIGATION
Place Category
Enter a destination using a point of interest or landmark using the interface dial.
1. Press MENU.
2. Select Place Category.
3. Select a category and a subcategory. For
example, Auto Service followed by Honda
Dealers.
4. Select a search method, such as Sort by
Distance to Travel.
5. A list of places appears. Scroll the list to select
the place you want.
6. Select Set as Destination to set the route.
Find Nearest Place
Enter a destination by category and distance using voice commands. Press the
Talk button before saying each command.
1. Say “Find nearest” and a place. For example,
“Find nearest ATM.”
2. A list of the nearest places in your area is
displayed by shortest distance to destination.
3. Say the number next to the destination you want
to select.
4. Say “Set as destination” to set the route.
Routing
After a destination is set, you can alter or cancel your route.
Map Legend
Canceling Your Route
You can cancel your route at any time. Press the Talk button and say “Cancel
route.” You can also use the interface dial to make and enter selections.
1. When en route, press DEST/ROUTE.
2. Select Cancel Route. The route is cleared and the
map screen returns.
Taking a Detour
You can calculate a detour route manually if you encounter a road closure\
or other
obstacle. Use the interface dial to make and enter selections.
1. When en route, press DEST/ROUTE.
2. Select Detour. The system attempts to calculate
a new route by avoiding the next 5 miles (8 km)
while on a freeway or 1 mile (1 km) while on a
surface street.
FM TrafficView traffic flow, incidents, and construction in major metro areas. You can also
route around congestion or incidents using voice commands. Press the Talk
button before saying each command.
1. When en route, say “Display traffic on my route.”
A list of incidents on your route appears.
2. Say the number of the incident you want to avoid.
3. Say “Avoid” and the incident list returns.
4. Say “Reroute” to set the new route.
During route guidance
Next
guidance
pointEstimated time to destination
Distance to destination Calculated
route