2015 HONDA FIT spare tire
[x] Cancel search: spare tirePage 406 of 453

405Continued
Handling the Unexpected
If a Tire Goes Flat
Changing a Flat Tire
If a tire goes flat while driving, grasp the steering wheel firmly, and brake gradually
to reduce speed. Then, stop in a safe plac e. Replace the flat tire with a compact
spare tire. Go to a dealer as soon as possib le to have the full-size tire repaired or
replaced.
1. Park the vehicle on firm, level, and non- slippery surface and apply the parking
brake.
2. Move the shift lever to
(P.
2. Move the shift lever to
(R.
3. Turn on the hazard warning lights an d turn the ignition switch to LOCK
(0*1.
*1 : Models with the smart entry system have an ENGINE START/STOP button instead of an ignition switch.
1Changing a Flat Tire
Periodically check the tire pressure of the compact
spare. It should be set to the specified pressure.
Specified Pressure: 60 psi (420 kPa, 4.2 kgf/cm
2)
When driving with the compact spare tire, keep the
vehicle speed under 50 mph (80 km/h). Replace with
a full-size tire as soon as possible.
The compact spare tire and wheel in your vehicle are
specifically for this model.
Do not use them with another vehicle.
Do not use another type of compact spare tire or
wheel with your vehicle.
Do not mount tire chains on a compact spare tire.
If a chain-mounted front tire goes flat, remove one of
the full-size rear tires and replace it with the compact
spare tire. Remove the flat front tire and replace it
with the full-size tire that was removed from the rear.
Mount the tire chains on the front tire.
Automatic transmission (CVT) models
Manual transmission models
All models
15 US FIT-31T5A6000.book 405 ページ 2014年3月6日 木曜日 午後7時5分
Page 407 of 453

406
uuIf a Tire Goes Flat uChanging a Flat Tire
Handling the Unexpected
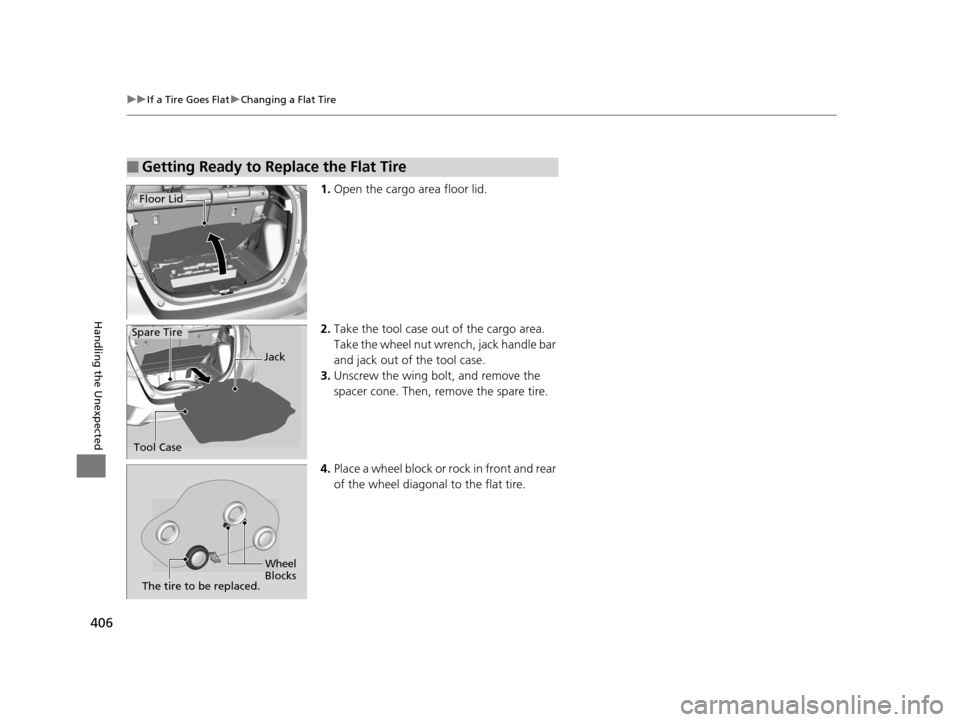
1. Open the cargo area floor lid.
2. Take the tool case out of the cargo area.
Take the wheel nut wrench, jack handle bar
and jack out of the tool case.
3. Unscrew the wing bolt, and remove the
spacer cone. Then, remove the spare tire.
4. Place a wheel block or ro ck in front and rear
of the wheel diagonal to the flat tire.
■Getting Ready to Replace the Flat Tire
Floor Lid
Tool Case Jack
Spare Tire
Wheel
Blocks
The tire to be replaced.
15 US FIT-31T5A6000.book 406 ページ 2014年3月6日 木曜日 午後7時5分
Page 408 of 453

407
uuIf a Tire Goes Flat uChanging a Flat Tire
Continued
Handling the Unexpected
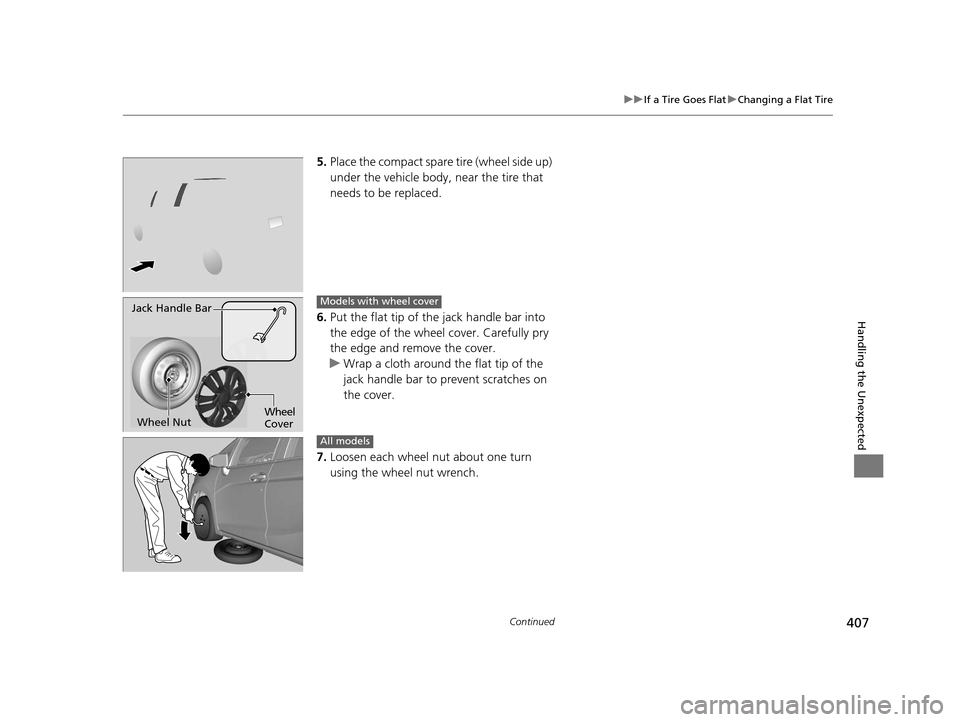
5. Place the compact spare tire (wheel side up)
under the vehicle body, near the tire that
needs to be replaced.
6. Put the flat tip of the jack handle bar into
the edge of the wheel cover. Carefully pry
the edge and remove the cover.
u Wrap a cloth around the flat tip of the
jack handle bar to prevent scratches on
the cover.
7. Loosen each wheel nut about one turn
using the wheel nut wrench.
Jack Handle Bar
Wheel Nut Wheel
CoverModels with wheel cover
All models
15 US FIT-31T5A6000.book 407 ページ 2014年3月6日 木曜日 午後7時5分
Page 410 of 453

Continued409
uuIf a Tire Goes Flat uChanging a Flat Tire
Handling the Unexpected
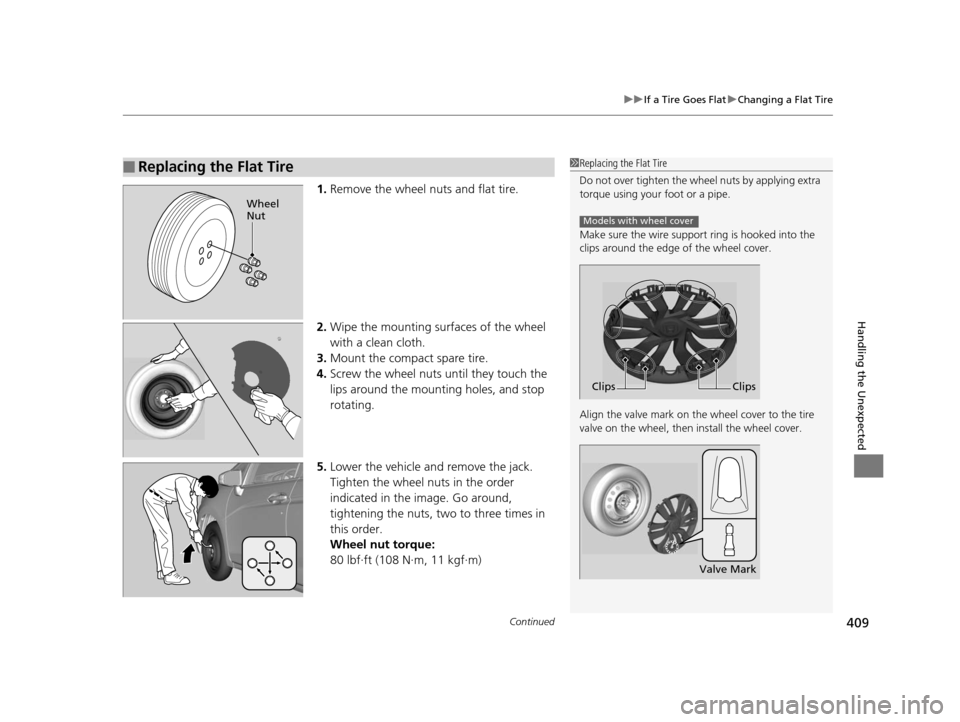
1. Remove the wheel nuts and flat tire.
2. Wipe the mounting surfaces of the wheel
with a clean cloth.
3. Mount the compact spare tire.
4. Screw the wheel nuts until they touch the
lips around the mounting holes, and stop
rotating.
5. Lower the vehicle and remove the jack.
Tighten the wheel nuts in the order
indicated in the image. Go around,
tightening the nuts, two to three times in
this order.
Wheel nut torque:
80 lbf∙ft (108 N∙m, 11 kgf∙m)
■Replacing the Flat Tire1Replacing the Flat Tire
Do not over tighten the wheel nuts by applying extra
torque using your foot or a pipe.
Make sure the wire support ring is hooked into the
clips around the edge of the wheel cover.
Align the valve mark on the wheel cover to the tire
valve on the wheel, then install the wheel cover.
Models with wheel cover
Clips
Clips
Valve Mark
Wheel
Nut
15 US FIT-31T5A6000.book 409 ページ 2014年3月6日 木曜日 午後7時5分
Page 411 of 453

uuIf a Tire Goes Flat uChanging a Flat Tire
410
Handling the Unexpected
1. Remove the center cap.
2. Place the flat tire face down in the spare tire
well.
3. Remove the spacer cone from the wing
bolt, flip it over, and insert it back on the
bolt. Secure the flat tire with the wing bolt.
4. Securely store the wheel nut wrench, jack
handle bar and jack back in the tool case.
Store the case in the cargo area under the
cargo floor lid.
If you replace a flat tire with the spare tire, the low tire pressure/TPMS indicator
comes on while you are driving. After driving for a few miles (kilometers), the
indicator will start blinking for a short time and then stay on, but this is normal.
Calibrate the TPMS when you replace the tire with a specified regular tire.
2TPMS Calibration P. 336
■Storing the Flat Tire1Storing the Flat Tire
Make sure the wire support ring is on the outer side
of the tire valve as shown.
3WARNING
Loose items can fly around the interior in a
crash and can seriously injure the
occupants.
Store the wheel, jack, and tools securely
before driving.
Models with wheel cover
Wire Support Ring
Tire Valve
For full-size
tire
For compact
spare tire
Wing BoltSpacer
Cone
Models with aluminum wheels
All models
■TPMS and the Spare Tire
U.S. models
15 US FIT-31T5A6000.book 410 ページ 2014年3月6日 木曜日 午後7時5分
Page 423 of 453

422
uuIndicator, Coming On/Blinking uIf the Low Tire Pressure/TPMS Indicator Comes On or Blinks
Handling the Unexpected
If the Low Tire Pressure/TPMS Indicator Comes On or
Blinks
■Reasons for the indicator to come on or blink
A tire pressure is signifi cantly low, or the TPMS has not been calibrated.
If there is a problem with the TPMS or the compact spare tire is installed,
the indicator blinks for about one minute, and then stays on
■What to do when the indicator comes on
Drive carefully and avoid abrupt cornering and hard braking.
Stop your vehicle in a safe place. Ch eck the tire pressure and adjust the
pressure to the specified level. The sp ecified tire pressure is on a label on
the driver side doorjamb. u Calibrate the TPMS after the tire pressure is adjusted.
■What to do when the indicator blinks, then remains on
Have the tire inspected by a dealer as soon as possible. If the compact
spare tire causes the indicator to blink, change the tire to a full-size tire.
The indicator goes off after driv ing for a few miles (kilometers).
u Calibrate the TPMS after a full-size tire is reinstalled.
U.S. models
1If the Low Tire Pressure/TPMS Indicator Comes On or Blinks
NOTICE
Driving on an extremely unde rinflated tire can cause
it to overheat. An overheated tire can fail. Always
inflate your tires to the prescribed level.
15 US FIT-31T5A6000.book 422 ページ 2014年3月6日 木曜日 午後7時5分
Page 434 of 453

433
uuSpecifications u
Information
■Brake Fluid
■ Automatic Transmission (CVT) Fluid
*
■Manual Transmission Fluid*
SpecifiedHonda Heavy Duty Brake Fluid DOT 3
SpecifiedHonda HCF-2 Transmission Fluid
Capacity Change 3.6 US qt (3.4 L)
SpecifiedHonda Manual Transmission Fluid
Capacity Change 1.5 US qt (1.4 L)
■ Engine Oil
■ Engine Coolant
*1: Automatic transmission (CVT) models
*2: Manual transmission models
Recommended·Genuine Honda Motor Oil 0W-20
·API Premium-grade 0W-20 detergent oil
Capacity Change 3.3 US qt (3.1 L)
Change
including
filter
3.5 US qt (3.3 L)
SpecifiedHonda Long-Life Antifreeze/Coolant Type2
Ratio 50/50 with distilled water
Capacity
0.999 US gal (3.78 L) *1
(change including the remaining
0.111 US gal (0.42 L) in the reserve tank)
0.999 US gal (3.78 L)*2
(change including the remaining
0.111 US gal (0.42 L) in the reserve tank)
■ Tire
*1: LX, Canadian DX
*2: EX, EX-L
Regular
Size185/60R15 84T*1
185/55R16 83H*2
Pressure
psi (kPa[kgf/cm2])
Front33 (230 [2.3])
Rear33 (230 [2.3])*1
32 (220 [2.2])*2
Compact
Spare Size T135/80D15 99M
Pressure
psi (kPa[kgf/cm
2])
60 (420 [4.2])
Wheel SizeRegular15 x 6J*1
16 x 6J*2
Compact Spare15 x 4T
* Not available on all models
15 US FIT-31T5A6000.book 433 ページ 2014年3月6日 木曜日 午後7時5分
Page 447 of 453

446
Index
Indicator ............................................ 70, 421
Parking Brake .......................................... 340
Brake System Indicator ............................... 70
Brightness Control (Instrument Panel) .... 128
Bulb Replacement ..................................... 373
Back-Up Light and Rear Turn Signal
Lights..................................................... 377
Brake/Tail/Rear Side Marker Lights ........... 378
Fog Lights ................................................ 375
Headlights ............................................... 373
High-Mount Brake Light .......................... 378
Rear License Plate Light............................ 379
Side Turn Signal, Emergency Indicator Lights..................................................... 376
Bulb Specifications .................................... 432
C
Carbon Monoxide Gas ................................ 66
Cargo Area Cover ..................................... 152
Cargo Floor Box ........................................ 148
Carrying Cargo .................................. 303, 305
CD Player ................................................... 179
Certification Label .................................... 434
Changing Bulbs ......................................... 373
Charging System Indicator ................. 71, 419
Child Safety ................................................. 54
Childproof Door Locks ............................. 102
Child Seat .................................................... 54
Booster Seats ............................................. 65
Child Seat for Infants ................................. 56 Child Seat for Small Children ..................... 57
Installing a Child Seat with a Lap/Shoulder
Seat Belt .................................................. 61
Larger Children ......................................... 64
Rear-facing Child Seat ............................... 56
Selecting a Child Seat ................................ 58
Childproof Door Locks ............................. 102
Cleaning the Exterior ............................... 400
Cleaning the Interior ................................ 398
Climate Control System ............................ 157
Clock ............................................................ 88
Coat Hook ................................................. 150
Compact Spare Tire .......................... 405, 433
Controls ....................................................... 87
Coolant (Engine) ...................................... 368
Adding to the Radiator ............................ 369
Adding to the Reserve Tank..................... 368
High Temperature Indicator ....................... 74
Low Temperature Indicator........................ 74
Overheating ............................................ 417
Creeping (Automatic Transmission) ........ 318
Cruise Control ........................................... 329
Indicator.................................................... 79
Cup Holders .............................................. 147
Customer Service Information ................. 442
D
Daytime Running Lights.......................... 125
Dead Battery ............................................ 414
Defrosting the Windshield and Windows ................................................. 156
Devices that Emit Radio Waves ............... 435
Dimming Headlights .............................................. 121
Rearview Mirror ...................................... 131
Dipstick (Engine Oil) ................................ 364
Directional Signals (Turn Signal) ............. 121
Display Setup .................................... 176, 198
Door Mirrors ............................................. 131
Doors .......................................................... 90
Auto Door Locking.................................. 103
Auto Door Unlocking .............................. 103
Door and Tailgate Open Indicator ....... 31, 75
Keys.......................................................... 90
Locking/Unlocking the Doors from the Inside ................................................ 99
Locking/Unlocking the Doors from the Outside ............................................. 93
Lockout Prevention System ....................... 98
DOT Tire Quality Grading ........................ 387
Driving ...................................................... 301
Automatic Transmission .......................... 318
Braking ................................................... 340
Cruise Control ........................................ 329
Shifting Gear .......................... 319, 321, 325
Starting the Engine ......................... 311, 313
Dust and Pollen Filter .............................. 397
15 US FIT-31T5A6000.book 446 ページ 2014年3月6日 木曜日 午後7時5分