2015 HONDA CR-Z warning light
[x] Cancel search: warning lightPage 276 of 329

275Continued
Handling the Unexpected
If a Tire Goes Flat
Changing a Flat Tire*
If a tire goes flat while driving, grasp the steering wheel firmly, and brake gradually
to reduce speed. Then, stop in a safe plac e. Replace the flat tire with a compact
spare tire. Go to a dealer as soon as possib le to have the full-size tire repaired or
replaced.
1. Park the vehicle on firm, level, and non- slippery surface and apply the parking
brake.
2. Move the shift lever to
(P.
2. Move the shift lever to
(R.
3. Turn on the hazard warning lights an d turn the ignition switch to LOCK
(0.
1Changing a Flat Tire*
Follow compact spare precautions:
Periodically check the tire pressure of the compact
spare. It should be set to the specified pressure.
Specified Pressure: 60 psi (420 kPa, 4.2 kgf/cm
2)
When driving with the compact spare tire, keep the
vehicle speed under 50 mph (80 km/h). Replace with
a full-size tire as soon as possible.
The compact spare tire and wheel in your vehicle are
specifically for this model. Do not use them with
another vehicle. Do not us e another type of compact
spare tire or wheel with your vehicle.
Do not mount tire chains on a compact spare tire.
If a chain-mounted front tire goes flat, remove one of
the full-size rear tires and replace it with the compact
spare tire. Remove the flat front tire and replace it
with the full-size tire that was removed from the rear.
Mount the tire chains on the front tire.
NOTICE
Do not use a puncture-repairing agent, other than
the one provided in the kit that came with your
vehicle. If used, you ma y permanently damage the
tire pressure sensor.
Continuously variable transmission models
Manual transmission models
All models
* Not available on all models
15 CR-Z-31SZT6400.book 275 ページ 2014年8月1日 金曜日 午後1時59分
Page 282 of 329

281
uuIf a Tire Goes Flat uTemporarily Repairing a Flat Tire
Continued
Handling the Unexpected
Temporarily Repairing a Flat Tire
This vehicle is not equipped wi th a spare tire. If the tire has a large cut or is otherwise
severely damaged, you will need to have th e vehicle towed. If the tire only has a
small puncture, from a nail for instance, you can use the temporary tire repair kit so
that you can drive to the nearest servic e station for a more permanent repair.
If a tire goes flat while driving, grasp the steering wheel firmly, and brake gradually
to reduce speed. Then stop in a safe place.
1. Park the vehicle on firm, level, and non- slippery surface, and apply the parking
brake.
2. Move the shift lever to
(P.
2. Move the shift lever to
(R.
3. Turn on the hazard warning lights an d turn the ignition switch to LOCK
(0.
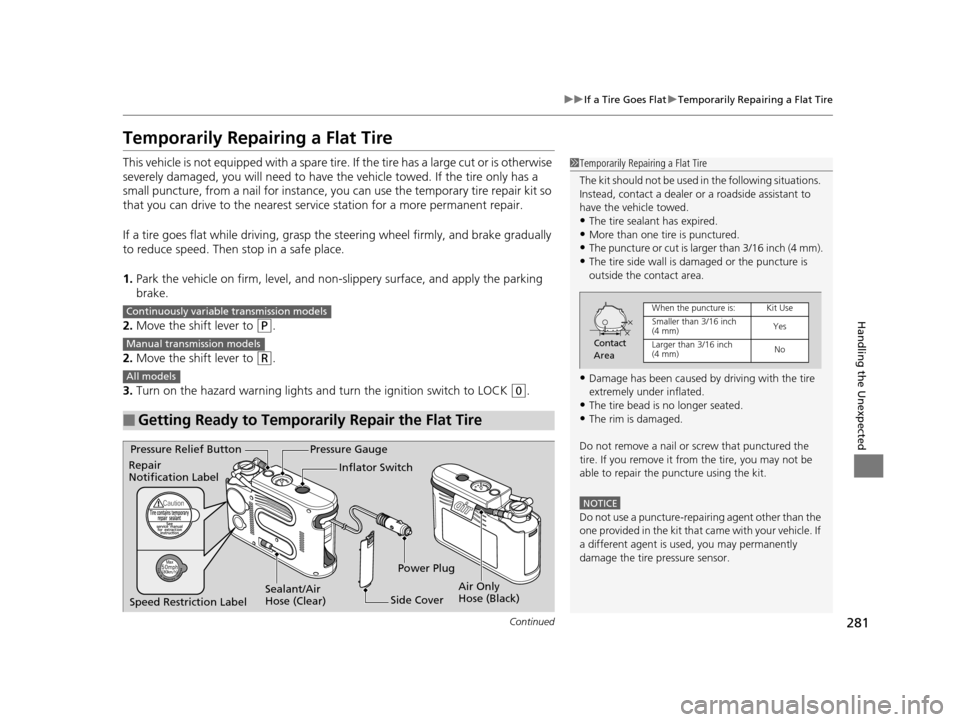
■Getting Ready to Temporarily Repair the Flat Tire
1Temporarily Repairing a Flat Tire
The kit should not be used in the following situations.
Instead, contact a dealer or a roadside assistant to
have the vehicle towed.
•The tire sealant has expired.•More than one tire is punctured.
•The puncture or cut is larger than 3/16 inch (4 mm).
•The tire side wall is da maged or the puncture is
outside the contact area.
•Damage has been caused by driving with the tire
extremely under inflated.
•The tire bead is no longer seated.
•The rim is damaged.
Do not remove a nail or screw that punctured the
tire. If you remove it from the tire, you may not be
able to repair the puncture using the kit.
NOTICE
Do not use a puncture-repairing agent other than the
one provided in the kit that came with your vehicle. If
a different agent is used, you may permanently
damage the tire pressure sensor.
Contact
Area
When the puncture is:Kit Use
Smaller than 3/16 inch
(4 mm)Yes
Larger than 3/16 inch
(4 mm) No
Continuously variable transmission models
Manual transmission models
All models
Pressure Gauge
Sealant/Air
Hose (Clear)
Pressure Relief Button
Air Only
Hose (Black)
Inflator Switch
Side Cover
Repair
Notification Label
Power Plug
Speed Restriction Label
15 CR-Z-31SZT6400.book 281 ページ 2014年8月1日 金曜日 午後1時59分
Page 292 of 329

291Continued
Handling the Unexpected
Jump Starting
Turn off the power to electric devices, such as audio and lights. Turn off the engine,
then open the hood. 1.Connect the first jumper cable to your
vehicle's + terminal.
2. Connect the other end of the first jumper
cable to the booster battery + terminal.
u Use a 12 volt booster battery only.
u When using an automotive battery
charger to boost your 12-volt battery,
select a lower charging voltage than 15-
volt. Check the charger manual for the
proper setting.
3. Connect the second jumper cable to the
booster battery - terminal.
4. Connect the other end of the second
jumper cable to the grounding strap as
shown. Do not connect this jumper cable to
any other part.
5. If your vehicle is connected to another
vehicle, start the assisting vehicle's engine
and increase its rpm slightly.
6. Attempt to start your ve hicle's engine. If it
turns over slowly, check that the jumper
cables have good metal-to-metal contact.
■Jump Starting Procedure1 Jump Starting
Securely attach the jumper cables clips so that they
do not come off when the e ngine vibrates. Also be
careful not to tangle the ju mper cables or allow the
cable ends to touch each other while attaching or
detaching the jumper cables.
Battery performance degrades in cold conditions and
may prevent the engi ne from starting.
3WARNING
A battery can explode if you do not follow
the correct procedure, seriously injuring
anyone nearby.
Keep all sparks, open flames, and smoking
materials away from the battery.
Booster
Battery
15 CR-Z-31SZT6400.book 291 ページ 2014年8月1日 金曜日 午後1時59分
Page 295 of 329

294
Handling the Unexpected
Overheating
How to Handle Overheating
Overheating symptoms are as follows:
•The high temperature indicator comes on or the engine suddenly loses power.
• Steam or spray comes out of the engine compartment.
■First thing to do
1. Immediately park the vehicle in a safe place.
2. Turn off all accessories and turn on the hazard warning lights.
u No steam or spray present: Keep the engine running and open the hood.
u Steam or spray is present: Turn off the engine and wait until it subsides.
Then open the hood.
1 How to Handle Overheating
NOTICE
Continuing to drive with the high temperature
indicator on may da mage the engine.
3WARNING
Steam and spray from an overheated
engine can seriously scald you.
Do not open the hood if steam is coming
out.
15 CR-Z-31SZT6400.book 294 ページ 2014年8月1日 金曜日 午後1時59分
Page 297 of 329

296
Handling the Unexpected
Indicator, Coming On/Blinking
If the Low Oil Pressure Indicator Comes On
■Reasons for the indicator to come on
Comes on when the engine oil pressure is low.
■What to do as soon as the indicator comes on
1. Immediately park the vehicle on level ground in a safe place.
2. If necessary, turn the ha zard warning lights on.
■What to do after parking the vehicle
1. Stop the engine and let it sit for about three minutes.
2. Open the hood and check the oil level.
u Add oil as necessary.
2 Oil Check P. 234
3.Start the engine and check th e low oil pressure indicator.
u The indicator goes off: Start driving again.
u The indicator does not go off within 10 seconds: Stop the engine
and contact a dealer for repairs immediately.
1If the Low Oil Pressure Indicator Comes On
NOTICE
Running the engine with low oil pressure can cause
serious mechanical damage almost immediately.
15 CR-Z-31SZT6400.book 296 ページ 2014年8月1日 金曜日 午後1時59分
Page 325 of 329

324
Index
Fuel Fill Door....................................... 22, 219
Fuses .......................................................... 301
Inspecting and Changing ......................... 304
Locations ......................................... 301, 302
G
Gasoline (Fuel) Economy ................................................. 221
Gauge ....................................................... 81
Information ............................................. 218
Instant Fuel Economy ................................. 81
Low Fuel Indicator ..................................... 68
Refueling ................................................. 218
Gauges ......................................................... 81
Gear Shift Lever Positions
Continuously Variable Transmission ......... 185
Glass (care) ................................................ 270
Glove Box .................................................. 128
H
Halogen Bulbs ........................................... 244
Handling the Unexpected ........................ 273
HandsFreeLink® (HFL)............................... 160
HFL Buttons ............................................. 160
HFL Menus .............................................. 162
HFL Status Display.................................... 161
Phone Setup ............................................ 164
Hatch ......................................................... 105
Door/Hatch Open Indicator .................. 31, 69 Unable to Open....................................... 307
Hazard Warning Button .............................. 4
Head Restraints ........................................ 124
Headlights ................................................. 112
Aiming .................................................... 244
Automatic Operation............................... 113
Dimming ................................................. 112
Operating................................................ 112
Heaters (Seat) ........................................... 135
HFL (HandsFreeLink ®)............................... 160
High Temperature Indicator ...................... 72
High-Beam Indicator .................................. 73
Hill Start Assist System ............................. 182
Honda IMA System ..................................... 12
I
Identification Numbers ............................ 312
Engine and Transmission ......................... 312
Vehicle Identification ............................... 312
Ignition Switch ......................................... 111
Illumination Control ................................. 117
Knob ....................................................... 117
IMA Battery Charge Level Indicator .......... 82
IMA System Indicator ................................. 72
Immobilizer System .................................. 107
Indicator.................................................... 75
Indicators .................................................... 66
7-Speed Manual Shift Mode ...................... 74
Anti-lock Brake System (ABS)..................... 69
Auto Idle Stop ........................................... 75 Charging System............................... 67, 297
CRUISE CONTROL ............................. 75, 203
CRUISE MAIN.................................... 75, 202
Door Open.......................................... 31, 69
ECON Mode ............................................. 76
Electric Power Steering (EPS)
System ............................................ 71, 299
Fog Light .................................................. 74
High Temperature ..................................... 72
High-Beam................................................ 73
IMA System .............................................. 72
Immobilizer System ................................... 75
Lights On .................................................. 74
Low Fuel ................................................... 68
Low Oil Pressure ............................... 66, 296
Low Temperature...................................... 73
Low Tire Pressure/TPMS .................... 71, 207
Malfunction Indicator Lamp .............. 67, 298
NORMAL Mode ........................................ 76
Parking Brake and Brak e System ....... 66, 299
Plus Sport System...................................... 77
Seat Belt Reminder .............................. 33, 68
Security System Alarm............................... 75
Shift Down ............................................... 76
Shift Lever Position.................................... 74
Shift Up .................................................... 76
Side Airbag Off ................................... 52, 73
SPORT Mode............................................. 76
Supplemental Restraint System ........... 50, 69
System Message ....................................... 72
Transmission ............................................. 67
15 CR-Z-31SZT6400.book 324 ページ 2014年8月1日 金曜日 午後1時59分