Page 5 of 24
67
Accessing the Information Display
Main Displays
Lower Displays
MULTI-INFORMATION DISPLAY (MID)
Consists of several displays that provide you with useful information.
When you start the engine, the
information display shows your
last active selection from the
previous drive cycle. To toggle between the different
displays:
• Press either info button (p/q)
for the main displays.
• Press SEL/RESET for the lower displays.
Main Screen
Average andinstant fuel economy
Range
Elapsed time
* You can also change vehicle settings using the SETTINGS button on the center panel.
OdometerTrip ATrip B
Vehicle
settings*
Oil life
Average speed
Page 7 of 24

1011
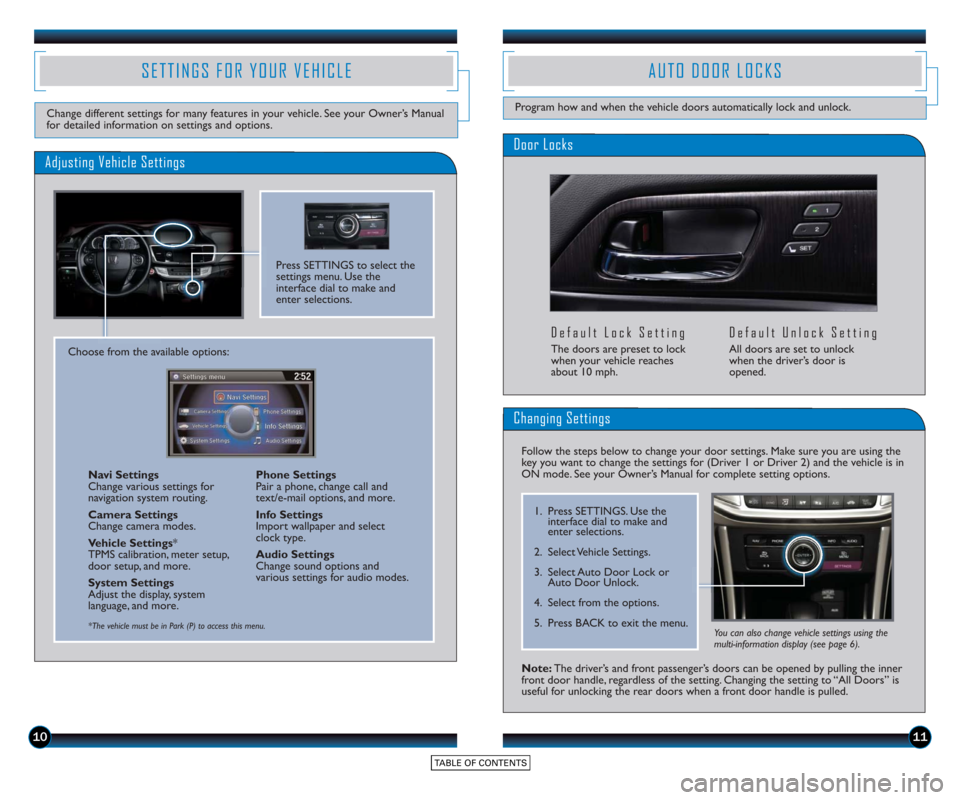
Door Locks
Default Lock Setting
The doors are preset to lock
when your vehicle reaches
about 10 mph.
Default Unlock Setting
All doors are set to unlock
when the driver’s door is
opened.
AUTO DOOR LOCKS
Program how and when the vehicle doors automatically lock and unlock.
Note: The driver’s and front passenger’s doors can be opened by pulling the inner
front door handle, regardless of the setting. Changing the setting to “All Doors” is
useful for unlocking the rear doors when a front door handle is pulled.
Changing Settings
Follow the steps below to change your door settings. Make sure you are using the
key you want to change the settings for (Driver 1 or Driver 2) and the vehicle is in
ON mode. See your Owner’s Manual for complete setting options.
1. Press SETTINGS. Use theinterface dial to make and
enter selections.
2. Select Vehicle Settings.
3. Select Auto Door Lock or Auto Door Unlock.
4. Select from the options.
5. Press BACK to exit the menu.
SETTINGS FOR YOUR VEHICLE
Change different settings for many features in your vehicle. See your Owner’s Manual
for detailed information on settings and options.
Adjusting Vehicle Settings
Press SETTINGS to select the
settings menu. Use the
interface dial to make and
enter selections.
Choose from the available options:
Navi Settings
Change various settings for
navigation system routing.
Camera Settings
Change camera modes.
Vehicle Settings *
TPMS calibration, meter setup,
door setup, and more.
System Settings
Adjust the display, system
language, and more. Phone Settings
Pair a phone, change call and
text/e-mail options, and more.
Info Settings
Import wallpaper and select
clock type.
Audio Settings
Change sound options and
various settings for audio modes.
*The vehicle must be in Park (P) to access this menu.You can also change vehicle settings using the
multi-information display (see page 6).
Page 13 of 24

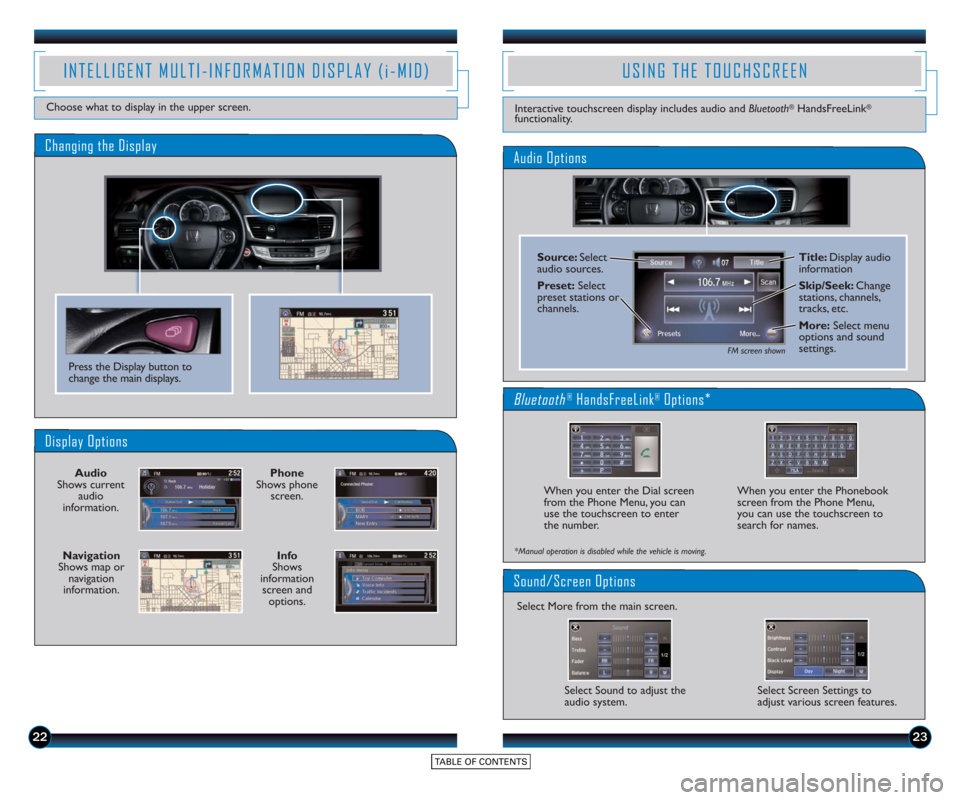
Display Options
Press the Display button to
change the main displays.
Phone
Shows phone screen.
Info
Shows
information screen and options.
Navigation
Shows map or navigation
information. Audio
Shows current audio
information.
2223
INTELLIGENT MULTI-INFORMATION DISPLAY (i-MID)
Choose what to display in the upper screen.
Changing the Display
USING THE TOUCHSCREEN
Interactive touchscreen display includes audio and Bluetooth®HandsFreeLink®
functionality.
Audio Options
FM screen shown
Source: Select
audio sources.
Preset:Select
preset stations or
channels. Title: Display audio
information
Skip/Seek:
Change
stations, channels,
tracks, etc.
More: Select menu
options and sound
settings.
Bluetooth®HandsFreeLink®Options*
Sound/Screen Options
When you enter the Dial screen
from the Phone Menu, you can
use the touchscreen to enter
the number.
*Manual operation is disabled while the vehicle is moving.
Select Sound to adjust the
audio system. Select Screen Settings to
adjust various screen features.
Select More from the main screen. When you enter the Phonebook
screen from the Phone Menu,
you can use the touchscreen to
search for names.
Page 15 of 24

2627
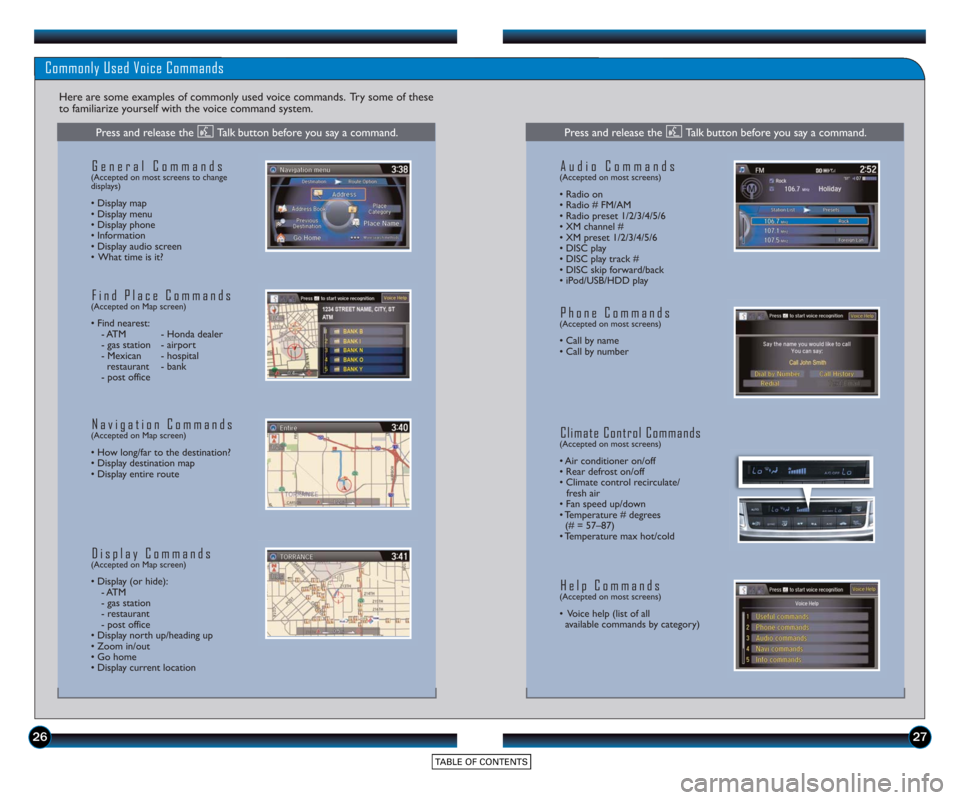
Commonly Used Voice Commands
Here are some examples of commonly used voice commands. Try some of these
to familiarize yourself with the voice command system.
General Commands(Accepted on most screens to change
displays)
• Display map
• Display menu
• Display phone
• Information
• Display audio screen
• What time is it?
Find Place Commands(Accepted on Map screen)
• Find nearest: - ATM - Honda dealer
- gas station - airport
- Mexican - hospital restaurant - bank
- post office
Navigation Commands(Accepted on Map screen)
• How long/far to the destination?
• Display destination map
• Display entire route
Display Commands(Accepted on Map screen)
• Display (or hide): - ATM
- gas station
- restaurant
- post office
• Display north up/heading up
• Zoom in/out
• Go home
• Display current location
Audio Commands(Accepted on most screens)
• Radio on
• Radio # FM/AM
• Radio pr eset 1/2/3/4/5/6
• XM channel #
• XM preset 1/2/3/4/5/6
• DISC play
• DISC play track #
• DISC skip forward/back
• iPod/USB/HDD play
Phone Commands(Accepted on most screens)
• Call by name
• Call by number
Climate Control Commands(Accepted on most screens)
• Air conditioner on/off
• Rear defrost on/off
• Climate control recirculate/ fresh air
• Fan speed up/down
• Temperature # degrees (# = 57–87)
• Temperature max hot/cold
Help Commands(Accepted on most screens)
• Voice help (list of all available commands by category)
Press and release the Talk button before you say a command.Press and release the Talk button before you say a command.
Page 20 of 24

3637
BASIC AUDIO OPERATION
Operate basic controls of your audio system using various and convenient methods.
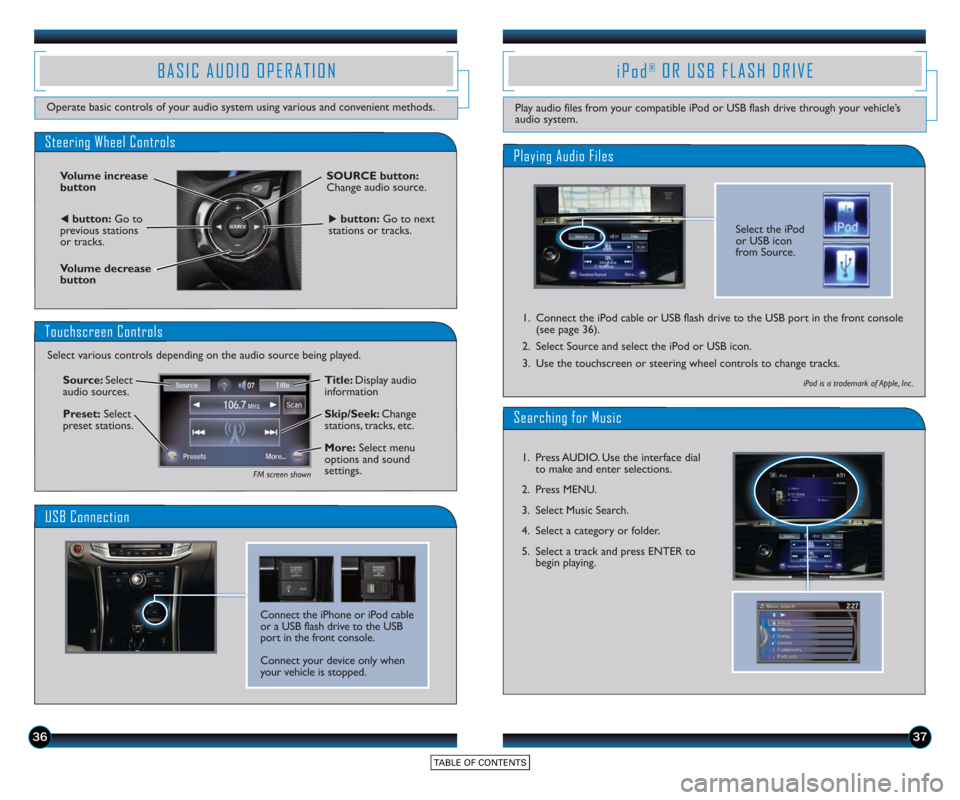
Steering Wheel Controls
Volume increase
button
Volume decrease
button
SOURCE button:
Change audio source.
tbutton:Go to
previous stations
or tracks.ubutton: Go to next
stations or tracks.
Touchscreen Controls
Select various controls depending on the audio source being played.
FM screen shown
Source: Select
audio sources.
Preset: Select
preset stations. Title: Display audio
information
Skip/Seek:
Change
stations, tracks, etc.
More: Select menu
options and sound
settings.
Connect the iPhone or iPod cable
or a USB flash drive to the USB
port in the front console.
Connect your device only when
your vehicle is stopped.
USB Connection
Select the iPod
or USB icon
from Source.
Playing Audio Files
iPod®OR USB FLASH DRIVE
Play audio files from your compatible iPod or USB flash drive through your vehicle’s
audio system.
1. Connect the iPod cable or USB flash drive to the USB port in the front console
(see page 36).
2. Select Source and select the iPod or USB icon.
3. Use the touchscreen or steering wheel controls to change tracks.
iPod is a trademark of Apple, Inc .
Searching for Music
1. Press AUDIO. Use the interface dial to make and enter selections.
2. Press MENU.
3. Select Music Search.
4. Select a category or folder.
5. Select a track and press ENTER to begin playing.