2015 HONDA ACCORD COUPE change wheel
[x] Cancel search: change wheelPage 435 of 557
434
uuWhen Driving uLaneWatch
TM*
Driving
LaneWatch
TM
*
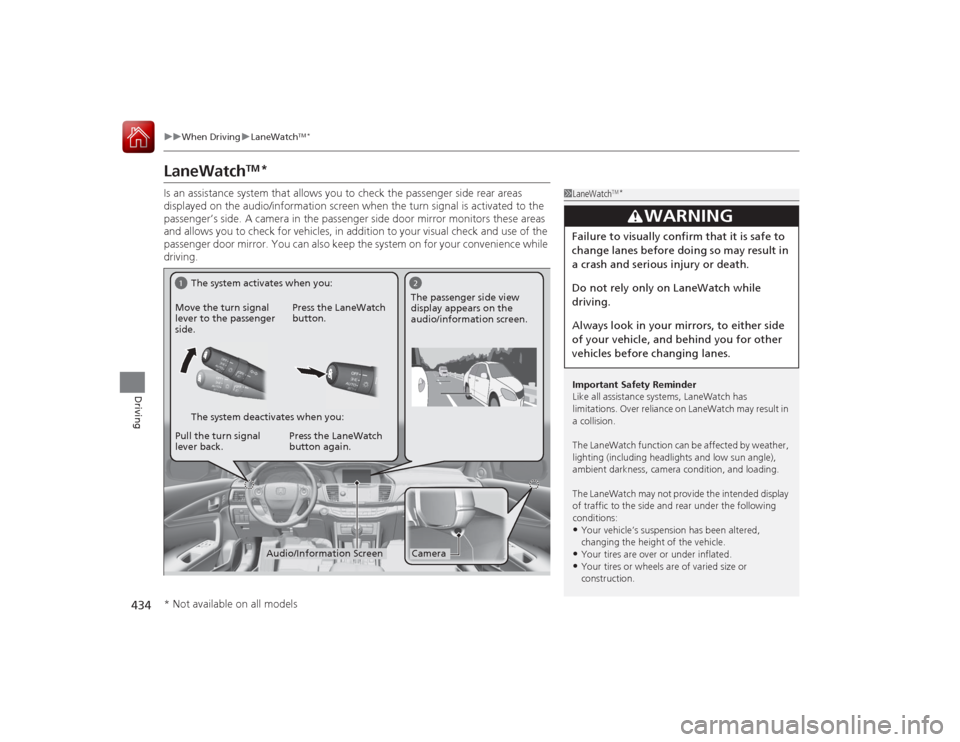
Is an assistance system that allows you to check the passenger side rear areas
displayed on the audio/information screen when the turn signal is activated to the
passenger’s side. A camera in the passenger side door mirror monitors these areas
and allows you to check for vehicles, in addition to your visual check and use of the
passenger door mirror. You can also keep the system on for your convenience while
driving.
1LaneWatch
TM*
Important Safety Reminder
Like all assistance systems, LaneWatch has
limitations. Over reliance on LaneWatch may result in
a collision.
The LaneWatch function can be af fected by weather,
lighting (including headlights and low sun angle),
ambient darkness, camera condition, and loading.
The LaneWatch may not provide the intended display
of traffic to the side and rear under the following
conditions:•Your vehicle’s suspension has been altered,
changing the height of the vehicle.•Your tires are over or under inflated.•Your tires or wheels are of varied size or
construction.
3
WARNING
Failure to visually confirm that it is safe to
change lanes before doing so may result in
a crash and serious in jury or death.
Do not rely only on LaneWatch while
driving.
Always look in your mirrors, to either side
of your vehicle, and behind you for other
vehicles before changing lanes.
1
2Camera
Audio/Information Screen
Move the turn signal
lever to the passenger
side.
Press the LaneWatch
button.
Pull the turn signal
lever back. Press the LaneWatch
button again. The passenger side view
display appears on the
audio/information screen.
The system activates when you:
The system deactivates when you:
* Not available on all models
Page 437 of 557

436
uuWhen Driving uTire Pressure Monitoring System (TPMS)
Driving
Tire Pressure Monitoring System (TPMS)Instead of directly measuring the pressure in each tire, the TPMS on this vehicle
monitors and compares the rolling radius and rotational characteristics of each
wheel and tire while you are driving to determine if one or more tires are
significantly under-inflated. This will cause the low tire pressure/TPMS indicator to
come.
You must start TPMS calibration every time you:
• Adjust the pressure in one or more tires.
• Rotate the tires.
• Replace one or more tires.
Before calibrating the TPMS:
• Set the cold tire pressure in all four tires.
2 Checking Tires P. 485
Make sure:
•The vehicle is at a complete stop.
• The shift lever is in
(N
.
• The shift lever is in
(P
.
• The ignition switch is in ON
(w
*1.
*1: Models with the smart entry system have an ENGINE START/STOP button instead of an
ignition switch.■
TPMS Calibration
1 Tire Pressure Monitoring System (TPMS)
The system does not monitor the tires when driving
at low speed.
Conditions such as low ambient temperature and
altitude change directly affect tire pressure and can
trigger the low tire pressure/TPMS indicator to come on.
Tire pressure checked and inflated in:•Warm weather can become under-inflated in
colder weather.•Cold weather can become over-inflated in warmer
weather.
The low tire pressure i ndicator will not come on as a
result of over inflation.
The TPMS may not function properly if tire type and
size are mixed. Make sure to use the same size and
type of tire. 2 Checking and Maintaining Tires P. 485
The low tire pressure/TP MS indicator may come on
with a delay or may not come on at all when:•You rapidly accele rate, decelerate, or turn the
steering wheel.•You drive on snowy or slippery roads.•Snow chains are used.
The low tire pressure/TP MS indicator may come on
under the following conditions:•A compact spare tire is used.•There is a heavier and uneven load on the tires,
such as when towing a trailer, than the condition at
calibration.•Snow chains are used.
Manual transmission modelsAutomatic transmission/CVT modelsAll models
Page 446 of 557
445Driving
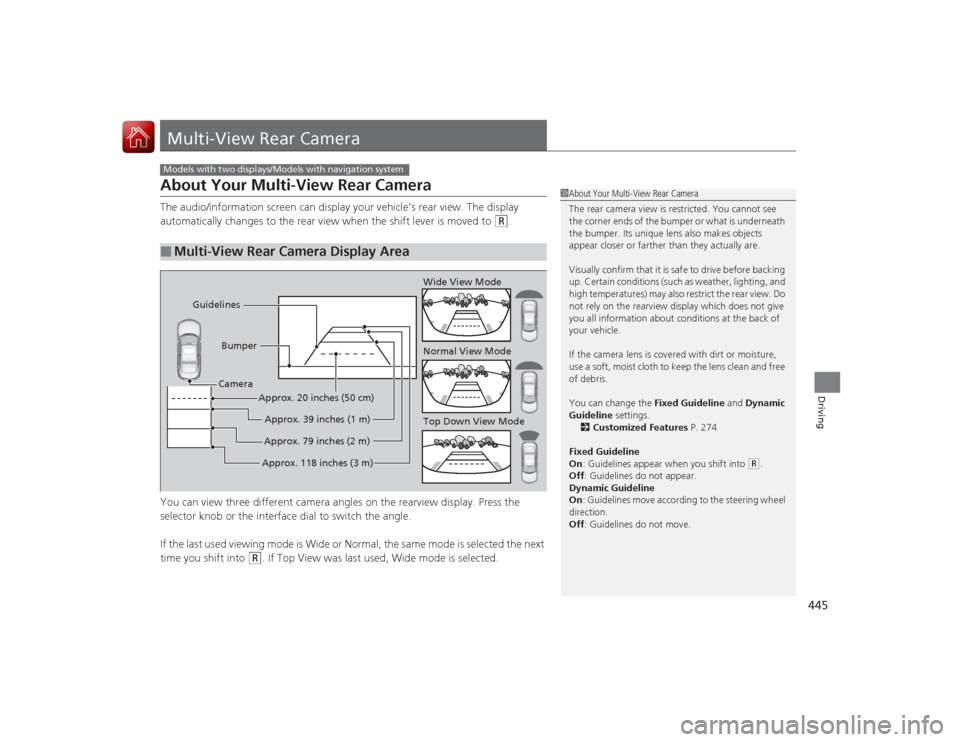
Multi-View Rear CameraAbout Your Multi-View Rear CameraThe audio/information screen can display your vehicle’s rear view. The display
automatically changes to the rear view when the shift lever is moved to
(R
.
You can view three different camera angles on the rearview display. Press the
selector knob or the interface dial to switch the angle.
If the last used viewing mode is Wide or Normal, the same mode is selected the next
time you shift into
(R
. If Top View was last used, Wide mode is selected.
■
Multi-View Rear Camera Display AreaModels with two displays/Models with navigation system
1 About Your Multi-View Rear Camera
The rear camera view is restricted. You cannot see
the corner ends of the bumper or what is underneath
the bumper. Its unique lens also makes objects
appear closer or farther than they actually are.
Visually confirm that it is safe to drive before backing
up. Certain conditions (such as weather, lighting, and
high temperatures) may also restrict the rear view. Do
not rely on the rearview display which does not give
you all information about conditions at the back of
your vehicle.
If the camera lens is covered with dirt or moisture,
use a soft, moist cloth to keep the lens clean and free
of debris.
You can change the Fixed Guideline and Dynamic
Guideline settings. 2 Customized Features P. 274
Fixed Guideline
On : Guidelines appear when you shift into
(R.
Off : Guidelines do not appear.
Dynamic Guideline
On : Guidelines move according to the steering wheel
direction.
Off : Guidelines do not move.
Top Down View Mode Normal View Mode Wide View Mode
Guidelines
Bumper
Camera
Approx. 118 inches (3 m)Approx. 79 inches (2 m)Approx. 39 inches (1 m)
Approx. 20 inches (50 cm)
Page 447 of 557
446Driving
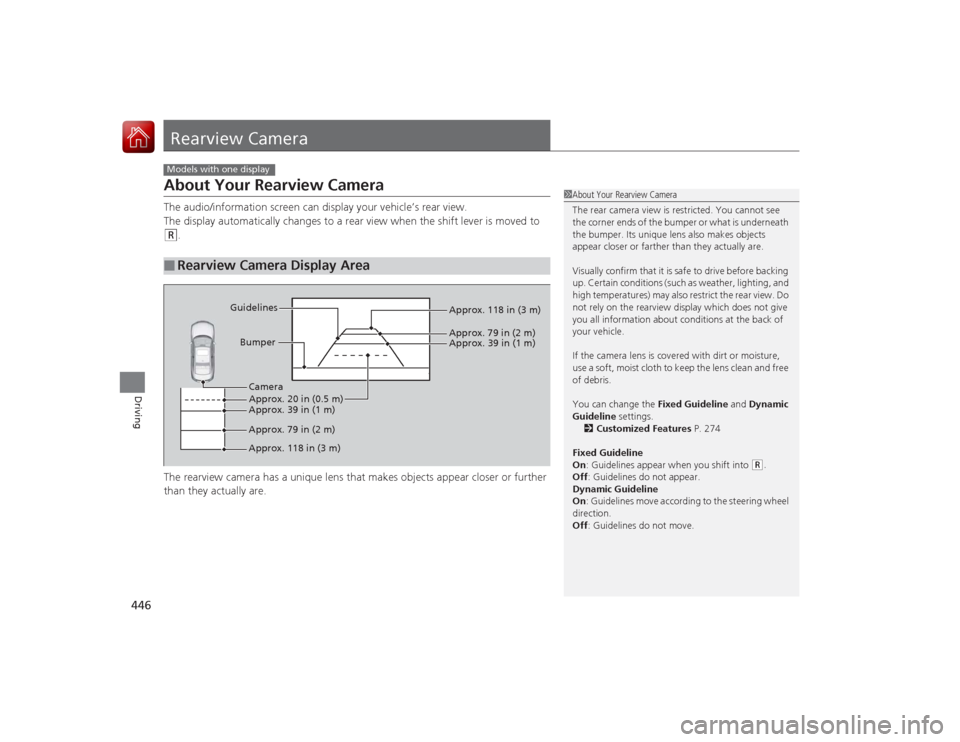
Rearview CameraAbout Your Rearview CameraThe audio/information screen can display your vehicle’s rear view.
The display automatically changes to a rear view when the shift lever is moved to (R
.
The rearview camera has a unique lens that makes objects appear closer or further
than they actually are.
■
Rearview Camera Display AreaModels with one display
1 About Your Rearview Camera
The rear camera view is restricted. You cannot see
the corner ends of the bumper or what is underneath
the bumper. Its unique lens also makes objects
appear closer or farther than they actually are.
Visually confirm that it is safe to drive before backing
up. Certain conditions (such as weather, lighting, and
high temperatures) may also restrict the rear view. Do
not rely on the rearview display which does not give
you all information about conditions at the back of
your vehicle.
If the camera lens is covered with dirt or moisture,
use a soft, moist cloth to keep the lens clean and free
of debris.
You can change the Fixed Guideline and Dynamic
Guideline settings. 2 Customized Features P. 274
Fixed Guideline
On : Guidelines appear when you shift into
(R.
Off : Guidelines do not appear.
Dynamic Guideline
On : Guidelines move according to the steering wheel
direction.
Off : Guidelines do not move.
Bumper
Guidelines
Approx. 118 in (3 m)
Approx. 79 in (2 m) Approx. 39 in (1 m)
Approx. 20 in (0.5 m)
Approx. 118 in (3 m) Approx. 79 in (2 m) Approx. 39 in (1 m) Camera
Page 509 of 557

uuIf a Tire Goes Flat uChanging a Flat Tire
508Handling the Unexpected
1. Place the jack under the jacking point
closest to the tire to be changed.
2. Turn the end bracket clockwise as shown in
the image until the top of the jack contacts
the jacking point.
u Make sure that the jacking point tab is
resting in the jack notch.
3. Raise the vehicle, using the jack handle bar
and the jack handle, until the tire is off the
ground.
■
How to Set Up the Jack
1How to Set Up the Jack
Do not use the jack with people or luggage in the
vehicle.
Use the jack provided in your vehicle.
Other jacks may not support the weight (“load”) or
may not fit the jacking point.
The following instructions must be followed to use
the jack safely:•Do not use while the engine is running.•Use only where the ground is firm and level.•Use only at the jacking points.•Do not get in the vehicle while using the jack.•Do not put anything on top of or underneath the
jack.
3
WARNING
The vehicle can easily roll off the jack,
seriously injuring anyone underneath.
Follow the directions for changing a tire
exactly, and never get under the vehicle
when it is supported only by the jack.
Jack
Handle
Bar Wheel Nut
Wrench as Jack Handle
Page 514 of 557

513
uuEngine Does Not Start uEmergency Engine Stop
Handling the Unexpected
Emergency Engine StopThe ENGINE START/STOP button may be used to stop the engine due to an
emergency situation even while driving. If you must stop the engine, do either of the
following operations:
• Press and hold the ENGINE START/STOP button for about two seconds.
• Firmly press the ENGINE START/STOP button twice.
The steering wheel will not lo ck. However, because turning off the engine disables
the power assist the engine provides to the steering and braking systems, it will
require significantly more physical effort and time to steer and slow the vehicle. Use
both feet on the brake pedal to slow down the vehicle and stop immediately in a
safe place. With manual transmission models you can also downshift the
transmission to utilize engine braking.
The power mode is in ACCESSORY when the engine is stopped.
To change the mode to VEHICLE OFF, move the shift lever to
(P
after the vehicle
comes to a complete stop.
Then press the ENGINE START/STOP button twice without depressing the brake
pedal.
The power mode changes to VEHICLE OFF.
Models with smart entry system
1 Emergency Engine Stop
Do not press the button while driving unless it is
absolutely necessary for the engine to be switched
off.
U.S. automatic transmission/CVT modelsCanadian automatic transmission/CVT modelsManual transmission models
Page 532 of 557
531
uuSpecifications u
Continued
Information
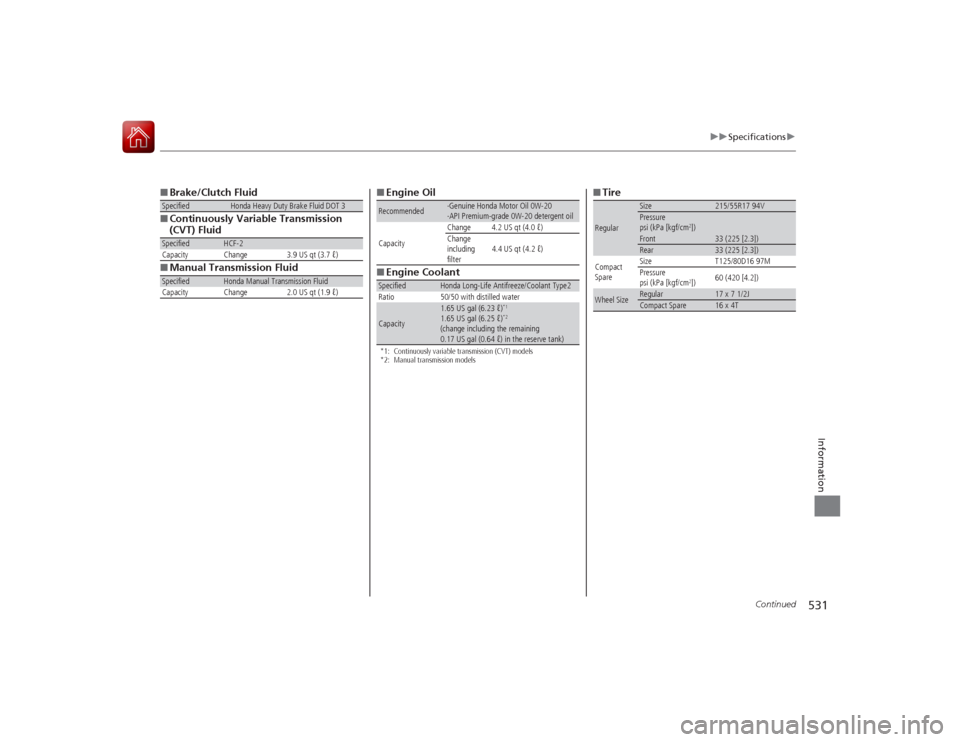
■Brake/Clutch Fluid
■ Continuously Variable Transmission
(CVT) Fluid
■ Manual Transmission FluidSpecified
Honda Heavy Duty Brake Fluid DOT 3
Specified
HCF-2
Capacity Change 3.9 US qt (3.7 ℓ)
Specified
Honda Manual Transmission Fluid
Capacity Change 2.0 US qt (1.9 ℓ)
■ Engine Oil
■ Engine Coolant*1: Continuously variable transmission (CVT) models
*2: Manual transmission modelsRecommended
·Genuine Honda Motor Oil 0W-20
·API Premium-grade 0W-20 detergent oil
Capacity Change 4.2 US qt (4.0 ℓ)
Change
including
filter
4.4 US qt (4.2 ℓ)
Specified
Honda Long-Life Antifreeze/Coolant Type2
Ratio 50/50 with distilled water
Capacity
1.65 US gal (6.23 ℓ)
*1
1.65 US gal (6.25 ℓ)
*2
(change including the remaining
0.17 US gal (0.64 ℓ) in the reserve tank)
■ TireRegular
Size
215/55R17 94V
Pressure
psi (kPa [kgf/cm
2])
Front
33 (225 [2.3])
Rear
33 (225 [2.3])
Compact
Spare Size
T125/80D16 97M
Pressure
psi (kPa [kgf/cm
2]) 60 (420 [4.2])
Wheel Size
Regular
17 x 7 1/2J
Compact Spare
16 x 4T
Page 534 of 557
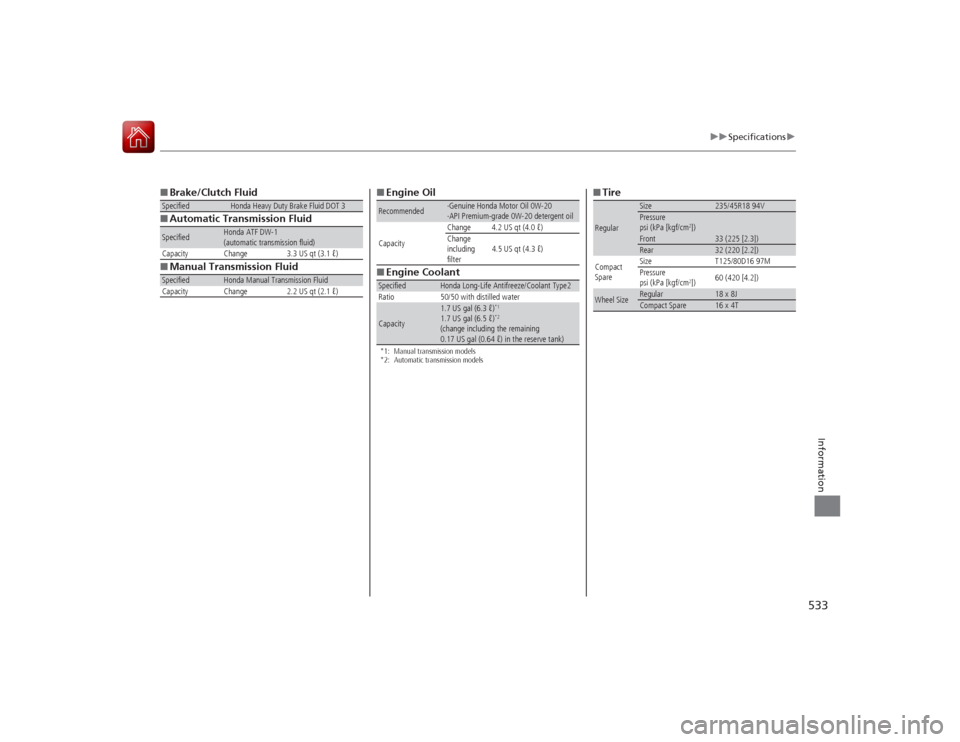
533
uuSpecifications u
Information
■Brake/Clutch Fluid
■ Automatic Transmission Fluid
■ Manual Transmission FluidSpecified
Honda Heavy Duty Brake Fluid DOT 3
Specified
Honda ATF DW-1
(automatic transmission fluid)
Capacity Change 3.3 US qt (3.1 ℓ)
Specified
Honda Manual Transmission Fluid
Capacity Change 2.2 US qt (2.1 ℓ)
■ Engine Oil
■ Engine Coolant*1: Manual transmission models
*2: Automatic transmission modelsRecommended
·Genuine Honda Motor Oil 0W-20
·API Premium-grade 0W-20 detergent oil
Capacity Change 4.2 US qt (4.0 ℓ)
Change
including
filter
4.5 US qt (4.3 ℓ)
Specified
Honda Long-Life Antifreeze/Coolant Type2
Ratio 50/50 with distilled water
Capacity
1.7 US gal (6.3 ℓ)
*1
1.7 US gal (6.5 ℓ)
*2
(change including the remaining
0.17 US gal (0.64 ℓ) in the reserve tank)
■ TireRegular
Size
235/45R18 94V
Pressure
psi (kPa [kgf/cm
2])
33 (225 [2.3])
FrontRear
32 (220 [2.2])
Compact
Spare Size
T125/80D16 97M
Pressure
psi (kPa [kgf/cm
2]) 60 (420 [4.2])
Wheel Size
Regular
18 x 8J
Compact Spare
16 x 4T