Page 151 of 557

150Features
Audio SystemAbout Your Audio SystemSee the Navigation System Manual for information on the navigation system.
The audio system features AM/FM radio and SiriusXM® Radio service
*. It can also
play audio CDs, WMA/MP3/AAC files, Hard Disk Drive (HDD) audio*, USB flash
drives, and iPod, iPhone and Bluetooth® devices.
You can operate the audio system from the buttons and switches on the panel or
the icons on the touchscreen interface
*.
1 About Your Audio System
SiriusXM ® Radio is available on a subscription basis
only. For more information on SiriusXM ® Radio,
contact a dealer.
2 General Information on the Audio System
P. 270
SiriusXM ® Radio is available in the United States and
Canada, except Hawaii, Alaska, and Puerto Rico.
SiriusXM ® is a trademark of Sirius XM Radio, Inc.
Video CDs, DVDs, and 3-inch (8-cm) mini CDs are not
supported.
iPod, iPhone and iTunes are trademarks of Apple Inc.
State or local laws may prohibit the operation of
handheld electronic devices while operating a
vehicle.
Models with navigation system
Remote Controls iPod
USB Flash
Drive
* Not available on all models
Page 153 of 557
152
uuAudio System uAuxiliary Input Jack
Features
Auxiliary Input JackUse the jack to connect standard audio devices.
1.Open the AUX cover.
2. Connect a standard audio device to the
input jack using a 1/8 inch (3.5 mm) stereo
miniplug.
u The audio system automatically switches
to the AUX mode.
1Auxiliary Input Jack
You can return to AUX mode by pressing the AUX
button.
You can return to AUX mode by selecting Change
Source on the Audio menu screen or Source on the
touchscreen.
Replacement of the audio system with other than a
genuine Honda system may make the auxiliary jack
inoperable.Models with one displayModels with two displaysModels with navigation system
Models with one displayModels with two
displaysModels with
navigation system
Page 212 of 557

211Features
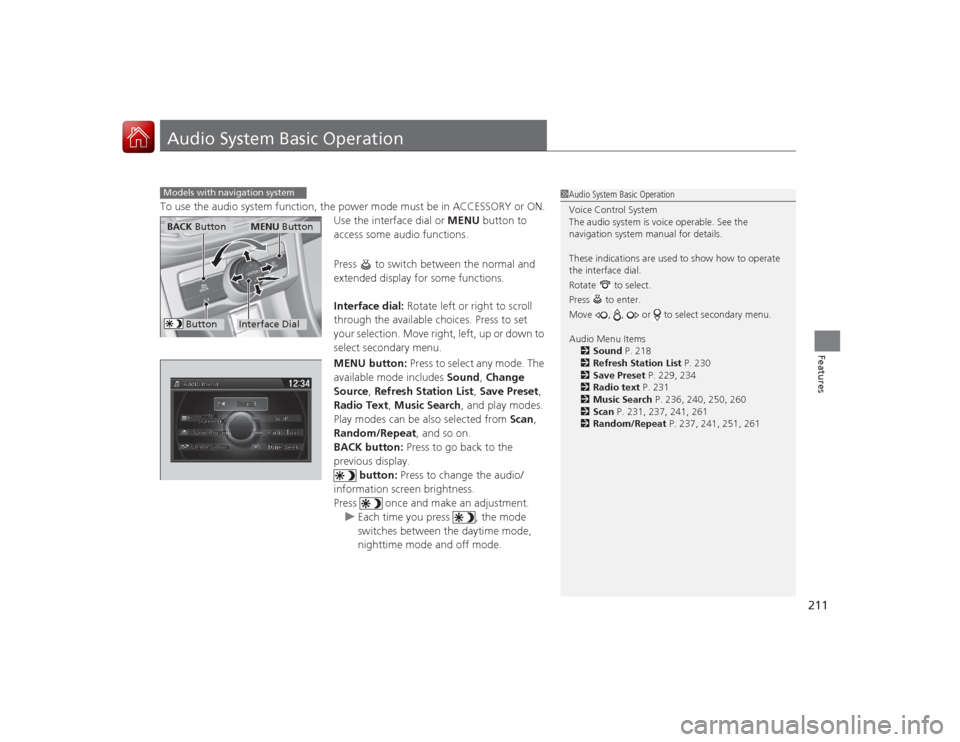
Audio System Basic OperationTo use the audio system function, the power mode must be in ACCESSORY or ON.Use the interface dial or MENU button to
access some audio functions.
Press to switch between the normal and
extended display for some functions.
Interface dial: Rotate left or right to scroll
through the available choices. Press to set
your selection. Move right, left, up or down to
select secondary menu.
MENU button: Press to select any mode. The
available mode includes Sound, Change
Source , Refresh Station List , Save Preset,
Radio Text , Music Search, and play modes.
Play modes can be also selected from Scan,
Random/Repeat , and so on.
BACK button: Press to go back to the
previous display. button: Press to change the audio/
information screen brightness.
Press once and make an adjustment. u Each time you press , the mode
switches between the daytime mode,
nighttime mode and off mode.Models with navigation system
1Audio System Basic Operation
Voice Control System
The audio system is voice operable. See the
navigation system manual for details.
These indications are used to show how to operate
the interface dial.
Rotate to select.
Press to enter.
Move , , or to select secondary menu.
Audio Menu Items
2 Sound P. 218
2 Refresh Station List P. 230
2 Save Preset P. 229, 234
2 Radio text P. 231
2 Music Search P. 236, 240, 250, 260
2 Scan P. 231, 237, 241, 261
2 Random/Repeat P. 237, 241, 251, 261
Interface DialMENU Button
BACK Button
Button
Page 215 of 557
214
uuAudio System Basic Operation uAudio/Information Screen
Features
Audio/Information ScreenDisplays the audio status and wallpaper. From this screen, you can go to various
setup options.
Press the (display) button to change the display.■
Switching the Display
1Switching the Display
You can also use the AUDIO, NAV, PHONE and
INFO buttons to go to the corresponding display.
(Display) Button
Audio
Info
Audio/Information Screen
Navigation
Phone
AUDIO Button
NAV ButtonPHONE Button
INFO Button
Page 216 of 557

215
uuAudio System Basic Operation uAudio/Information Screen
Continued
Features
■Audio
Shows the current audio information.■Navigation
Shows the navigation screen.
2 Refer to the Navigation System Manual
■Phone
Shows the HFL information.
2 Bluetooth® HandsFreeLink ® P. 351
■Info
Shows the Trip Computer or Clock/Wallpaper and other information. Rotate
to select an item, then press .■Trip computer (Current Drive)
Shows the range, and instant and average fuel ec onomy of the current trip, as well
as the average fuel economy from your last trip.■Trip computer (History of Trip A)
Shows the range, average fuel econom y and distances traveled for the current trip, as well
as the average fuel economy and distances traveled during the last three driving cycles.
Each time you reset the trip meter A, the information on the display updates. The
history of the previous three driving cycles is kept.■Deleting the history manually
1. Move on the History of Trip A screen to select Delete History , then press .
2. You will receive a confirmation message on the screen. Rotate to select Yes,
then press .■Clock/Wallpaper
Shows a clock screen or an image you import.
Page 221 of 557

220
uuAudio System Basic Operation uVoice Control Operation
Features
Voice Control OperationYour vehicle has a voice control system that allows hands-free operation of most of
the navigation system functions.
The voice control system uses the (Talk) and (hang-up/back) buttons on the
steering wheel and a microphone near the map lights on the ceiling.
To achieve optimum voice recognition when using the navigation voice control
system:
• Make sure the correct screen is displayed for the voice command that you are
using.
• Close the windows and moonroof.
• Adjust the dashboard and side vents so air does not blow onto the microphone
on the ceiling.
• Speak clearly in a clear, natural speaking voice without pausing between words.
• Reduce any background noise if poss ible. The system may misinterpret your
command if more than one person is speaking at the same time.
• Refer to the Voice Help feature.
2 Refer to the Navigation System Manual
■
Voice Recognition
1Voice Control Operation
When you press the button, a helpful prompt asks
what you would like to do. Press and release the
button again to bypass this prompt and give a
command.1Voice Recognition
The voice control system can only be used from the
driver’s seat because the microphone unit removes
noises from the front passenger’s side.
Page 222 of 557
221
uuAudio System Basic Operation uVoice Control Operation
Continued
Features
The system accepts these commands on the
Voice Portal screen.
• Call Your contact name
• Call Phone Number
• Find nearest POI category name
• Go home
• Route menu
• Cancel route
The system accepts these commands on any
screen.
• Call by number
• Call by name
• Call Phone Number
• Call your contact name
Contacts that are imported from your
phone to the vehicle are all made available
by voice. Voice Tags can also be recorded
for each of your Speed Dial entries.■
Voice Portal Commands
■
Phone Commands
2 Refer to the Navigation System ManualThe system accepts these commands on any
screen.
•Trip computer
• Traffic information
• Display clock
• Display wallpaper■
Navigation Commands
■
Info Commands
When the (Talk) button is pressed,
available voice commands appear on the
screen.
For a complete list of commands, say “Voice
Help” after the beep.■
On Screen Commands
Page 248 of 557
247
uuAudio System Basic Operation uPlaying Hard Disk Drive (HDD) Audio
Features
Update the Gracenote ® Album Info (Gracenote ® Media Database) that is included
with the navigation system. 1.Insert the update disc into the disc slot or
connect the USB flash drive that includes
the update.
2. Press the SETTINGS button in the HDD
mode.
3. Rotate to select Audio Settings, then
press .
4. Move or to select the CD/HDD tab.
5. Rotate to select Update Gracenote
Album Info , then press .
6. Rotate to select Update by USB or
Update by CD , then press .
u The system starts updating and the
confirmation message appears on the
screen. Press to finish.■
Updating Gracenote ® Album Info
1 Updating Gracenote® Album Info
To acquire updated files:•Consult a dealer.•U.S.: Visit automobiles.honda.com.•Canada: Visit www.hondanavi.ca .
Once you perform an update, any information you
edited before wi ll be overwritten or erased.