Page 9 of 20
9
auDIo steer Ing wheel controls
Push to Talk
Press to answer an incoming call or to use natural voice recognitionF with the audio, BluetoothF, navigationF or OnStar® system.
End Call/Mute
Press to end or reject a call.
Press to mute/unmute the vehicle speakers.
Next/Previous
With the Audio screen displayed on the DIC, press or to seek the previous or next radio station or track.
Volume (behind right side of steering wheel)
Press the top or bottom button to adjust the volume.
Next/Previous Favorite Station (behind left side of steering wheel)
Press the top or bottom button to display the current station or track. Press the top or bottom button again to go to the next or previous favorite radio station or track.
See your Infotainment System Owner Manual.
F Optional equipment
Next/Previous Favorite Station button shown. Volume button is located behind the right side of the steering wheel.
Page 10 of 20
10
gmc IntellIlIn K raDIo w Ith 8-Inch* color screen
Refer to your Owner Manual for important safety information about using \
the infotainment system while driving.
The GMC IntelliLink radio is controlled by using the audio system buttons and touch screen.
See your Infotainment System Owner Manual.
F Optional equipment *Screen measured diagonally
Interaction Selector: Touch to display the favorites list
TUNE/MENU: Tune radio stations/Open and select menus
Applications: Touch the screen icon to access the application
Additional Pages: Touch to view additional pages of applications (if available)
Power/ Volume
BACK: Move back one level in the menus
Home screen
Eject disc
MEDIA: Select the media source
RADIO: Select AM, FM, XMF
SEEK: Previous/Next radio station or track
Open/Close the storage compartment
Page 11 of 20
11
gmc IntellIlIn K raDIo w Ith 8-Inch* color screen
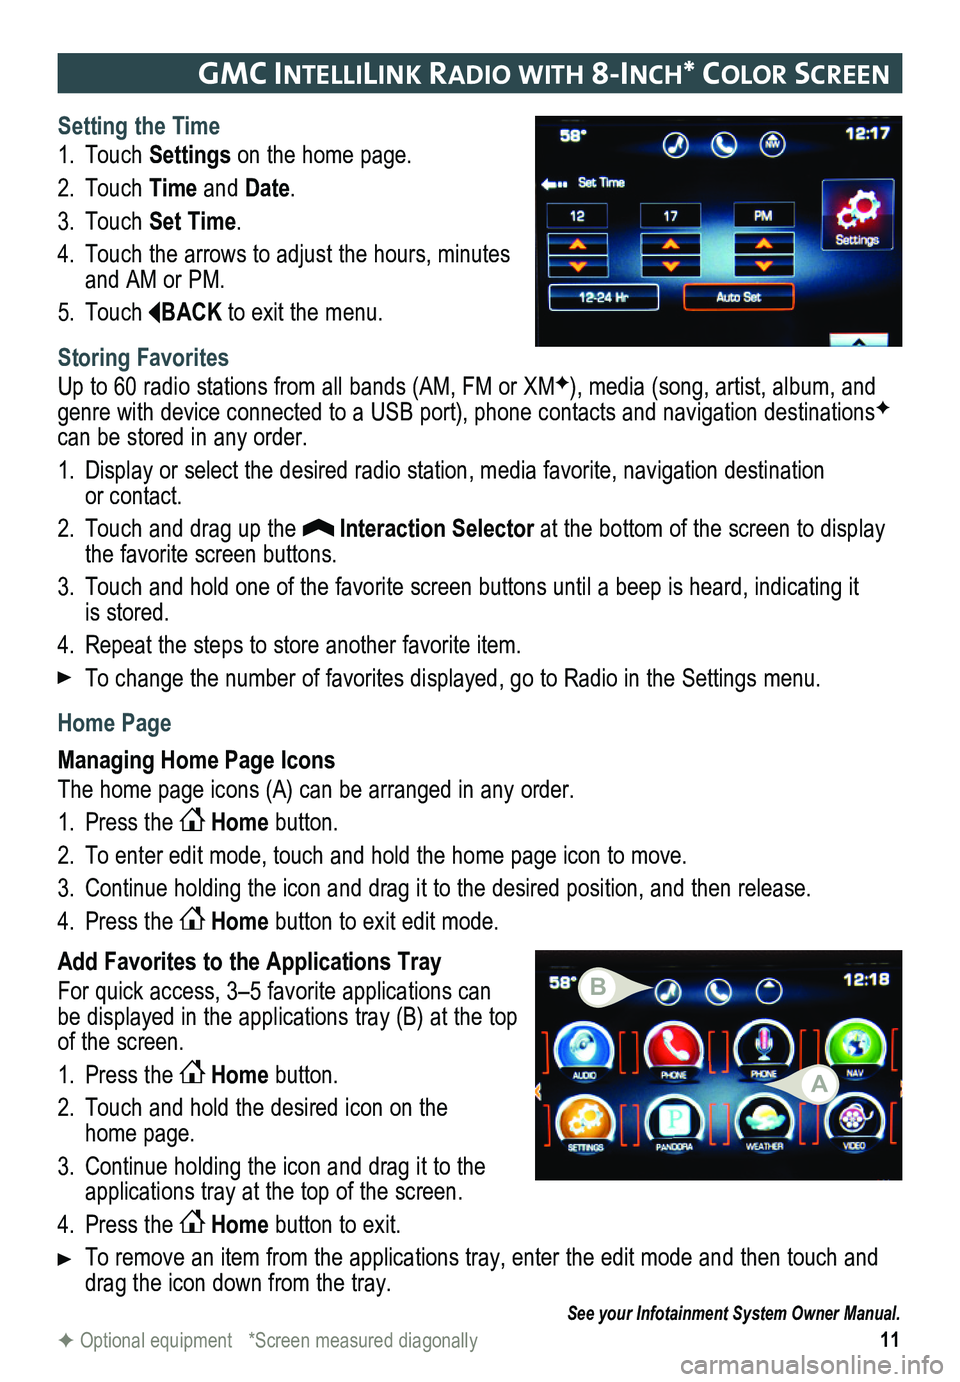
Setting the Time
1. Touch Settings on the home page.
2. Touch Time and Date.
3. Touch Set Time.
4. Touch the arrows to adjust the hours, minutes and AM or PM.
5. Touch BACK to exit the menu.
Storing Favorites
Up to 60 radio stations from all bands (AM, FM or XMF), media (song, artist, album, and genre with device connected to a USB port), phone contacts and navigation destinationsF can be stored in any order.
1. Display or select the desired radio station, media favorite, navigation destination or contact.
2. Touch and drag up the Interaction Selector at the bottom of the screen to display the favorite screen buttons.
3. Touch and hold one of the favorite screen buttons until a beep is heard,\
indicating it is stored.
4. Repeat the steps to store another favorite item.
To change the number of favorites displayed, go to Radio in the Settings menu.
Home Page
Managing Home Page Icons
The home page icons (A) can be arranged in any order.
1. Press the Home button.
2. To enter edit mode, touch and hold the home page icon to move.
3. Continue holding the icon and drag it to the desired position, and then release.
4. Press the Home button to exit edit mode.
Add Favorites to the Applications Tray
For quick access, 3–5 favorite applications can be displayed in the applications tray (B) at the top of the screen.
1. Press the Home button.
2. Touch and hold the desired icon on the home page.
3. Continue holding the icon and drag it to the applications tray at the top of the screen.
4. Press the Home button to exit.
To remove an item from the applications tray, enter the edit mode and then touch and drag the icon down from the tray.
See your Infotainment System Owner Manual.
F Optional equipment *Screen measured diagonally
A
B
Page 12 of 20
12
bluetooth® system
Portable auDIo DevIces
Refer to your Owner Manual for important safety information about using \
the Bluetooth system while driving.
Before using a Bluetooth-enabled device in the vehicle, it must be paired with the in- vehicle Bluetooth system. The pairing process is disabled when the vehicle is moving. Not all devices will support all functions. Visit www.gmtotalconnect.com for more information.
Pair a Phone
1. To use voice recognition, press the Push to Talk button; after the beep, say “Pair phone,” or
Use the MENU knob or the touch screen to select the Phone icon > Phones > Pair Device.
2. Start the pairing process on the phone. Locate GMC IntelliLink on the phone.
3. Enter the four-digit code that appears on the touch screen into the phone or, if a six-digit code appears on the phone, confirm it on the touch screen.
4. If your phone prompts you to accept the connection or phone book download, click “yes” and always allow.
Streaming Audio
With a paired device connected via Bluetooth, press the MEDIA button until Bluetooth is displayed on the touch screen to stream audio from the device. Control audio opera\
tion using the device controls. For full control of the mobile device, it may\
be necessary to con-nect the device to the USB port.
See your Infotainment System Owner Manual.
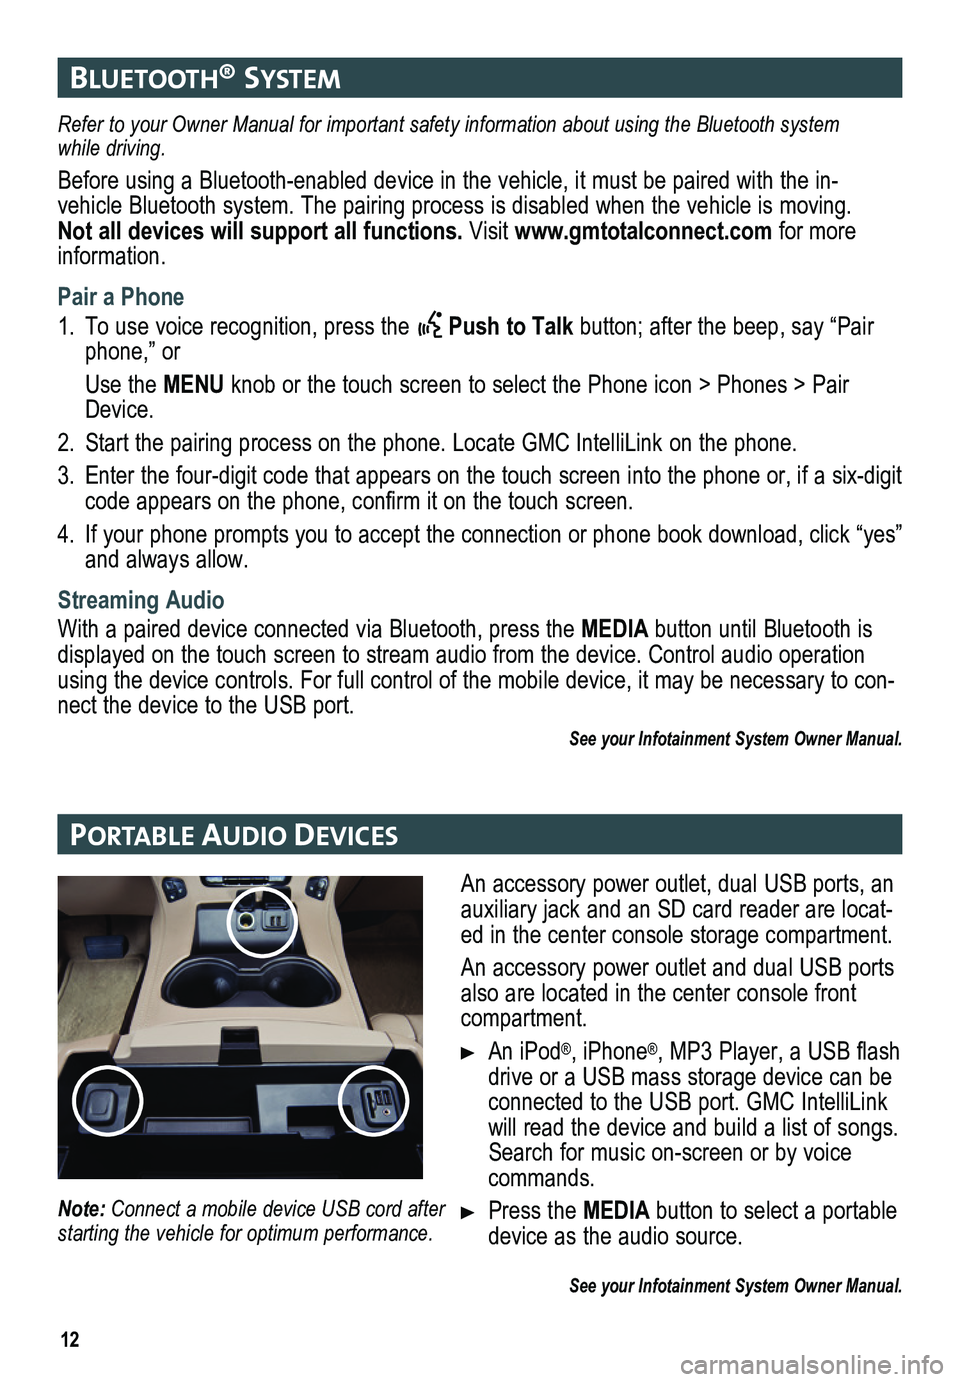
An accessory power outlet, dual USB ports, an auxiliary jack and an SD card reader are locat-ed in the center console storage compartment.
An accessory power outlet and dual USB ports also are located in the center console front compartment.
An iPod®, iPhone®, MP3 Player, a USB flash drive or a USB mass storage device can be connected to the USB port. GMC IntelliLink will read the device and build a list of songs. Search for music on-screen or by voice commands.
Press the MEDIA button to select a portable device as the audio source.
See your Infotainment System Owner Manual.
Note: Connect a mobile device USB cord after starting the vehicle for optimum performance.
Page 13 of 20
13
gmc IntellIlIn K
GMC IntelliLink uses a Bluetooth or USB connection to link a compatible device, such as a smartphone, cell phone, USB flash drive or portable audio player/iPod®. IntelliLink enables streaming audio through a smartphone and hands-free voice control. Music\
also can be played from a USB flash drive.
For assistance with the IntelliLink system, contact Customer Assistance at 1-855-4-SUPPORT (1-855-478-7767) or visit www.gmc.com/intellilink.
Natural Voice Recognition
Control the music source and make phone calls hands-free (after pairing\
your Bluetooth-enabled phone) using the natural voice recognition system.
1. Press the Push to Talk button on the steering wheel.
2. The radio will say “Command please,” followed by a beep.
3. After the beep, say what you want it to do using natural speech.
• Phone (using your paired phone):
Example command: “Call Amanda” or “Dial 555-1212”
• Media Music Device Search (when connected to USB only):
Example command: “Play artist [name]” or “Play song [name]”
• Radio control:
Example command: “Tune FM 104.3” or “Tune XM Classic Vinyl”
• Help:
Say “Help” for voice recognition assistance
PANDORA® Internet Radio
Listen to personalized radio stations based on favorite artists or genres.
Download the Pandora app to your smartphone. Restart the smartphone and \
sign in to Pandora.
Create a station on your phone to listen to a customized song list in the vehicle.
Connect your smartphone/device to the system by Bluetooth or, for Apple devices, by a USB cable.
Touch the Pandora icon on the touch screen to access Pandora. A slight delay may occur when loading a song or changing a station.
Voice Pass-Thru and Siri® Eyes Free
Voice pass-thru allows access to the voice recognition commands on a paired cell phone, i.e. Siri or Voice Command. See the cell phone manufacturer’s user guide to determine whether the cell phone supports this feature.
To activate voice pass-thru, touch the microphone icon on the touch screen.
See your Infotainment System Owner Manual.
Page 14 of 20
14
vehIcle PersonalIzat Ion
DrIver assIstance systems
F Optional equipment
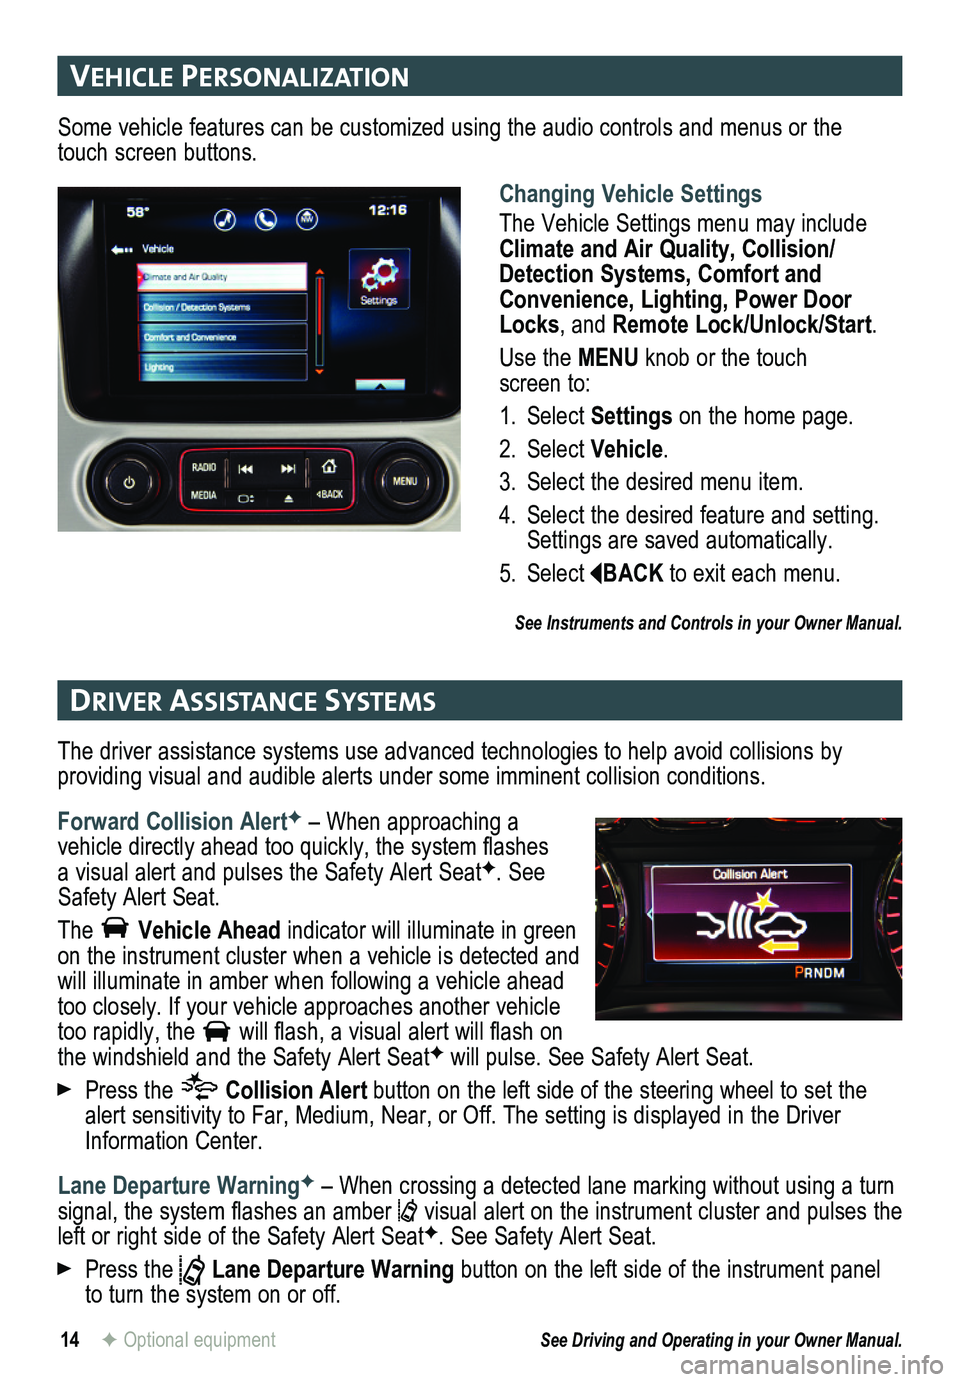
Changing Vehicle Settings
The Vehicle Settings menu may include Climate and Air Quality, Collision/Detection Systems, Comfort and Convenience, Lighting, Power Door Locks, and Remote Lock/Unlock/Start.
Use the MENU knob or the touch screen to:
1. Select Settings on the home page.
2. Select Vehicle.
3. Select the desired menu item.
4. Select the desired feature and setting. Settings are saved automatically.
5. Select BACK to exit each menu.
See Instruments and Controls in your Owner Manual.
Some vehicle features can be customized using the audio controls and menus or the touch screen buttons.
The driver assistance systems use advanced technologies to help avoid collisions by
providing visual and audible alerts under some imminent collision conditions.
Forward Collision AlertF – When approaching a vehicle directly ahead too quickly, the system flashes a visual alert and pulses the Safety Alert SeatF. See Safety Alert Seat.
The Vehicle Ahead indicator will illuminate in green on the instrument cluster when a vehicle is detected and will illuminate in amber when following a vehicle ahead too closely. If your vehicle approaches another vehicle too rapidly, the will flash, a visual alert will flash on the windshield and the Safety Alert SeatF will pulse. See Safety Alert Seat.
Press the Collision Alert button on the left side of the steering wheel to set the alert sensitivity to Far, Medium, Near, or Off. The setting is displayed in the Driver Information Center.
Lane Departure WarningF – When crossing a detected lane marking without using a turn signal, the system flashes an amber visual alert on the instrument cluster and pulses the left or right side of the Safety Alert SeatF. See Safety Alert Seat.
Press the Lane Departure Warning button on the left side of the instrument panel to turn the system on or off.
See Driving and Operating in your Owner Manual.
Page 15 of 20
15
DrIver assIstance systems
Safety Alert SeatF – The driver’s seat pulses, left side, right side, or simultaneou\
sly, to alert the driver of potential hazards.
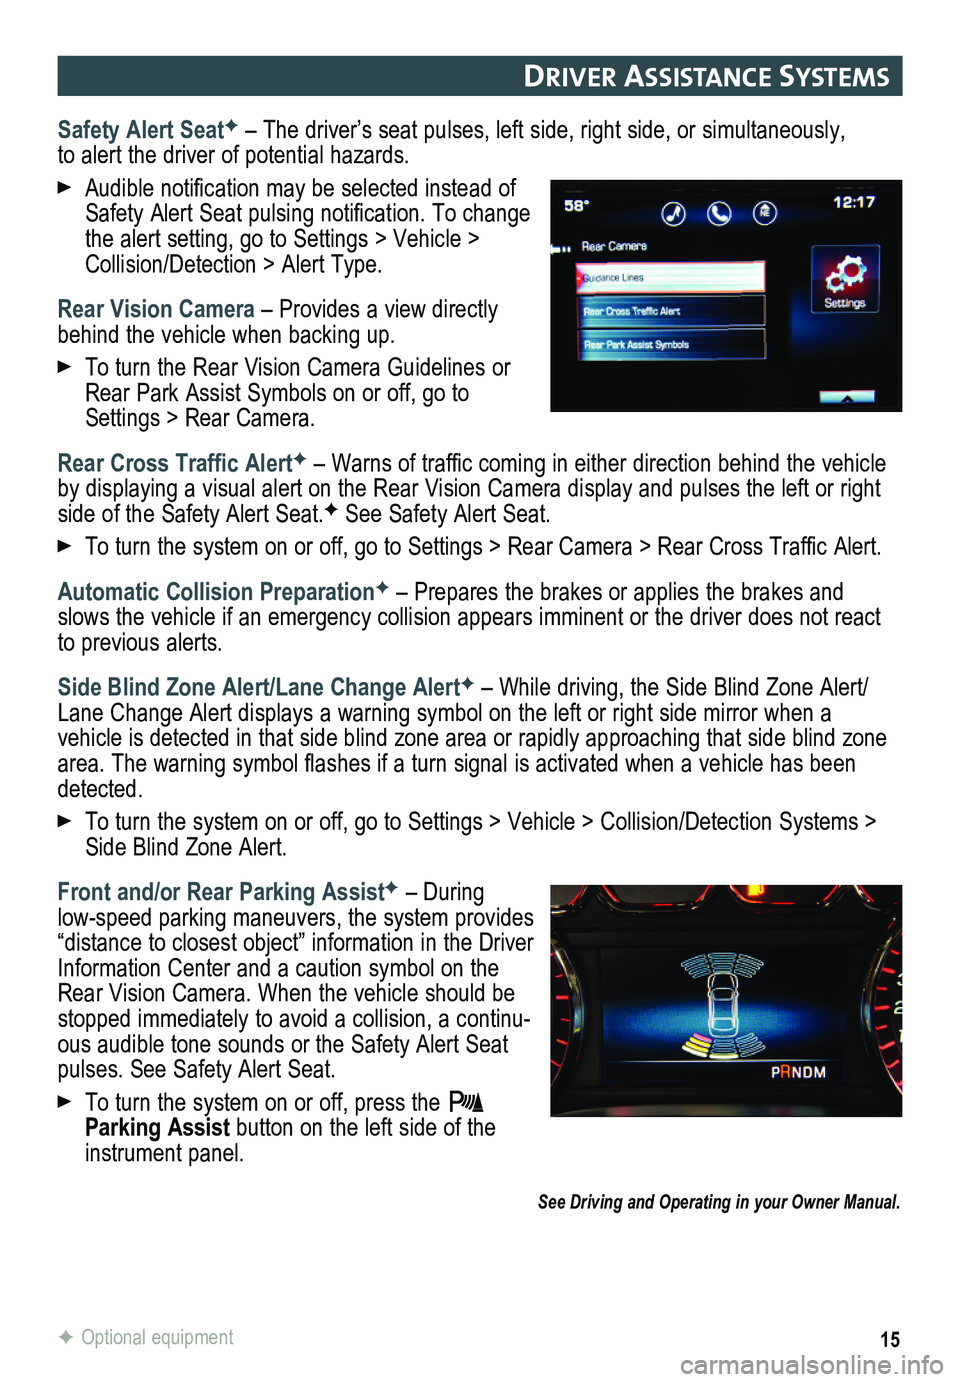
Audible notification may be selected instead of Safety Alert Seat pulsing notification. To change the alert setting, go to Settings > Vehicle > Collision/Detection > Alert Type.
Rear Vision Camera – Provides a view directly behind the vehicle when backing up.
To turn the Rear Vision Camera Guidelines or Rear Park Assist Symbols on or off, go to Settings > Rear Camera.
Rear Cross Traffic AlertF – Warns of traffic coming in either direction behind the vehicle by displaying a visual alert on the Rear Vision Camera display and pulses the left or right side of the Safety Alert Seat.F See Safety Alert Seat.
To turn the system on or off, go to Settings > Rear Camera > Rear Cross Traffic Alert.
Automatic Collision PreparationF – Prepares the brakes or applies the brakes and slows the vehicle if an emergency collision appears imminent or the driver does not react to previous alerts.
Side Blind Zone Alert/Lane Change AlertF – While driving, the Side Blind Zone Alert/Lane Change Alert displays a warning symbol on the left or right side mirror when a vehicle is detected in that side blind zone area or rapidly approaching that sid\
e blind zone area. The warning symbol flashes if a turn signal is activated when a vehicle has been detected.
To turn the system on or off, go to Settings > Vehicle > Collision/Detection Systems > Side Blind Zone Alert.
Front and/or Rear Parking AssistF – During
low-speed parking maneuvers, the system provides “distance to closest object” information in the Driver Information Center and a caution symbol on the Rear Vision Camera. When the vehicle should be stopped immediately to avoid a collision, a continu-ous audible tone sounds or the Safety Alert Seat pulses. See Safety Alert Seat.
To turn the system on or off, press the Parking Assist button on the left side of the instrument panel.
See Driving and Operating in your Owner Manual.
F Optional equipment
Page 16 of 20
16
automatIc clImate controls
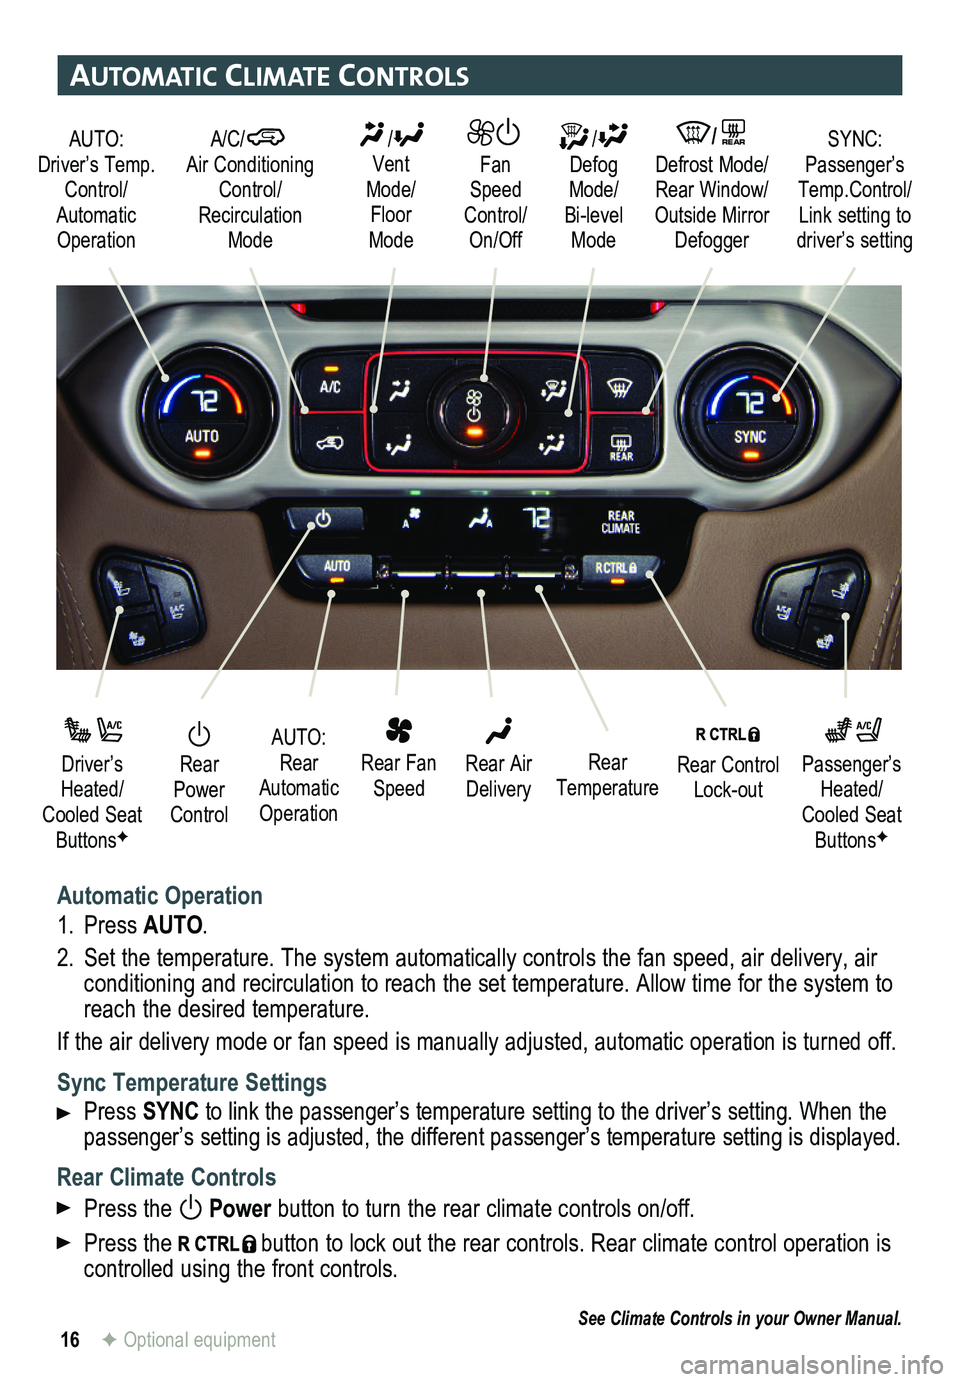
Automatic Operation
1. Press AUTO.
2. Set the temperature. The system automatically
controls the fan speed, air delivery, air conditioning and recirculation to reach the set temperature. Allow time for the system to reach the desired temperature.
If the air delivery mode or fan speed is manually adjusted, automatic op\
eration is turned off.
Sync Temperature Settings
Press SYNC to link the passenger’s temperature setting to the driver’s setting. When the passenger’s setting is adjusted, the different passenger’s temperature setting is displayed.\
Rear Climate Controls
Press the Power button to turn the rear climate controls on/off.
Press the button to lock out the rear controls. Rear climate control operation is controlled using the front controls.
See Climate Controls in your Owner Manual.
Rear Power Control
Driver’s Heated/Cooled Seat ButtonsF
Passenger’s Heated/Cooled Seat ButtonsF
AUTO: Rear Automatic Operation
Rear Fan Speed
Rear Control Lock-out
Rear Air DeliveryRear Temperature
AUTO: Driver’s Temp. Control/Automatic Operation
/ Defog Mode/ Bi-level Mode
/REAR Defrost Mode/ Rear Window/Outside Mirror Defogger
SYNC: Passenger’s Temp.Control/Link setting to driver’s setting
/ Vent Mode/ Floor Mode
Fan Speed Control/On/Off
A/C/ Air Conditioning Control/Recirculation Mode
F Optional equipment