Page 9 of 20
 or – (minus) screen button to adjust the hours, minutes or date.
4. Touc")
9
auDIo system
Setting the Time
1. Press the
Clock button.
2. Touch the Set Time screen button.
3. Touch the + (plus) or – (minus) screen button to adjust the hours, minutes or date.
4. Touch the OK screen button to confirm the setting.
Storing Favorite Stations
Radio stations from all bands (AM, FM or XM♦) can be stored, in any order, on up to six
pages of favorites.
1. Tune in the desired radio station.
2. Press the FAV button to display the page where the station is to be stored.
3. Press and hold one of the six preset screen buttons until a beep is hear\
d.
4. Repeat the steps for each desired station.
Portable Audio Devices
An accessory power outlet, 3.5-mm auxiliary input jack and a USB portF are located in the
center console.
Active Noise Cancellation (4-cylinder models only)
The Active Noise Cancellation (ANC) system monitors and effectively cancels out poten-
tially undesirable vehicle noises at certain vehicle speeds. For optimal ANC performance,
do not block the rear speaker located on the right side of the cargo are\
a.
See your Infotainment System Owner Manual.
F Optional equipment
An iPod®, iPhone®, MP3 Player, a USB
flash drive or a USB mass storage
device can be connected to the USB
port. GMC IntelliLink
F will read the
device, build a list of voice commands,
and fill in missing song information and
album graphics. Search for music on-
screen or by voice commands.
A portable audio device connected to
the auxiliary input jack can be controlled
only by using the portable device con-
trols. To optimize speaker volume, fully
increase the volume level of the portable
device.
Page 10 of 20

10F Optional equipment
bluetooth® system
Before using a Bluetooth-enabled device in the vehicle, it must be paired with the in-vehicle
Bluetooth system. Not all devices will support all functions. The pairing process is disabled
when the vehicle is moving. For more information about Bluetooth pairing\
, device compat-
ibility and text messaging, visit www.gmtotalconnect.com .
Pair a Phone
1. To use voice recognition, press the
Push to Talk button on the steering wheel;
after the beep, say “Pair.”
To use the screen buttons, press the CONFIG button and then touch Phone Settings >
Pair Device.
2. Start the pairing process on the phone. Locate your vehicle name or Inte\
lliLink on
the phone.
3. Enter the four-digit code that appears on the touch screen into the phone or confirm the
six-digit code on the phone.
4. If your phone prompts you to accept the connection or phone book download, click “yes”
and always allow.
Text Messaging
F
Text messages can be displayed or played back over the audio system; or a predefined
message can be sent. Only SMS text messages are supported.
1. Touch the Messages screen button on the home page.
2. Once all messages are retrieved, the Text Message Inbox displays.
3. Select a text message to view (available only if the vehicle is not in motion) or listen to.
A pop-up screen will display when there is an incoming text message.
See your Infotainment System Owner Manual.
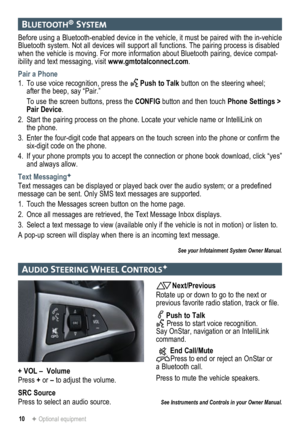
au DIo steer Ing Wheel controlsF
Next/Previous
Rotate up or down to go to the next or
previous favorite radio station, track or file.
Push to Talk
Press to start voice recognition.
Say OnStar, navigation or an IntelliLink
command.
End Call/Mute
Press to end or reject an OnStar or
a Bluetooth call.
Press to mute the vehicle speakers.
See Instruments and Controls in your Owner Manual.
+ VOL – Volume
Press + or – to adjust the volume.
SRC Source
Press to select an audio source.
Page 11 of 20

11
gmc IntellIlIn KF
IntelliLink uses a Bluetooth or USB connection to link a compatible smartphone, cell phone,
USB flash drive or portable audio player/iPod® to the touch screen infotainment display. It
offers a variety of entertainment options and features enhanced hands-fr\
ee voice control,
music information and the ability to play music files from a USB flash drive.
For assistance with the operation of the IntelliLink system, contact Customer Assistance at
1-855-4-SUPPORT (855-478-7767) or visit www.gmc.com/intellilink .
PANDORA
® Internet Radio
Listen to personalized radio stations based on favorite artists or genres.
Download the Pandora app to your smartphone. Restart the smartphone and \
sign in
to Pandora.
Create a station on your phone to listen to a customized song list in the vehicle.
Connect your smartphone/device to the system by Bluetooth or, for Apple devices,
by a USB cable.
Touch the Pandora icon on the touch screen to access Pandora. A slight delay may
occur when loading a song or changing a station.
Stitcher SmartRadio™
Stream favorite podcasts, radio shows and news to your vehicle.
Download the Stitcher app to your smartphone. Restart the smartphone and sign in
to Stitcher.
Select a category to listen to.
If you like the station, touch the Star screen button to add it to your Favorites list.
SiriusXM™ Satellite Radio (subscription required)
SiriusXM provides access to over 180 channels of commercial-free music, sports, talk,
entertainment, comedy and weather using the radio controls or voice comm\
ands.
• XM Travel Link includes fuel locations and prices, weather, and movies with theater
locations. Additional subscription fee required.
• XM Tune Select finds your favorite artists or songs on all XM stations and alerts you.
Voice Pass-Thru and Siri® Eyes Free
Voice pass-thru allows access to the voice recognition commands on a compatible cell
phone; i.e. Siri or Voice Command. Visit www.gmtotalconnect.com for more information.
To activate phone voice recognition, press and hold the Push to Talk button on the
steering wheel for two seconds.
F Optional equipment
See your Infotainment System Owner Manual.
Page 12 of 20
 using the enhanced voice recognitio")
12
gmc IntellIlIn KF
onstar®WI th 4g lte
Voice Recognition
Control the music source and make phone calls hands-free (after pairing\
your Bluetooth-
enabled phone) using the enhanced voice recognition system.
1. Press the
Push to Talk button on the steering wheel.
2. The radio will say “Please say a command,” followed by a beep.
3. After the beep, say what you want it to do.
• Phone (Using your paired phone):
– “Pair” or “Connect”
– “Dial” or “Call [number]”
– “Dial” or “Call [phone book name]”
Example command: “Call Amanda” or “Dial 555-1212”
• Media Music Device Search:
– “Play CD”
– “Play USB”
– “Play Bluetooth audio”
Example command: “Play artist [name]” or “Play song [name]”
• Radio Control:
Example command: “Tune FM 104.3” or “Tune Classic Vinyl”
Example command: “Tune Pandora” (Pandora app required)
• Quick Tips:
– Say “Help” for voice recognition assistance.
– To start speaking immediately without waiting for the beep, press the
Push to
Talk button twice.
See your Infotainment System Owner Manual.
With OnStar 4G LTE and Wi-Fi, up to seven devices (smartphones, tablets and laptops)
can be connected to high-speed Internet through the vehicle’s built-in Wi-Fi® hotspot.
To retrieve the SSID and password for the hotspot, press the OnStar Voice Command
button on your overhead console or rearview mirror, wait for the prompt,\
and then say
“Wi-Fi settings.” The information will be displayed on the screen.
For assistance or to change the SSID and password, press the blue OnStar button or call
1-888-4-ONSTAR (1-888-466-7827) to connect to an OnStar Advisor.
Note: See onstar.com for a detailed instruction guide, vehicle availability, details, and system limita -
tions. Services and apps vary by make, model, year, carrier, availabilit\
y, and conditions. 4G LTE
service is available in select markets. 4G LTE performance is based on industry averages and \
vehicle
systems design. Some services require a data plan.
See your Infotainment System Owner Manual.
F Optional equipment
Page 13 of 20

13
navIgatIon systemF
Note: When the vehicle is moving, various on-screen functions are disabled to reduce
driver distraction.
Controls
NAV Navigation
Press to view the vehicle’s current position on the map screen.
DEST Destination
Press to access the Route screen to enter a destination or plan a route.
RPT Repeat
Press to repeat the last voice guidance prompt.
To select various functions, touch the highlighted touch screen buttons in the on-screen
menus or use the MENU/SEL knob.
Entering a Destination
1. Press the DEST control button.
2. Touch one of the Select Destination menu options to plan a route. If you know the
specific address, touch the Address Entry screen button.
3. Enter the State/Province, City and Street name. Touch the List screen button to select
the desired name from the generated list for each entry.
4. Enter the house number. Touch the DONE screen button.
5. If the displayed address is correct, touch the GO screen button.
6. Select the route preference and touch the Start Guidance screen button.
See your Infotainment System Owner Manual.
rear seat entertaI nment systemF
Play a DVD Video
1. Press the release button on the seatback consoles to raise the screens.
2. Insert a DVD into the audio system.
3. Press the DVD screen button to select the DVD source. Sound will play through the
vehicle speakers.
4. To use the wireless headphones, press the On/Off button on the headphones, select
Channel 1, and adjust the volume using the headphone volume control.
5. To control DVD playback, use the audio controls or the remote control. For best
performance, aim the remote control at the driver-side seatback console.\
Changing the Source on the Video Screens
Continually press the AUX button on the remote control to play a DVD or an auxiliary
device, such as a video game, on both screens or a different source on e\
ach screen.
See your Infotainment System Owner Manual.
F Optional equipment
Page 14 of 20

14
cruIse control
Adjusting Cruise Control
RES+ Resume/Accelerate
Rotate the thumbwheel up to resume a
set speed.
When the system is active, rotate the
thumbwheel up to increase speed.
SET– Set/Coast
When the system is active, rotate the
thumbwheel down to decrease speed.
Cancel
Press to cancel the cruise control but retain
the set speed in memory.
The cruise control set speed is erased
when cruise control or the vehicle ignition
is turned off.
See Driving and Operating in your Owner Manual.
Setting Cruise Control
1. Press the
ON/OFF button. The
Cruise Control symbol will illuminate in
white in the instrument cluster.
2. When traveling at the desired speed,
rotate the SET– thumbwheel down
to set the speed. The
symbol will
illuminate in green in the instrument
cluster.
for War D collIsIon alert/lane DeParture Warn IngF
Forward Collision Alert
When approaching a vehicle directly ahead
too quickly, a visual alert flashes on top of
the instrument panel and beeps sound.
Press the Collision Alert button on
the left side of the steering wheel to set
the alert timing.
Lane Departure Warning
When crossing a detected lane marking without using a turn signal, a visual alert flashes
on top of the instrument panel and beeps sound.
Press the Lane Departure Warning button on the left side of the steering wheel to
turn the system on or off.
See Driving and Operating in your Owner Manual.
F Optional equipment
Page 15 of 20
.
–
Trip/Fuel menu (digital speed ometer,
trip odometers,")
15
DrIver Informat Ion center
A. MENU
Press to display the:
– Vehicle Information menu (units,
tire pressures, remaining oil life).
–
Trip/Fuel menu (digital speed ometer,
trip odometers, fuel range, average
fuel economy, instantaneous fuel
economy, average vehicle speed,
timer, OnStar Turn-by-Turn
guidanceF).
B.
Press the up or down button to scroll
through the items of each menu.
C. SET/CLR
Press to set or clear the displayed menu
item or warning message.
The Driver Information Center (DIC) on the instrument cluster displays a variety of vehicle
system information and warning messages.
TIP: To display an easy-to-read digital speedometer, open the Trip/Fuel menu and scroll to tab 1.
DIC Controls
See Instruments and Controls in your Owner Manual.
vehIcle PersonalIzat Ion
1. Press the CONFIG button (A) to enter
the Configuration Settings menu.
2. Turn the MENU knob (B) to highlight
Vehicle Settings, and then press the
knob to select it; or use the screen
buttons.
3. Turn the MENU knob to highlight the
desired menus and settings, and then
press the knob to select the highlighted
item; or use the screen buttons.
4. Press the BACK button (C) to move
back within a menu.
See Instruments and Controls in your Owner Manual.
Vehicle personalization items may include climate and air quality, comfort and conven ience,
collision/detection systems, language, lighting, power door locks, remot\
e lock/unlock/start,
and factory settings. Use the controls on the audio system to change the settings.
F Optional equipment
ACB
A
B
C
Page 16 of 20

16
Fan
control
On/Off AUTO
F:
Automatic operation
FRONT Defrost mode
Driver’s
heated seat controlF Air delivery modes: Vent Bi-level Floor Defog
REAR
Rear window defoggerPassenger’s heated seat control
F
Automatic climate control system with heated seats shown.
A/C
Air conditioning control
Temperature control
clImate controls
Recirculation Mode
The
recirculation mode can help to quickly cool the air inside the vehicle or prevent
outside odors from entering the vehicle. It is not available while the defog or defrost mode
is selected. When the recirculation mode is used without air conditioning, the air humidity
increases and the windows may fog.
Air Outlets
Use the thumbwheels below the center outlets to open or close the center\
outlets.
Use the chrome-accented sliding knob on each outlet to direct airflow.
Automatic Operation
F
1. Press AUTO.
2. Set the temperature. Allow time for the system to automatically reach the desired
temperature.
Note: When outside temperature and vehicle temperature are cold, fan speed will not increase until
warmer air is available.
See Climate Controls in your Owner Manual.
Recirculation mode
F Optional equipment