Page 105 of 439
Black plate (52,1)GMC 2015i Sierra Denali Owner Manual (GMNA-Localizing-U.S./Canada/
Mexico-8431500) - 2015 - crc - 6/20/14
3-52 Seats and Restraints 7. If your child restraint has a top
tether, follow the child restraint
manufacturer's instructions
regarding the use of the top
tether. See Lower Anchors and
Tethers for Children (LATCH
System) on page 3-38 for more
information on using the top
tether anchors.
8. Before placing a child in the
child restraint, make sure it is
securely held in place. To check,
grasp the child restraint at the
safety belt path and attempt to
move it side to side and back
and forth. When the child
restraint is properly installed,
there should be no more than
2.5 cm (1 in) of movement.
To remove the child restraint,
unbuckle the vehicle safety belt and
let it return to the stowed position.
Page 106 of 439

Black plate (1,1)GMC 2015i Sierra Denali Owner Manual (GMNA-Localizing-U.S./Canada/
Mexico-8431500) - 2015 - crc - 6/20/14
Storage 4-1
Storage Storage Compartments Storage Compartments . . . . . . . 4-1
Instrument Panel Storage . . . . . 4-1
Glove Box . . . . . . . . . . . . . . . . . . . . 4-1
Cupholders . . . . . . . . . . . . . . . . . . . 4-1
Sunglasses Storage . . . . . . . . . . 4-2
Center Console Storage . . . . . . 4-2
Floor Console Storage . . . . . . . . 4-3
Additional Storage Features Cargo Tie-Downs . . . . . . . . . . . . . 4-3 Storage
Compartments
{ WarningDo not store heavy or sharp
objects in storage compartments.
In a crash, these objects may
cause the cover to open and
could result in injury.
Instrument Panel Storage Card Holder If equipped, there is a card holder
on the front instrument panel to the
left of the steering wheel. Glove Box
To access the upper glove box,
unlock with the key and pull up on
the handle.
To access the lower glove box, pull
down on the handle.
Cupholders Front
Base
There may be cupholders on the
center front seat console armrest.
Page 107 of 439
Black plate (2,1)GMC 2015i Sierra Denali Owner Manual (GMNA-Localizing-U.S./Canada/
Mexico-8431500) - 2015 - crc - 6/20/14
4-2 Storage Uplevel
If equipped, the cupholder in the
center console is removable and
can be repositioned. Lift the
cupholder from the sides to
remove it.
Insert the cupholder between the
guides on the console and push
down to secure it.
Rear
If equipped, pull the rear seat
armrest down to access the
cupholders. Sunglasses Storage
If equipped, sunglasses storage is
on the overhead console. Press the
fixed button on the cover and
release to access. Center Console Storage
The center console may contain the
following features:
1. Tote Compartment
2. Accessory Power Outlets
3. Power Cord Openings
4. Removable Cupholders
5. Device Holder
6. USB Ports
7. High Voltage Power Outlet
(HVPO) (if equipped)
Page 108 of 439
Black plate (3,1)GMC 2015i Sierra Denali Owner Manual (GMNA-Localizing-U.S./Canada/
Mexico-8431500) - 2015 - crc - 6/20/14
Storage 4-38. SD Card Reader
9. Auxiliary Jack
10. Latch
11. Rear Seat Audio (RSA)
Press the latch (10) and lift the
armrest to open the main storage
compartment.
There is an open storage
compartment on the rear of the
center console.
See Power Outlets on page 5-5 and
“ Audio Players ” in the infotainment
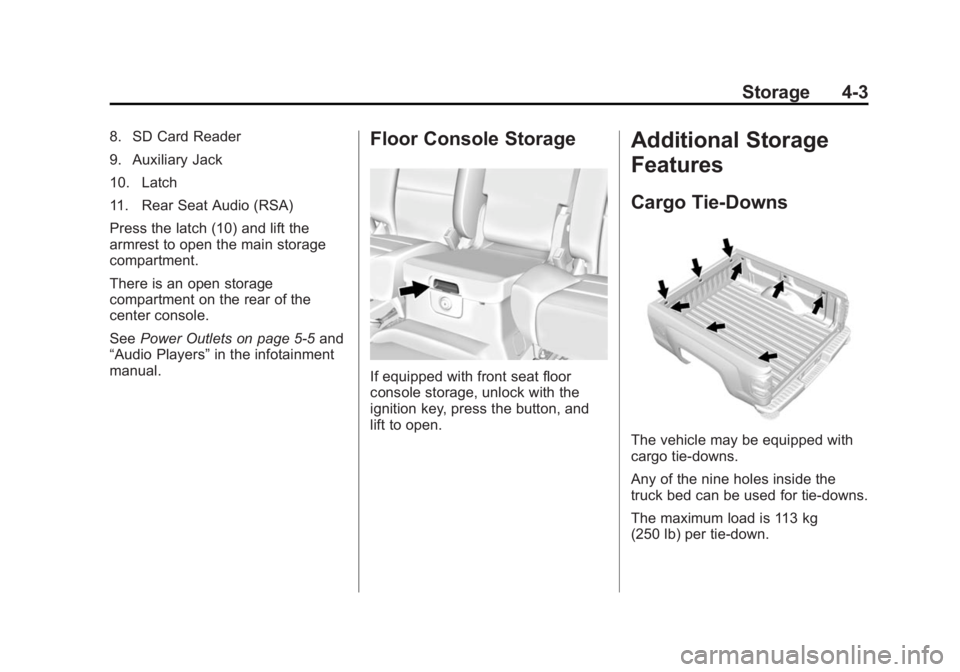
manual. Floor Console Storage
If equipped with front seat floor
console storage, unlock with the
ignition key, press the button, and
lift to open. Additional Storage
Features Cargo Tie-Downs
The vehicle may be equipped with
cargo tie-downs.
Any of the nine holes inside the
truck bed can be used for tie-downs.
The maximum load is 113 kg
(250 lb) per tie-down.
Page 109 of 439

Black plate (4,1)GMC 2015i Sierra Denali Owner Manual (GMNA-Localizing-U.S./Canada/
Mexico-8431500) - 2015 - crc - 6/20/14
4-4 Storage
{ CautionThe truck bed walls will collapse if
the tie-downs are overloaded.
To install:
1. Insert a tie-down loop assembly
until it is flush with the truck
bed wall. 2. Turn the tie-down loop clockwise
to tighten. The tie-down will be
hard to turn until the toggle
moves past the installation point
on the toggle guide.
3. Fasten the tie-down firmly by
hand only. Do not use tools.
To remove:
1. Remove the tie-down loop
completely by turning
counterclockwise while holding
the backing plate against the
truck bed wall.
2. Pull the backing plate away from
the truck bed wall until a click is
heard. This locks the toggle into
position on the toggle guide.
3. Push the backing plate against
the truck bed wall. This allows
the toggle nut to spin.
4. Remove the backing plate,
toggle guide, and toggle nut
from the truck bed wall
completely. 5. Reinstall the tie-down loop
through the backing plate into
the toggle nut for reuse.
Page 110 of 439

Black plate (1,1)GMC 2015i Sierra Denali Owner Manual (GMNA-Localizing-U.S./Canada/
Mexico-8431500) - 2015 - crc - 6/20/14
Instruments and Controls 5-1
Instruments and
Controls Controls Steering Wheel Adjustment . . . 5-2
Steering Wheel Controls . . . . . . 5-2
Heated Steering Wheel . . . . . . . 5-3
Horn . . . . . . . . . . . . . . . . . . . . . . . . . . 5-3
Windshield Wiper/Washer . . . . . 5-3
Compass . . . . . . . . . . . . . . . . . . . . . 5-4
Clock . . . . . . . . . . . . . . . . . . . . . . . . . 5-4
Power Outlets . . . . . . . . . . . . . . . . . 5-5
Warning Lights, Gauges, and
Indicators Warning Lights, Gauges, and
Indicators . . . . . . . . . . . . . . . . . . . . 5-8
Instrument Cluster . . . . . . . . . . . . 5-9
Speedometer . . . . . . . . . . . . . . . . 5-11
Odometer . . . . . . . . . . . . . . . . . . . . 5-11
Trip Odometer . . . . . . . . . . . . . . . 5-11
Tachometer . . . . . . . . . . . . . . . . . . 5-11
Fuel Gauge . . . . . . . . . . . . . . . . . . 5-12
Engine Oil Pressure
Gauge . . . . . . . . . . . . . . . . . . . . . . 5-12
Engine Coolant Temperature
Gauge . . . . . . . . . . . . . . . . . . . . . . 5-13 Transmission Temperature
Gauge . . . . . . . . . . . . . . . . . . . . . . 5-14
Voltmeter Gauge . . . . . . . . . . . . . 5-15
Safety Belt Reminders . . . . . . . 5-15
Airbag Readiness Light . . . . . . 5-16
Passenger Airbag Status
Indicator . . . . . . . . . . . . . . . . . . . . 5-17
Charging System Light . . . . . . 5-18
Malfunction
Indicator Lamp . . . . . . . . . . . . . 5-18
Brake System Warning
Light . . . . . . . . . . . . . . . . . . . . . . . 5-21
Antilock Brake System (ABS)
Warning Light . . . . . . . . . . . . . . 5-21
Four-Wheel-Drive Light . . . . . . 5-22
Tow/Haul Mode Light . . . . . . . . 5-22
Hill Descent Control Light . . . . 5-22
Lane Departure Warning
(LDW) Light . . . . . . . . . . . . . . . . 5-22
Vehicle Ahead Indicator . . . . . . 5-23
Traction Off Light . . . . . . . . . . . . 5-23
StabiliTrak ®
OFF Light . . . . . . . 5-23
Traction Control System
(TCS)/StabiliTrak ®
Light . . . . 5-24
Engine Coolant Temperature
Warning Light . . . . . . . . . . . . . . 5-24
Tire Pressure Light . . . . . . . . . . 5-25
Engine Oil Pressure Light . . . . 5-25
Low Fuel Warning Light . . . . . . 5-25 Security Light . . . . . . . . . . . . . . . . 5-26
High-Beam On Light . . . . . . . . . 5-26
Front Fog Lamp Light . . . . . . . . 5-26
Lamps On Reminder . . . . . . . . . 5-26
Cruise Control Light . . . . . . . . . 5-27
Door Ajar Light . . . . . . . . . . . . . . 5-27
Information Displays Driver Information
Center (DIC) . . . . . . . . . . . . . . . 5-27
Vehicle Messages Vehicle Messages . . . . . . . . . . . 5-31
Battery Voltage and Charging
Messages . . . . . . . . . . . . . . . . . . 5-31
Brake System Messages . . . . 5-32
Compass Messages . . . . . . . . . 5-32
Door Ajar Messages . . . . . . . . . 5-33
Engine Cooling System
Messages . . . . . . . . . . . . . . . . . . 5-33
Engine Oil Messages . . . . . . . . 5-34
Engine Power Messages . . . . 5-34
Fuel System Messages . . . . . . 5-35
Key and Lock Messages . . . . . 5-35
Lamp Messages . . . . . . . . . . . . . 5-35
Object Detection System
Messages . . . . . . . . . . . . . . . . . . 5-35
Ride Control System
Messages . . . . . . . . . . . . . . . . . . 5-36
Page 111 of 439

Black plate (2,1)GMC 2015i Sierra Denali Owner Manual (GMNA-Localizing-U.S./Canada/
Mexico-8431500) - 2015 - crc - 6/20/14
5-2 Instruments and Controls Airbag System Messages . . . . 5-37
Safety Belt Messages . . . . . . . 5-37
Security Messages . . . . . . . . . . 5-38
Steering System
Messages . . . . . . . . . . . . . . . . . . 5-38
Tire Messages . . . . . . . . . . . . . . . 5-38
Transmission Messages . . . . . 5-39
Vehicle Reminder
Messages . . . . . . . . . . . . . . . . . . 5-41
Vehicle Speed Messages . . . . 5-42
Washer Fluid Messages . . . . . 5-42
Vehicle Personalization Vehicle Personalization . . . . . . 5-42
Universal Remote System Universal Remote System . . . 5-49
Universal Remote System
Programming . . . . . . . . . . . . . . . 5-49
Universal Remote System
Operation . . . . . . . . . . . . . . . . . . 5-52 Controls Steering Wheel
Adjustment
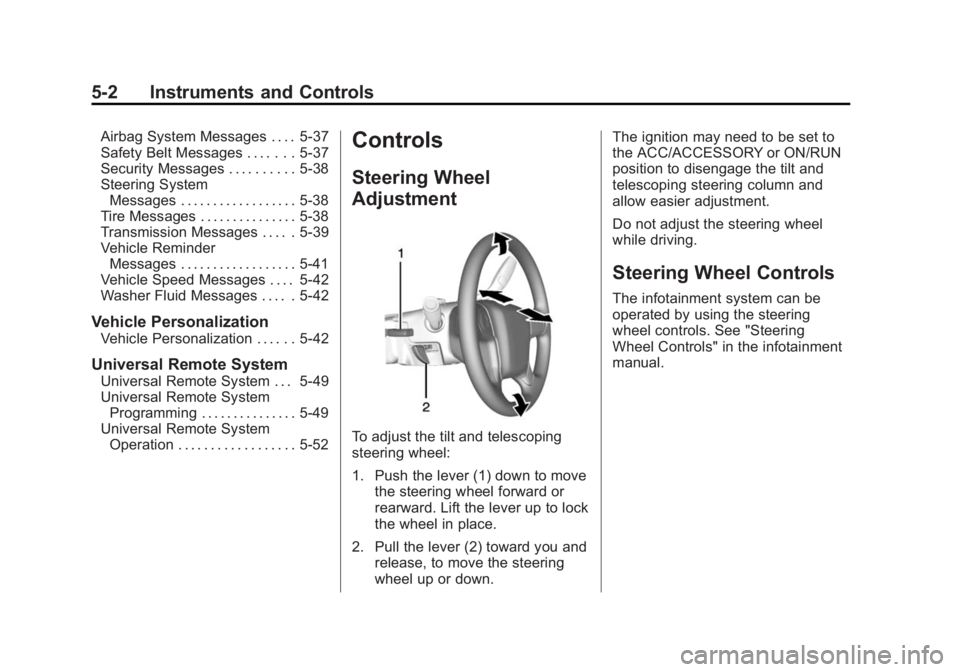
To adjust the tilt and telescoping
steering wheel:
1. Push the lever (1) down to move
the steering wheel forward or
rearward. Lift the lever up to lock
the wheel in place.
2. Pull the lever (2) toward you and
release, to move the steering
wheel up or down. The ignition may need to be set to
the ACC/ACCESSORY or ON/RUN
position to disengage the tilt and
telescoping steering column and
allow easier adjustment.
Do not adjust the steering wheel
while driving.
Steering Wheel Controls The infotainment system can be
operated by using the steering
wheel controls. See "Steering
Wheel Controls" in the infotainment
manual.
Page 112 of 439

Black plate (3,1)GMC 2015i Sierra Denali Owner Manual (GMNA-Localizing-U.S./Canada/
Mexico-8431500) - 2015 - crc - 6/20/14
Instruments and Controls 5-3
Heated Steering Wheel
( (Heated Steering Wheel): Press
to turn it on or off. A light next to the
button displays when the feature is
turned on.
The steering wheel takes about
three minutes to start heating.
Horn To sound the horn, press
a on the
steering wheel. Windshield Wiper/Washer
The windshield wiper control is on
the turn signal lever.
The windshield wipers are controlled
by turning the band with
z on it.
1 (High Speed): Fast wipes.
w (Low Speed): Slow wipes.
3 INT (Adjustable Interval
Wipes): Turn the band up for more
frequent wipes or down for less
frequent wipes.
OFF: Turns the windshield
wipers off.
8 (Mist): For a single wipe, turn
to
8 , then release. For several
wipes, hold the band on
8 longer. Clear ice and snow from the wiper
blades before using them. If frozen
to the windshield, carefully loosen or
thaw them. Damaged wiper blades
should be replaced. See Wiper
Blade Replacement on page 10-35 .
Heavy snow or ice can overload the
wiper motor. An internal circuit
breaker to the motor will stop the
motor until it cools down.
Wiper Parking
If the ignition is put in OFF while the
wipers are on
w ,
1 , or
3 INT,
they will immediately stop.
If the windshield wiper lever is then
moved to OFF before the driver
door is opened or within 10 minutes,
the wipers will restart and move to
the base of the windshield.
If the ignition is put in OFF while the
wipers are performing wipes due to
windshield washing, the wipers
continue to run until they reach the
base of the windshield.