Page 143 of 558
SITTING IN THE CORRECT POSITION
WARNING:Sitting improperly out of position or with the seat
back reclined too far can take off weight from the seat cushion
and affect the decision of the passenger sensing system, resulting in
serious injury or death in a crash. Always sit upright against your seat
back, with your feet on the floor.
WARNING: Do not recline the seat back as this can cause the
occupant to slide under the seat’s safety belt, resulting in severe
personal injury in the event of a crash.
WARNING: Do not place objects higher than the seat backs to
reduce the risk of injury in a crash or during heavy braking or
when stopping suddenly.
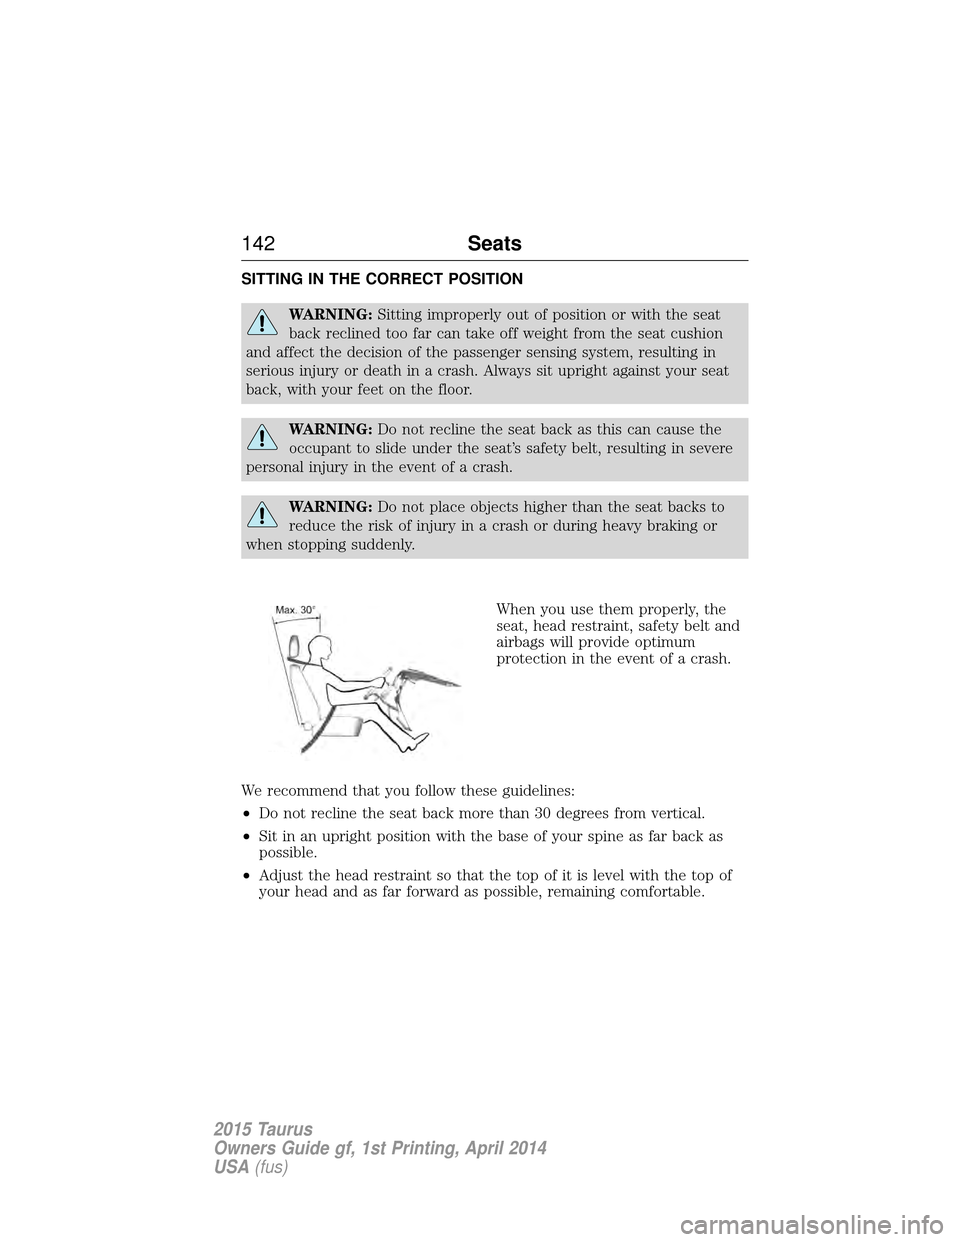
When you use them properly, the
seat, head restraint, safety belt and
airbags will provide optimum
protection in the event of a crash.
We recommend that you follow these guidelines:
• Do not recline the seat back more than 30 degrees from vertical.
• Sit in an upright position with the base of your spine as far back as
possible.
• Adjust the head restraint so that the top of it is level with the top of
your head and as far forward as possible, remaining comfortable.
142 Seats
2015 Taurus
Owners Guide gf, 1st Printing, April 2014
USA(fus)
Page 144 of 558
•Keep sufficient distance between yourself and the steering wheel. We
recommend a minimum of 10 inches (25 centimeters) between your
breastbone and the airbag cover.
• Hold the steering wheel with your arms slightly bent.
• Bend your legs slightly so that you can press the pedals fully.
• Position the shoulder strap of the safety belt over the center of your
shoulder and position the lap strap tightly across your hips.
Make sure that your driving position is comfortable and that you can
maintain full control of your vehicle.
HEAD RESTRAINTS
WARNING: To minimize the risk of neck injury in the event of a
crash, the driver and passenger occupants should not sit in or
operate the vehicle, until the head restraint is placed in its proper
position. The driver should never adjust the head restraint while the
vehicle is in motion.
WARNING: The adjustable head restraint is a safety device.
Whenever possible it should be installed and properly adjusted
when the seat is occupied. An improperly adjusted head restraint may
provide reduced protection to an occupant during certain rear impacts.
WARNING: Install the head restraint properly to minimize the
risk of neck injury in the event of a crash.
Seats 143
2015 Taurus
Owners Guide gf, 1st Printing, April 2014
USA(fus)
Page 145 of 558
Note:Before adjusting any head restraint, adjust the seat back to an
upright driving or riding position. Properly adjust the head restraint so
that the top of the head restraint is even with the top of your head and
positioned as close as possible to the back of your head. For occupants
of extremely tall stature, adjust the head restraint to its full up position.
To adjust the head restraint, do the following:
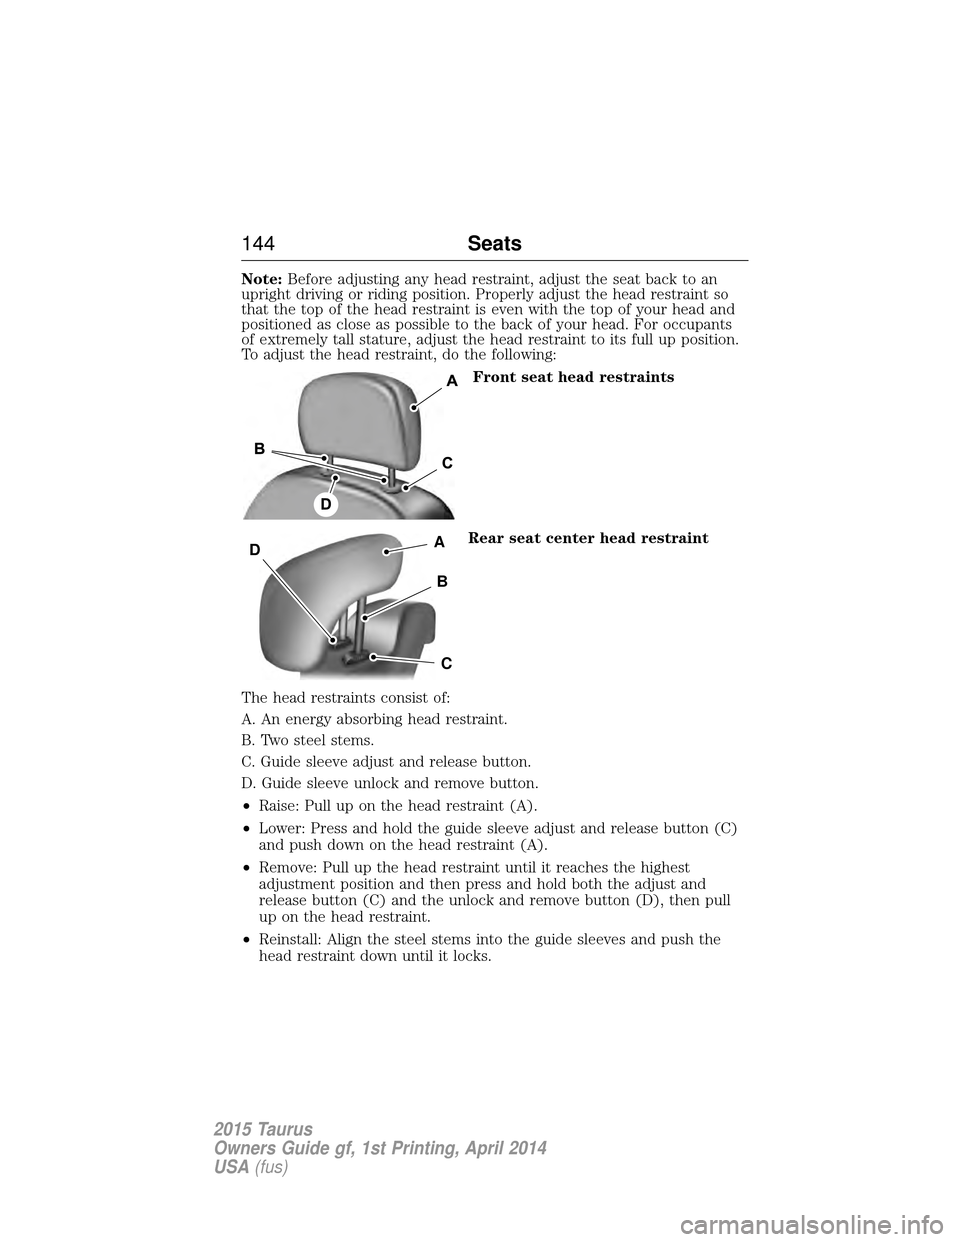
Front seat head restraints
Rear seat center head restraint
The head restraints consist of:
A. An energy absorbing head restraint.
B. Two steel stems.
C. Guide sleeve adjust and release button.
D. Guide sleeve unlock and remove button.
• Raise: Pull up on the head restraint (A).
• Lower: Press and hold the guide sleeve adjust and release button (C)
and push down on the head restraint (A).
• Remove: Pull up the head restraint until it reaches the highest
adjustment position and then press and hold both the adjust and
release button (C) and the unlock and remove button (D), then pull
up on the head restraint.
• Reinstall: Align the steel stems into the guide sleeves and push the
head restraint down until it locks.
A
B
C
D
144 Seats
2015 Taurus
Owners Guide gf, 1st Printing, April 2014
USA(fus)
Page 146 of 558
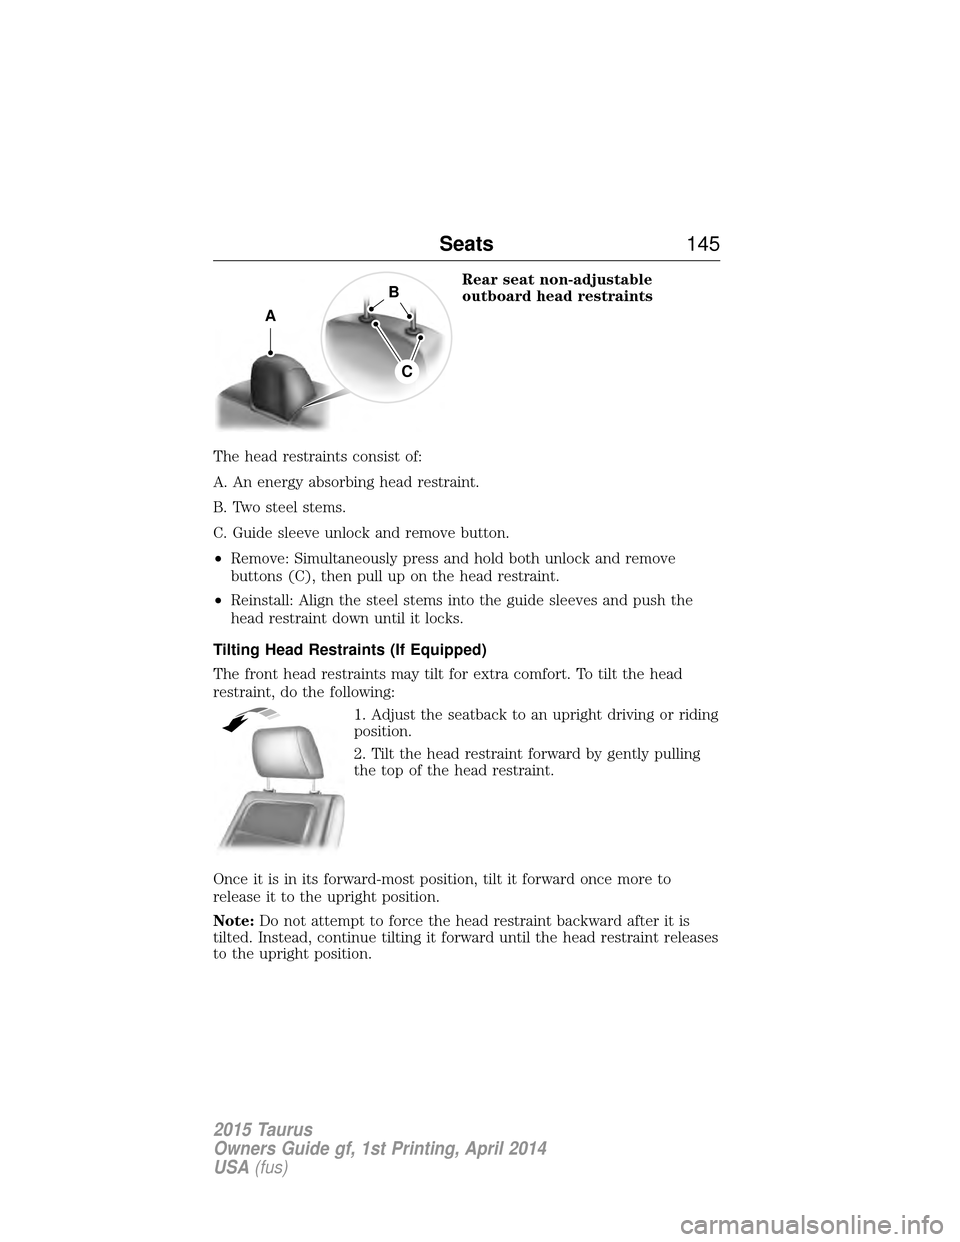
Rear seat non-adjustable
outboard head restraints
The head restraints consist of:
A. An energy absorbing head restraint.
B. Two steel stems.
C. Guide sleeve unlock and remove button.
• Remove: Simultaneously press and hold both unlock and remove
buttons (C), then pull up on the head restraint.
• Reinstall: Align the steel stems into the guide sleeves and push the
head restraint down until it locks.
Tilting Head Restraints (If Equipped)
The front head restraints may tilt for extra comfort. To tilt the head
restraint, do the following: 1. Adjust the seatback to an upright driving or riding
position.
2. Tilt the head restraint forward by gently pulling
the top of the head restraint.
Once it is in its forward-most position, tilt it forward once more to
release it to the upright position.
Note: Do not attempt to force the head restraint backward after it is
tilted. Instead, continue tilting it forward until the head restraint releases
to the upright position.
A
B
C
Seats 145
2015 Taurus
Owners Guide gf, 1st Printing, April 2014
USA(fus)
Page 147 of 558
MANUAL SEATS
WARNING:Do not adjust the driver seat or seatback while the
vehicle is moving. This may result in sudden seat movement,
causing loss of control of your vehicle.
WARNING: Rock the seat backward and forward after releasing
the lever to make sure that it is fully engaged.
Moving the seats backward and
forward
WARNING:Before returning the seatback to its original position,
make sure that cargo or any objects are not trapped behind the
seatback. After returning the seatback to its original position, pull on
the seatback to ensure that it has fully latched. An unlatched seat may
become dangerous in the event of a sudden stop or crash.
Recline adjustment
Lumbar adjustment
146Seats
2015 Taurus
Owners Guide gf, 1st Printing, April 2014
USA(fus)
Page 148 of 558
POWER SEATS (IF EQUIPPED)
WARNING:Never adjust the driver seat or seatback when the
vehicle is moving.
WARNING: Before returning the seatback to its original position,
make sure that cargo or any objects are not trapped behind the
seatback.
Note: On vehicles with memory seats, to prevent damage to the seat,
the power seats are designed to set a stopping position just short of the
end of the seat track. If the seat encounters an object while moving
forward or backward, a new stopping position will be set.
To reset the seat to its normal stopping position:
1. After encountering the new stopping position, press the power seat
control again to override.
2. Continue pressing the control until it reaches the end of the seat track.
Seats 147
2015 Taurus
Owners Guide gf, 1st Printing, April 2014
USA(fus)
Page 149 of 558
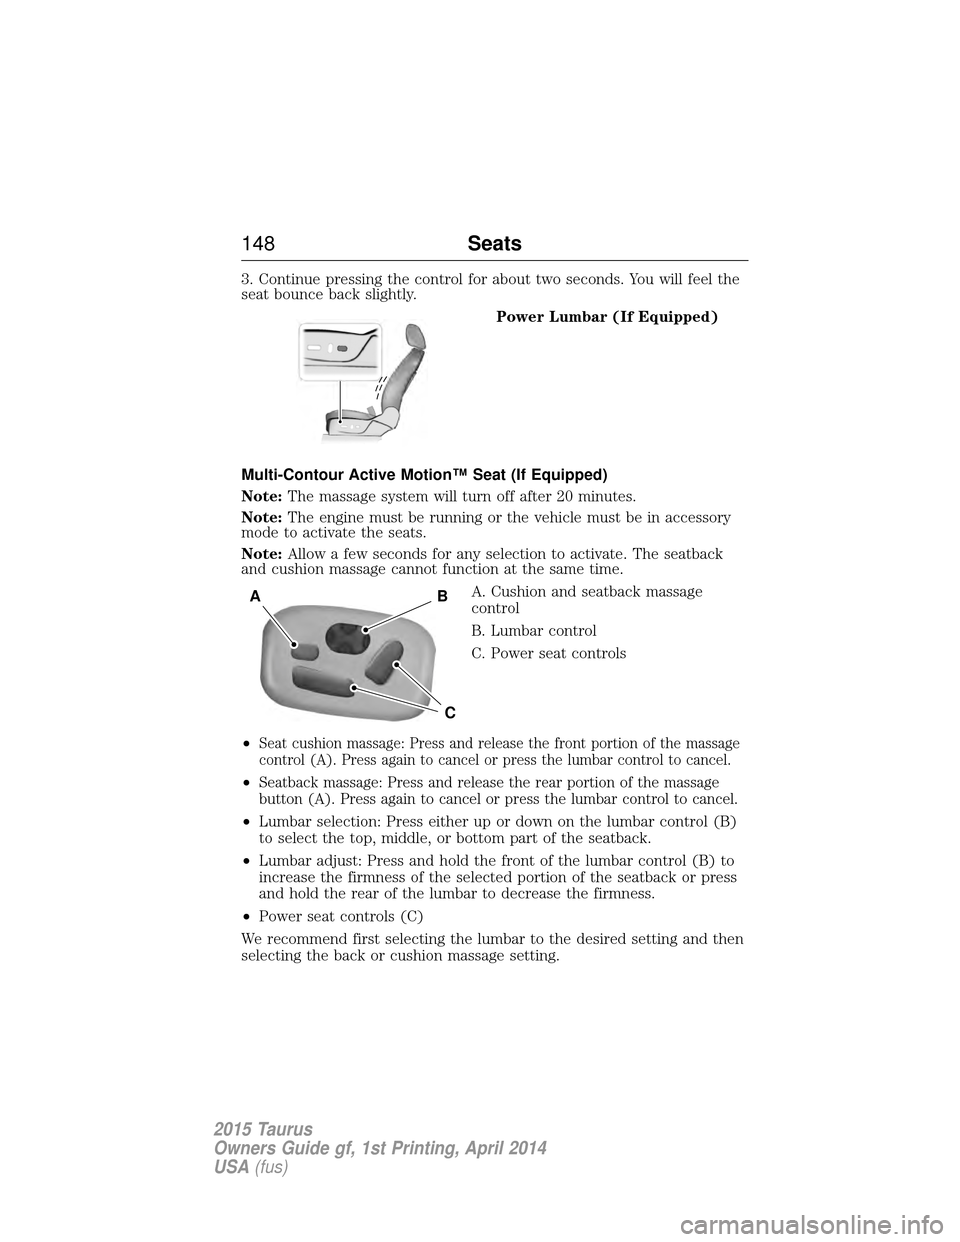
3. Continue pressing the control for about two seconds. You will feel the
seat bounce back slightly.Power Lumbar (If Equipped)
Multi-Contour Active Motion™ Seat (If Equipped)
Note: The massage system will turn off after 20 minutes.
Note: The engine must be running or the vehicle must be in accessory
mode to activate the seats.
Note: Allow a few seconds for any selection to activate. The seatback
and cushion massage cannot function at the same time.
A. Cushion and seatback massage
control
B. Lumbar control
C. Power seat controls
•
Seat cushion massage: Press and release the front portion of the massage
control (A). Press again to cancel or press the lumbar control to cancel.
•Seatback massage: Press and release the rear portion of the massage
button (A). Press again to cancel or press the lumbar control to cancel.
• Lumbar selection: Press either up or down on the lumbar control (B)
to select the top, middle, or bottom part of the seatback.
• Lumbar adjust: Press and hold the front of the lumbar control (B) to
increase the firmness of the selected portion of the seatback or press
and hold the rear of the lumbar to decrease the firmness.
• Power seat controls (C)
We recommend first selecting the lumbar to the desired setting and then
selecting the back or cushion massage setting.
BA
C
148 Seats
2015 Taurus
Owners Guide gf, 1st Printing, April 2014
USA(fus)
Page 150 of 558
MEMORY FUNCTION (if equipped)
The memory control is located on the side seat panel.
This feature will automatically recall the position of the following:
•Driver seat.
• Power mirrors.
• Optional adjustable pedals.
• Optional power tilt and telescopic steering column.
A. Type 1
B. Type 2
Programming a Memory Position
1. Switch the ignition on.
2. Adjust the memory features to your desired positions using the
associated controls.
3. Press and hold the desired preset button for about two seconds until
you hear a single tone.
You can save up to two preset memory positions. You can save a memory
preset at any time
Recalling a Memory Position
Press and release the desired memory preset button to recall a saved
memory position.
You can recall a programmed memory position:
• In any gearshift position if the ignition is not on.
• Only in park (P) or neutral (N) if the ignition is on.
AB
Seats 149
2015 Taurus
Owners Guide gf, 1st Printing, April 2014
USA(fus)