2015 FORD SUPER DUTY tow bar
[x] Cancel search: tow barPage 91 of 470
Fuel Hist.
Shows fuel usage as a bar graph based ontime. The graph is updated each minutewith the fuel economy that was achievedduring the prior 5, 10, 30 minutes of driving.
Truck Apps
In this mode, off-roadinformation depicted withgraphics and trailer towingapplication options are available.
Note:Some items are optional and maynot appear.
Truck Apps
Pitch and bank angle (in degrees)Off Road
Steering angle (in degrees)
Differential lock/unlock
Energy flow
ELD (Electronic Locking Differential)Press OK for Info
Hill Descent Control
4X4 System
Traction Control
AdvanceTrac + RSC
Active trailer name or default trailerTrailer
Accumulated trailer distance
Trailer gain and output
Trailer Disconnected
OptionsPress OK for options
Change Active Trailer
Adding a new trailer
Conventional, FifthWheel or GooseneckConnection Checklist (ifequipped)
Delete Trailer
Tow / Haul or TrailerBrake ControllerInformation Screen
88Super Duty (), enUSAInformation DisplaysE163181
Page 192 of 470
TOWING A TRAILER
WARNINGS
Do not exceed the GVWR orthe GAWR specified on thecertification label.
Towing trailers beyond themaximum recommendedgross trailer weight exceeds thelimit of the vehicle and couldresult in engine damage,transmission damage, structuraldamage, loss of vehicle control,vehicle rollover and personalinjury.
Your vehicle may have electricalitems, such as fuses or relays,related to towing. See the Fuseschapter.
Your vehicle's load capacitydesignation is by weight, not byvolume, so you cannot necessarilyuse all available space whenloading a vehicle.
Towing a trailer places an extraload on your vehicle's engine,transmission, axle, brakes, tiresand suspension. Inspect thesecomponents periodically during,and after, any towing operation.
Load Placement
To help minimize how trailermovement affects your vehiclewhen driving:
•Load the heaviest items closestto the trailer floor.
•Load the heaviest itemscentered between the left andright side trailer tires.
•Load the heaviest items abovethe trailer axles or just slightlyforward toward the trailertongue. Do not allow the finaltrailer tongue weight to goabove or below 10-15% of theloaded trailer weight.
•Select a tow bar with thecorrect rise or drop. When boththe loaded vehicle and trailerare connected, the trailer frameshould be level, or slightlyangled down toward yourvehicle, when viewed from theside.
When driving with a trailer orpayload, a slight takeoff vibrationor shudder may be present due tothe increased payload weight.Additional information regardingproper trailer loading and settingyour vehicle up for towing islocated in another chapter of thismanual. See Load Limit (page178). You can also find theinformation in the RV & TrailerTowing Guide, available at anauthorized dealer.
189Super Duty (), enUSATowing
Page 196 of 470
Chassis cab
MaximumGCWRRear axle ratioEngineVehicle
26000 lb (11793kg)4.886.8L gas
F-550 (19000/19500 lbGVWR)
26000 lb (11793kg)
4.886.7L diesel35000 lb (15875
kg)*
Calculating the MaximumLoaded Trailer Weight for YourVehicle
1.Start with the gross combinedweight rating for your vehiclemodel and axle ratio. See theprevious chart.
2.Subtract all of the followingthat apply to your vehicle:
•Vehicle curb weight
•Hitch hardware weight, such asa draw bar, ball, locks or weightdistributing hardware
•Driver weight
•Passenger(s) weight
•Payload, cargo and luggageweight
•Aftermarket equipment weight.
This equals the maximum loadedtrailer weight for this combination.
Note:The trailer tongue load isconsidered part of the payload foryour vehicle. Reduce the totalpayload by the final trailer tongueweight.
Note:Consult an authorized dealerto determine the maximum trailer
weight allowed for your vehicle ifyou are not sure.
ESSENTIAL TOWING CHECKS
Follow these guidelines for safetowing:
•Do not tow a trailer until youdrive your vehicle at least 1000miles (1600 kilometers).
•Consult your local motorvehicle laws for towing a trailer.
•See the instructions includedwith towing accessories for theproper installation andadjustment specifications.
193Super Duty (), enUSATowing
Page 199 of 470
Do not use a hitch that eitherclamps onto the bumper orattaches to the axle. You mustdistribute the load in your trailerso that 10-15% for conventionaltowing or 15-25% for fifth wheeltowing of the total weight of thetrailer is on the tongue.
Weight-distributing Hitches
WARNING
Do not adjust aweight-distributing hitch toany position where the rearbumper of the vehicle is higherthan it was before attaching thetrailer. Doing so will defeat thefunction of the weight-distributinghitch, which may causeunpredictable handling, and could
result in serious personal injury.
When hooking-up a trailer using aweight-distributing hitch, alwaysuse the following procedure:
1.Park the loaded vehicle,without the trailer, on a levelsurface.
2.Measure the height to the topof your vehicle's front wheelopening on the fender. This isH1.
3.Attach the loaded trailer toyour vehicle without theweight-distributing barsconnected.
4.Measure the height to the topof your vehicle's front wheelopening on the fender a secondtime. This is H2.
5.Install and adjust the tensionin the weight-distributing barsso that the height of yourvehicle's front wheel openingon the fender is approximatelyhalfway between H1 and H2.
6.Check that the trailer is level orslightly nose down toward yourvehicle. If not, adjust the ballheight accordingly and repeatSteps 2-6.
Once the trailer is level or slightlynose down toward the vehicle:
•Lock the bar tension adjusterin place.
•Check that the trailer tonguesecurely attaches and locksonto the hitch.
•Install safety chains, lighting,and trailer brake controls asrequired by law or the trailermanufacturer.
Fifth-wheel Trailer Hitch (IfEquipped)
WARNINGS
The mounting pads in the bedare specifically designed forcertain fifth-wheel trailer hitchesand gooseneck ball hitches. Donot use these mounting pads forother purposes. Doing so couldresult in vehicle structural
196Super Duty (), enUSATowing
Page 202 of 470
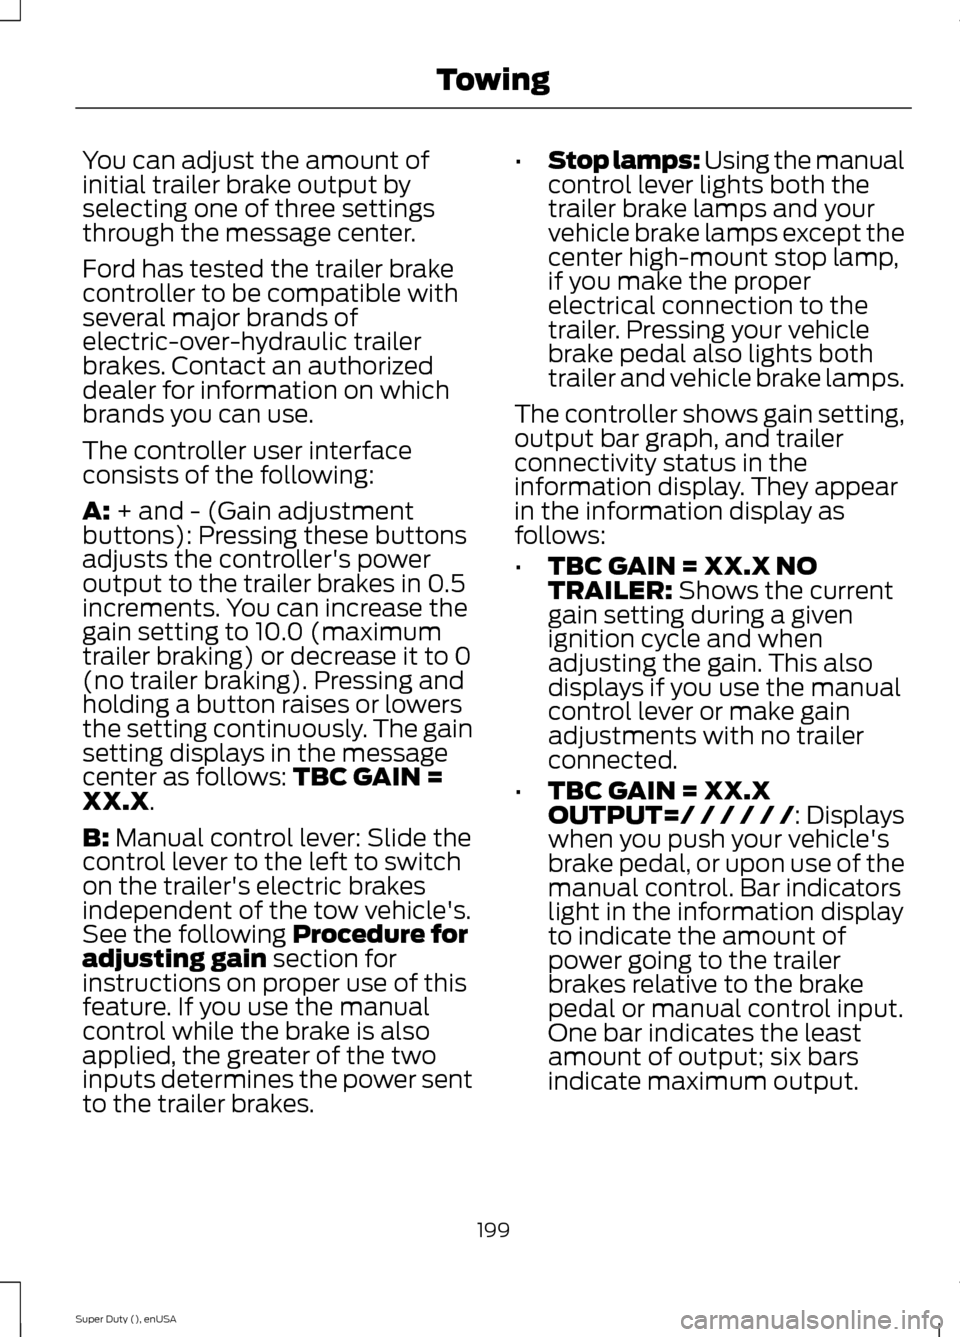
You can adjust the amount ofinitial trailer brake output byselecting one of three settingsthrough the message center.
Ford has tested the trailer brakecontroller to be compatible withseveral major brands ofelectric-over-hydraulic trailerbrakes. Contact an authorizeddealer for information on whichbrands you can use.
The controller user interfaceconsists of the following:
A: + and - (Gain adjustmentbuttons): Pressing these buttonsadjusts the controller's poweroutput to the trailer brakes in 0.5increments. You can increase thegain setting to 10.0 (maximumtrailer braking) or decrease it to 0(no trailer braking). Pressing andholding a button raises or lowersthe setting continuously. The gainsetting displays in the messagecenter as follows: TBC GAIN =XX.X.
B: Manual control lever: Slide thecontrol lever to the left to switchon the trailer's electric brakesindependent of the tow vehicle's.See the following Procedure foradjusting gain section forinstructions on proper use of thisfeature. If you use the manualcontrol while the brake is alsoapplied, the greater of the twoinputs determines the power sentto the trailer brakes.
•Stop lamps: Using the manualcontrol lever lights both thetrailer brake lamps and yourvehicle brake lamps except thecenter high-mount stop lamp,if you make the properelectrical connection to thetrailer. Pressing your vehiclebrake pedal also lights bothtrailer and vehicle brake lamps.
The controller shows gain setting,output bar graph, and trailerconnectivity status in theinformation display. They appearin the information display asfollows:
•TBC GAIN = XX.X NOTRAILER: Shows the currentgain setting during a givenignition cycle and when
adjusting the gain. This alsodisplays if you use the manualcontrol lever or make gainadjustments with no trailerconnected.
•TBC GAIN = XX.XOUTPUT=/ / / / / /: Displayswhen you push your vehicle'sbrake pedal, or upon use of themanual control. Bar indicatorslight in the information displayto indicate the amount ofpower going to the trailerbrakes relative to the brakepedal or manual control input.One bar indicates the leastamount of output; six barsindicate maximum output.
199Super Duty (), enUSATowing
Page 211 of 470
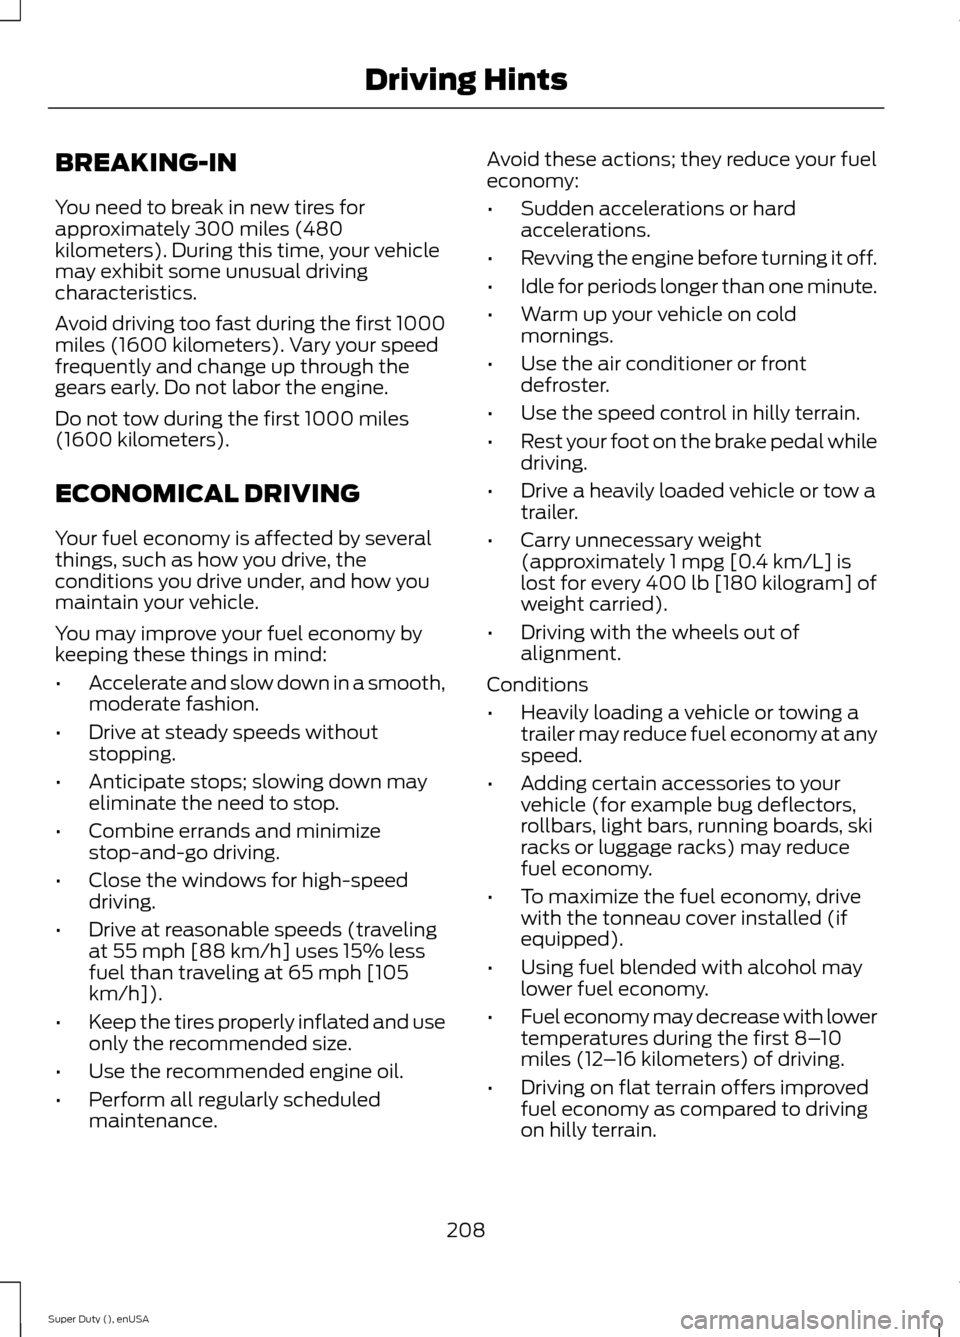
BREAKING-IN
You need to break in new tires forapproximately 300 miles (480kilometers). During this time, your vehiclemay exhibit some unusual drivingcharacteristics.
Avoid driving too fast during the first 1000miles (1600 kilometers). Vary your speedfrequently and change up through thegears early. Do not labor the engine.
Do not tow during the first 1000 miles(1600 kilometers).
ECONOMICAL DRIVING
Your fuel economy is affected by severalthings, such as how you drive, theconditions you drive under, and how youmaintain your vehicle.
You may improve your fuel economy bykeeping these things in mind:
•Accelerate and slow down in a smooth,moderate fashion.
•Drive at steady speeds withoutstopping.
•Anticipate stops; slowing down mayeliminate the need to stop.
•Combine errands and minimizestop-and-go driving.
•Close the windows for high-speeddriving.
•Drive at reasonable speeds (travelingat 55 mph [88 km/h] uses 15% lessfuel than traveling at 65 mph [105km/h]).
•Keep the tires properly inflated and useonly the recommended size.
•Use the recommended engine oil.
•Perform all regularly scheduledmaintenance.
Avoid these actions; they reduce your fueleconomy:
•Sudden accelerations or hardaccelerations.
•Revving the engine before turning it off.
•Idle for periods longer than one minute.
•Warm up your vehicle on coldmornings.
•Use the air conditioner or frontdefroster.
•Use the speed control in hilly terrain.
•Rest your foot on the brake pedal whiledriving.
•Drive a heavily loaded vehicle or tow atrailer.
•Carry unnecessary weight(approximately 1 mpg [0.4 km/L] islost for every 400 lb [180 kilogram] ofweight carried).
•Driving with the wheels out ofalignment.
Conditions
•Heavily loading a vehicle or towing atrailer may reduce fuel economy at anyspeed.
•Adding certain accessories to yourvehicle (for example bug deflectors,rollbars, light bars, running boards, skiracks or luggage racks) may reducefuel economy.
•To maximize the fuel economy, drivewith the tonneau cover installed (ifequipped).
•Using fuel blended with alcohol maylower fuel economy.
•Fuel economy may decrease with lowertemperatures during the first 8–10miles (12–16 kilometers) of driving.
•Driving on flat terrain offers improvedfuel economy as compared to drivingon hilly terrain.
208Super Duty (), enUSADriving Hints
Page 227 of 470
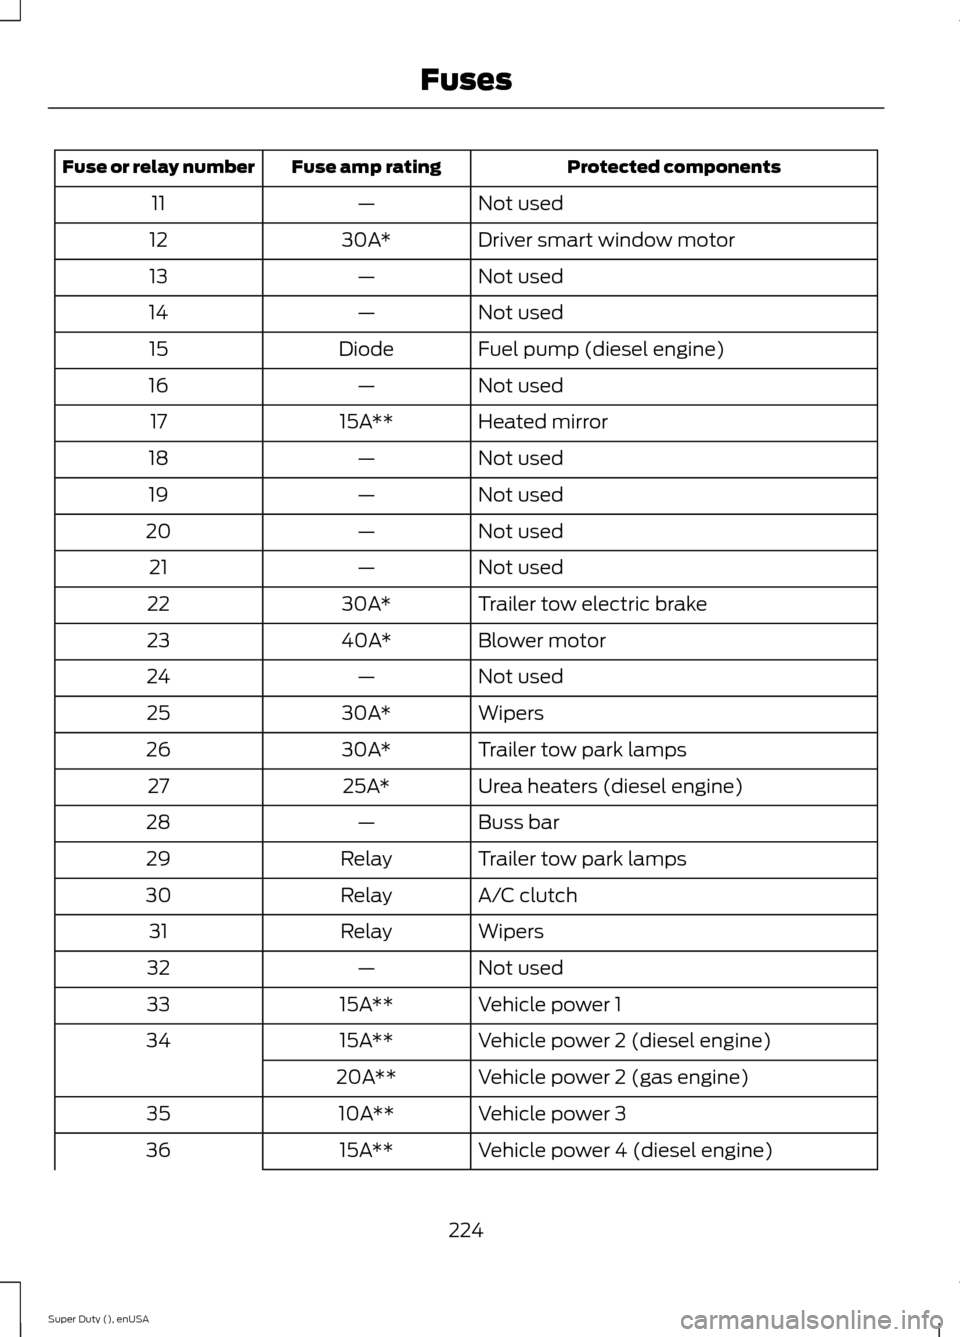
Protected componentsFuse amp ratingFuse or relay number
Not used—11
Driver smart window motor30A*12
Not used—13
Not used—14
Fuel pump (diesel engine)Diode15
Not used—16
Heated mirror15A**17
Not used—18
Not used—19
Not used—20
Not used—21
Trailer tow electric brake30A*22
Blower motor40A*23
Not used—24
Wipers30A*25
Trailer tow park lamps30A*26
Urea heaters (diesel engine)25A*27
Buss bar—28
Trailer tow park lampsRelay29
A/C clutchRelay30
WipersRelay31
Not used—32
Vehicle power 115A**33
Vehicle power 2 (diesel engine)15A**34
Vehicle power 2 (gas engine)20A**
Vehicle power 310A**35
Vehicle power 4 (diesel engine)15A**36
224Super Duty (), enUSAFuses
Page 231 of 470
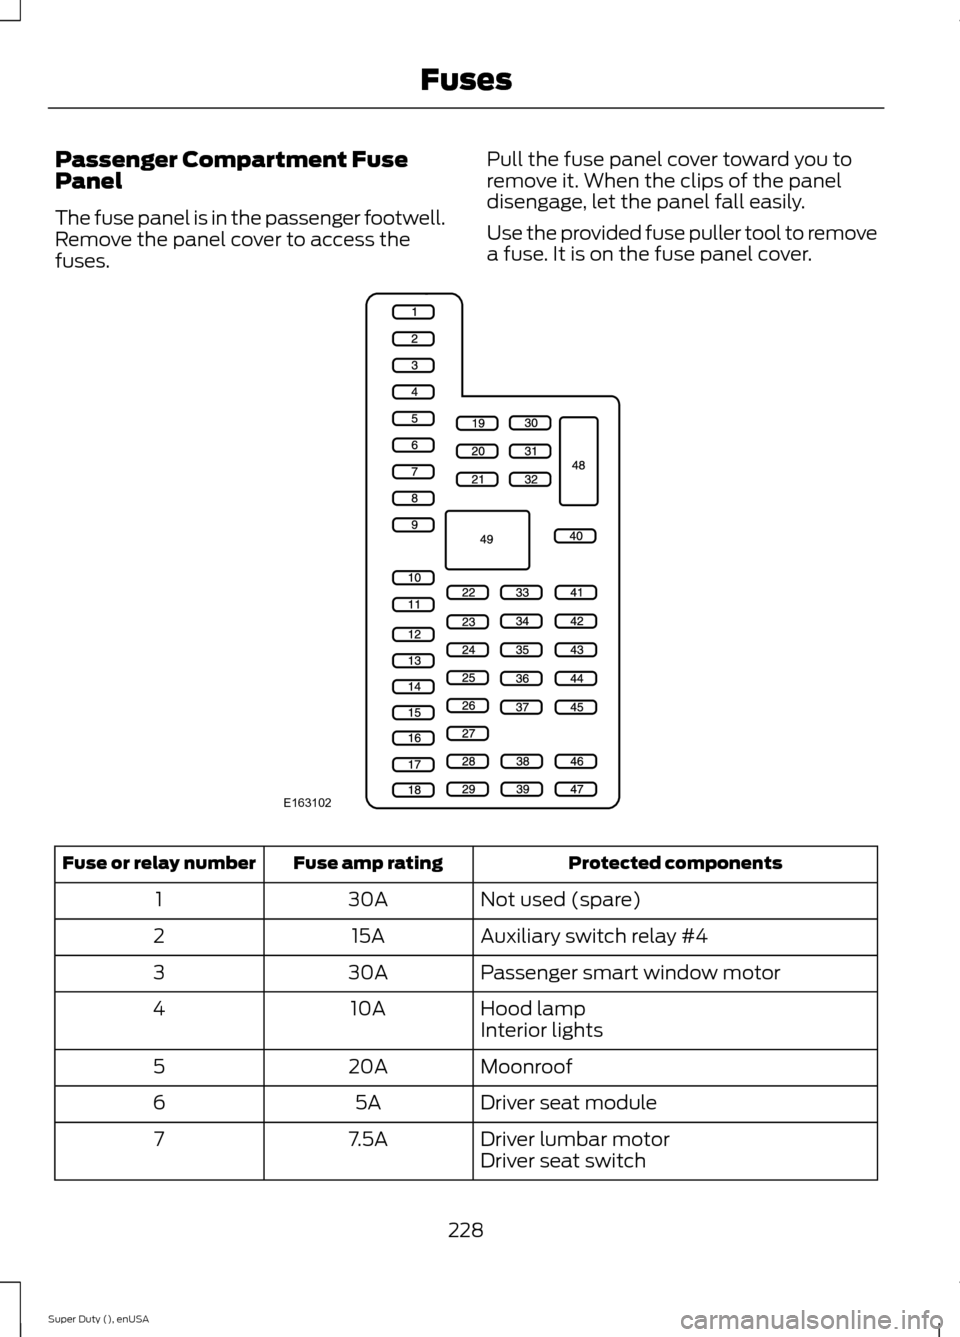
Passenger Compartment FusePanel
The fuse panel is in the passenger footwell.Remove the panel cover to access thefuses.
Pull the fuse panel cover toward you toremove it. When the clips of the paneldisengage, let the panel fall easily.
Use the provided fuse puller tool to removea fuse. It is on the fuse panel cover.
Protected componentsFuse amp ratingFuse or relay number
Not used (spare)30A1
Auxiliary switch relay #415A2
Passenger smart window motor30A3
Hood lamp10A4Interior lights
Moonroof20A5
Driver seat module5A6
Driver lumbar motor7.5A7Driver seat switch
228Super Duty (), enUSAFusesE163102