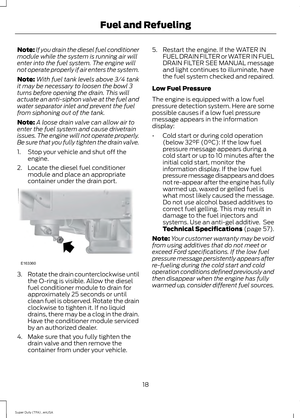
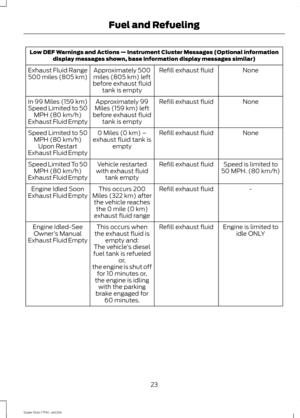
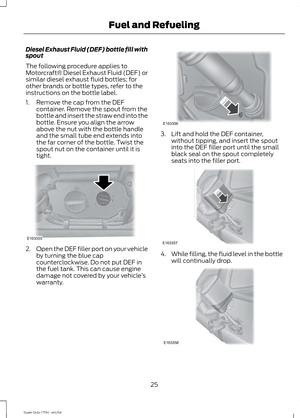
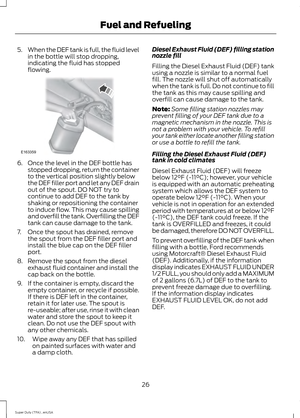
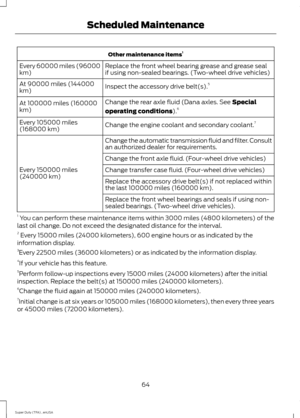
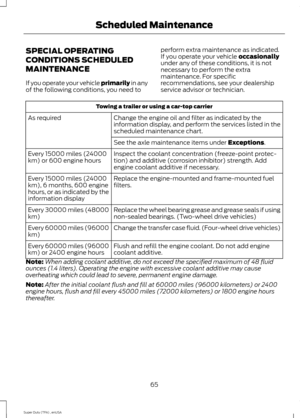
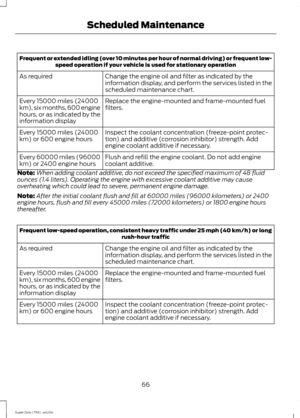
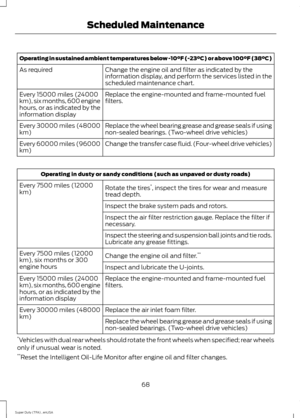
Page 49 of 84

WARNINGS
To reduce the risk of personal injury,
make sure the engine is cool before
unscrewing the coolant pressure
relief cap. The cooling system is under
pressure; steam and hot liquid can come
out forcefully when the cap is loosened
slightly. Do not add coolant further than the
MAX mark.
Note:
Do not use stop leak pellets, cooling
system sealants, or additives as they can
cause damage to the engine cooling or
heating systems. This damage would not
be covered under your vehicle ’s warranty.
Note: During normal vehicle operation, the
engine coolant may change color from
orange to pink or light red. As long as the
engine coolant is clear and uncontaminated,
this color change does not indicate the
engine coolant has degraded nor does it
require the engine coolant to be drained, the
system to be flushed, or the engine coolant
to be replaced. •
Do not mix different colors or types of
coolant in your vehicle. Make sure the
correct coolant is used. Mixing of
engine coolants may harm your
engine ’s cooling system. The use of an
improper coolant may harm engine and
cooling system components and may
void the warranty. Use engine coolant
meeting the Ford specification. See
Capacities and Specifications (page
55).
• In case of emergency, a large amount
of water without engine coolant may
be added in order to reach a vehicle
service location. In this instance, the
cooling system must be drained,
chemically cleaned with Motorcraft
Premium Cooling System Flush, and
refilled with prediluted engine coolant
as soon as possible. Water alone
(without engine coolant) can cause
engine damage from corrosion,
overheating or freezing.
• Do not use alcohol, methanol, brine or
any engine coolants mixed with alcohol
or methanol antifreeze (coolant).
Alcohol and other liquids can cause
engine damage from overheating or
freezing.
• Do not add extra inhibitors or additives
to the coolant. These can be harmful
and compromise the corrosion
protection of the engine coolant.
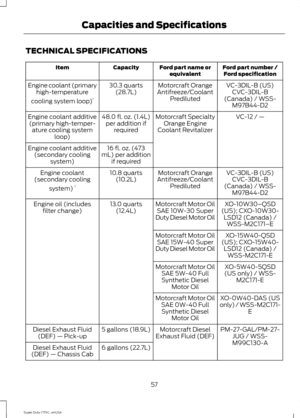
Add prediluted engine coolant meeting the
Ford specification (Motorcraft Orange
Antifreeze/Coolant Prediluted). See
Technical Specifications
(page 57).
Note: Generic coolants marketed for all
makes and models may not meet the Ford
specification and may cause damage to the
cooling system. This damage may void the
warranty.
46
Super Duty (TFA) , enUSA Maintenance
Page 50 of 84

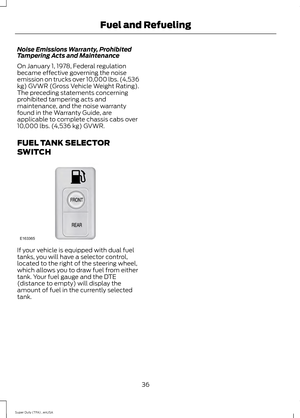
For vehicles with overflow coolant systems
with a non-pressurized cap on the coolant
recovery system, add coolant to the
coolant recovery reservoir when the engine
is cool. Add prediluted engine coolant
(Motorcraft Orange Antifreeze/Coolant
Prediluted) to the FULL COLD level. For all
other vehicles which have a coolant degas
system with a pressurized cap, or if it is
necessary to remove the coolant pressure
relief cap on the radiator of a vehicle with
an overflow system, follow these steps to
add engine coolant.
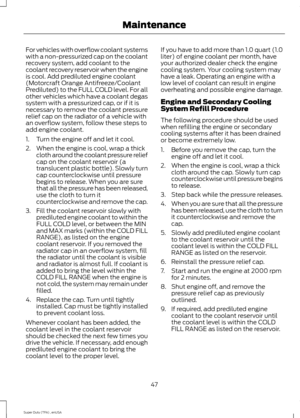
1. Turn the engine off and let it cool.
2. When the engine is cool, wrap a thick
cloth around the coolant pressure relief
cap on the coolant reservoir (a
translucent plastic bottle). Slowly turn
cap counterclockwise until pressure
begins to release. When you are sure
that all the pressure has been released,
use the cloth to turn it
counterclockwise and remove the cap.
3. Fill the coolant reservoir slowly with prediluted engine coolant to within the
FULL COLD level, or between the MIN
and MAX marks (within the COLD FILL
RANGE), as listed on the engine
coolant reservoir. If you removed the
radiator cap in an overflow system, fill
the radiator until the coolant is visible
and radiator is almost full. If coolant is
added to bring the level within the
COLD FILL RANGE when the engine is
not cold, the system may remain under
filled.
4. Replace the cap. Turn until tightly installed. Cap must be tightly installed
to prevent coolant loss.
Whenever coolant has been added, the
coolant level in the coolant reservoir
should be checked the next few times you
drive the vehicle. If necessary, add enough
prediluted engine coolant to bring the
coolant level to the proper level. If you have to add more than 1.0 quart (1.0
liter) of engine coolant per month, have
your authorized dealer check the engine
cooling system. Your cooling system may
have a leak. Operating an engine with a
low level of coolant can result in engine
overheating and possible engine damage.
Engine and Secondary Cooling
System Refill Procedure
The following procedure should be used
when refilling the engine or secondary
cooling systems after it has been drained
or become extremely low.
1. Before you remove the cap, turn the
engine off and let it cool.
2. When the engine is cool, wrap a thick cloth around the cap. Slowly turn cap
counterclockwise until pressure begins
to release.
3. Step back while the pressure releases.
4. When you are sure that all the pressure
has been released, use the cloth to turn
it counterclockwise and remove the
cap.
5. Slowly add prediluted engine coolant to the coolant reservoir until the
coolant level is within the COLD FILL
RANGE as listed on the reservoir.
6. Reinstall the pressure relief cap.
7. Start and run the engine at 2000 rpm for 2 minutes.
8. Shut engine off, and remove the pressure relief cap as previously
outlined.
9. If required, add prediluted engine coolant to the coolant reservoir until
the coolant level is within the COLD
FILL RANGE as listed on the reservoir.
47
Super Duty (TFA) , enUSA Maintenance
Page 51 of 84
 AND the upper radiator
hose at the radiator is warm to the
touch (indicating tha")
10.
Engine cooling system: Repeat
Step 5 until the coolant level has
stabilized (is no longer dropping after
each step) AND the upper radiator
hose at the radiator is warm to the
touch (indicating that the engine
thermostat is open and coolant is
flowing through the radiator).
Secondary cooling system: Repeat
Step 5 until the coolant level has
stabilized (is no longer dropping after
each step) AND the lower passenger
side of the secondary radiator is
warm to the touch (indicating
secondary thermostat is open and
coolant is flowing through the entire
system).
11. Reinstall the pressure relief cap. Shut
the engine off and let it cool.
12. Check the coolant level in the reservoir before you drive your vehicle
the next few times (with the engine
cool).
13. If necessary, add prediluted engine coolant to the coolant reservoir until
the coolant level is within the COLD
FILL RANGE as listed on the reservoir.
After any coolant has been added,
check the coolant concentration. See
Adding Engine Coolant
earlier in
the chapter for more information.
Whenever coolant has been added, the
coolant level in the reservoir should be
checked the next few times you drive the
vehicle. If needed, add prediluted engine
coolant to bring the coolant level to the
proper level on the reservoir.
Recycled Engine Coolant
Ford Motor Company does not recommend
the use of recycled engine coolant since a
Ford-approved recycling process is not yet
available. Used engine coolant should be disposed
of in an appropriate manner. Follow your
community
’s regulations and standards
for recycling and disposing of automotive
fluids.
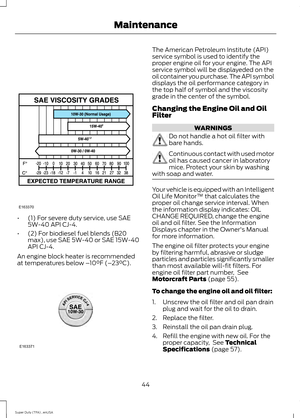
Severe Climates
If you drive in extremely cold climates:
• It may be necessary to have a Ford
authorized dealer increase the coolant
concentration above 50%.
• A coolant concentration of 60% will
provide improved freeze point
protection. Engine coolant
concentrations above 60% will
decrease the overheat protection
characteristics of the engine coolant
and may cause engine damage.
If you drive in extremely hot climates:
• It may be necessary to have a Ford
authorized dealer decrease the coolant
concentration to 40%.
• A coolant concentration of 40% will
provide improved overheat protection.
Engine coolant concentrations below
40% will decrease the corrosion/freeze
protection characteristics of the engine
coolant and may cause engine
damage.
Vehicles driven year-round in non-extreme
climates should use prediluted engine
coolant for optimum cooling system and
engine protection.
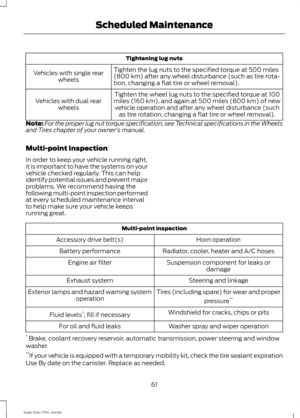
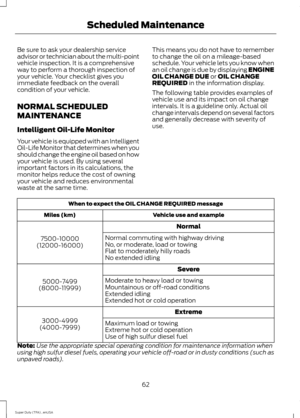
Checking Coolant Corrosion
Inhibitor Additive Strength
At specific mileage intervals of 15000
miles (24000 km), as listed in the
scheduled maintenance information
chapter, the coolant corrosion inhibitor
additive should be checked. The optional
information display, if equipped, will also
display the message CHECK COOLANT
ADDITIVE at this time. The purpose of
checking is to verify the correct engine
48
Super Duty (TFA) , enUSA Maintenance
Page 52 of 84
 and corrosion inhibitor additive
level (strength) of the coolant for
maximum engine performance and
protection. Three products are available
to confirm")
coolant concentration (freeze point
protection) and corrosion inhibitor additive
level (strength) of the coolant for
maximum engine performance and
protection. Three products are available
to confirm the life and health of the
coolant: one tool, a test kit and a coolant
inhibitor additive:
•
Rotunda tool 300–ROB75240
available from your dealer –
recommended refractometer to test
coolant concentration.
• Rotunda 328-R071–ELC (Antifreeze
Coolant ELC Contamination Kit) –
Evaluates the corrosion inhibitor
additive strength. Note the first step is
to verify the vehicle ’s coolant
concentration is in the correct range of
40 – 60%. Coolant concentrations
outside this range will not provide valid
test results. If the report results in a
pass (i.e., the cooling system does not
show excessive contamination/the
corrosion inhibitor additive strength is
sufficient), no action is required. If the
report results as insufficient (does not
pass), the corrosion inhibitor additive
strength of the coolant is too low. If the
ENGINE COOLING SYSTEM corrosion
inhibitor additive strength is low, add
48 fluid oz. of Motorcraft Specialty
Orange Engine Coolant Revitalizer. If
the SECONDARY COOLING SYSTEM
corrosion inhibitor additive strength is
low, add 16 fluid oz. of Motorcraft
Specialty Orange Engine Coolant
Revitalizer.
• Motorcraft Specialty Orange Engine
Coolant Revitalizer
– Additive to
boost the corrosion inhibitor level
based upon the test results of the
Antifreeze Coolant ELC Contamination
Kit. The Revitalizer may be added two
times over the life of the coolant. If
additional dosages are required, the
cooling system must be flushed and
refilled per the instructions in the
Workshop Manual.
See
Capacities and Specifications
(page 55). for the proper coolant and
additive specifications.
49
Super Duty (TFA) , enUSA Maintenance
Page 53 of 84

Coolant Change
At specific mileage intervals, as listed in
the scheduled maintenance information,
the coolant should be changed. The
optional information display, if equipped,
will also display the message COOLANT
CHANGE REQUIRED at this time.
See Capacities and Specifications
(page 55). for the proper coolant.
Engine-driven Cooling Fan (Fan
Clutch)
Your vehicle is equipped with an engine
driven cooling fan drive (also called a fan
clutch). This fan drive changes the fan
speed to match the vehicle ’s changing
cooling air flow requirements. Fan speed,
fan noise level and fuel consumption all
will increase based on the driving
conditions that include trailer towing, hill
climbing, heavy loads, high speed and high
ambient temperature, individually or in
combination.
The fan drive is designed to provide the
minimum fan speed (and resulting
minimum fan noise and fuel consumption)
required to meet the ever changing vehicle
cooling air flow requirements. You will hear
the amount of fan noise increasing and
decreasing as the engine power
requirements and vehicle driving conditions
change as you drive. This is to be expected
as being normal to the operation of your
vehicle. High levels of fan noise might also
be heard when your engine is first started,
and should normally decrease after driving
for a short time. CHANGING THE ENGINE AIR
FILTER
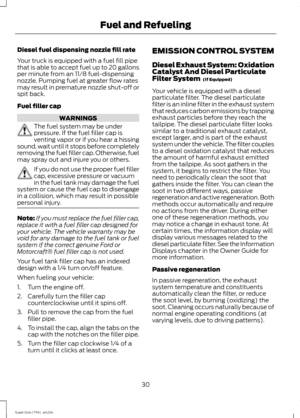
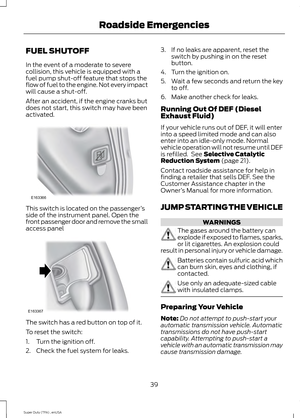
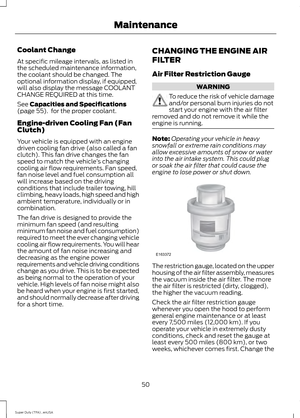
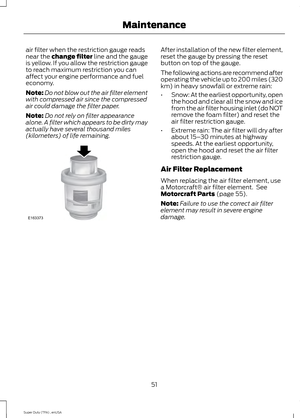
Air Filter Restriction Gauge WARNING
To reduce the risk of vehicle damage
and/or personal burn injuries do not
start your engine with the air filter
removed and do not remove it while the
engine is running. Note:
Operating your vehicle in heavy
snowfall or extreme rain conditions may
allow excessive amounts of snow or water
into the air intake system. This could plug
or soak the air filter that could cause the
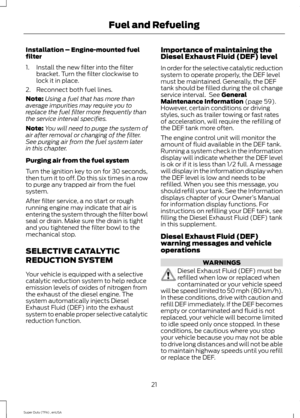
engine to lose power or shut down. The restriction gauge, located on the upper
housing of the air filter assembly, measures
the vacuum inside the air filter. The more
the air filter is restricted (dirty, clogged),
the higher the vacuum reading.
Check the air filter restriction gauge
whenever you open the hood to perform
general engine maintenance or at least
every 7,500 miles (12,000 km). If you
operate your vehicle in extremely dusty
conditions, check and reset the gauge at
least every 500 miles (800 km), or two
weeks, whichever comes first. Change the
50
Super Duty (TFA) , enUSA MaintenanceE163372
Page 54 of 84

air filter when the restriction gauge reads
near the change filter line and the gauge
is yellow. If you allow the restriction gauge
to reach maximum restriction you can
affect your engine performance and fuel
economy.
Note:
Do not blow out the air filter element
with compressed air since the compressed
air could damage the filter paper.
Note: Do not rely on filter appearance
alone. A filter which appears to be dirty may
actually have several thousand miles
(kilometers) of life remaining. After installation of the new filter element,
reset the gauge by pressing the reset
button on top of the gauge.
The following actions are recommend after
operating the vehicle up to 200 miles (320
km) in heavy snowfall or extreme rain:
•
Snow: At the earliest opportunity, open
the hood and clear all the snow and ice
from the air filter housing inlet (do NOT
remove the foam filter) and reset the
air filter restriction gauge.
• Extreme rain: The air filter will dry after
about 15– 30 minutes at highway
speeds. At the earliest opportunity,
open the hood and reset the air filter
restriction gauge.
Air Filter Replacement
When replacing the air filter element, use
a Motorcraft® air filter element. See
Motorcraft Parts (page 55).
Note: Failure to use the correct air filter
element may result in severe engine
damage.
51
Super Duty (TFA) , enUSA MaintenanceE163373
Page 55 of 84
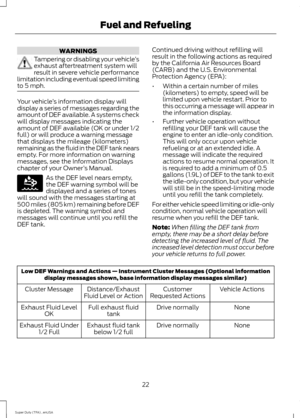
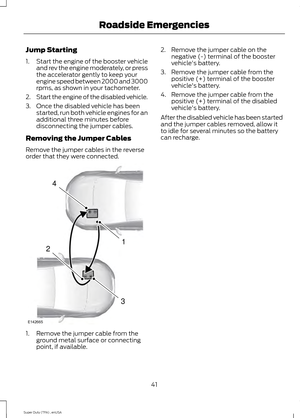
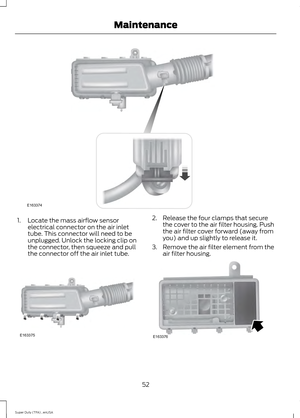
1. Locate the mass airflow sensor
electrical connector on the air inlet
tube. This connector will need to be
unplugged. Unlock the locking clip on
the connector, then squeeze and pull
the connector off the air inlet tube. 2. Release the four clamps that secure
the cover to the air filter housing. Push
the air filter cover forward (away from
you) and up slightly to release it.
3. Remove the air filter element from the
air filter housing. 52
Super Duty (TFA) , enUSA MaintenanceE163374 E163375 E163376
Page 56 of 84
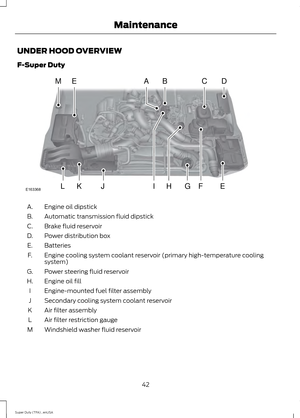
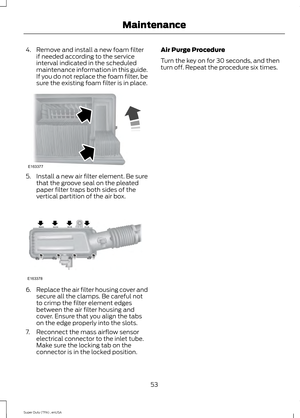
4. Remove and install a new foam filter
if needed according to the service
interval indicated in the scheduled
maintenance information in this guide.
If you do not replace the foam filter, be
sure the existing foam filter is in place. 5. Install a new air filter element. Be sure
that the groove seal on the pleated
paper filter traps both sides of the
vertical partition of the air box. 6.
Replace the air filter housing cover and
secure all the clamps. Be careful not
to crimp the filter element edges
between the air filter housing and
cover. Ensure that you align the tabs
on the edge properly into the slots.
7. Reconnect the mass airflow sensor electrical connector to the inlet tube.
Make sure the locking tab on the
connector is in the locked position. Air Purge Procedure
Turn the key on for 30 seconds, and then
turn off. Repeat the procedure six times.
53
Super Duty (TFA) , enUSA MaintenanceE163377 E163378