Page 186 of 401

FLOOR MATS (IF EQUIPPED)
WARNING:Always use floor mats that are designed to fit the
foot well of your vehicle. Only use floor mats that leave the pedal
area unobstructed. Only use floor mats that are firmly secured to
retention posts so that they cannot slip out of position and interfere
with the pedals or impair safe operation of your vehicle in other ways.
•Incorrectly fitted floor mats can cause the accelerator pedal to
become stuck in the open position. This can cause loss of vehicle
control.
•Always correctly install the floor mats to the retention posts so that
they cannot slip out of position or obstruct pedal operation.
•Do not place unsecured floor mats or any other covering in the foot
well.
•Do not place additional floor mats or any other covering on top of
the original floor mats. This will reduce the pedal clearance and
interfere with the pedal operation.
•Do not allow objects to fall or become trapped under the pedals of
your vehicle. This can cause loss of vehicle control.
•Carry out regular inspections to make sure the floor mats are secure.
To install the floor mats, position the floor mat eyelet over the retention
post and press down to lock in position.
Remove in reverse order.
Driving Hints185
2015 Police(pol)
Owners Guide gf, 2nd Printing, April 2015
USA(fus)
Page 195 of 401

IN CALIFORNIA (U.S. ONLY)
California Civil Code Section 1793.2(d) requires that, if a manufacturer
or its representative is unable to repair a motor vehicle to conform to the
vehicle’s applicable express warranty after a reasonable number of
attempts, the manufacturer shall be required to either replace the
vehicle with one substantially identical or repurchase the vehicle and
reimburse the buyer in an amount equal to the actual price paid or
payable by the consumer (less a reasonable allowance for consumer
use). The consumer has the right to choose whether to receive a refund
or replacement vehicle.
California Civil Code Section 1793.22(b) presumes that the manufacturer
has had a reasonable number of attempts to conform the vehicle to its
applicable express warranties if, within the first 18 months of ownership
of a new vehicle or the first 18000 mi (29 000 km), whichever occurs
first:
1. Two or more repair attempts are made on the same nonconformity
likely to cause death or serious bodily injury OR
2. Four or more repair attempts are made on the same nonconformity (a
defect or condition that substantially impairs the use, value or safety of
the vehicle) OR
3. The vehicle is out of service for repair of nonconformities for a total of
more than 30 calendar days (not necessarily all at one time).
In the case of 1 or 2 above, the consumer must also notify the
manufacturer of the need for the repair of the nonconformity at the
following address:
Ford Motor Company
16800 Executive Plaza Drive
Mail Drop 3NE-B
Dearborn, MI 48126
You are required to submit your warranty dispute to BBB AUTO LINE
before asserting in court any rights or remedies conferred by California
Civil Code Section 1793.22(b). You are also required to use BBB AUTO
LINE before exercising rights or seeking remedies created by the Federal
Magnuson-Moss Warranty Act, 15 U.S.C. sec. 2301 et seq. If you choose
to seek redress by pursuing rights and remedies not created by California
Civil Code Section 1793.22(b) or the Magnuson-Moss Warranty Act,
resorting to BBB AUTO LINE is not required by those statutes.
194Customer Assistance
2015 Police(pol)
Owners Guide gf, 2nd Printing, April 2015
USA(fus)
Page 213 of 401
Utility
1. Inside the vehicle, pull the hood release handle located under the
bottom left corner of the instrument panel.
2. Go to the front of the vehicle and release the auxiliary latch that is
located under the front center of the hood.
3. Raise the hood and support it with the prop rod.
4. Lower and secure the prop rod in the clip.
5. Lower the hood and allow it to drop the last 8 to 11 inches (20 to 30
centimeters).
Note:Make sure the hood is properly closed.
212Maintenance
2015 Police(pol)
Owners Guide gf, 2nd Printing, April 2015
USA(fus)
Page 234 of 401

Changing the air filter element
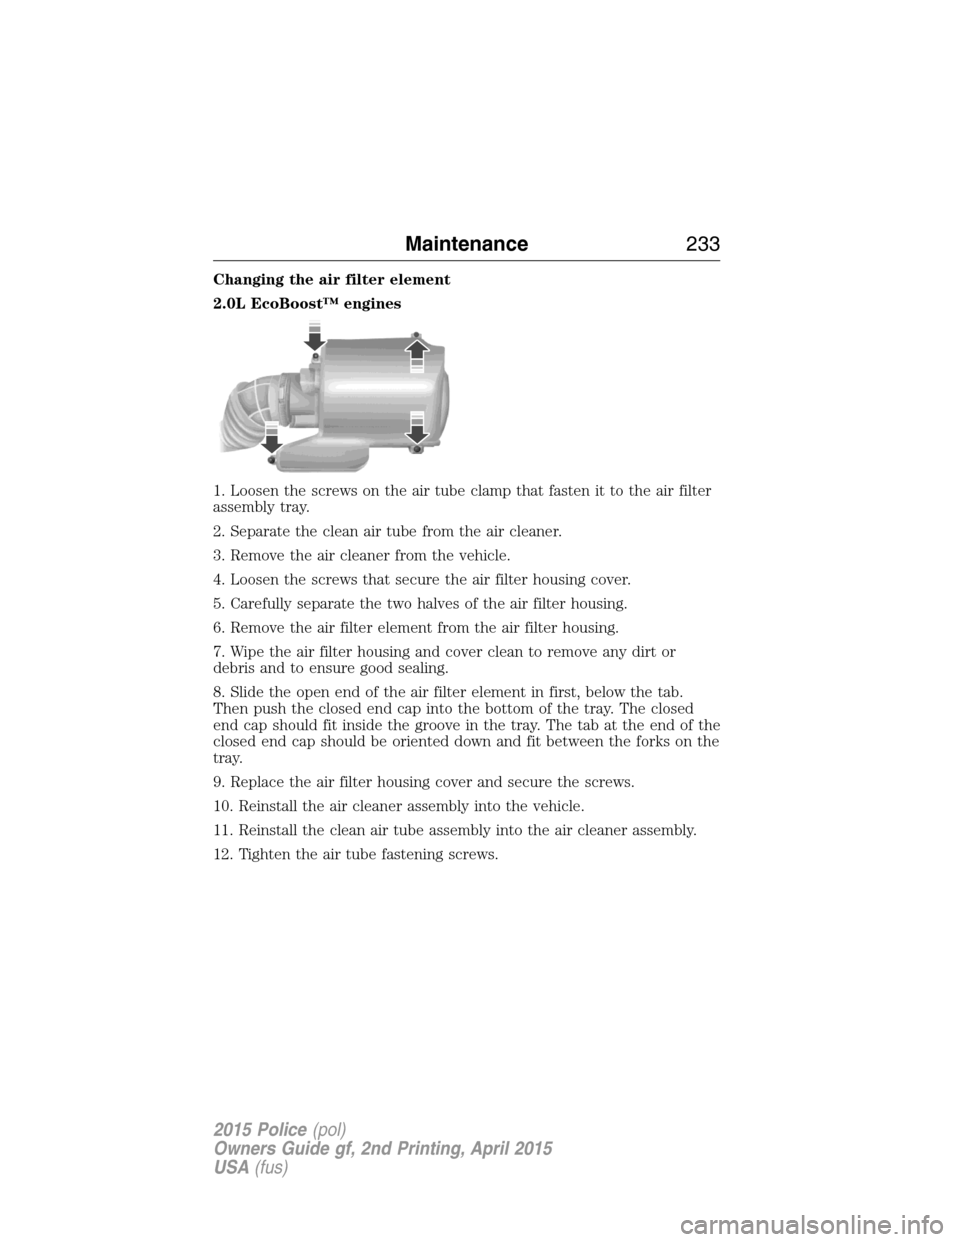
2.0L EcoBoost™ engines
1. Loosen the screws on the air tube clamp that fasten it to the air filter
assembly tray.
2. Separate the clean air tube from the air cleaner.
3. Remove the air cleaner from the vehicle.
4. Loosen the screws that secure the air filter housing cover.
5. Carefully separate the two halves of the air filter housing.
6. Remove the air filter element from the air filter housing.
7. Wipe the air filter housing and cover clean to remove any dirt or
debris and to ensure good sealing.
8. Slide the open end of the air filter element in first, below the tab.
Then push the closed end cap into the bottom of the tray. The closed
end cap should fit inside the groove in the tray. The tab at the end of the
closed end cap should be oriented down and fit between the forks on the
tray.
9. Replace the air filter housing cover and secure the screws.
10. Reinstall the air cleaner assembly into the vehicle.
11. Reinstall the clean air tube assembly into the air cleaner assembly.
12. Tighten the air tube fastening screws.
Maintenance233
2015 Police(pol)
Owners Guide gf, 2nd Printing, April 2015
USA(fus)
Page 235 of 401
Changing the air filter element
3.5L V6 engine, 3.5L EcoBoost and 3.7L engines
3.5L V6 engine shown, 3.5L
EcoBoost and 3.7L engines similar
1. Release the clamps that secure the air filter housing cover.
2. Carefully separate the two halves of the air filter housing.
3. Remove the air filter element from the air filter housing.
4. Wipe the air filter housing and cover clean to remove any dirt or
debris and to ensure good sealing.
5. Install a new air filter element. Be careful not to crimp the filter
element edges between the air filter housing and cover. This could cause
filter damage and allow unfiltered air to enter the engine if not properly
seated.
6. Replace the air filter housing cover and secure the clamps. Be sure
that the air cleaner cover tabs are engaged into the slots of the air
cleaner housing.
234Maintenance
2015 Police(pol)
Owners Guide gf, 2nd Printing, April 2015
USA(fus)
Page 245 of 401

Replacing turn/backup lamp bulbs (Utility)
The turn/backup lamp bulbs are located in the same area of the tail lamp
assembly, one below the other. Follow the same steps to replace these
bulbs:
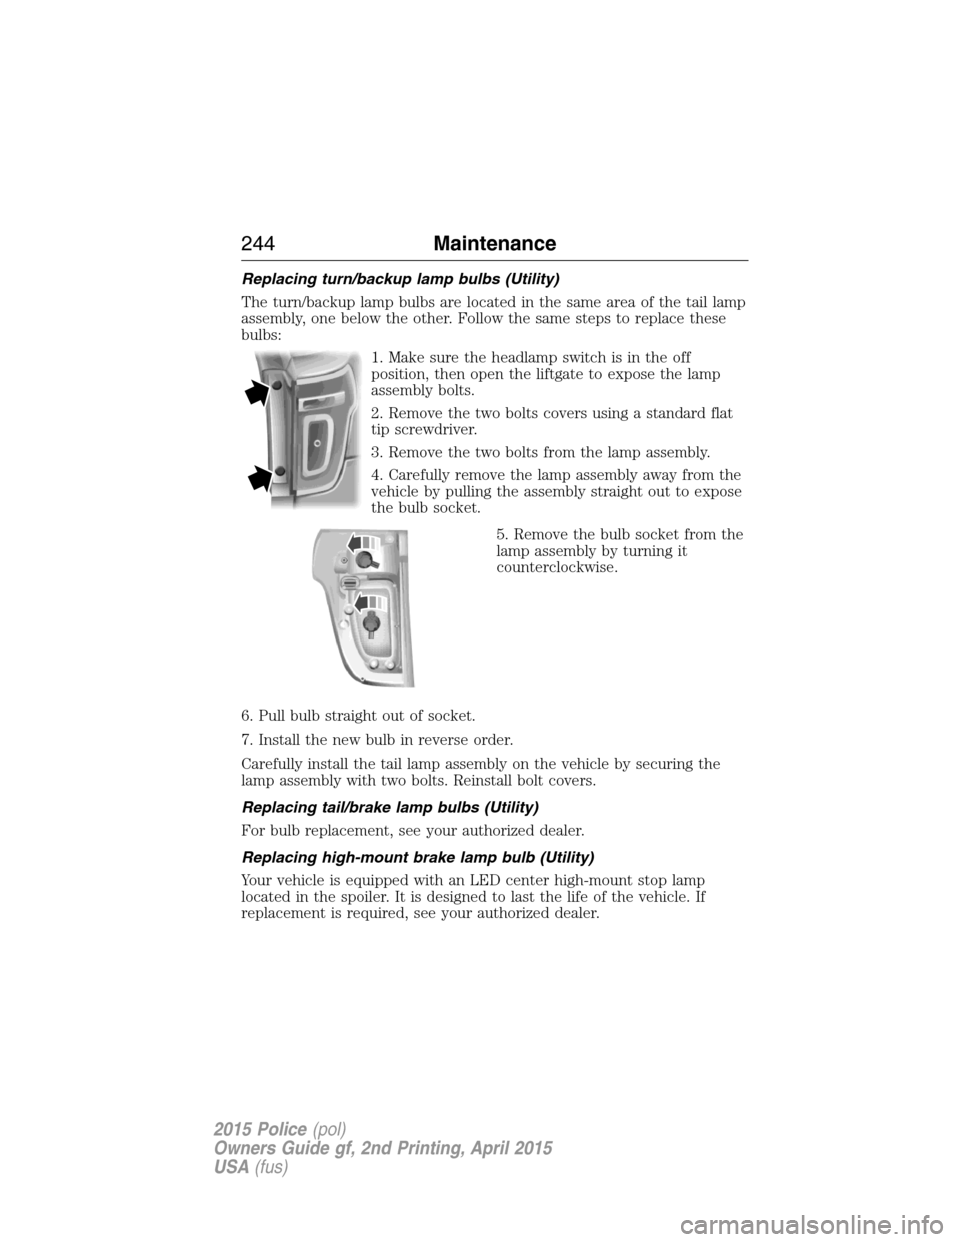
1. Make sure the headlamp switch is in the off
position, then open the liftgate to expose the lamp
assembly bolts.
2. Remove the two bolts covers using a standard flat
tip screwdriver.
3. Remove the two bolts from the lamp assembly.
4. Carefully remove the lamp assembly away from the
vehicle by pulling the assembly straight out to expose
the bulb socket.
5. Remove the bulb socket from the
lamp assembly by turning it
counterclockwise.
6. Pull bulb straight out of socket.
7. Install the new bulb in reverse order.
Carefully install the tail lamp assembly on the vehicle by securing the
lamp assembly with two bolts. Reinstall bolt covers.
Replacing tail/brake lamp bulbs (Utility)
For bulb replacement, see your authorized dealer.
Replacing high-mount brake lamp bulb (Utility)
Your vehicle is equipped with an LED center high-mount stop lamp
located in the spoiler. It is designed to last the life of the vehicle. If
replacement is required, see your authorized dealer.
244Maintenance
2015 Police(pol)
Owners Guide gf, 2nd Printing, April 2015
USA(fus)
Page 279 of 401

•For police utility, use only SAE Class S snow chains, snow cables or
equivalent on the front axle for 245/55R18 equipped vehicles. The use
of snow chains, snow cables or other traction assist devices that are
larger than SAE Class S may cause damage to your vehicle’s wheel
house, suspension and/or body.
•Do not install tire chains, cables, or optional traction devices on the
rear tires. This could cause damage to the vehicle’s wheel house or
body.
•Install cable chains securely, verifying that the cables do not touch any
wiring, brake lines or fuel lines.
•Do not exceed 30 mph (48 km/h) with tire cables on your vehicle.
•Drive cautiously. If you hear the cables rub or bang against your
vehicle, stop and retighten the cables. If this does not work, remove
the cables to prevent damage to your vehicle.
•Remove the tire cables when they are no longer needed. Do not use
tire cables on dry roads.
TIRE PRESSURE MONITORING SYSTEM
WARNING:The tire pressure monitoring system is NOT a
substitute for manually checking tire pressure. The tire pressure
should be checked periodically (at least monthly) using a tire gauge.
SeeInflating Your Tiresin this chapter. Failure to properly maintain
your tire pressure could increase the risk of tire failure, loss of control,
vehicle rollover and personal injury.
Each tire, including the spare (if provided), should be checked
monthly when cold and inflated to the inflation pressure
recommended by the vehicle manufacturer on the vehicle
placard or tire inflation pressure label. (If your vehicle has tires of a
different size than the size indicated on the vehicle placard or tire
inflation pressure label, you should determine the proper tire inflation
pressure for those tires.)
278Wheels and Tires
2015 Police(pol)
Owners Guide gf, 2nd Printing, April 2015
USA(fus)
Page 287 of 401
WARNING:To reduce the risk of possible serious injury or
death, do not remove the full size spare tire from the factory
secured location. This location is necessary to achieve police-rated
75 mph (120 km/h) rear impact crash-test performance. Removal
increases the risk of fuel leak in high-speed rear impacts.
Note:Passengers should not remain in the vehicle when the vehicle is
being jacked.
Note:For sedan, only the original equipment tire or 245/55R18 tire with
outer diameter less than 725 millimeters will stow in the tire tub.
Utility
1. Park on a level surface, set the parking brake and activate the hazard
flashers.
2. Place the transmission in park(P)and turn the engine off.
3. Lift the floor cargo cover, then
remove the wing nut that secures
the spare tire by turning it
counterclockwise.
4. Lift and remove the spare tire
from the spare tire well.
286Wheels and Tires
2015 Police(pol)
Owners Guide gf, 2nd Printing, April 2015
USA(fus)