2015 FORD POLICE INTERCEPTOR SEDAN turn signal
[x] Cancel search: turn signalPage 66 of 401

How to Reprogram Your Remote Entry Transmitters
You must have all remote entry transmitters (maximum of four) available
before beginning this procedure.Note:Do not press the brake pedal at
any time during this procedure. If the brake pedal is pressed at any time
during this procedure, programming mode will be exited and the entire
procedure must be repeated.
Note:Ensure the brake pedal is not pressed during this sequence.
To reprogram the remote entry transmitters:
1. Make sure your vehicle is electronically unlocked.
2. Put the key in the ignition.
3. Cycle eight times rapidly (within 10 seconds) between the off and on
positions.Note:The eighth turn must end in the on position.
4. The doors will lock, then unlock, to confirm that the programming
mode has been activated.
5. Within 20 seconds press any button on the remote entry transmitter.
Note:If more than 20 seconds have passed you will need to start the
procedure over again.
6. The doors will lock, then unlock, to confirm that this remote entry
transmitter has been programmed.
7. Repeat Step 5 to program each additional remote entry transmitter.
8. Turn the ignition to the off position after you have finished
programming all of the remote entry transmitters.Note:After
20 seconds, you will automatically exit the programming mode.
9. The doors will lock, then unlock, to confirm that the programming
mode has been exited.
Car Finder
Note:This feature will not work with the Dark Car feature.
Press the button twice within three seconds. The horn will
sound and the turn signals will flash. We recommend you use
this method to locate your vehicle, rather than using the panic
alarm.
Keys and Remote Control65
2015 Police(pol)
Owners Guide gf, 2nd Printing, April 2015
USA(fus)
Page 69 of 401

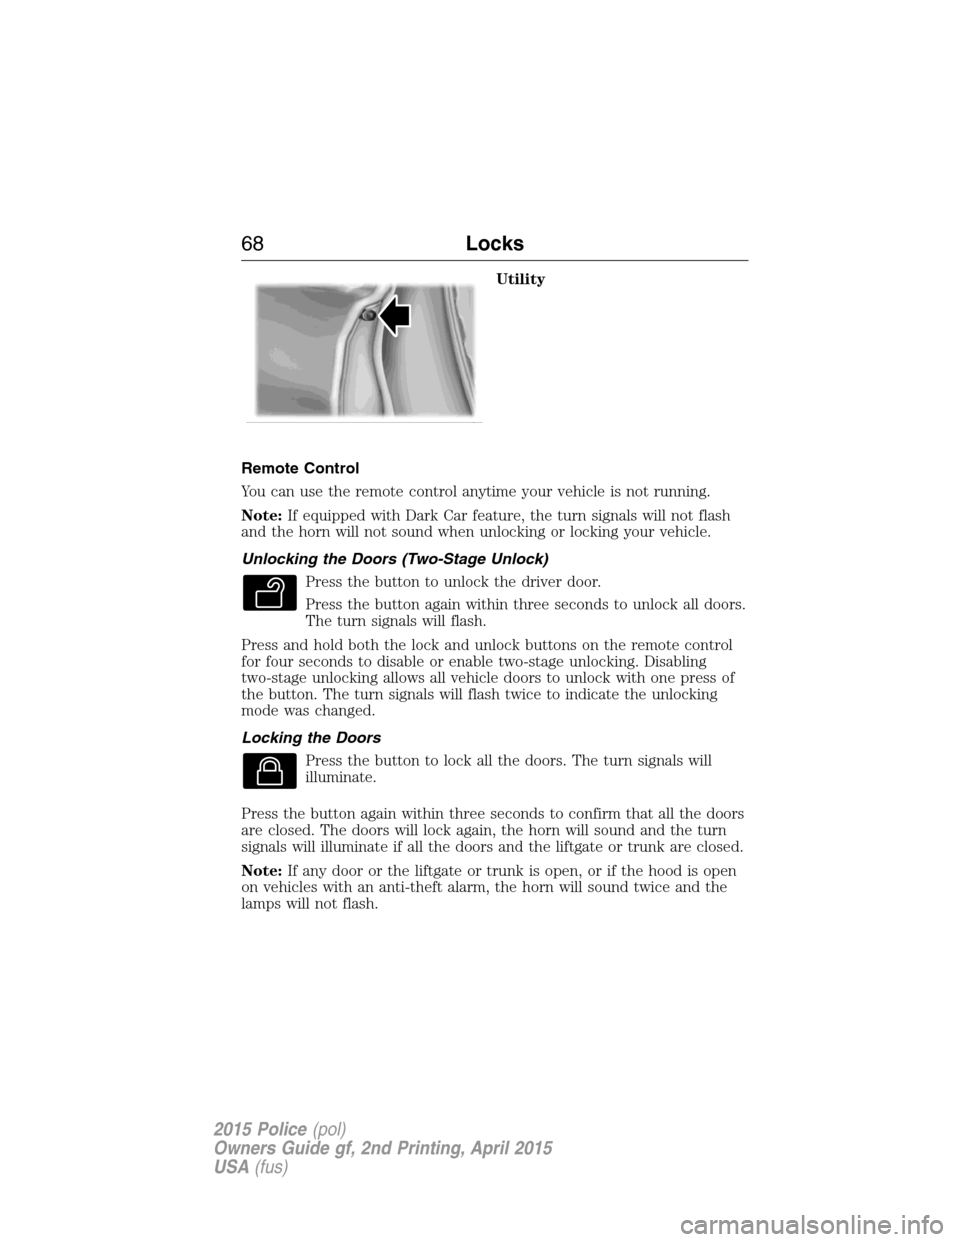
Utility
Remote Control
You can use the remote control anytime your vehicle is not running.
Note:If equipped with Dark Car feature, the turn signals will not flash
and the horn will not sound when unlocking or locking your vehicle.
Unlocking the Doors (Two-Stage Unlock)
Press the button to unlock the driver door.
Press the button again within three seconds to unlock all doors.
The turn signals will flash.
Press and hold both the lock and unlock buttons on the remote control
for four seconds to disable or enable two-stage unlocking. Disabling
two-stage unlocking allows all vehicle doors to unlock with one press of
the button. The turn signals will flash twice to indicate the unlocking
mode was changed.
Locking the Doors
Press the button to lock all the doors. The turn signals will
illuminate.
Press the button again within three seconds to confirm that all the doors
are closed. The doors will lock again, the horn will sound and the turn
signals will illuminate if all the doors and the liftgate or trunk are closed.
Note:If any door or the liftgate or trunk is open, or if the hood is open
on vehicles with an anti-theft alarm, the horn will sound twice and the
lamps will not flash.
68Locks
2015 Police(pol)
Owners Guide gf, 2nd Printing, April 2015
USA(fus)
Page 98 of 401

Stability Control System
Displays when the AdvanceTrac/Traction control is active. If the
light remains on, have the system serviced immediately.
Stability Control System Off
Illuminates when AdvanceTrac/Traction control has been
disabled by the driver.
Turn signal
Illuminates when the left or right turn signal or the hazard
warning flasher is turned on. If the indicators stay on or flash
faster, check for a burned out bulb.
AUDIBLE WARNINGS AND INDICATORS
Key In Ignition Warning Chime
Sounds when the key is left in the ignition and the driver’s door is
opened.
Headlamps On Warning Chime
Sounds when the headlamps or parking lamps are on, the ignition is off
(the key is not in the ignition) and the driver’s door is opened.
Parking Brake On Warning Chime
Sounds when you have left the parking brake on and drive your vehicle.
If the warning chime remains on after you have released the parking
brake, have the system checked by your authorized dealer immediately.
Instrument Cluster97
2015 Police(pol)
Owners Guide gf, 2nd Printing, April 2015
USA(fus)
Page 160 of 401

Using the Systems
BLIS® turns on when the engine is started and the vehicle is driven
forward above 3 mph (5 km/h); it remains on while the transmission is in
D (Drive) or N (Neutral). If shifted out of D (Drive) or N (Neutral), the
system enters CTA mode. Once shifted back into D (Drive), BLIS® turns
back on when the vehicle is driven above 3 mph (5 km/h).
Note:BLIS® does not function in R (Reverse) or P (Park) or provide
any additional warning when a turn signal is on.
CTA detects approaching vehicles from up to 45 feet (14 meters) away
though coverage decreases when the sensors are blocked. Reversing
slowly helps increase the coverage area and effectiveness.
WARNING:To help avoid personal injury, NEVER use the CTA
system as a replacement for using the interior and exterior
mirrors and looking over your shoulder before backing out of a parking
space. CTA is not a replacement for careful driving.
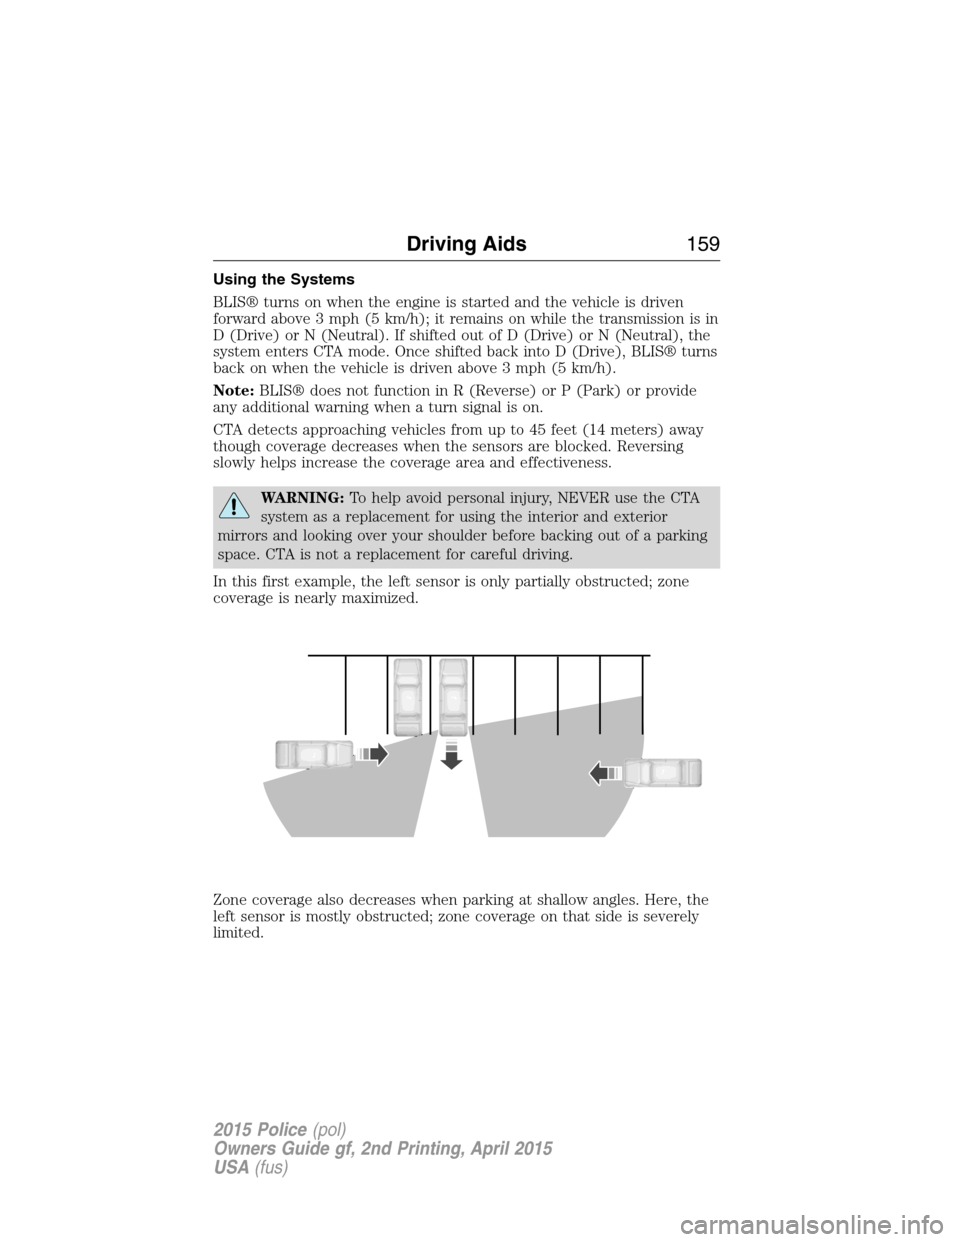
In this first example, the left sensor is only partially obstructed; zone
coverage is nearly maximized.
Zone coverage also decreases when parking at shallow angles. Here, the
left sensor is mostly obstructed; zone coverage on that side is severely
limited.
Driving Aids159
2015 Police(pol)
Owners Guide gf, 2nd Printing, April 2015
USA(fus)
Page 163 of 401

Reasons for messages being displayed
The radar surface is
dirty or obstructedClean the fascia area in front of the radar or
remove the obstruction.
The radar surface is
not dirty or obstructedDrive normally in traffic for a few minutes to
allow the radar to detect passing vehicles so it
can clear the blocked state.
Heavy rainfall/snowfall
interferes with the
radar signalsNo action required. The system automatically
resets to an unblocked state once the
rainfall/snowfall rate decreases or stops. Do
not use BLIS® and/or CTA in these conditions.
System Limitations
The BLIS® and CTA systems do have their limitations; situations such as
severe weather conditions or debris build-up on the sensor area may
limit vehicle detection.
The following are other situations that may limit the BLIS®:
•Certain maneuvering of vehicles entering and exiting the blind zone.
•Vehicles passing through the blind zone at very fast rates.
•When several vehicles forming a convoy pass through the blind zone.
The following are other situations that may limit the CTA system:
•Adjacently parked vehicles or objects obstructing the sensors.
•Approaching vehicles passing at speeds greater than 15 mph
(24 km/h).
•Driving in reverse faster than 3 mph (5 km/h).
•Backing out of an angled parking spot.
False Alerts
Note:If you connected a trailer to your vehicle the BLIS® system may
detect the trailer causing a false alert. To avoid false alerts you may want
to turn the BLIS off manually.
There may be certain instances when either the BLIS® or CTA systems
illuminate the alert indicator with no vehicle in the coverage zone; this is
known as a false alert. Some amount of false alerts are normal; they are
temporary and self-correct.
162Driving Aids
2015 Police(pol)
Owners Guide gf, 2nd Printing, April 2015
USA(fus)
Page 179 of 401

The rating for the tow vehicle’s braking system operation is at
the gross vehicle weight rating, not the gross combined weight
rating.
Separate functioning brake systems are required for safe control
of towed vehicles and trailers weighing more than 1500 pounds
(680 kilograms) when loaded.
Trailer Lamps
WARNING:Never connect any trailer lamp wiring to the
vehicle’s tail lamp wiring; this may damage the electrical system
resulting in a fire. Contact an authorized dealer as soon as possible for
assistance in proper trailer tow wiring installation. Additional electrical
equipment may be required.
Trailer lamps are required on most towed vehicles. Make sure all running
lights, brake lights, turn signals and hazard lights are working.
Before Towing a Trailer
Practice turning, stopping and backing up to get the feel of your
vehicle-trailer combination before starting on a trip. When turning, make
wider turns so the trailer wheels clear curbs and other obstacles.
When Towing a Trailer
•Do not drive faster than 70 mph (113 km/h) during the first 500 miles
(800 kilometers).
•Do not make full-throttle starts.
•Check your hitch, electrical connections and trailer wheel lug nuts
thoroughly after you have traveled 50 miles (80 kilometers).
•When stopped in congested or heavy traffic during hot weather, place
the gearshift in positionPto aid engine and transmission cooling and
to help air conditioning performance.
•Turn off the speed control with heavy loads or in hilly terrain. The
speed control may turn off automatically when you are towing on
long, steep grades.
•Shift to a lower gear when driving down a long or steep hill. Do not
apply the brakes continuously, as they may overheat and become less
effective.
178Towing
2015 Police(pol)
Owners Guide gf, 2nd Printing, April 2015
USA(fus)
Page 189 of 401

HAZARD WARNING FLASHERS
The hazard flasher control is located on the instrument panel
by the radio. Use it when your vehicle is disabled and is
creating a safety hazard for other motorists.
•Press the flasher control and all front and rear direction signals will
flash.
•Press the flasher control again to turn them off.
Note:With extended use, the flashers may run down your 12–volt
battery.
FUEL SHUTOFF
WARNING:Failure to inspect and if necessary repair fuel leaks
after a collision may increase the risk of fire and serious injury.
Ford Motor Company recommends that the fuel system be inspected by
an authorized dealer after any collision.
In the event of a moderate to severe collision, this vehicle is equipped
with a fuel pump shut-off feature that stops the flow of fuel to the
engine. Not every impact will cause a shut-off.
Should your vehicle shut off after a collision, you may restart your
vehicle by doing the following:
1. Switch off the ignition and wait 10 seconds.
2. Switch on the ignition.
3. Repeat steps 1 and 2 to re-enable fuel pump.
Note:When you try to restart your vehicle after a fuel shutoff, the
vehicle makes sure that various systems are safe to restart. One your
vehicle determines that the systems are safe, then the vehicle will allow
you to restart.
Note:In the event that your vehicle does not restart after your third
attempt, contact an authorized dealer.
JUMP-STARTING THE VEHICLE
WARNING:The gases around the battery can explode if exposed
to flames, sparks, or lit cigarettes. An explosion could result in
injury or vehicle damage.
188Roadside Emergencies
2015 Police(pol)
Owners Guide gf, 2nd Printing, April 2015
USA(fus)
Page 239 of 401

Headlamp (Sedan):
A. Front parking lamp/turn signal
bulb
B. Low/High beam headlamp bulb
C. Sidemarker bulb
Low/High beam bulbs (Sedan)
1. Make sure the headlamp switch is
in the off position, then open the
hood.
2. Reach in behind the headlamp
assembly to access the bulbs and
connectors.
3. Remove service cap.
4. Remove bulb from the headlamp
assembly by turning it
counterclockwise, then pull it
straight out.
Headlamp (Utility):
A. Low/High beam headlamp bulb
B. Front parking lamp/turn signal
bulb
C. Sidemarker bulbABC
238Maintenance
2015 Police(pol)
Owners Guide gf, 2nd Printing, April 2015
USA(fus)