Page 217 of 401
3.7L V6 engine
A. Engine coolant reservoir
B. Windshield washer fluid reservoir
C. Brake fluid reservoir
D. Battery
E. Power distribution box
F. Air filter assembly
G. Automatic transmission fluid dipstick
H. Engine oil dipstick
I. Engine oil filler cap
A
IHGF
BCDE
216Maintenance
2015 Police(pol)
Owners Guide gf, 2nd Printing, April 2015
USA(fus)
Page 226 of 401
Moving the Air Filter Assembly (EcoBoost engine)
WARNING:Do not run engine with the air filter disconnected
1. Shut the engine off.
2. Clean the area around the clamp that connects the air filter assembly
to the rubber hose (1).
3. Remove the bolt cover (if
equipped).
4. Remove two bolts that attach the
air filter assembly to the front of the
vehicle (2).
5. Loosen the clamp holding the air
filter assembly to the rubber hose
(1).
6. Remove the harness retaining clip
by pulling up (3). Do not disconnect
the sensor (4).
Maintenance225
2015 Police(pol)
Owners Guide gf, 2nd Printing, April 2015
USA(fus)
Page 227 of 401
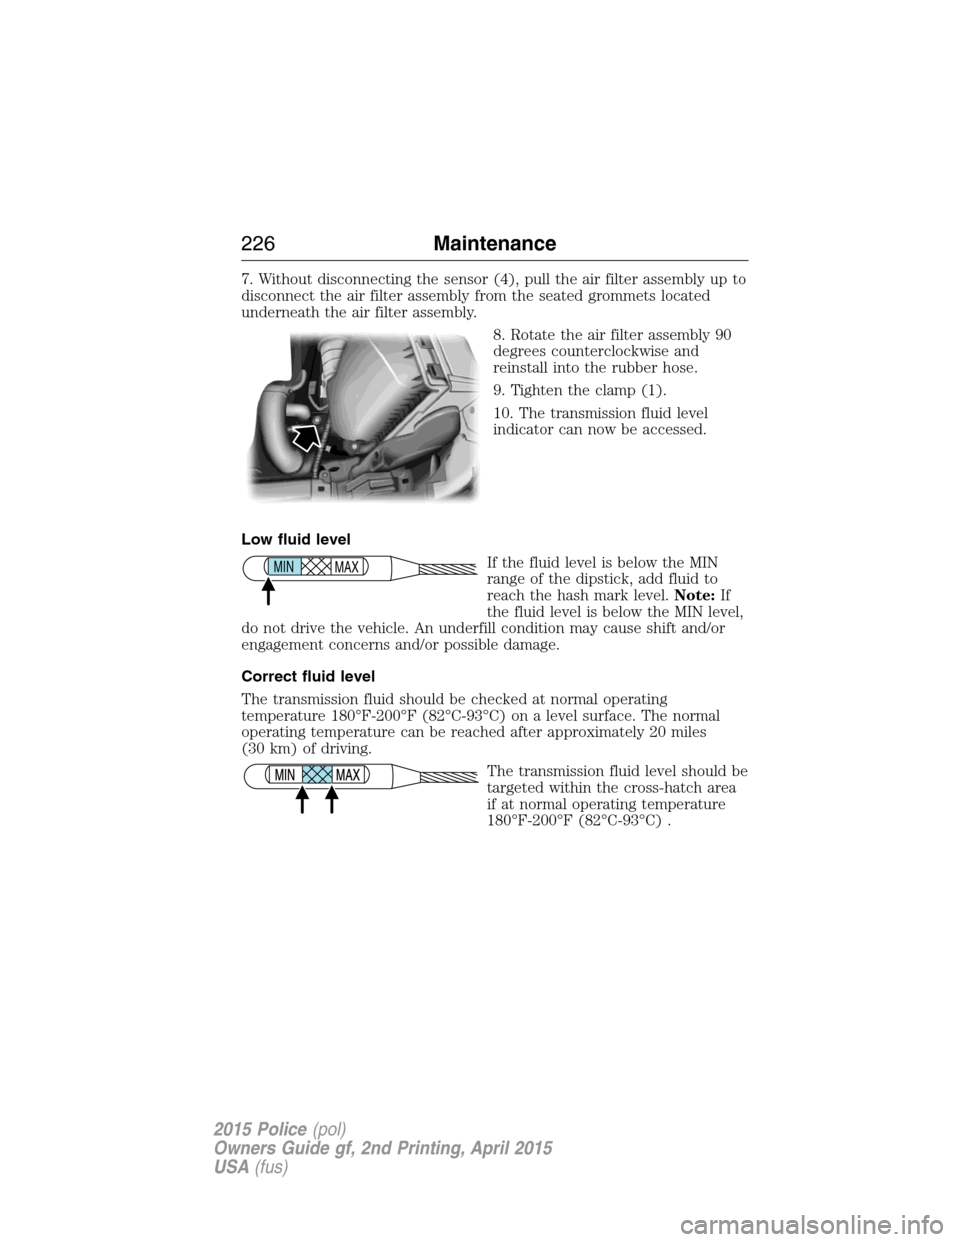
7. Without disconnecting the sensor (4), pull the air filter assembly up to
disconnect the air filter assembly from the seated grommets located
underneath the air filter assembly.
8. Rotate the air filter assembly 90
degrees counterclockwise and
reinstall into the rubber hose.
9. Tighten the clamp (1).
10. The transmission fluid level
indicator can now be accessed.
Low fluid level
If the fluid level is below the MIN
range of the dipstick, add fluid to
reach the hash mark level.Note:If
the fluid level is below the MIN level,
do not drive the vehicle. An underfill condition may cause shift and/or
engagement concerns and/or possible damage.
Correct fluid level
The transmission fluid should be checked at normal operating
temperature 180°F-200°F (82°C-93°C) on a level surface. The normal
operating temperature can be reached after approximately 20 miles
(30 km) of driving.
The transmission fluid level should be
targeted within the cross-hatch area
if at normal operating temperature
180°F-200°F (82°C-93°C) .
MAX MIN
226Maintenance
2015 Police(pol)
Owners Guide gf, 2nd Printing, April 2015
USA(fus)
Page 229 of 401
Refer to yourscheduled maintenance informationfor scheduled
intervals for fluid checks and changes. Your transmission does not
consume fluid. However, the fluid level should be checked if the
transmission is not working properly, (i.e., if the transmission slips or
shifts slowly) or if you notice some sign of fluid leakage.
Do not use supplemental transmission fluid additives, treatments or
cleaning agents. The use of these materials may affect transmission
operation and result in damage to internal transmission components.
BRAKE FLUID CHECK
Fluid levels between the MIN and MAX lines are within the normal
operating range; there is no need to add fluid. If the fluid levels are
outside of the normal operating range, the performance of the system
could be compromised; seek service from your authorized dealer
immediately.
Note:Police pursuits, involving hard braking, result in high temperatures
in the brake system - including the brake fluid. Over time, repeated
exposure to high brake temperatures can degrade brake fluid, potentially
reducing its boiling point. A lower boiling point could cause long brake
pedal travel and a loss of braking confidence during subsequent pursuit
driving. Ford recommends that police fleets replace the brake fluid at
every brake pad service interval according to the service procedure.
Brake fluid should be replaced on vehicles involved in high speed
pursuits with heavy brake usage.
POWER STEERING FLUID CHECK
Your vehicle is equipped with an electric power steering (EPS) system.
There is no fluid reservoir to check or fill. For additional information on
the electric power steering (EPS) system, Refer toDriving Aids.
FUEL FILTER
Your vehicle is equipped with a lifetime fuel filter that is integrated with
the fuel tank. Regular maintenance or replacement is not needed.
WASHER FLUID CHECK
WARNING:If you operate your vehicle in temperatures below
40°F (5°C), use washer fluid with antifreeze protection. Failure
to use washer fluid with antifreeze protection in cold weather could
result in impaired windshield vision and increase the risk of injury or
accident.
228Maintenance
2015 Police(pol)
Owners Guide gf, 2nd Printing, April 2015
USA(fus)
Page 233 of 401
Changing the rear window wiper blade (Utility only)
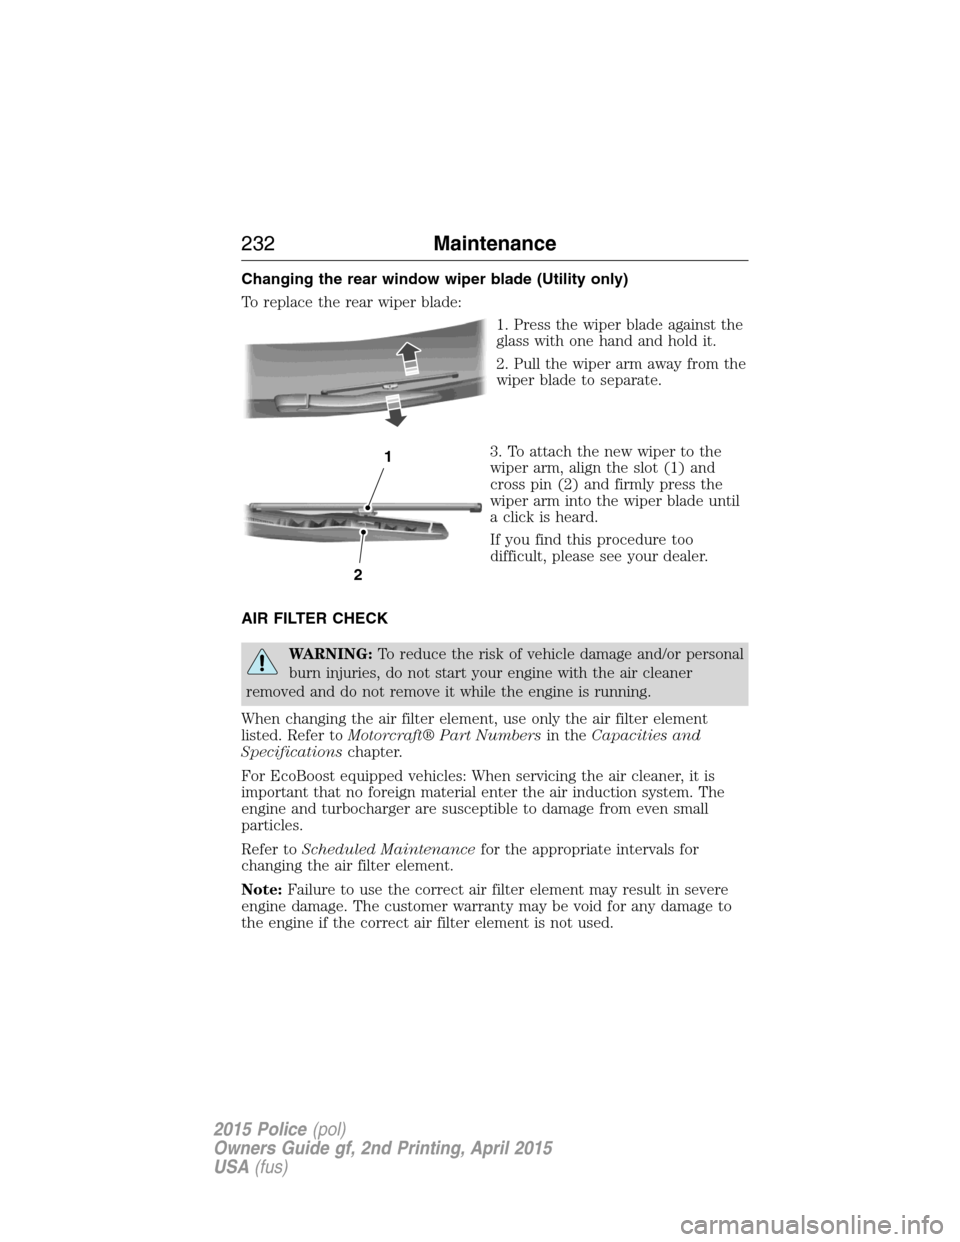
To replace the rear wiper blade:
1. Press the wiper blade against the
glass with one hand and hold it.
2. Pull the wiper arm away from the
wiper blade to separate.
3. To attach the new wiper to the
wiper arm, align the slot (1) and
cross pin (2) and firmly press the
wiper arm into the wiper blade until
a click is heard.
If you find this procedure too
difficult, please see your dealer.
AIR FILTER CHECK
WARNING:To reduce the risk of vehicle damage and/or personal
burn injuries, do not start your engine with the air cleaner
removed and do not remove it while the engine is running.
When changing the air filter element, use only the air filter element
listed. Refer toMotorcraft® Part Numbersin theCapacities and
Specificationschapter.
For EcoBoost equipped vehicles: When servicing the air cleaner, it is
important that no foreign material enter the air induction system. The
engine and turbocharger are susceptible to damage from even small
particles.
Refer toScheduled Maintenancefor the appropriate intervals for
changing the air filter element.
Note:Failure to use the correct air filter element may result in severe
engine damage. The customer warranty may be void for any damage to
the engine if the correct air filter element is not used.
2
1
232Maintenance
2015 Police(pol)
Owners Guide gf, 2nd Printing, April 2015
USA(fus)
Page 234 of 401
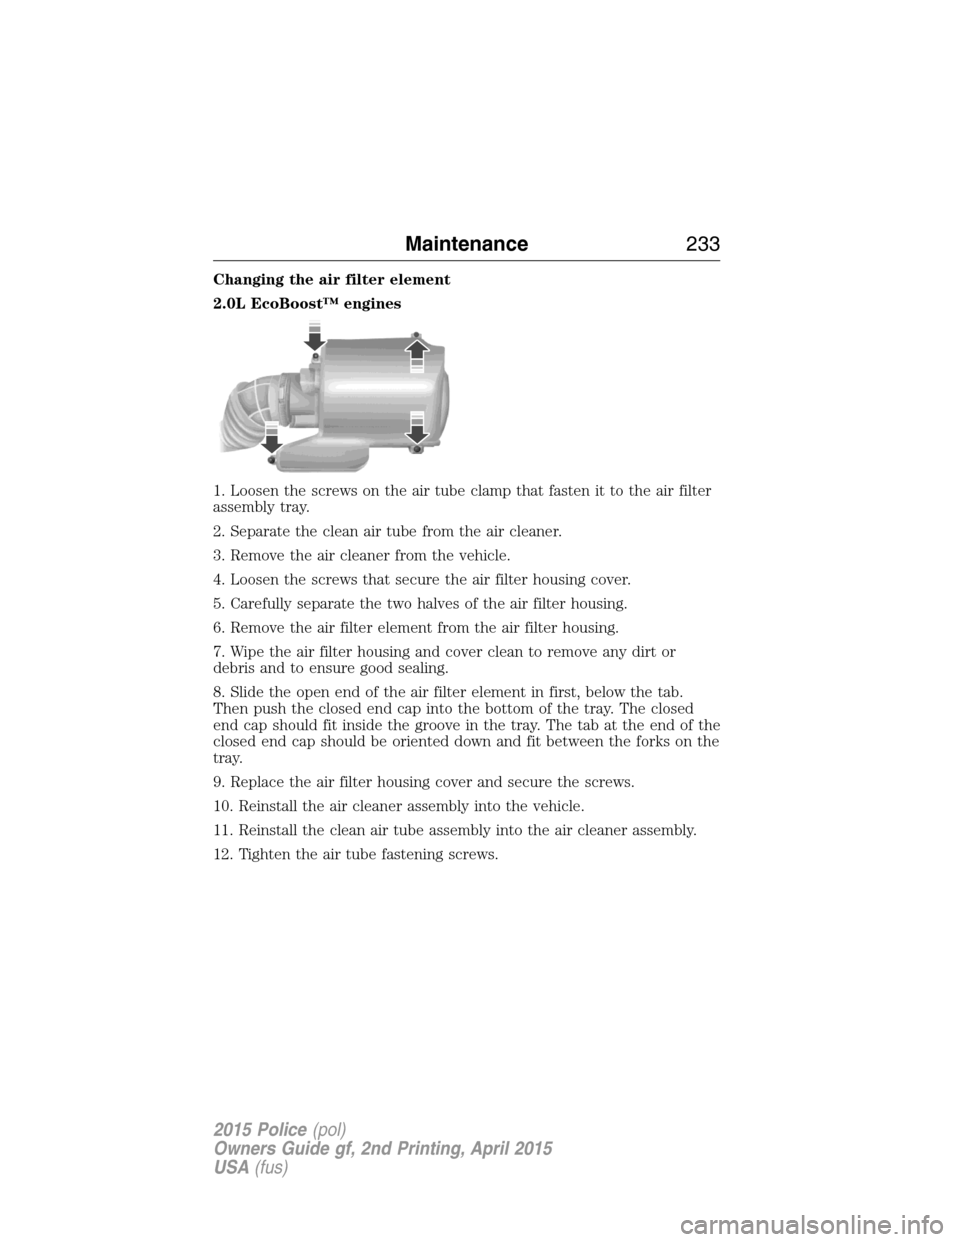
Changing the air filter element
2.0L EcoBoost™ engines
1. Loosen the screws on the air tube clamp that fasten it to the air filter
assembly tray.
2. Separate the clean air tube from the air cleaner.
3. Remove the air cleaner from the vehicle.
4. Loosen the screws that secure the air filter housing cover.
5. Carefully separate the two halves of the air filter housing.
6. Remove the air filter element from the air filter housing.
7. Wipe the air filter housing and cover clean to remove any dirt or
debris and to ensure good sealing.
8. Slide the open end of the air filter element in first, below the tab.
Then push the closed end cap into the bottom of the tray. The closed
end cap should fit inside the groove in the tray. The tab at the end of the
closed end cap should be oriented down and fit between the forks on the
tray.
9. Replace the air filter housing cover and secure the screws.
10. Reinstall the air cleaner assembly into the vehicle.
11. Reinstall the clean air tube assembly into the air cleaner assembly.
12. Tighten the air tube fastening screws.
Maintenance233
2015 Police(pol)
Owners Guide gf, 2nd Printing, April 2015
USA(fus)
Page 235 of 401
Changing the air filter element
3.5L V6 engine, 3.5L EcoBoost and 3.7L engines
3.5L V6 engine shown, 3.5L
EcoBoost and 3.7L engines similar
1. Release the clamps that secure the air filter housing cover.
2. Carefully separate the two halves of the air filter housing.
3. Remove the air filter element from the air filter housing.
4. Wipe the air filter housing and cover clean to remove any dirt or
debris and to ensure good sealing.
5. Install a new air filter element. Be careful not to crimp the filter
element edges between the air filter housing and cover. This could cause
filter damage and allow unfiltered air to enter the engine if not properly
seated.
6. Replace the air filter housing cover and secure the clamps. Be sure
that the air cleaner cover tabs are engaged into the slots of the air
cleaner housing.
234Maintenance
2015 Police(pol)
Owners Guide gf, 2nd Printing, April 2015
USA(fus)
Page 252 of 401
When washing:
•
Take care when using a power washer to clean the engine. The
high-pressure fluid could penetrate the sealed parts and cause damage.
•Do not spray a hot engine with cold water to avoid cracking the
engine block or other engine components.
•Spray Motorcraft Engine Shampoo and Degreaser on all parts that
require cleaning and pressure rinse clean. In Canada, use Motorcraft
Engine Shampoo.
•Never wash or rinse the engine while it is hot or running; water in the
running engine may cause internal damage.
•Never wash or rinse any ignition coil, spark plug wire or spark plug
well, or the area in and around these locations.
•Cover the battery, power distribution box, and air filter assembly to
prevent water damage when cleaning the engine.
CLEANING THE WINDOWS AND WIPER BLADES
The windows and wiper blades should be cleaned regularly. If the wipers
do not wipe properly, substances on the vehicle’s glass or the wiper blades
may cause squeaking or chatter noise from the blades, and streaking and
smearing of the windshield. To clean these items, follow these tips:
•The windows may be cleaned with a non-abrasive cleaner such as
Motorcraft® Ultra-Clear Spray Glass Cleaner (U.S.) or Motorcraft
Premium Glass Cleaner (Canada).
•The wiper blades can be cleaned with isopropyl (rubbing) alcohol or
Motorcraft Premium Windshield Washer Concentrates in the U.S., or
Motorcraft Premium Quality Windshield Washer Fluid in Canada.
Replace your wiper blades when they appear worn or do not function
properly.
•Do not use abrasive materials, as they may cause scratches.
•Do not use fuel, kerosene, or paint thinner to clean any parts.
If you cannot remove those streaks after cleaning with the glass cleaner or
if the wipers chatter and move in a jerky motion, clean the outer surface of
the windshield and the wiper blades using a sponge or soft cloth with a
neutral detergent or mild-abrasive cleaning solution. After cleaning, rinse
the windshield and wiper blades with clean water. The windshield is clean
if beads do not form when you rinse the windshield with water.
Note:Do not use sharp objects, such as a razor blade, to clean the
inside of the rear window or to remove decals, as it may cause damage
to the rear window defroster’s heated grid lines.
Vehicle Care251
2015 Police(pol)
Owners Guide gf, 2nd Printing, April 2015
USA(fus)