2015 FORD FOCUS ELECTRIC lock
[x] Cancel search: lockPage 86 of 369
WARNING LAMPS AND
INDICATORS
The following warning lamps and
indicators alert you to a vehicle condition
that may become serious. Some lamps
illuminate when you start your vehicle to
make sure they work. If any lamps remain
on after starting your vehicle, refer to the
respective system warning lamp for further
information.
Note:
Some warning indicators appear in
the information display and operate the
same as a warning lamp but do not
illuminate when you start your vehicle
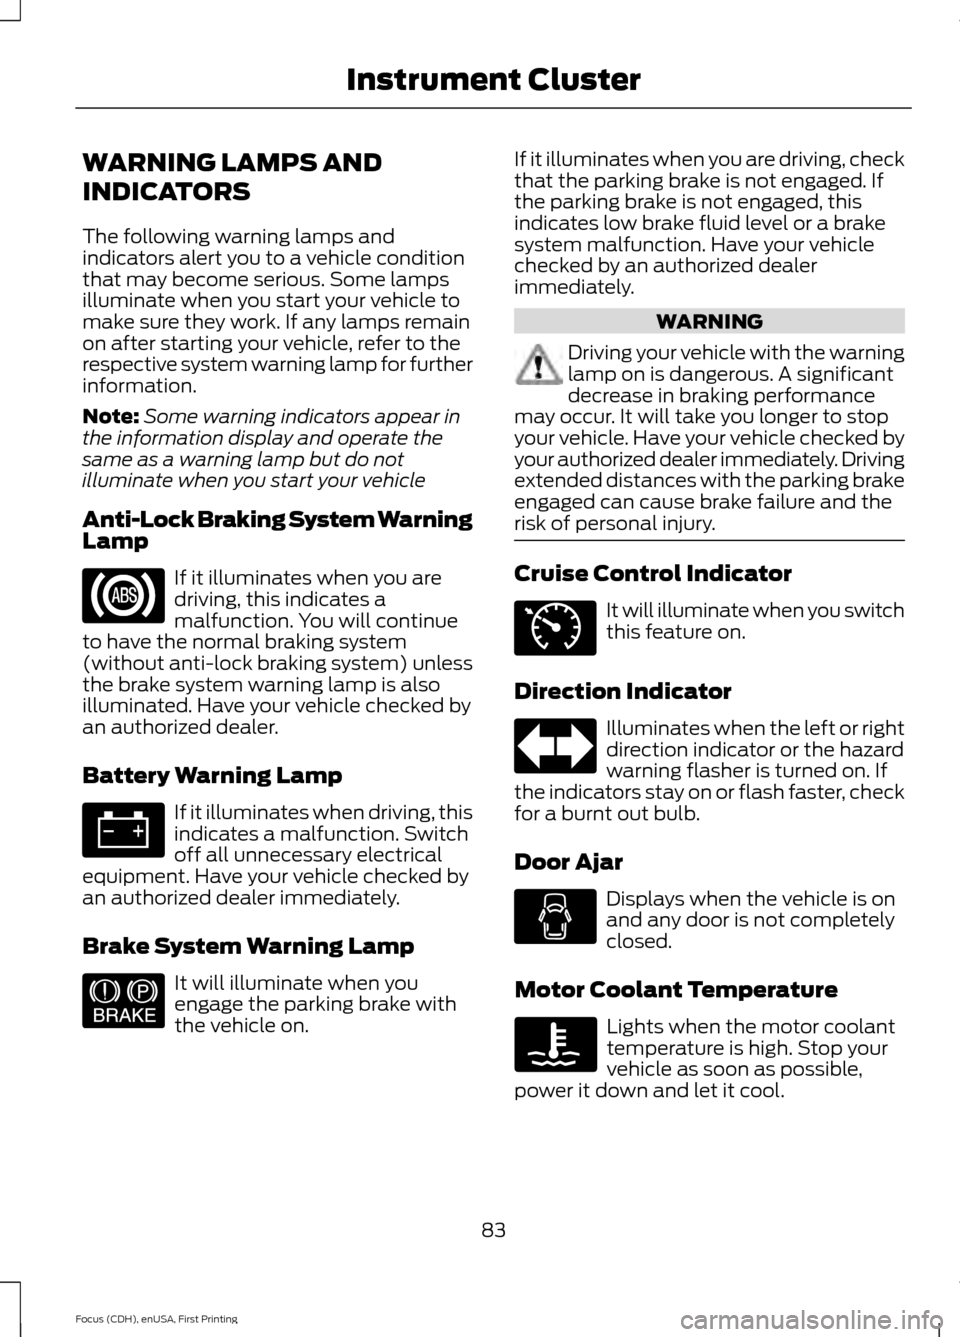
Anti-Lock Braking System Warning
Lamp If it illuminates when you are
driving, this indicates a
malfunction. You will continue
to have the normal braking system
(without anti-lock braking system) unless
the brake system warning lamp is also
illuminated. Have your vehicle checked by
an authorized dealer.
Battery Warning Lamp If it illuminates when driving, this
indicates a malfunction. Switch
off all unnecessary electrical
equipment. Have your vehicle checked by
an authorized dealer immediately.
Brake System Warning Lamp It will illuminate when you
engage the parking brake with
the vehicle on. If it illuminates when you are driving, check
that the parking brake is not engaged. If
the parking brake is not engaged, this
indicates low brake fluid level or a brake
system malfunction. Have your vehicle
checked by an authorized dealer
immediately. WARNING
Driving your vehicle with the warning
lamp on is dangerous. A significant
decrease in braking performance
may occur. It will take you longer to stop
your vehicle. Have your vehicle checked by
your authorized dealer immediately. Driving
extended distances with the parking brake
engaged can cause brake failure and the
risk of personal injury. Cruise Control Indicator
It will illuminate when you switch
this feature on.
Direction Indicator Illuminates when the left or right
direction indicator or the hazard
warning flasher is turned on. If
the indicators stay on or flash faster, check
for a burnt out bulb.
Door Ajar Displays when the vehicle is on
and any door is not completely
closed.
Motor Coolant Temperature Lights when the motor coolant
temperature is high. Stop your
vehicle as soon as possible,
power it down and let it cool.
83
Focus (CDH), enUSA, First Printing Instrument Cluster E144522 E71340
Page 108 of 369
Note:
Adjust the seatback to an upright
driving position before adjusting the head
restraint. Adjust the head restraint so that
the top of it is level with the top of your head
and as far forward as possible. Make sure
that you remain comfortable. If you are
extremely tall, adjust the head restraint to
its highest position.
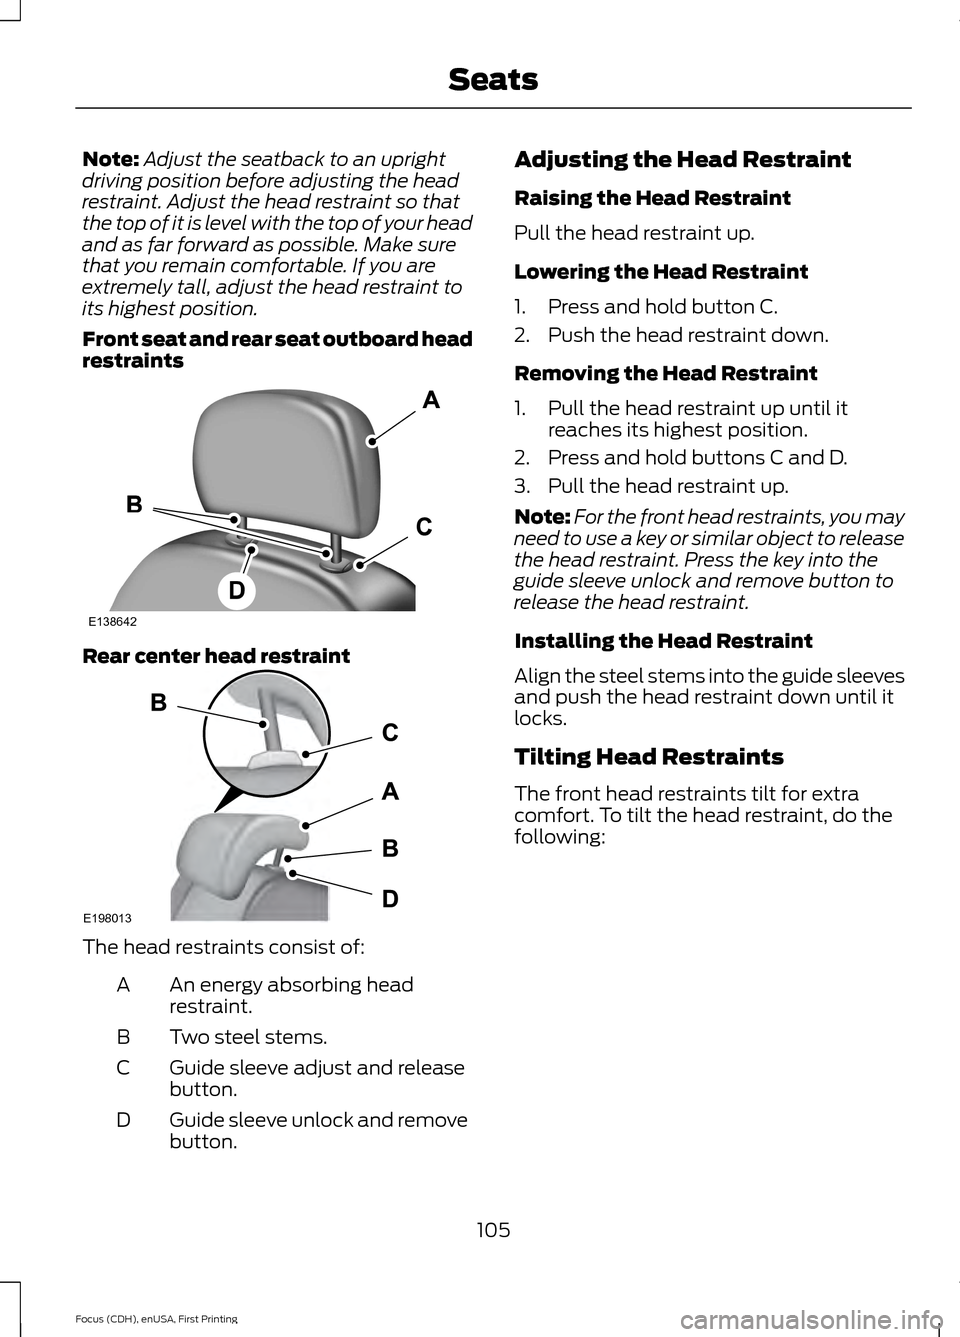
Front seat and rear seat outboard head
restraints Rear center head restraint
The head restraints consist of:
An energy absorbing head
restraint.
A
Two steel stems.
B
Guide sleeve adjust and release
button.
C
Guide sleeve unlock and remove
button.
D Adjusting the Head Restraint
Raising the Head Restraint
Pull the head restraint up.
Lowering the Head Restraint
1. Press and hold button C.
2. Push the head restraint down.
Removing the Head Restraint
1. Pull the head restraint up until it
reaches its highest position.
2. Press and hold buttons C and D.
3. Pull the head restraint up.
Note: For the front head restraints, you may
need to use a key or similar object to release
the head restraint. Press the key into the
guide sleeve unlock and remove button to
release the head restraint.
Installing the Head Restraint
Align the steel stems into the guide sleeves
and push the head restraint down until it
locks.
Tilting Head Restraints
The front head restraints tilt for extra
comfort. To tilt the head restraint, do the
following:
105
Focus (CDH), enUSA, First Printing SeatsE138642 E198013
Page 110 of 369
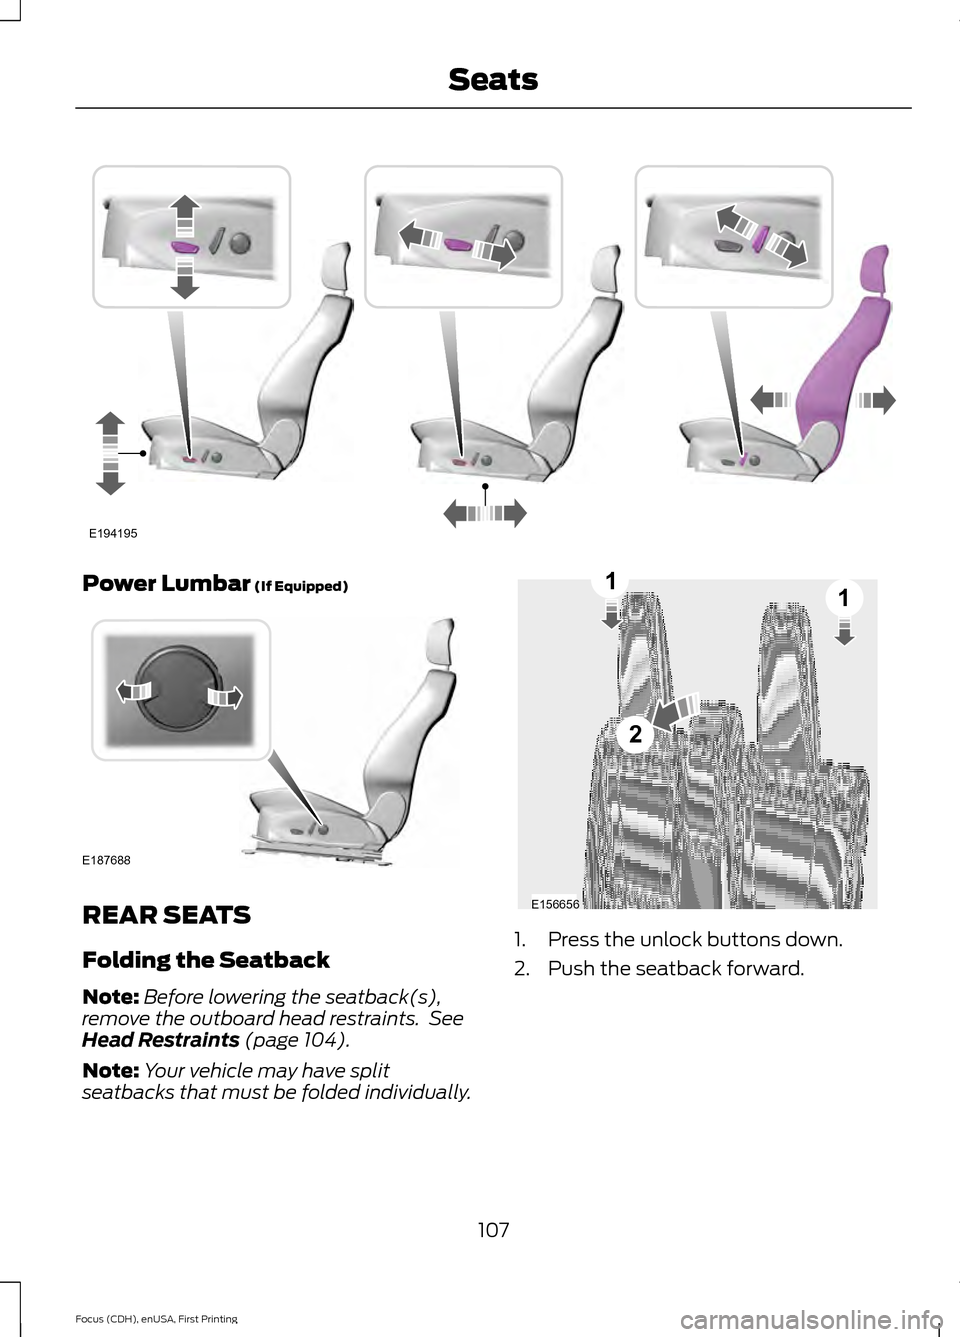
Power Lumbar (If Equipped)
REAR SEATS
Folding the Seatback
Note:
Before lowering the seatback(s),
remove the outboard head restraints. See
Head Restraints
(page 104).
Note: Your vehicle may have split
seatbacks that must be folded individually. 1. Press the unlock buttons down.
2. Push the seatback forward.
107
Focus (CDH), enUSA, First Printing SeatsE194195 E187688 E156656
2
11
Page 115 of 369
STARTING THE ELECTRIC
MOTOR
Keyless Starting
Note:
The system may not function if the
passive key is close to metal objects or
electronic devices, for example keys or a cell
phone.
Note: A valid passive key must be located
inside your vehicle to switch the ignition on
and start your vehicle.
Note: Passive keys left inside your vehicle
when locked are disabled. A message may
appear in the information display indicating
that there is no key detected when you try
to start your vehicle. Press the unlock
button on the remote control to enable it,
and then start your vehicle.
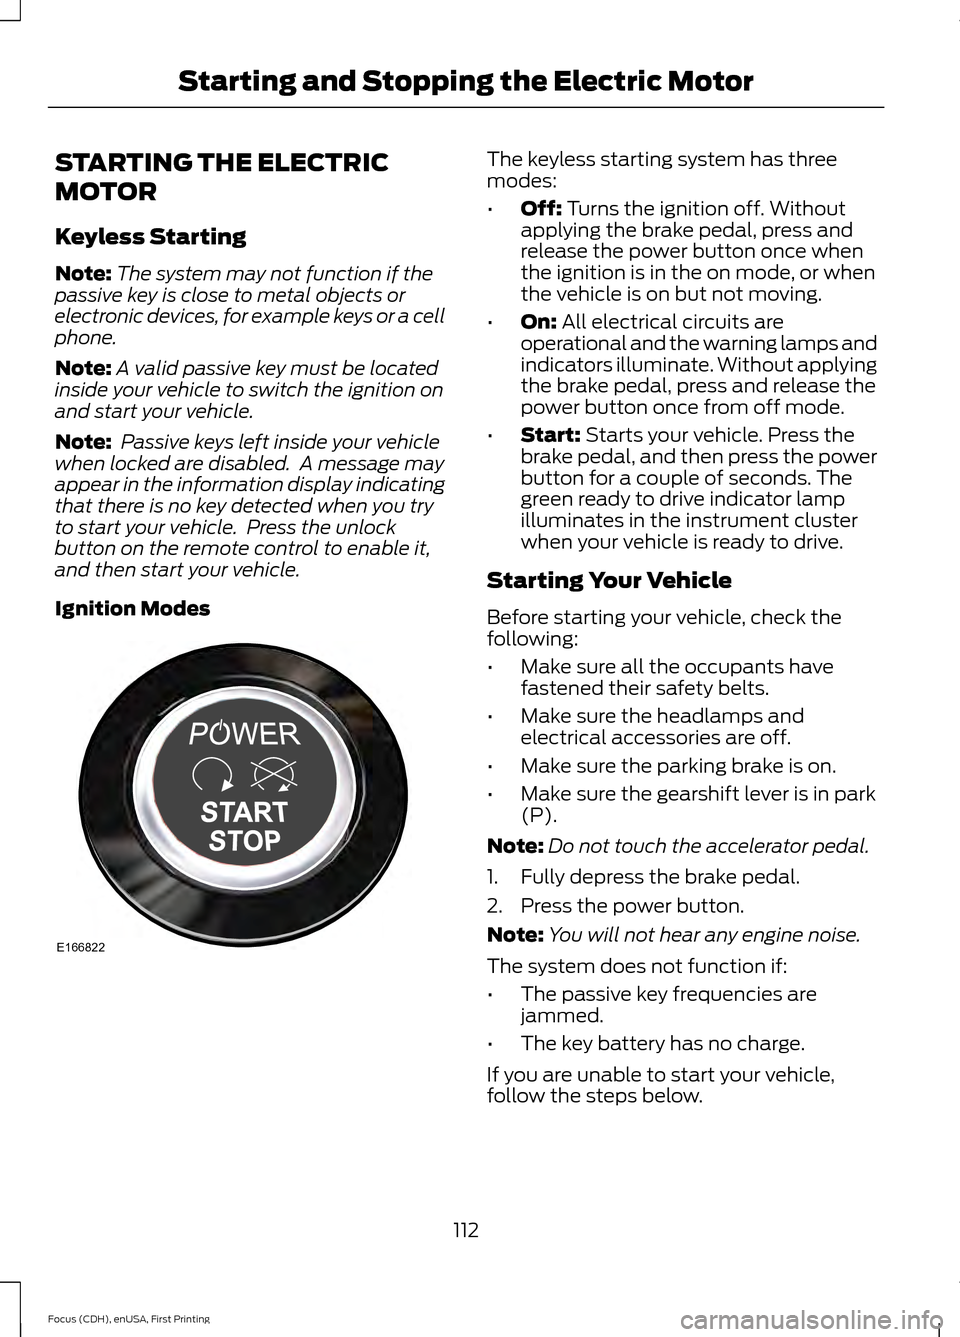
Ignition Modes The keyless starting system has three
modes:
•
Off: Turns the ignition off. Without
applying the brake pedal, press and
release the power button once when
the ignition is in the on mode, or when
the vehicle is on but not moving.
• On:
All electrical circuits are
operational and the warning lamps and
indicators illuminate. Without applying
the brake pedal, press and release the
power button once from off mode.
• Start:
Starts your vehicle. Press the
brake pedal, and then press the power
button for a couple of seconds. The
green ready to drive indicator lamp
illuminates in the instrument cluster
when your vehicle is ready to drive.
Starting Your Vehicle
Before starting your vehicle, check the
following:
• Make sure all the occupants have
fastened their safety belts.
• Make sure the headlamps and
electrical accessories are off.
• Make sure the parking brake is on.
• Make sure the gearshift lever is in park
(P).
Note: Do not touch the accelerator pedal.
1. Fully depress the brake pedal.
2. Press the power button.
Note: You will not hear any engine noise.
The system does not function if:
• The passive key frequencies are
jammed.
• The key battery has no charge.
If you are unable to start your vehicle,
follow the steps below.
112
Focus (CDH), enUSA, First Printing Starting and Stopping the Electric MotorE166822
Page 116 of 369
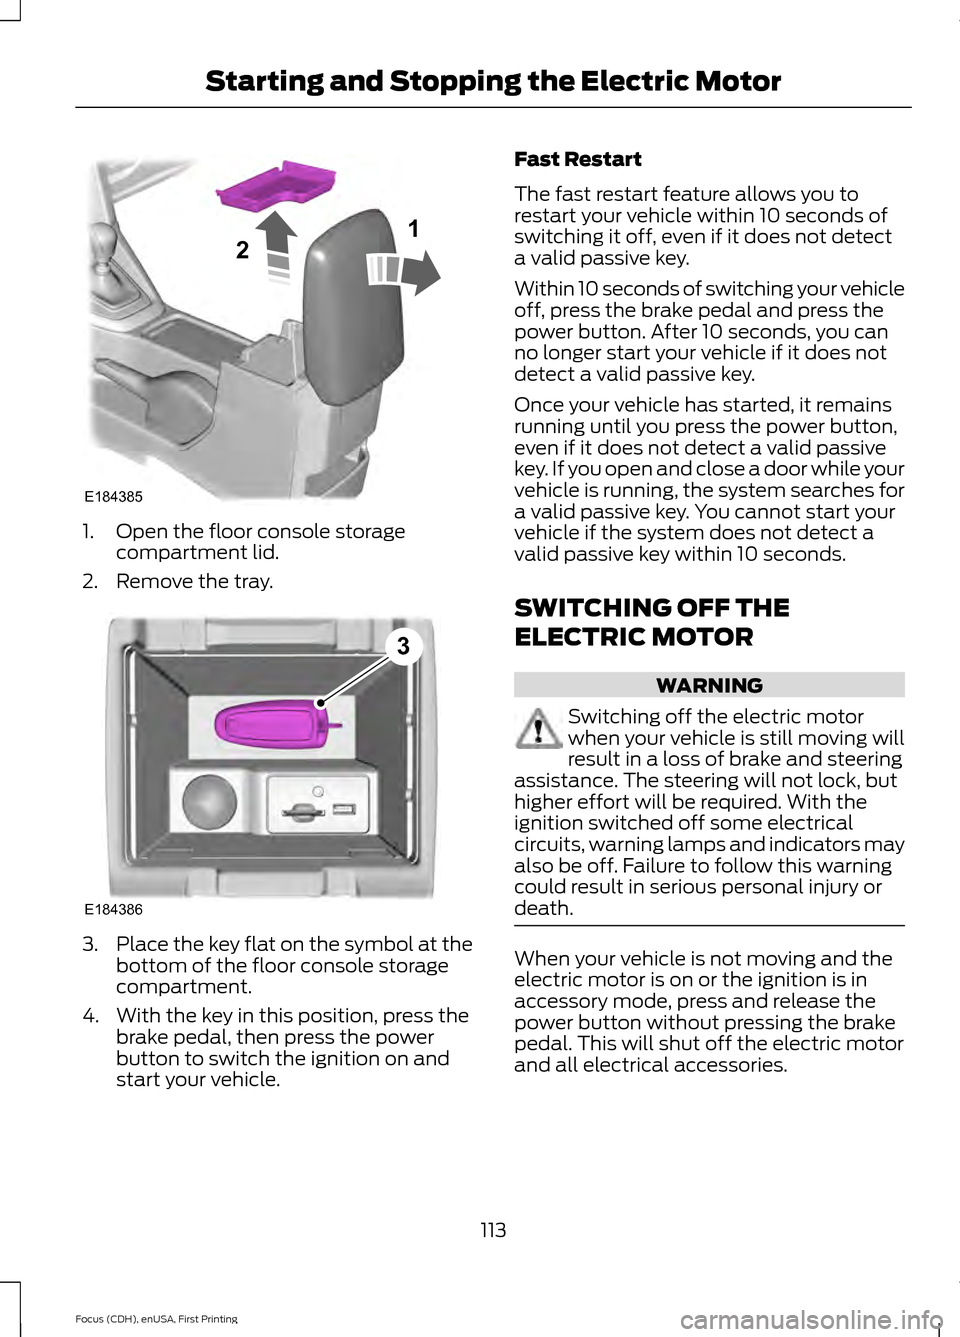
1. Open the floor console storage
compartment lid.
2. Remove the tray. 3.
Place the key flat on the symbol at the
bottom of the floor console storage
compartment.
4. With the key in this position, press the brake pedal, then press the power
button to switch the ignition on and
start your vehicle. Fast Restart
The fast restart feature allows you to
restart your vehicle within 10 seconds of
switching it off, even if it does not detect
a valid passive key.
Within 10 seconds of switching your vehicle
off, press the brake pedal and press the
power button. After 10 seconds, you can
no longer start your vehicle if it does not
detect a valid passive key.
Once your vehicle has started, it remains
running until you press the power button,
even if it does not detect a valid passive
key. If you open and close a door while your
vehicle is running, the system searches for
a valid passive key. You cannot start your
vehicle if the system does not detect a
valid passive key within 10 seconds.
SWITCHING OFF THE
ELECTRIC MOTOR
WARNING
Switching off the electric motor
when your vehicle is still moving will
result in a loss of brake and steering
assistance. The steering will not lock, but
higher effort will be required. With the
ignition switched off some electrical
circuits, warning lamps and indicators may
also be off. Failure to follow this warning
could result in serious personal injury or
death. When your vehicle is not moving and the
electric motor is on or the ignition is in
accessory mode, press and release the
power button without pressing the brake
pedal. This will shut off the electric motor
and all electrical accessories.
113
Focus (CDH), enUSA, First Printing Starting and Stopping the Electric MotorE184385
21 E184386
3
Page 121 of 369
Charge Port
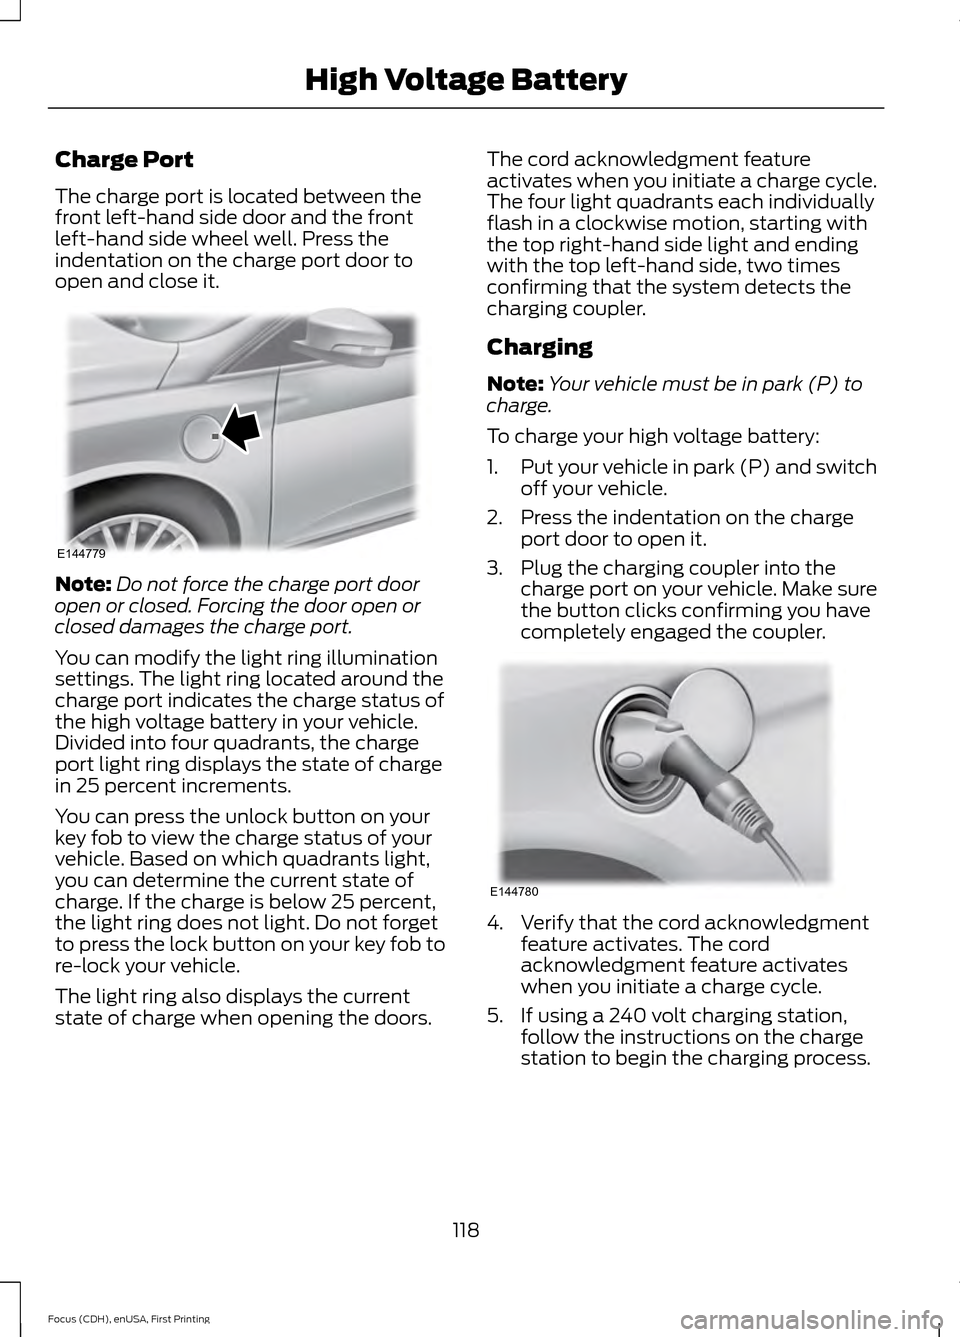
The charge port is located between the
front left-hand side door and the front
left-hand side wheel well. Press the
indentation on the charge port door to
open and close it.
Note:
Do not force the charge port door
open or closed. Forcing the door open or
closed damages the charge port.
You can modify the light ring illumination
settings. The light ring located around the
charge port indicates the charge status of
the high voltage battery in your vehicle.
Divided into four quadrants, the charge
port light ring displays the state of charge
in 25 percent increments.
You can press the unlock button on your
key fob to view the charge status of your
vehicle. Based on which quadrants light,
you can determine the current state of
charge. If the charge is below 25 percent,
the light ring does not light. Do not forget
to press the lock button on your key fob to
re-lock your vehicle.
The light ring also displays the current
state of charge when opening the doors. The cord acknowledgment feature
activates when you initiate a charge cycle.
The four light quadrants each individually
flash in a clockwise motion, starting with
the top right-hand side light and ending
with the top left-hand side, two times
confirming that the system detects the
charging coupler.
Charging
Note:
Your vehicle must be in park (P) to
charge.
To charge your high voltage battery:
1. Put your vehicle in park (P) and switch
off your vehicle.
2. Press the indentation on the charge port door to open it.
3. Plug the charging coupler into the charge port on your vehicle. Make sure
the button clicks confirming you have
completely engaged the coupler. 4. Verify that the cord acknowledgment
feature activates. The cord
acknowledgment feature activates
when you initiate a charge cycle.
5. If using a 240 volt charging station, follow the instructions on the charge
station to begin the charging process.
118
Focus (CDH), enUSA, First Printing High Voltage BatteryE144779 E144780
Page 122 of 369
The light ring located around the charge
port indicates the charge status of the high
voltage battery in your vehicle:
•
When the top right-hand side quadrant
is pulsing, the charge is between 0-25
percent.
• When the top right-hand side quadrant
is on and the bottom right-hand
quadrant is pulsing, the charge is
between 25-50 percent.
• When both right-hand side quadrants
are on and the bottom left-hand side
quadrant is pulsing, the charge is
between 50-75 percent.
• When three quadrants are on and the
top left-hand side quadrant is pulsing,
the charge is between 75-100 percent.
• When all the lights on the light ring are
on, the charge is complete.
Note: The light ring will turn off one minute
after reaching a full charge.
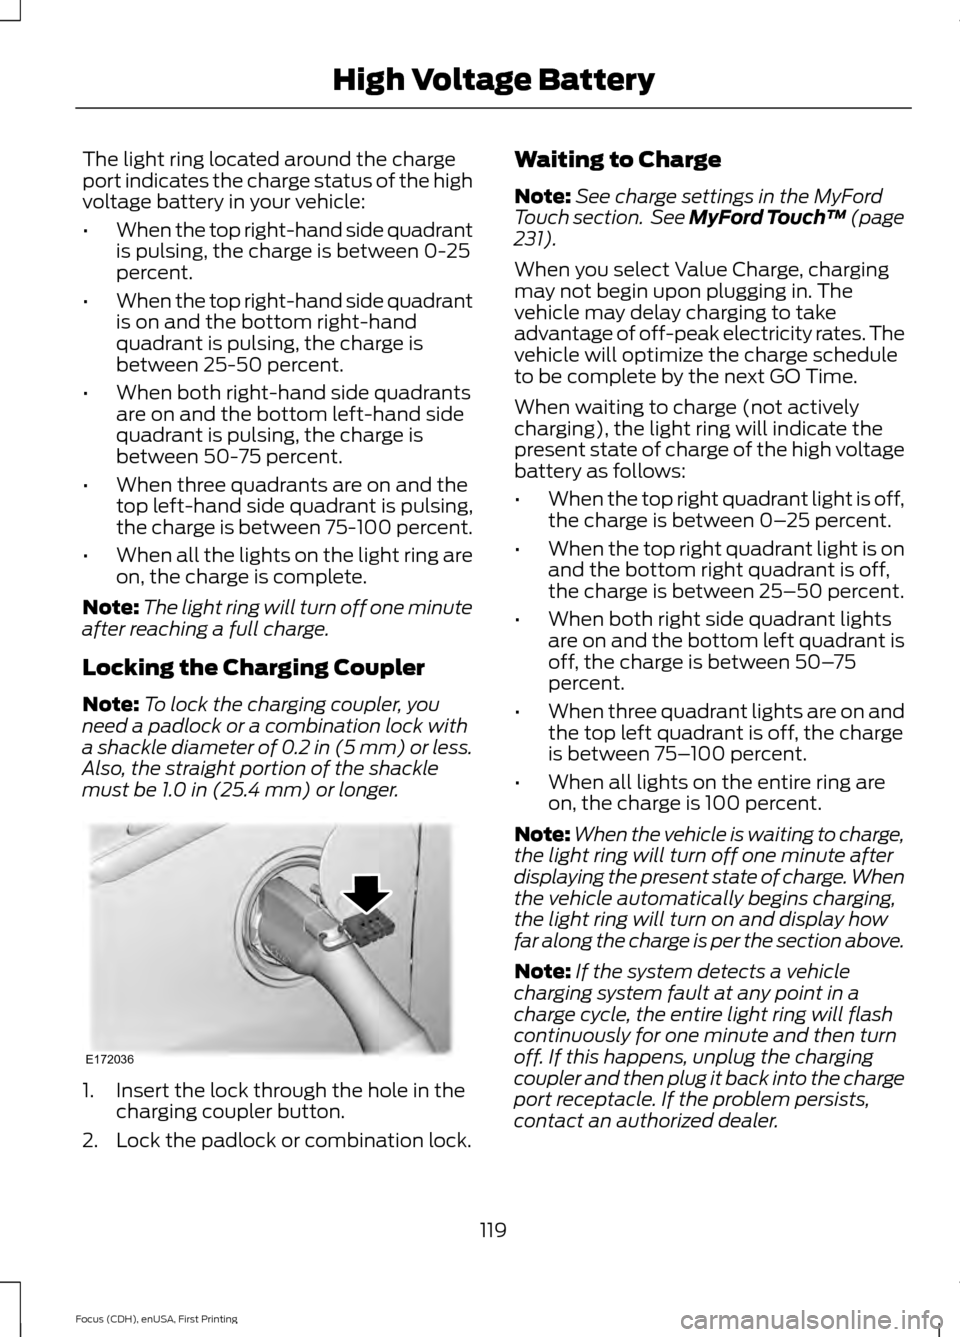
Locking the Charging Coupler
Note: To lock the charging coupler, you
need a padlock or a combination lock with
a shackle diameter of 0.2 in (5 mm) or less.
Also, the straight portion of the shackle
must be 1.0 in (25.4 mm) or longer. 1. Insert the lock through the hole in the
charging coupler button.
2. Lock the padlock or combination lock. Waiting to Charge
Note:
See charge settings in the MyFord
Touch section. See MyFord Touch ™
(page
231).
When you select Value Charge, charging
may not begin upon plugging in. The
vehicle may delay charging to take
advantage of off-peak electricity rates. The
vehicle will optimize the charge schedule
to be complete by the next GO Time.
When waiting to charge (not actively
charging), the light ring will indicate the
present state of charge of the high voltage
battery as follows:
• When the top right quadrant light is off,
the charge is between 0– 25 percent.
• When the top right quadrant light is on
and the bottom right quadrant is off,
the charge is between 25–50 percent.
• When both right side quadrant lights
are on and the bottom left quadrant is
off, the charge is between 50– 75
percent.
• When three quadrant lights are on and
the top left quadrant is off, the charge
is between 75– 100 percent.
• When all lights on the entire ring are
on, the charge is 100 percent.
Note: When the vehicle is waiting to charge,
the light ring will turn off one minute after
displaying the present state of charge. When
the vehicle automatically begins charging,
the light ring will turn on and display how
far along the charge is per the section above.
Note: If the system detects a vehicle
charging system fault at any point in a
charge cycle, the entire light ring will flash
continuously for one minute and then turn
off. If this happens, unplug the charging
coupler and then plug it back into the charge
port receptacle. If the problem persists,
contact an authorized dealer.
119
Focus (CDH), enUSA, First Printing High Voltage BatteryE172036
Page 123 of 369
You can modify the light ring lighting
conditions. See Charge Port Light Ring
Settings in the MyFord Touch section. See
MyFord Touch
™ (page 231).
Disconnecting the Charging
Coupler
Note: Do not pull the wall plug from the
wall while the vehicle is charging. Doing so
may damage the outlet and the cord.
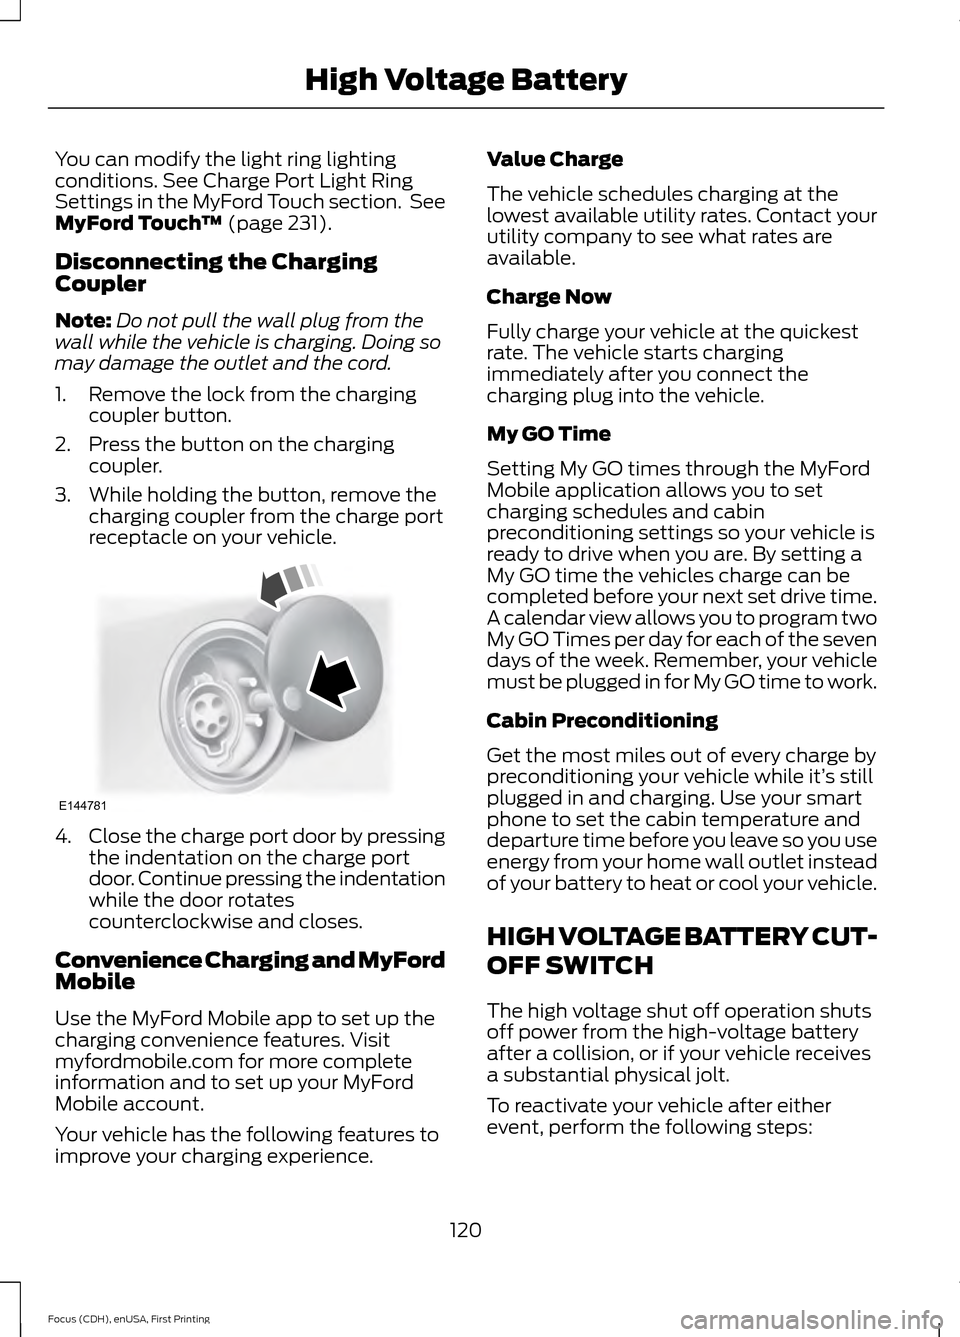
1. Remove the lock from the charging coupler button.
2. Press the button on the charging coupler.
3. While holding the button, remove the charging coupler from the charge port
receptacle on your vehicle. 4.
Close the charge port door by pressing
the indentation on the charge port
door. Continue pressing the indentation
while the door rotates
counterclockwise and closes.
Convenience Charging and MyFord
Mobile
Use the MyFord Mobile app to set up the
charging convenience features. Visit
myfordmobile.com for more complete
information and to set up your MyFord
Mobile account.
Your vehicle has the following features to
improve your charging experience. Value Charge
The vehicle schedules charging at the
lowest available utility rates. Contact your
utility company to see what rates are
available.
Charge Now
Fully charge your vehicle at the quickest
rate. The vehicle starts charging
immediately after you connect the
charging plug into the vehicle.
My GO Time
Setting My GO times through the MyFord
Mobile application allows you to set
charging schedules and cabin
preconditioning settings so your vehicle is
ready to drive when you are. By setting a
My GO time the vehicles charge can be
completed before your next set drive time.
A calendar view allows you to program two
My GO Times per day for each of the seven
days of the week. Remember, your vehicle
must be plugged in for My GO time to work.
Cabin Preconditioning
Get the most miles out of every charge by
preconditioning your vehicle while it’
s still
plugged in and charging. Use your smart
phone to set the cabin temperature and
departure time before you leave so you use
energy from your home wall outlet instead
of your battery to heat or cool your vehicle.
HIGH VOLTAGE BATTERY CUT-
OFF SWITCH
The high voltage shut off operation shuts
off power from the high-voltage battery
after a collision, or if your vehicle receives
a substantial physical jolt.
To reactivate your vehicle after either
event, perform the following steps:
120
Focus (CDH), enUSA, First Printing High Voltage BatteryE144781