2015 FORD FOCUS ELECTRIC display
[x] Cancel search: displayPage 101 of 369
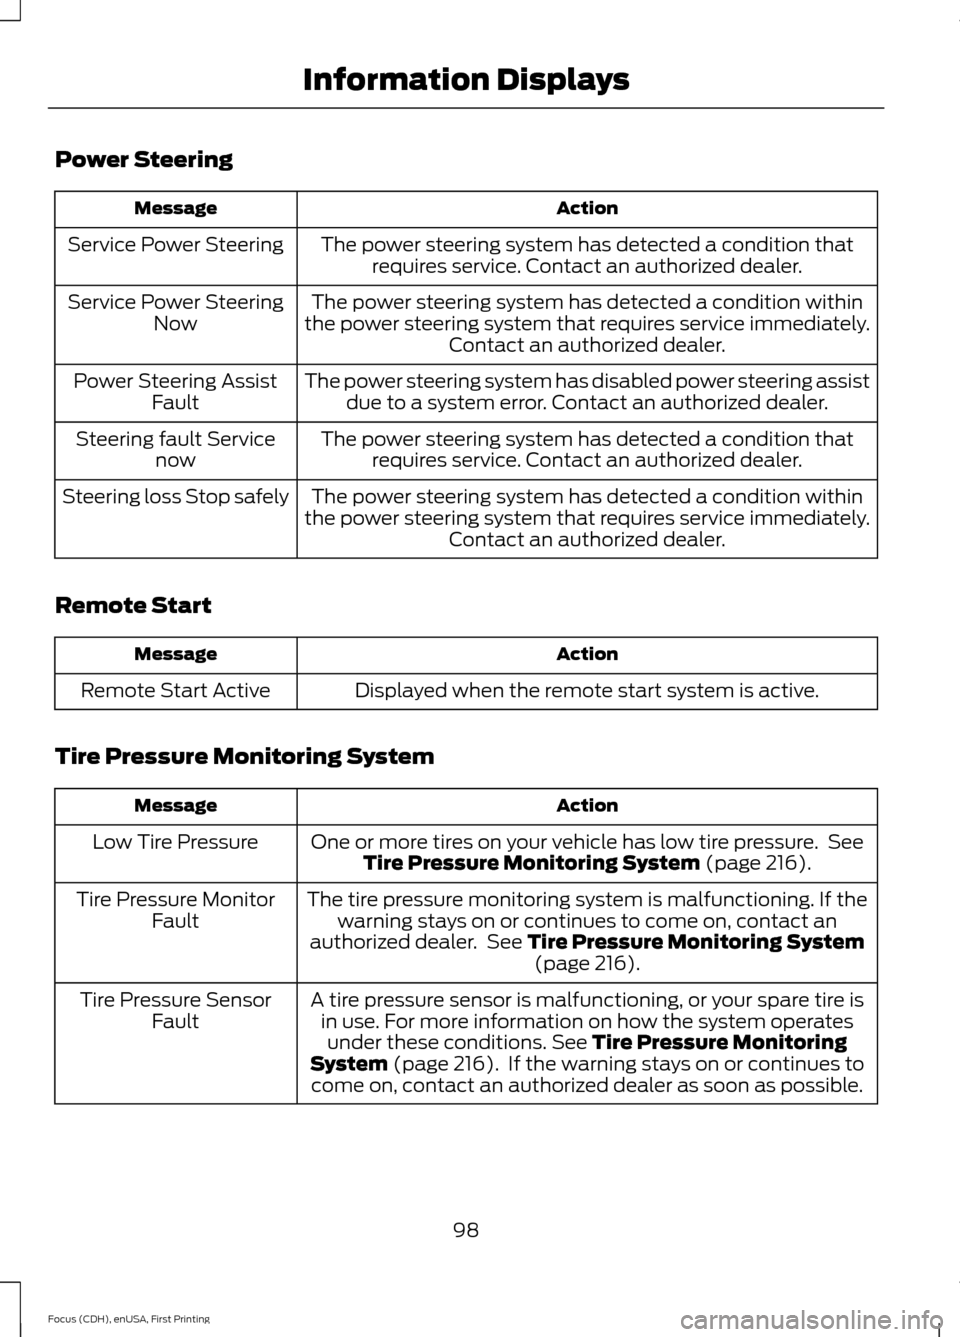
Power Steering
Action
Message
The power steering system has detected a condition thatrequires service. Contact an authorized dealer.
Service Power Steering
The power steering system has detected a condition within
the power steering system that requires service immediately. Contact an authorized dealer.
Service Power Steering
Now
The power steering system has disabled power steering assistdue to a system error. Contact an authorized dealer.
Power Steering Assist
Fault
The power steering system has detected a condition thatrequires service. Contact an authorized dealer.
Steering fault Service
now
The power steering system has detected a condition within
the power steering system that requires service immediately. Contact an authorized dealer.
Steering loss Stop safely
Remote Start Action
Message
Displayed when the remote start system is active.
Remote Start Active
Tire Pressure Monitoring System Action
Message
One or more tires on your vehicle has low tire pressure. SeeTire Pressure Monitoring System (page 216).
Low Tire Pressure
The tire pressure monitoring system is malfunctioning. If thewarning stays on or continues to come on, contact an
authorized dealer. See
Tire Pressure Monitoring System (page 216).
Tire Pressure Monitor
Fault
A tire pressure sensor is malfunctioning, or your spare tire isin use. For more information on how the system operatesunder these conditions.
See Tire Pressure Monitoring
System (page 216). If the warning stays on or continues to
come on, contact an authorized dealer as soon as possible.
Tire Pressure Sensor
Fault
98
Focus (CDH), enUSA, First Printing Information Displays
Page 102 of 369
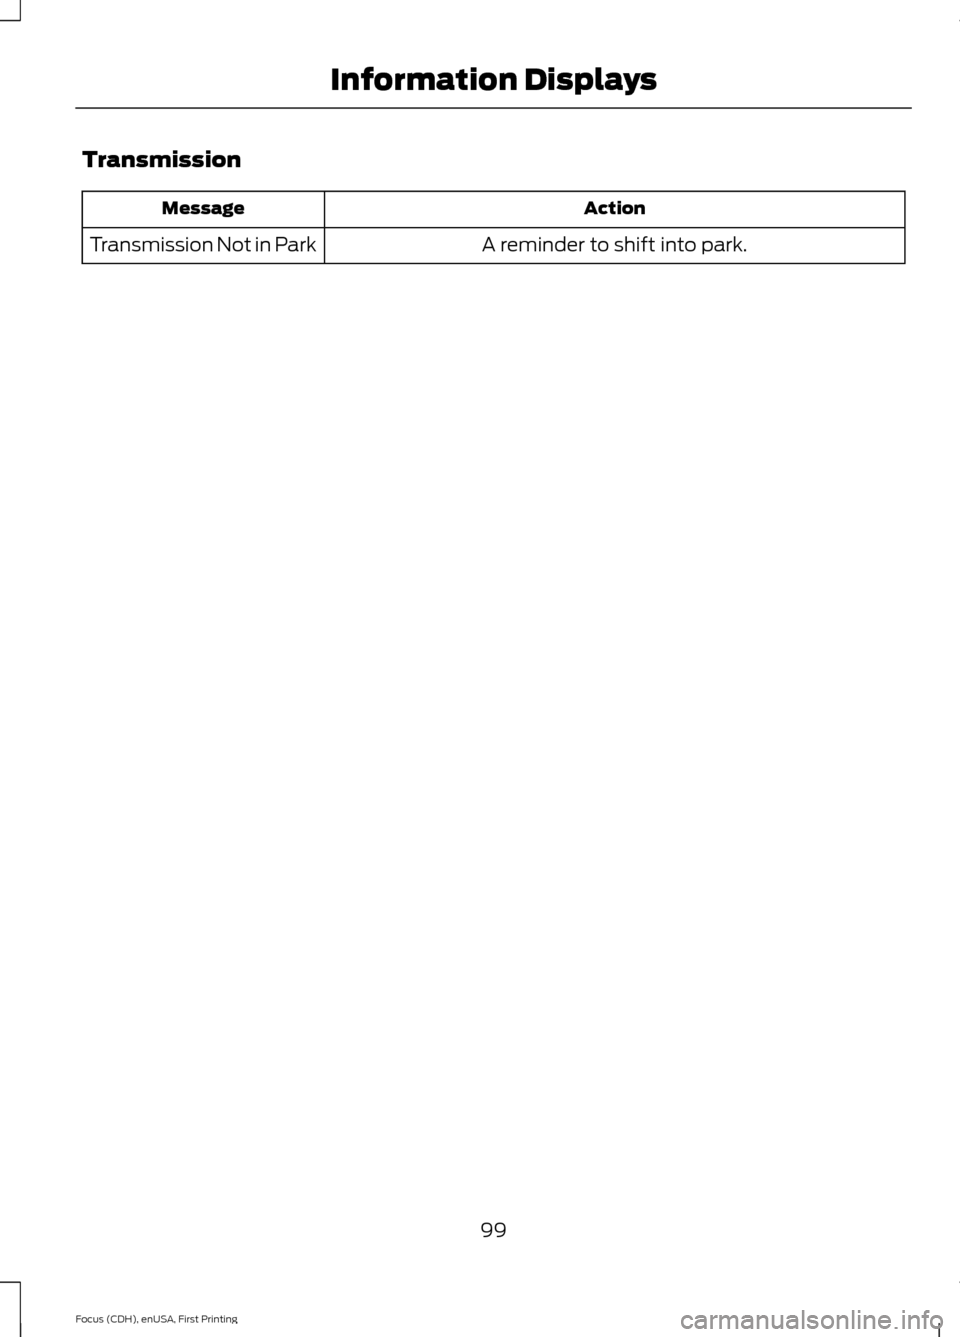
Transmission
Action
Message
A reminder to shift into park.
Transmission Not in Park
99
Focus (CDH), enUSA, First Printing Information Displays
Page 103 of 369
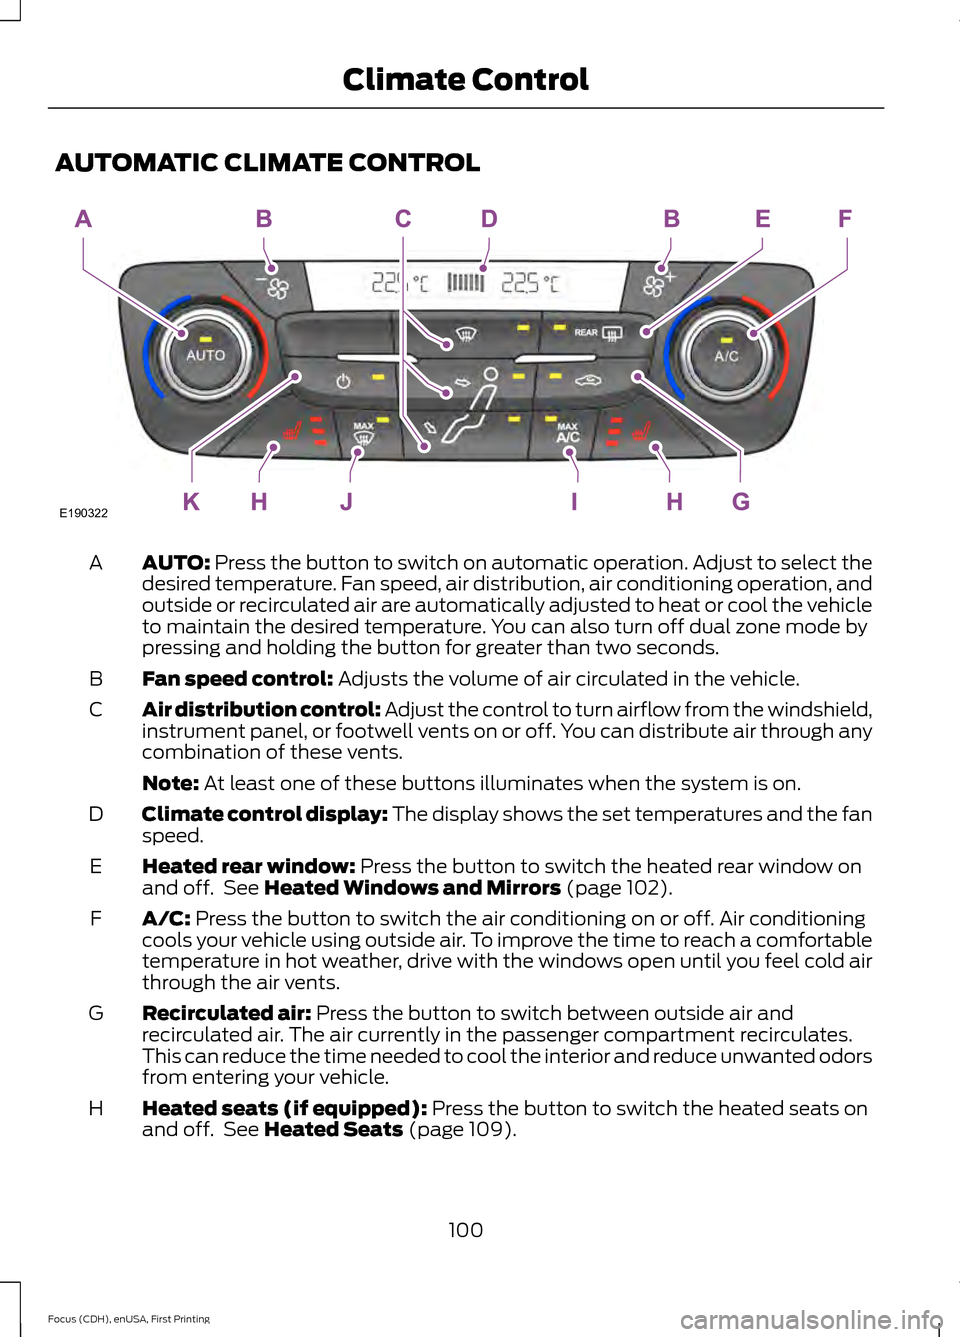
AUTOMATIC CLIMATE CONTROL
AUTO: Press the button to switch on automatic operation. Adjust to select the
desired temperature. Fan speed, air distribution, air conditioning operation, and
outside or recirculated air are automatically adjusted to heat or cool the vehicle
to maintain the desired temperature. You can also turn off dual zone mode by
pressing and holding the button for greater than two seconds.
A
Fan speed control:
Adjusts the volume of air circulated in the vehicle.
B
Air distribution control: Adjust the control to turn airflow from the windshield,
instrument panel, or footwell vents on or off. You can distribute air through any
combination of these vents.
C
Note:
At least one of these buttons illuminates when the system is on.
Climate control display: The display shows the set temperatures and the fan
speed.
D
Heated rear window:
Press the button to switch the heated rear window on
and off. See Heated Windows and Mirrors (page 102).
E
A/C:
Press the button to switch the air conditioning on or off. Air conditioning
cools your vehicle using outside air. To improve the time to reach a comfortable
temperature in hot weather, drive with the windows open until you feel cold air
through the air vents.
F
Recirculated air:
Press the button to switch between outside air and
recirculated air. The air currently in the passenger compartment recirculates.
This can reduce the time needed to cool the interior and reduce unwanted odors
from entering your vehicle.
G
Heated seats (if equipped):
Press the button to switch the heated seats on
and off. See Heated Seats (page 109).
H
100
Focus (CDH), enUSA, First Printing Climate ControlE190322
Page 104 of 369
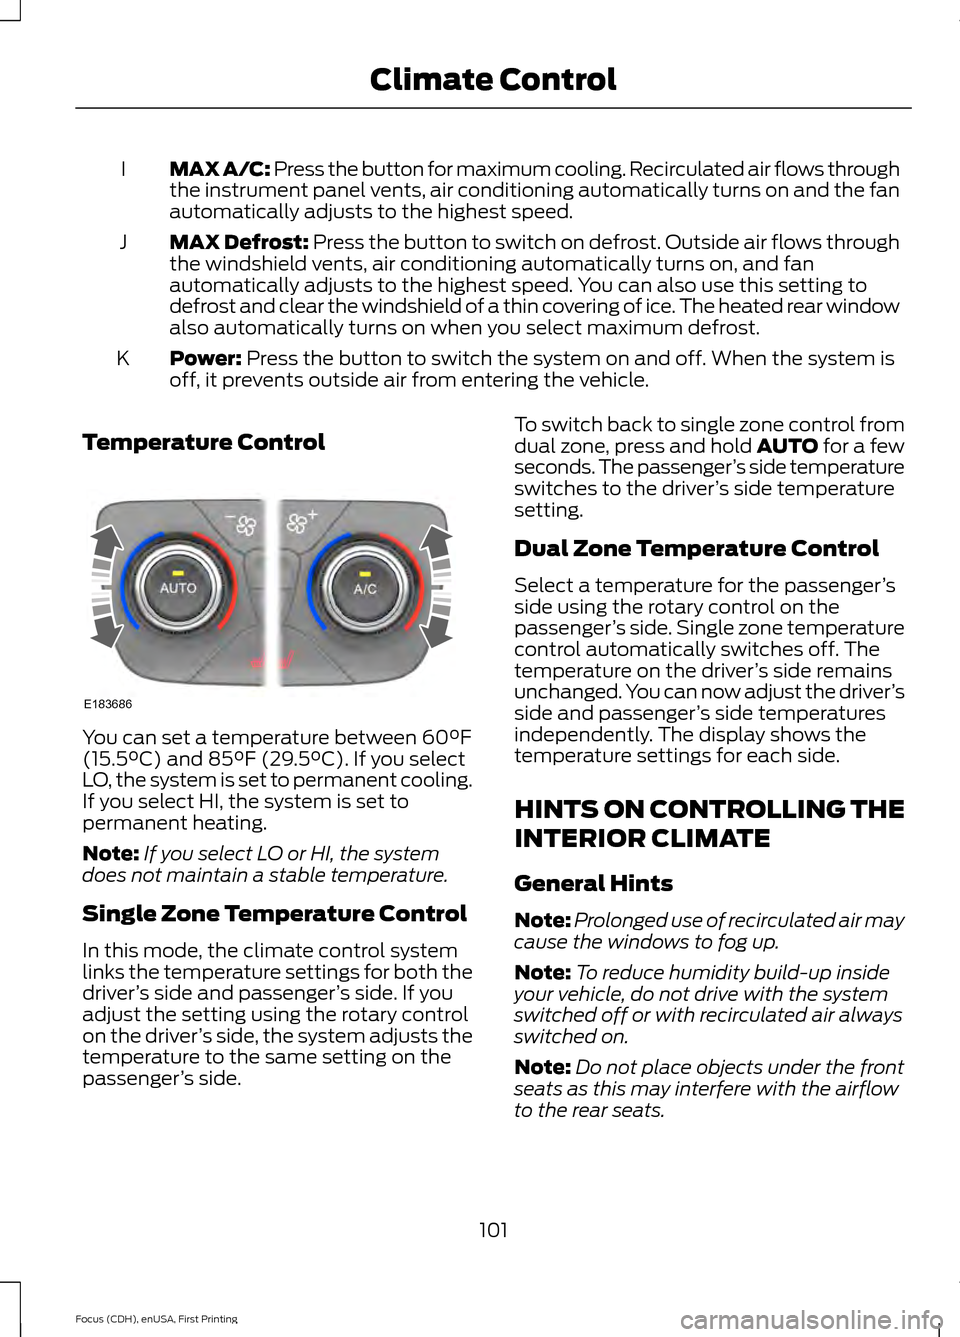
MAX A/C: Press the button for maximum cooling. Recirculated air flows through
the instrument panel vents, air conditioning automatically turns on and the fan
automatically adjusts to the highest speed.
I
MAX Defrost: Press the button to switch on defrost. Outside air flows through
the windshield vents, air conditioning automatically turns on, and fan
automatically adjusts to the highest speed. You can also use this setting to
defrost and clear the windshield of a thin covering of ice. The heated rear window
also automatically turns on when you select maximum defrost.
J
Power: Press the button to switch the system on and off. When the system is
off, it prevents outside air from entering the vehicle.
K
Temperature Control You can set a temperature between
60°F
(15.5°C) and 85°F (29.5°C). If you select
LO, the system is set to permanent cooling.
If you select HI, the system is set to
permanent heating.
Note: If you select LO or HI, the system
does not maintain a stable temperature.
Single Zone Temperature Control
In this mode, the climate control system
links the temperature settings for both the
driver ’s side and passenger ’s side. If you
adjust the setting using the rotary control
on the driver ’s side, the system adjusts the
temperature to the same setting on the
passenger ’s side. To switch back to single zone control from
dual zone, press and hold AUTO for a few
seconds. The passenger
’s side temperature
switches to the driver ’s side temperature
setting.
Dual Zone Temperature Control
Select a temperature for the passenger ’s
side using the rotary control on the
passenger ’s side. Single zone temperature
control automatically switches off. The
temperature on the driver ’s side remains
unchanged. You can now adjust the driver ’s
side and passenger ’s side temperatures
independently. The display shows the
temperature settings for each side.
HINTS ON CONTROLLING THE
INTERIOR CLIMATE
General Hints
Note: Prolonged use of recirculated air may
cause the windows to fog up.
Note: To reduce humidity build-up inside
your vehicle, do not drive with the system
switched off or with recirculated air always
switched on.
Note: Do not place objects under the front
seats as this may interfere with the airflow
to the rear seats.
101
Focus (CDH), enUSA, First Printing Climate ControlE183686
Page 106 of 369
Press the button to clear the
heated rear window of thin ice
and fog. The heated rear
window will automatically turn off after a
short period of time. Start the vehicle
before you switch the heated rear window
on.
Do not use razor blades or other sharp
objects to clean or remove decals from
the inside of the heated rear window.
The vehicle warranty does not cover
damage caused to the heated rear
window grid lines.
Heated Exterior Mirrors When you switch the heated
rear window on, the heated
exterior mirrors will
automatically turn on.
Note: Do not remove ice from the mirrors
with a scraper or adjust the mirror glass
when it is frozen in place.
Note: Do not clean the mirror housing or
glass with harsh abrasives, fuel or other
petroleum-based cleaning products.
CABIN AIR FILTER
Your vehicle is equipped with a cabin air
filter, which gives you and your passengers
the following benefits:
• It improves your driving comfort by
reducing particle concentration.
• It improves the interior compartment
cleanliness.
• It protects the climate control
components from particle deposits.
Note: Make sure you have a cabin air filter
installed at all times. This prevents foreign
objects from entering the system. Running
the system without a filter in place could
result in degradation or damage to the
system. Replace the filter at regular intervals. See
Scheduled Maintenance (page 347).
For additional cabin air filter information,
or to replace the filter, see an authorized
dealer.
REMOTE START
You can switch this feature on or off and
adjust the settings using the information
display.
The system adjusts the interior
temperature depending on your chosen
settings during remote start.
You cannot adjust the climate control
setting during remote start operation.
When you switch the ignition on the
climate control system returns to the
previous settings.
When you switch the ignition on, you may
have to switch the following features back
on:
• Heated seats.
• Heated rear window.
• Heated exterior mirrors.
Note: You can control the system through
SYNC using an applicable phone app. See
your phones user manual or visit
www.SYNCMyRide.com.
103
Focus (CDH), enUSA, First Printing Climate ControlE72507 E72507
Page 115 of 369
STARTING THE ELECTRIC
MOTOR
Keyless Starting
Note:
The system may not function if the
passive key is close to metal objects or
electronic devices, for example keys or a cell
phone.
Note: A valid passive key must be located
inside your vehicle to switch the ignition on
and start your vehicle.
Note: Passive keys left inside your vehicle
when locked are disabled. A message may
appear in the information display indicating
that there is no key detected when you try
to start your vehicle. Press the unlock
button on the remote control to enable it,
and then start your vehicle.
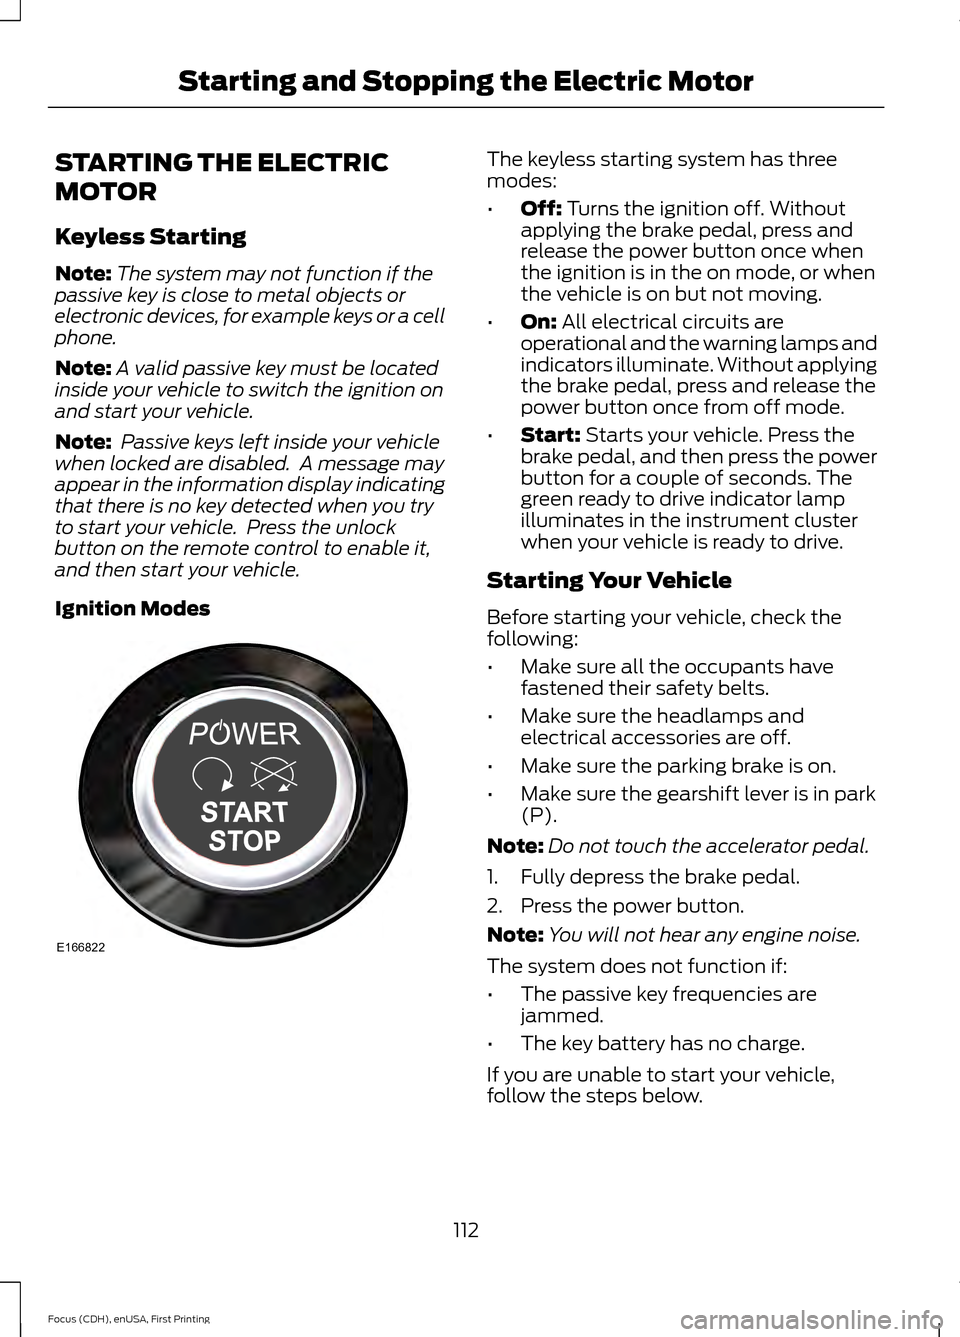
Ignition Modes The keyless starting system has three
modes:
•
Off: Turns the ignition off. Without
applying the brake pedal, press and
release the power button once when
the ignition is in the on mode, or when
the vehicle is on but not moving.
• On:
All electrical circuits are
operational and the warning lamps and
indicators illuminate. Without applying
the brake pedal, press and release the
power button once from off mode.
• Start:
Starts your vehicle. Press the
brake pedal, and then press the power
button for a couple of seconds. The
green ready to drive indicator lamp
illuminates in the instrument cluster
when your vehicle is ready to drive.
Starting Your Vehicle
Before starting your vehicle, check the
following:
• Make sure all the occupants have
fastened their safety belts.
• Make sure the headlamps and
electrical accessories are off.
• Make sure the parking brake is on.
• Make sure the gearshift lever is in park
(P).
Note: Do not touch the accelerator pedal.
1. Fully depress the brake pedal.
2. Press the power button.
Note: You will not hear any engine noise.
The system does not function if:
• The passive key frequencies are
jammed.
• The key battery has no charge.
If you are unable to start your vehicle,
follow the steps below.
112
Focus (CDH), enUSA, First Printing Starting and Stopping the Electric MotorE166822
Page 121 of 369
Charge Port
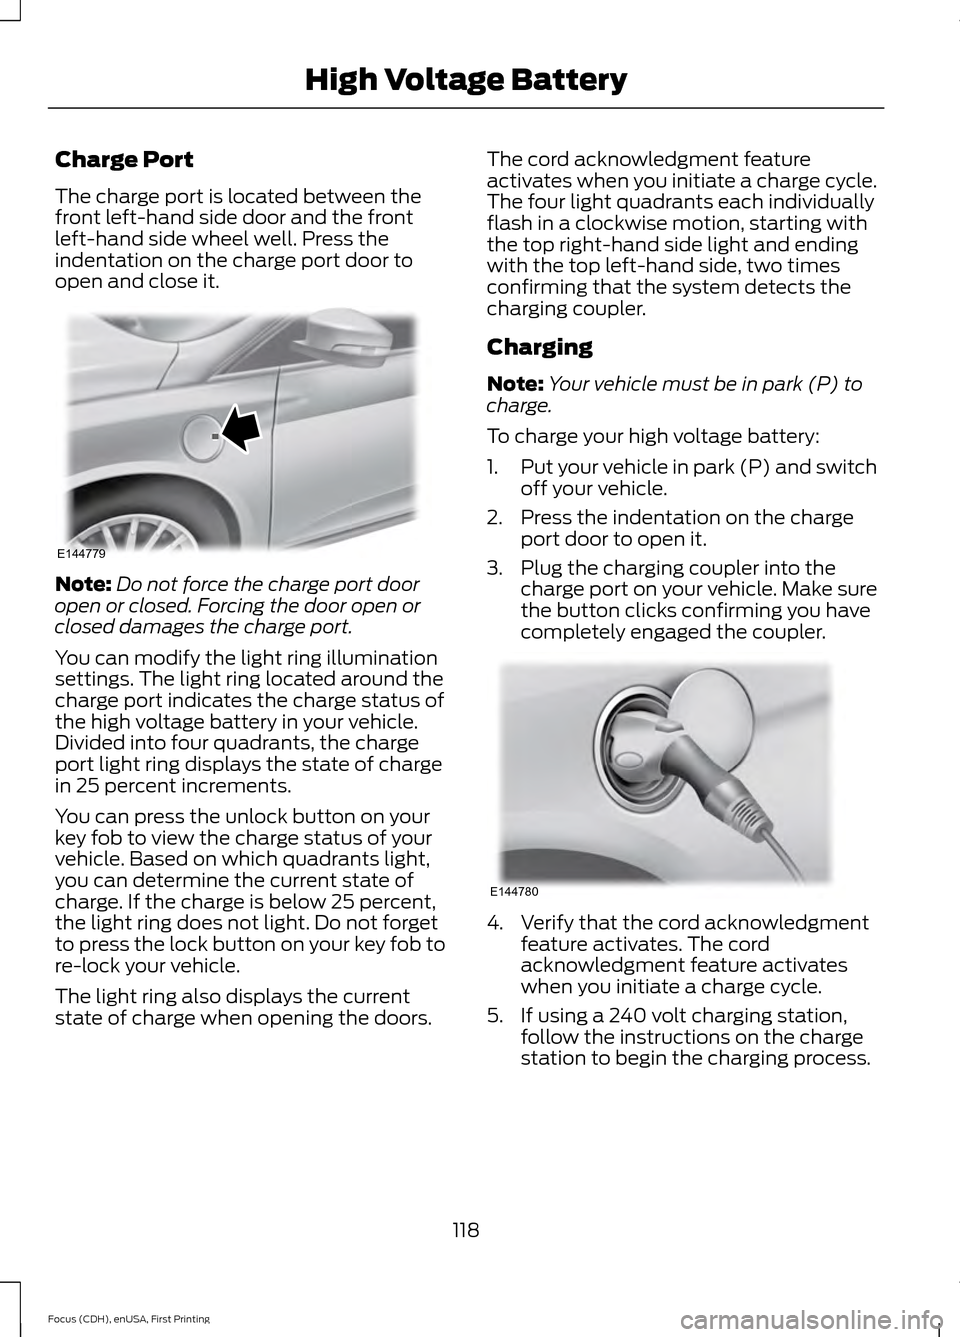
The charge port is located between the
front left-hand side door and the front
left-hand side wheel well. Press the
indentation on the charge port door to
open and close it.
Note:
Do not force the charge port door
open or closed. Forcing the door open or
closed damages the charge port.
You can modify the light ring illumination
settings. The light ring located around the
charge port indicates the charge status of
the high voltage battery in your vehicle.
Divided into four quadrants, the charge
port light ring displays the state of charge
in 25 percent increments.
You can press the unlock button on your
key fob to view the charge status of your
vehicle. Based on which quadrants light,
you can determine the current state of
charge. If the charge is below 25 percent,
the light ring does not light. Do not forget
to press the lock button on your key fob to
re-lock your vehicle.
The light ring also displays the current
state of charge when opening the doors. The cord acknowledgment feature
activates when you initiate a charge cycle.
The four light quadrants each individually
flash in a clockwise motion, starting with
the top right-hand side light and ending
with the top left-hand side, two times
confirming that the system detects the
charging coupler.
Charging
Note:
Your vehicle must be in park (P) to
charge.
To charge your high voltage battery:
1. Put your vehicle in park (P) and switch
off your vehicle.
2. Press the indentation on the charge port door to open it.
3. Plug the charging coupler into the charge port on your vehicle. Make sure
the button clicks confirming you have
completely engaged the coupler. 4. Verify that the cord acknowledgment
feature activates. The cord
acknowledgment feature activates
when you initiate a charge cycle.
5. If using a 240 volt charging station, follow the instructions on the charge
station to begin the charging process.
118
Focus (CDH), enUSA, First Printing High Voltage BatteryE144779 E144780
Page 122 of 369
The light ring located around the charge
port indicates the charge status of the high
voltage battery in your vehicle:
•
When the top right-hand side quadrant
is pulsing, the charge is between 0-25
percent.
• When the top right-hand side quadrant
is on and the bottom right-hand
quadrant is pulsing, the charge is
between 25-50 percent.
• When both right-hand side quadrants
are on and the bottom left-hand side
quadrant is pulsing, the charge is
between 50-75 percent.
• When three quadrants are on and the
top left-hand side quadrant is pulsing,
the charge is between 75-100 percent.
• When all the lights on the light ring are
on, the charge is complete.
Note: The light ring will turn off one minute
after reaching a full charge.
Locking the Charging Coupler
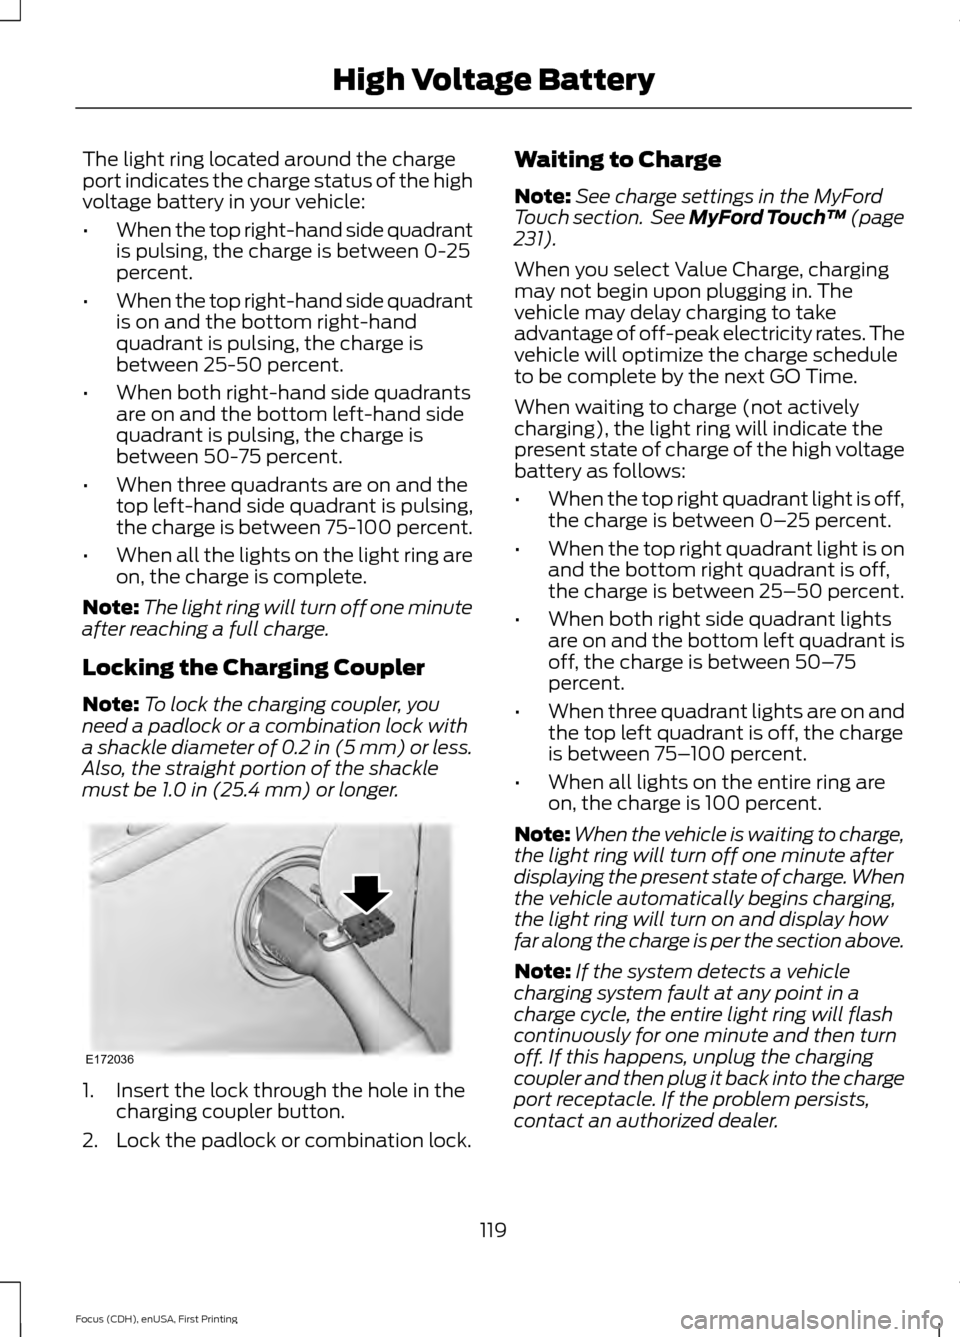
Note: To lock the charging coupler, you
need a padlock or a combination lock with
a shackle diameter of 0.2 in (5 mm) or less.
Also, the straight portion of the shackle
must be 1.0 in (25.4 mm) or longer. 1. Insert the lock through the hole in the
charging coupler button.
2. Lock the padlock or combination lock. Waiting to Charge
Note:
See charge settings in the MyFord
Touch section. See MyFord Touch ™
(page
231).
When you select Value Charge, charging
may not begin upon plugging in. The
vehicle may delay charging to take
advantage of off-peak electricity rates. The
vehicle will optimize the charge schedule
to be complete by the next GO Time.
When waiting to charge (not actively
charging), the light ring will indicate the
present state of charge of the high voltage
battery as follows:
• When the top right quadrant light is off,
the charge is between 0– 25 percent.
• When the top right quadrant light is on
and the bottom right quadrant is off,
the charge is between 25–50 percent.
• When both right side quadrant lights
are on and the bottom left quadrant is
off, the charge is between 50– 75
percent.
• When three quadrant lights are on and
the top left quadrant is off, the charge
is between 75– 100 percent.
• When all lights on the entire ring are
on, the charge is 100 percent.
Note: When the vehicle is waiting to charge,
the light ring will turn off one minute after
displaying the present state of charge. When
the vehicle automatically begins charging,
the light ring will turn on and display how
far along the charge is per the section above.
Note: If the system detects a vehicle
charging system fault at any point in a
charge cycle, the entire light ring will flash
continuously for one minute and then turn
off. If this happens, unplug the charging
coupler and then plug it back into the charge
port receptacle. If the problem persists,
contact an authorized dealer.
119
Focus (CDH), enUSA, First Printing High Voltage BatteryE172036