2015 FORD FOCUS ELECTRIC warning light
[x] Cancel search: warning lightPage 126 of 369
WARNINGS
If the parking brake is fully released,
but the brake warning lamp remains
illuminated, the brakes may not be
working properly. See your authorized
dealer. In the event of an electrical malfunction or
if the vehicle battery has no charge, use
the following procedure to shift the
gearshift lever from the park (P) position.
Apply the parking brake and switch the
ignition off before carrying out this
procedure.
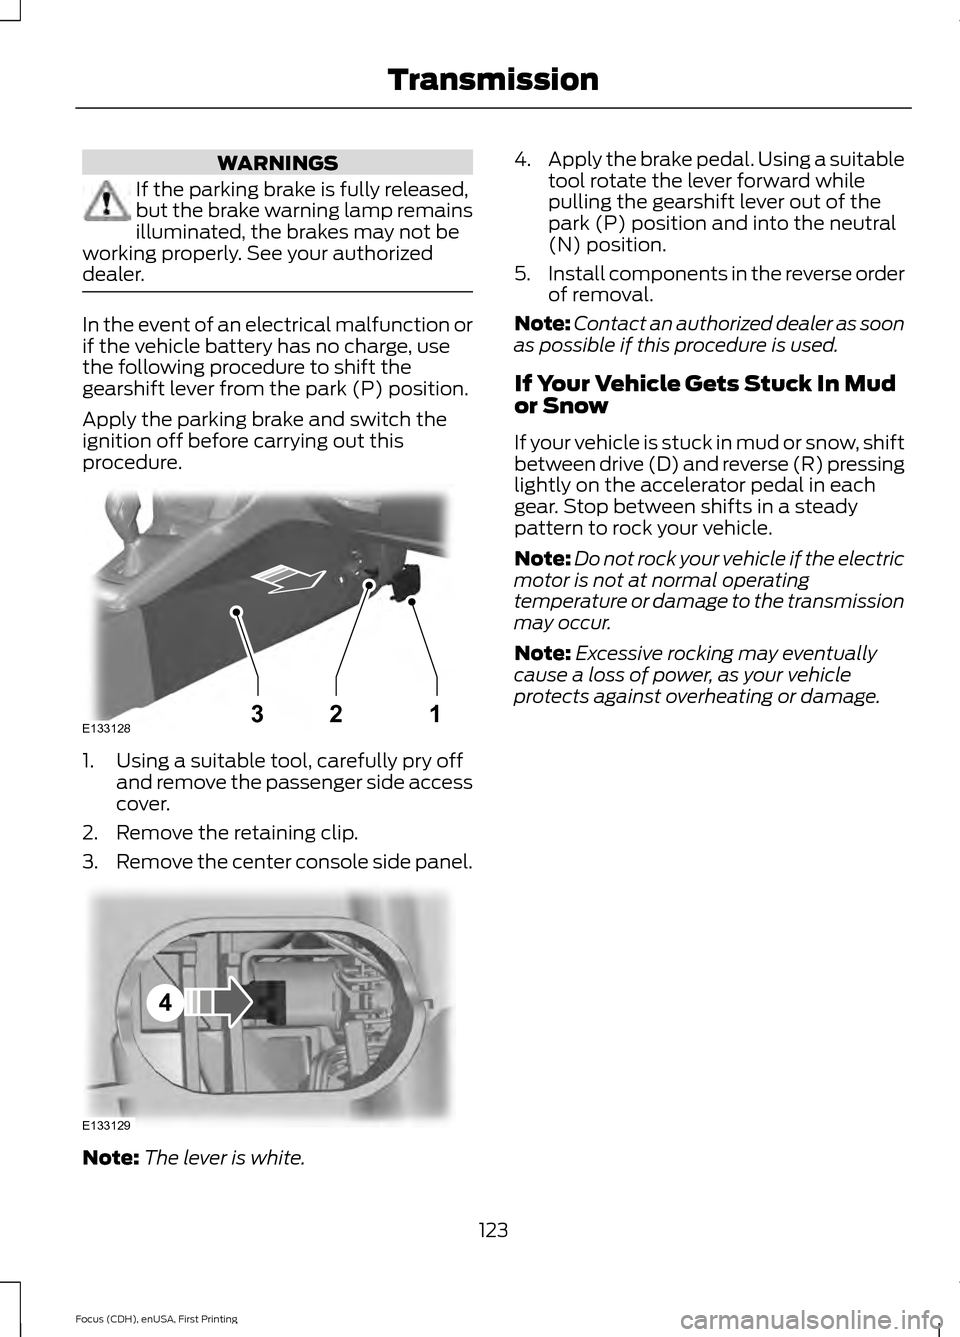
1. Using a suitable tool, carefully pry off
and remove the passenger side access
cover.
2. Remove the retaining clip.
3. Remove the center console side panel. Note:
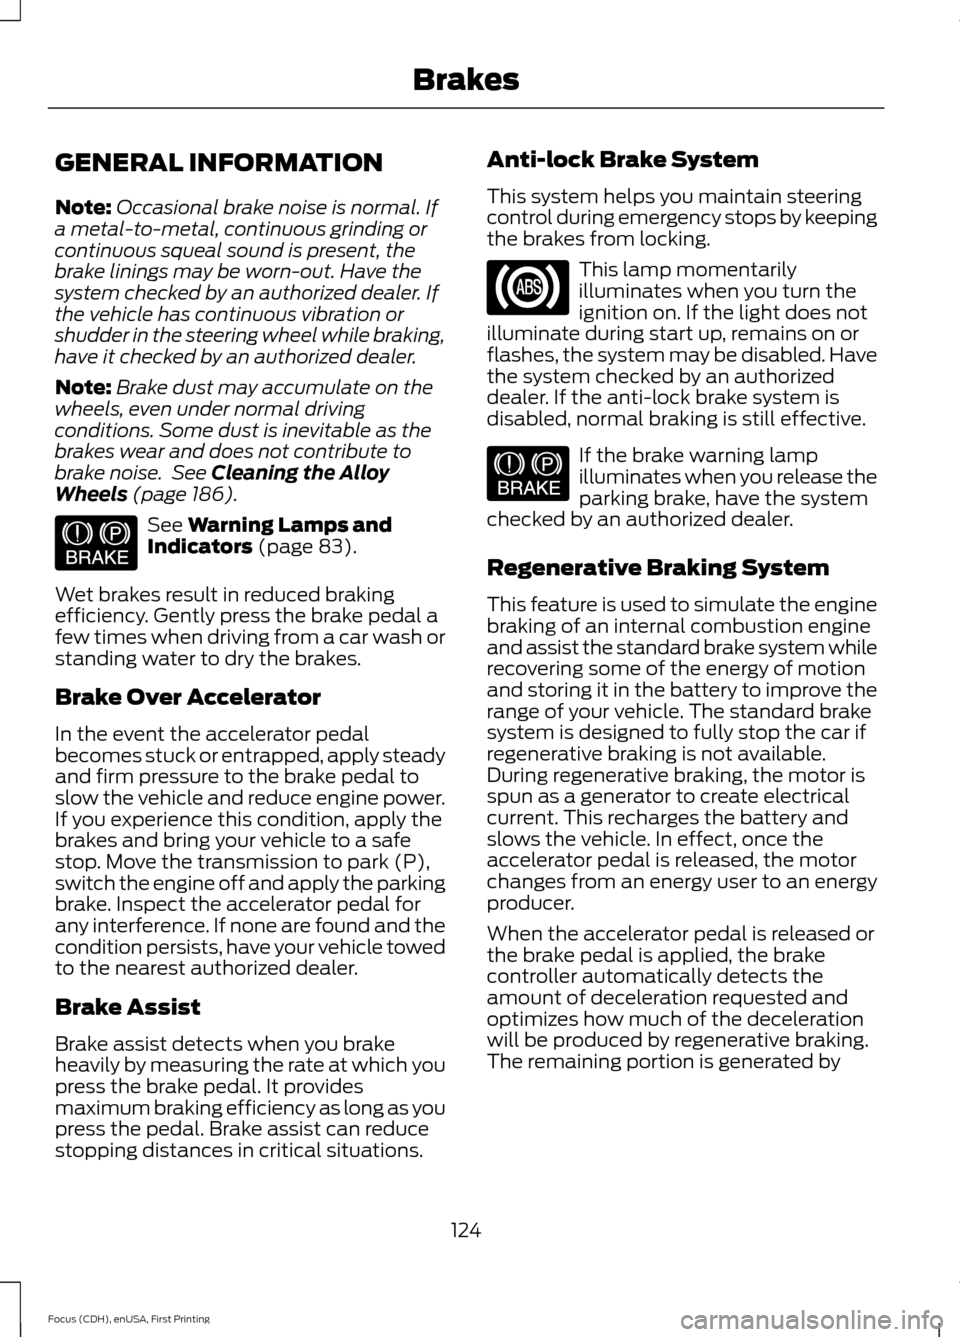
The lever is white. 4.
Apply the brake pedal. Using a suitable
tool rotate the lever forward while
pulling the gearshift lever out of the
park (P) position and into the neutral
(N) position.
5. Install components in the reverse order
of removal.
Note: Contact an authorized dealer as soon
as possible if this procedure is used.
If Your Vehicle Gets Stuck In Mud
or Snow
If your vehicle is stuck in mud or snow, shift
between drive (D) and reverse (R) pressing
lightly on the accelerator pedal in each
gear. Stop between shifts in a steady
pattern to rock your vehicle.
Note: Do not rock your vehicle if the electric
motor is not at normal operating
temperature or damage to the transmission
may occur.
Note: Excessive rocking may eventually
cause a loss of power, as your vehicle
protects against overheating or damage.
123
Focus (CDH), enUSA, First Printing TransmissionE133128132 E133129
4
Page 127 of 369
GENERAL INFORMATION
Note:
Occasional brake noise is normal. If
a metal-to-metal, continuous grinding or
continuous squeal sound is present, the
brake linings may be worn-out. Have the
system checked by an authorized dealer. If
the vehicle has continuous vibration or
shudder in the steering wheel while braking,
have it checked by an authorized dealer.
Note: Brake dust may accumulate on the
wheels, even under normal driving
conditions. Some dust is inevitable as the
brakes wear and does not contribute to
brake noise. See Cleaning the Alloy
Wheels (page 186). See
Warning Lamps and
Indicators (page 83).
Wet brakes result in reduced braking
efficiency. Gently press the brake pedal a
few times when driving from a car wash or
standing water to dry the brakes.
Brake Over Accelerator
In the event the accelerator pedal
becomes stuck or entrapped, apply steady
and firm pressure to the brake pedal to
slow the vehicle and reduce engine power.
If you experience this condition, apply the
brakes and bring your vehicle to a safe
stop. Move the transmission to park (P),
switch the engine off and apply the parking
brake. Inspect the accelerator pedal for
any interference. If none are found and the
condition persists, have your vehicle towed
to the nearest authorized dealer.
Brake Assist
Brake assist detects when you brake
heavily by measuring the rate at which you
press the brake pedal. It provides
maximum braking efficiency as long as you
press the pedal. Brake assist can reduce
stopping distances in critical situations. Anti-lock Brake System
This system helps you maintain steering
control during emergency stops by keeping
the brakes from locking. This lamp momentarily
illuminates when you turn the
ignition on. If the light does not
illuminate during start up, remains on or
flashes, the system may be disabled. Have
the system checked by an authorized
dealer. If the anti-lock brake system is
disabled, normal braking is still effective. If the brake warning lamp
illuminates when you release the
parking brake, have the system
checked by an authorized dealer.
Regenerative Braking System
This feature is used to simulate the engine
braking of an internal combustion engine
and assist the standard brake system while
recovering some of the energy of motion
and storing it in the battery to improve the
range of your vehicle. The standard brake
system is designed to fully stop the car if
regenerative braking is not available.
During regenerative braking, the motor is
spun as a generator to create electrical
current. This recharges the battery and
slows the vehicle. In effect, once the
accelerator pedal is released, the motor
changes from an energy user to an energy
producer.
When the accelerator pedal is released or
the brake pedal is applied, the brake
controller automatically detects the
amount of deceleration requested and
optimizes how much of the deceleration
will be produced by regenerative braking.
The remaining portion is generated by
124
Focus (CDH), enUSA, First Printing BrakesE144522 E144522
Page 128 of 369
standard friction braking. When the battery
is almost fully charged, the amount of
regenerative braking is limited to avoid
overcharging, and the requested
deceleration is produced by standard
friction braking alone.
Regenerative braking does not take the
place of the standard friction brakes; it only
assists them. Regenerative braking has
also been designed to interact with the
anti-lock brake system. Regenerative
braking is disabled when the anti-lock
brake system is activated or the battery is
fully charged.
HINTS ON DRIVING WITH
ANTI-LOCK BRAKES
Note:
When the system is operating, the
brake pedal will pulse and may travel
further. Maintain pressure on the brake
pedal. You may also hear a noise from the
system. This is normal.
The anti-lock braking system will not
eliminate the risks when:
• You drive too closely to the vehicle in
front of you.
• Your vehicle is hydroplaning.
• You take corners too fast.
• The road surface is poor.
PARKING BRAKE WARNING
Always set the parking brake fully
and make sure you shift the gearshift
lever to park (P). Switch the ignition
off and remove the key whenever you leave
your vehicle. Note:
Do not press the release button while
pulling the lever up.
To apply the parking brake: 1. Press the foot brake pedal firmly.
2. Pull the parking brake lever up to its
fullest extent.
Note: If you park your vehicle on a hill and
facing uphill, shift the gearshift lever to park
(P) and turn the steering wheel away from
the curb.
Note: If you park your vehicle on a hill and
facing downhill, shift the gearshift lever to
park (P) and turn the steering wheel toward
the curb.
To release the parking brake:
1. Press the brake pedal firmly.
2. Pull the lever up slightly.
3. Press the release button and push the lever down.
HILL START ASSIST WARNINGS
The system does not replace the
parking brake. When you leave your
vehicle, always apply the parking
brake and shift the transmission into park
(P) for automatic transmission or first gear
for manual transmission. You must remain in your vehicle once
you have activated the system.
During all times, you are responsible
for controlling your vehicle,
supervising the system and
intervening, if required. If the engine is revved excessively, or
if a malfunction is detected, the
system will be deactivated.
The system makes it easier to pull away
when your vehicle is on a slope without the
need to use the parking brake.
125
Focus (CDH), enUSA, First Printing Brakes
Page 129 of 369
When the system is active, your vehicle will
remain stationary on the slope for two to
three seconds after you release the brake
pedal. This allows you time to move your
foot from the brake to the accelerator
pedal. The brakes are released
automatically once the engine has
developed sufficient drive to prevent your
vehicle from rolling down the slope. This
is an advantage when pulling away on a
slope, for example from a car park ramp,
traffic lights or when reversing uphill into
a parking space.
The system will activate automatically on
any slope that will cause significant vehicle
rollback. For vehicles with a manual
transmission, you can switch this feature
off using the information display. See
Information Displays (page 86). The
system will remain on or off depending on
how it was last set.
Note: The system only functions when you
bring your vehicle to a complete stop. Shift
into reverse (R) when facing downhill and
first gear (1) when facing uphill.
Note: There is no warning lamp to indicate
the system is either on or off.
Using Hill Start Assist
1. Press the brake pedal to bring your vehicle to a complete standstill. Keep
the brake pedal pressed.
2. If the sensors detect that your vehicle is on a slope, the system will activate
automatically.
3. When you remove your foot from the brake pedal, your vehicle will remain
on the slope without rolling away for
about two or three seconds. This hold
time will automatically be extended if
you are in the process of driving off.
4. Drive off in the normal manner. The brakes will release automatically.
126
Focus (CDH), enUSA, First Printing Brakes
Page 135 of 369
Always use caution while reversing.
Objects in the red zone are closest to your
vehicle and objects in the green zone are
farther away. Objects are getting closer to
your vehicle as they move from the green
zone to the yellow or red zones. Use the
side view mirrors and rear view mirror to
get better coverage on both sides and rear
of your vehicle.
Manual Zoom
WARNING
When manual zoom is on, the full
area behind your vehicle may not
show. Be aware of your surroundings
when using the manual zoom feature. Note:
Manual zoom is only available when
the transmission is in reverse (R).
Note: When you enable manual zoom, only
the centerline is shown.
Selectable settings for this feature are
Zoom in (+) and Zoom out (-). Press the
symbol in the camera screen to change the
view. The default setting is Zoom OFF.
This allows you to get a closer view of an
object behind your vehicle. The zoomed
image keeps the bumper in the image to
provide a reference. The zoom is only
active while the transmission is in reverse
(R).
Camera System Settings
To access any of the rear view camera
system settings, make the following
selections in the multifunctional display
when the transmission is not in reverse (R):
• With Touch Screen: Settings > Vehicle
> Camera Settings
• Without Touch Screen: Menu > Camera
Settings Enhanced Park Aids or Park Pilot (If
Equipped)
Selectable settings for this feature are ON
and OFF.
The system uses red, yellow and green
highlights that appear on top of the video
image when any of the sensing systems
detect an object.
Rear Camera Delay
Selectable settings for this feature are ON
and OFF.
The default setting for the rear camera
delay is OFF.
When shifting the transmission out of
reverse (R) and into any gear other than
park (P), the camera image remains in the
display until:
•
Your vehicle speed sufficiently
increases.
• You shift your vehicle into park (P).
• 10 seconds of time elapse.
132
Focus (CDH), enUSA, First Printing Parking Aids
Page 148 of 369
BREAKING-IN
You need to break in new tires for
approximately 300 mi (480 km). During
this time, your vehicle may exhibit some
unusual driving characteristics.
Avoid hard accelerations and driving too
fast during the first
1000 mi (1,600 km).
COLD WEATHER
PRECAUTIONS
The functional operation of some
components and systems can be affected
at temperatures below
-13°F (-25°C).
DRIVING THROUGH WATER WARNING
Do not drive through flowing or deep
water as you may lose control of your
vehicle.
Note:
Driving through standing water can
cause vehicle damage.
Note: Engine damage can occur if water
enters the air filter.
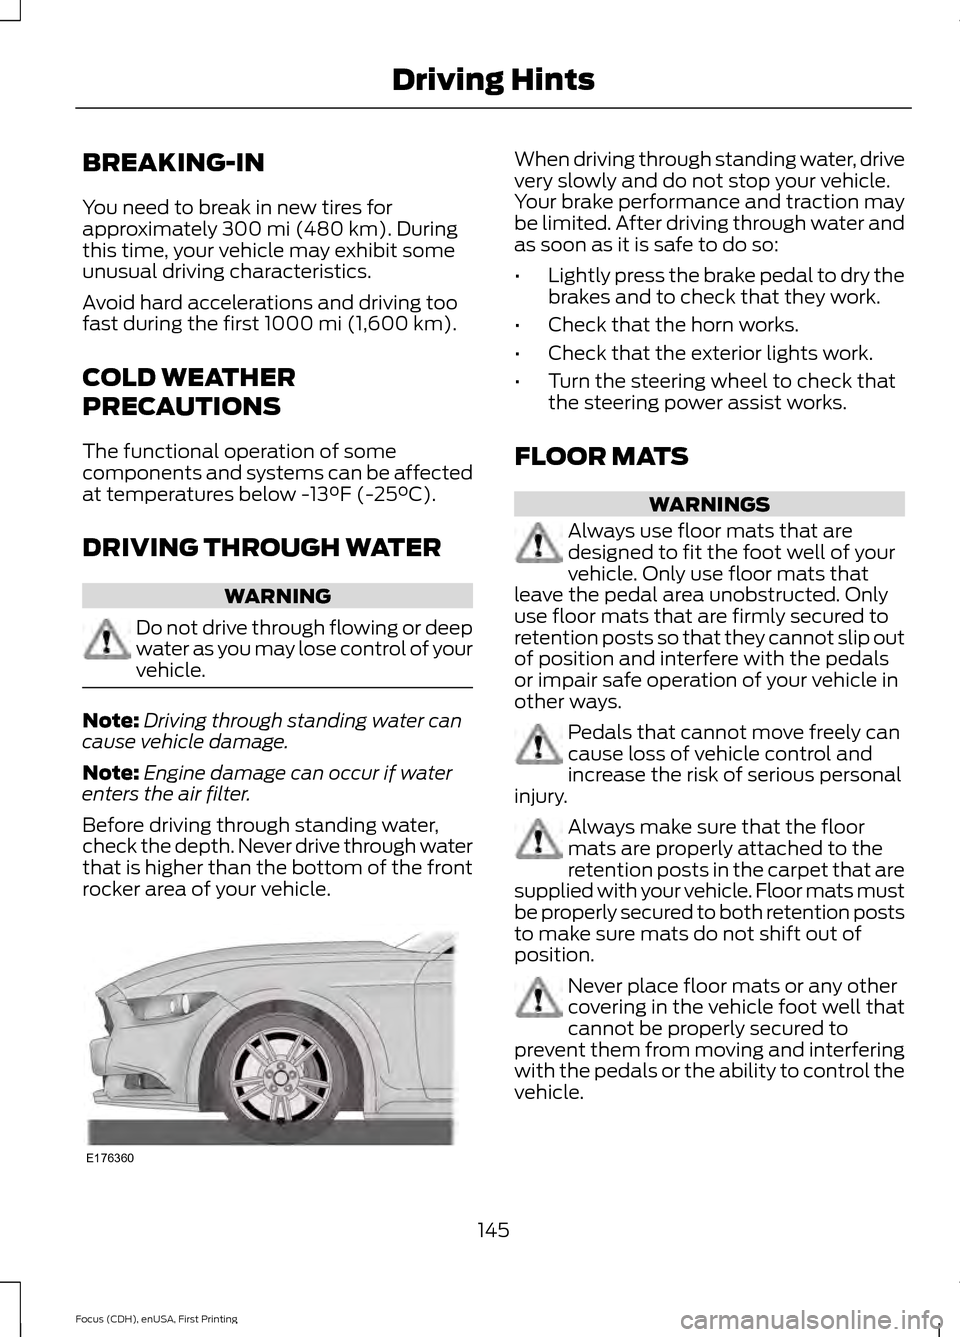
Before driving through standing water,
check the depth. Never drive through water
that is higher than the bottom of the front
rocker area of your vehicle. When driving through standing water, drive
very slowly and do not stop your vehicle.
Your brake performance and traction may
be limited. After driving through water and
as soon as it is safe to do so:
•
Lightly press the brake pedal to dry the
brakes and to check that they work.
• Check that the horn works.
• Check that the exterior lights work.
• Turn the steering wheel to check that
the steering power assist works.
FLOOR MATS WARNINGS
Always use floor mats that are
designed to fit the foot well of your
vehicle. Only use floor mats that
leave the pedal area unobstructed. Only
use floor mats that are firmly secured to
retention posts so that they cannot slip out
of position and interfere with the pedals
or impair safe operation of your vehicle in
other ways. Pedals that cannot move freely can
cause loss of vehicle control and
increase the risk of serious personal
injury. Always make sure that the floor
mats are properly attached to the
retention posts in the carpet that are
supplied with your vehicle. Floor mats must
be properly secured to both retention posts
to make sure mats do not shift out of
position. Never place floor mats or any other
covering in the vehicle foot well that
cannot be properly secured to
prevent them from moving and interfering
with the pedals or the ability to control the
vehicle.
145
Focus (CDH), enUSA, First Printing Driving HintsE176360
Page 171 of 369
Circuit switched
Relay Type
Relay
Not used.
-
R4
Not used.
-
R5
Not used.
-
R6
CHANGING A FUSE
Fuses WARNING
Always replace a fuse with one that
has the specified amperage rating.
Using a fuse with a higher amperage
rating can cause severe wire damage and
could start a fire. If electrical components in the vehicle are
not working, a fuse may have blown. Blown
fuses are identified by a broken wire within
the fuse. Check the appropriate fuses
before replacing any electrical
components.
Standard Fuse Amperage Rating and Color Color
J-type fuses
M-type fuses
Dual micro fuses
Micro fuses
Fuse rating
-
-
Tan
Tan
5A
-
-
Brown
Brown
7.5A
-
-
Red
Red
10A
-
Grey
Blue
Blue
15A
Blue
Light Blue
-
Yellow
20A
White
White
-
White
25A
Pink
Pink
-
Green
30A
Green
Green
-
-
40A
Red
-
-
-
50A
Yellow
-
-
-
60A
168
Focus (CDH), enUSA, First Printing FusesE142430
Page 174 of 369
Coolant reservoir. See Coolant Check (page 171).
A
Brake fluid reservoir. See
Brake Fluid Check (page 173).
B
12 volt battery. See
Changing the 12V Battery (page 173).
C
Electric motor compartment fuse box. See
Fuses (page 158).
D
Windshield washer fluid reservoir. See
Washer Fluid Check (page 173).
E
COOLANT CHECK WARNINGS
Do not add coolant when the electric
motor is hot. Steam and scalding
liquids released from a hot cooling
system can cause severe burns. You could
receive burns if you spill coolant on hot
motor parts. Failure to follow this warning
could result in serious personal injury. Do not put coolant in the windshield
washer fluid container. If sprayed on
the windshield, coolant could make
it difficult to see through the windshield.
Failure to follow this warning could result
in serious personal injury or death. To reduce the risk of personal injury,
make sure the electric motor is cool
before unscrewing the coolant
pressure relief cap. The cooling system is
under pressure; steam and hot liquid can
come out forcefully when the cap is
loosened slightly. Failure to follow this
warning could result in serious personal
injury. Do not add coolant further than the
MAX mark.
When the electric motor is cold, check the
level and concentration of the coolant in
the reservoir at the intervals listed in the
scheduled maintenance information.
Note:
Make sure that the coolant level is
between the MIN and MAX marks on the
coolant reservoir. Note:
Coolant expands when it is hot. The
level may extend beyond the MAX mark.
Note: If the level is at the MIN mark, below
the MIN mark or empty, add coolant
immediately.
Maintain coolant concentration within
48% to 50%, which equates to a freeze
point between -30°F (-34°C) and -34°F
(-37°C).
Note: For best results, coolant
concentration should be tested with a
refractometer such as Robinair Coolant and
Battery Refractometer 75240. We do not
recommend the use of hydrometers or
coolant test strips for measuring coolant
concentrations.
Note: It is very important to use prediluted
coolant meeting the Ford specification in
order to avoid plugging the small coolant
passageways. Use of concentrated coolant
and water may cause coolant passageway
plugging and void the warranty. See
Capacities and Specifications (page 225).
Note: Automotive fluids are not
interchangeable; do not use coolant,
antifreeze or windshield washer fluid outside
of its specified function and vehicle location.
Adding Coolant
Note: Do not use stop leak pellets or
cooling system sealants or additives as they
can cause damage to the cooling and
heating systems. This damage would not
be covered under your vehicle warranty.
171
Focus (CDH), enUSA, First Printing Maintenance