2015 FORD FOCUS ELECTRIC lights
[x] Cancel search: lightsPage 194 of 369
What to do When a Tire Is
Punctured
Repair a tire puncture within the tire's tread
area in two stages with the kit.
•
In the first stage, inflate the tire with a
sealing compound and air. After you
inflate the tire, you will need to drive
the vehicle a short distance (about 4
miles [6 kilometers]) to distribute the
sealant in the tire.
• In the second stage, check the tire
pressure and adjust, if necessary, to the
vehicle's specified tire inflation
pressure.
First Stage: Inflating the Tire with
Sealing Compound and Air WARNINGS
Do not stand directly over the kit
while inflating the tire. If you notice
any unusual bulges or deformations
in the tire's sidewall during inflation, stop
and call roadside assistance. If the tire does not inflate to the
recommended tire pressure within
15 minutes, stop and call roadside
assistance. Preparation: Park the vehicle in a safe, level
and secure area, away from moving traffic.
Switch the hazard lights on. Apply the
parking brake and switch the engine off.
Inspect the flat tire for visible damage.
WARNING
Do not run the engine during kit
operation unless the vehicle is
outdoors or in a well-ventilated area.
Sealant compound contains latex. To
avoid any allergic reactions, use the
non-latex gloves found in the accessory
box on the underside of the kit housing. Do not remove any foreign object that has
pierced the tire. If a puncture is located in
the tire sidewall, stop and call roadside
assistance.
1. Remove the valve cap from the tire
valve.
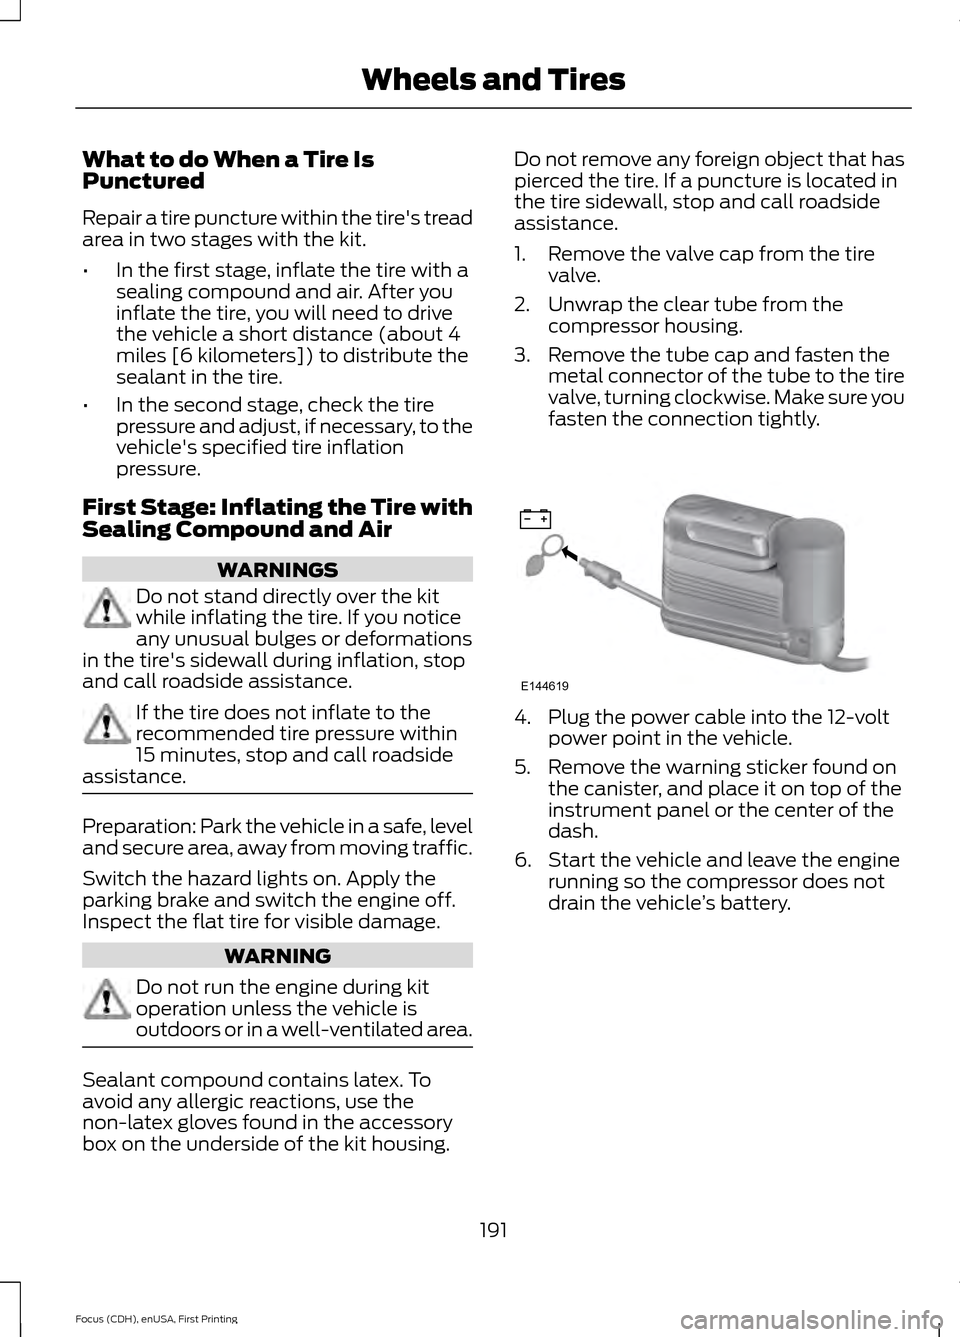
2. Unwrap the clear tube from the compressor housing.
3. Remove the tube cap and fasten the metal connector of the tube to the tire
valve, turning clockwise. Make sure you
fasten the connection tightly. 4. Plug the power cable into the 12-volt
power point in the vehicle.
5. Remove the warning sticker found on the canister, and place it on top of the
instrument panel or the center of the
dash.
6. Start the vehicle and leave the engine running so the compressor does not
drain the vehicle ’s battery.
191
Focus (CDH), enUSA, First Printing Wheels and TiresE144619
Page 199 of 369
•
Read all instructions and cautions fully.
• Before operating the kit, make sure
your vehicle is safely off the road and
away from moving traffic. Switch on
the hazard lights.
• Always set the parking brake to make
sure the vehicle does not move
unexpectedly.
• Do not remove any foreign objects,
such as nails or screws, from the tire.
• When using the kit, leave the engine
running (only if the vehicle is outdoors
or in a well-ventilated area) so the
compressor does not drain the
vehicle's battery.
• Do not allow the compressor to
operate continuously for more than 15
minutes. This will help prevent the
compressor from overheating.
• Never leave the kit unattended during
operation.
• Sealant compound contains latex.
Those with latex sensitivities should
use appropriate precautions to avoid
an allergic reaction.
• Keep the kit away from children.
• Only use the kit when the ambient
temperature is between -22°F (-30°C)
and 158°F (70°C).
• Only use the sealing compound before
the use-by date. The use-by date is on
a label on the sealant canister, which
you can see through the rectangular
viewing window on the bottom of the
compressor. Check the use-by date
regularly and replace the canister after
four years of non-use.
• Do not store the kit unsecured inside
the passenger compartment of the
vehicle as it may cause injury during a
sudden stop or crash. Always store the
kit in its original location. •
After sealant use, an authorized Ford
dealer must replace the tire pressure
monitoring system sensor and valve
stem on the wheel.
• Operating the kit could cause an
electrical disturbance in radio, CD and
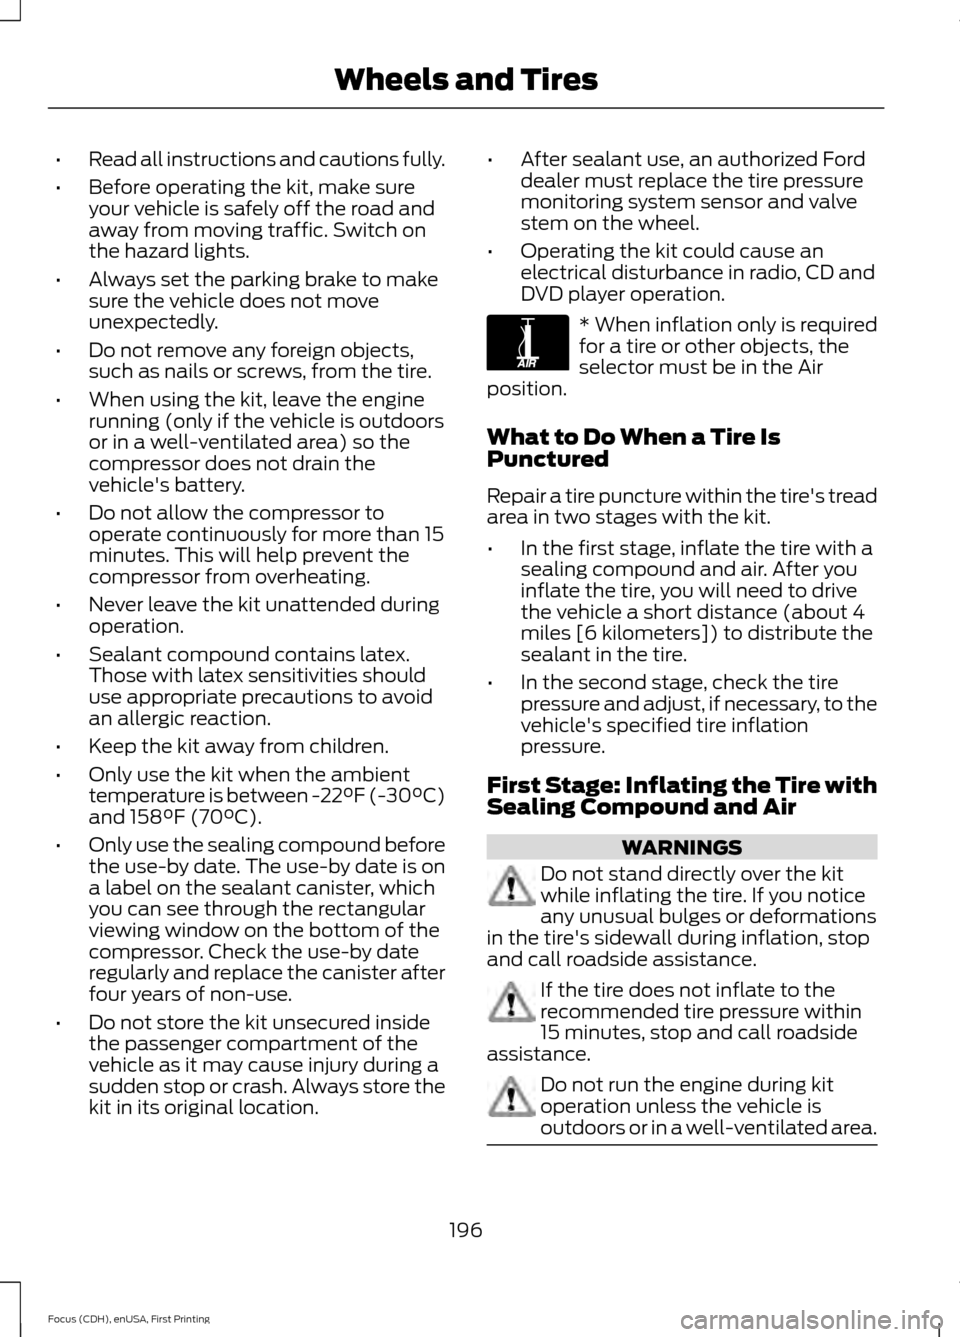
DVD player operation. * When inflation only is required
for a tire or other objects, the
selector must be in the Air
position.
What to Do When a Tire Is
Punctured
Repair a tire puncture within the tire's tread
area in two stages with the kit.
• In the first stage, inflate the tire with a
sealing compound and air. After you
inflate the tire, you will need to drive
the vehicle a short distance (about 4
miles [6 kilometers]) to distribute the
sealant in the tire.
• In the second stage, check the tire
pressure and adjust, if necessary, to the
vehicle's specified tire inflation
pressure.
First Stage: Inflating the Tire with
Sealing Compound and Air WARNINGS
Do not stand directly over the kit
while inflating the tire. If you notice
any unusual bulges or deformations
in the tire's sidewall during inflation, stop
and call roadside assistance. If the tire does not inflate to the
recommended tire pressure within
15 minutes, stop and call roadside
assistance. Do not run the engine during kit
operation unless the vehicle is
outdoors or in a well-ventilated area.
196
Focus (CDH), enUSA, First Printing Wheels and TiresE175978
Page 200 of 369
Preparation: Park the vehicle in a safe, level
and secure area, away from moving traffic.
Switch the hazard lights on. Apply the
parking brake and switch the engine off.
Inspect the flat tire for visible damage.
Sealant compound contains latex. Use
appropriate precautions to avoid any
allergic reactions.
Do not remove any foreign object that has
pierced the tire. If a puncture is located in
the tire sidewall, stop and call roadside
assistance.
1. Remove the valve cap from the tire
valve.
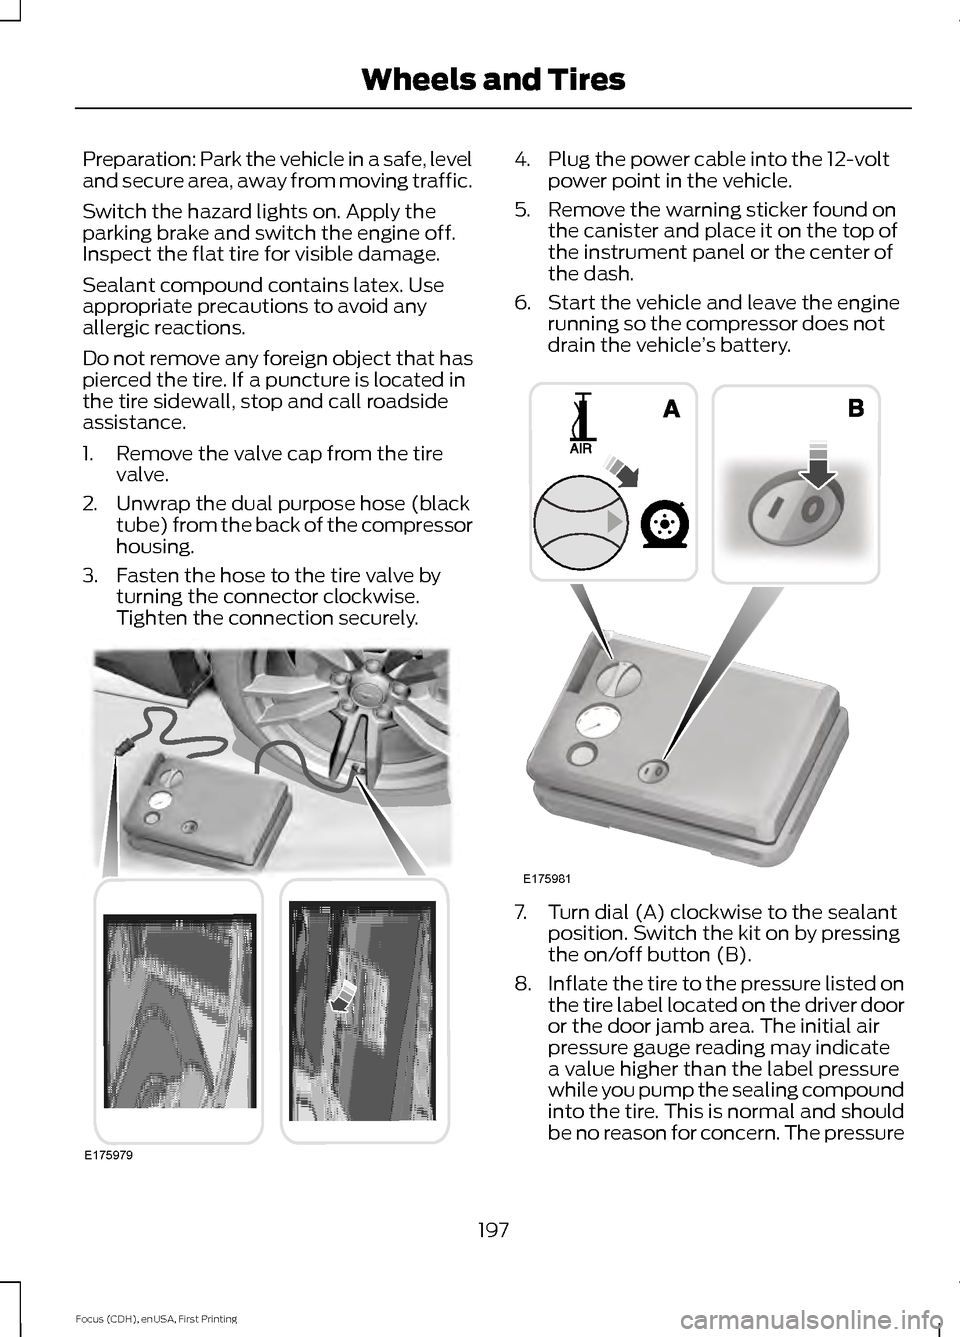
2. Unwrap the dual purpose hose (black tube) from the back of the compressor
housing.
3. Fasten the hose to the tire valve by turning the connector clockwise.
Tighten the connection securely. 4. Plug the power cable into the 12-volt
power point in the vehicle.
5. Remove the warning sticker found on the canister and place it on the top of
the instrument panel or the center of
the dash.
6. Start the vehicle and leave the engine running so the compressor does not
drain the vehicle ’s battery. 7. Turn dial (A) clockwise to the sealant
position. Switch the kit on by pressing
the on/off button (B).
8. Inflate the tire to the pressure listed on
the tire label located on the driver door
or the door jamb area. The initial air
pressure gauge reading may indicate
a value higher than the label pressure
while you pump the sealing compound
into the tire. This is normal and should
be no reason for concern. The pressure
197
Focus (CDH), enUSA, First Printing Wheels and TiresE175979 E175981
Page 284 of 369
My GO Time Summary
Action and Description
Menu Item
This is the time and date of your next set
drive time. Your vehicle automatically
schedules charging and cabin conditioning
to finish by this time.
GO Time
This is the chosen cabin conditioning setting
for this GO Time.
Temperature
This cancels the cabin conditioning for the
present GO Time. Once you touch Skip, the
GO Time and Temperature grey out, and
the LED illuminates on the Skip button.
Touch the button again to switch on the
cabin conditioning. This feature allows you
to ignore the present GO Time without
having to delete it or having to switch off
the entire schedule (see GO Time
Schedule later in this section). After the
present GO Time passes, the Skip feature
resets.
Skip
This accesses your GO Time Schedule (see
GO Time Schedule
later in this section).
The system also alerts you to any conflicts
by highlighting areas of the screen in yellow.
If your battery cannot have a full charge by
the scheduled drive time, the system high-
lights your next GO Time and Charge
Complete time and a message
Charge at
GO Time: under 100% appears. This is
normal; the vehicle is informing you of the
conflicting situation. This notification only
displays when the gearshift selector lever
is in position
P.
Edit
Note: Charging occurs as soon as you plug the vehicle in. The system limits cabin conditioning
to 15 minutes before your GO Time.
To eliminate the conflict notification immediately or to prevent a conflict in the future,
try the following:
• Switch the present GO Time to occur later.
• Plug the vehicle into a 240V charging station instead of the 120V convenience cord.
Higher power charging yields shorter charge times.
• Plug the vehicle in sooner.
281
Focus (CDH), enUSA, First Printing MyFord Touch
™
Page 293 of 369
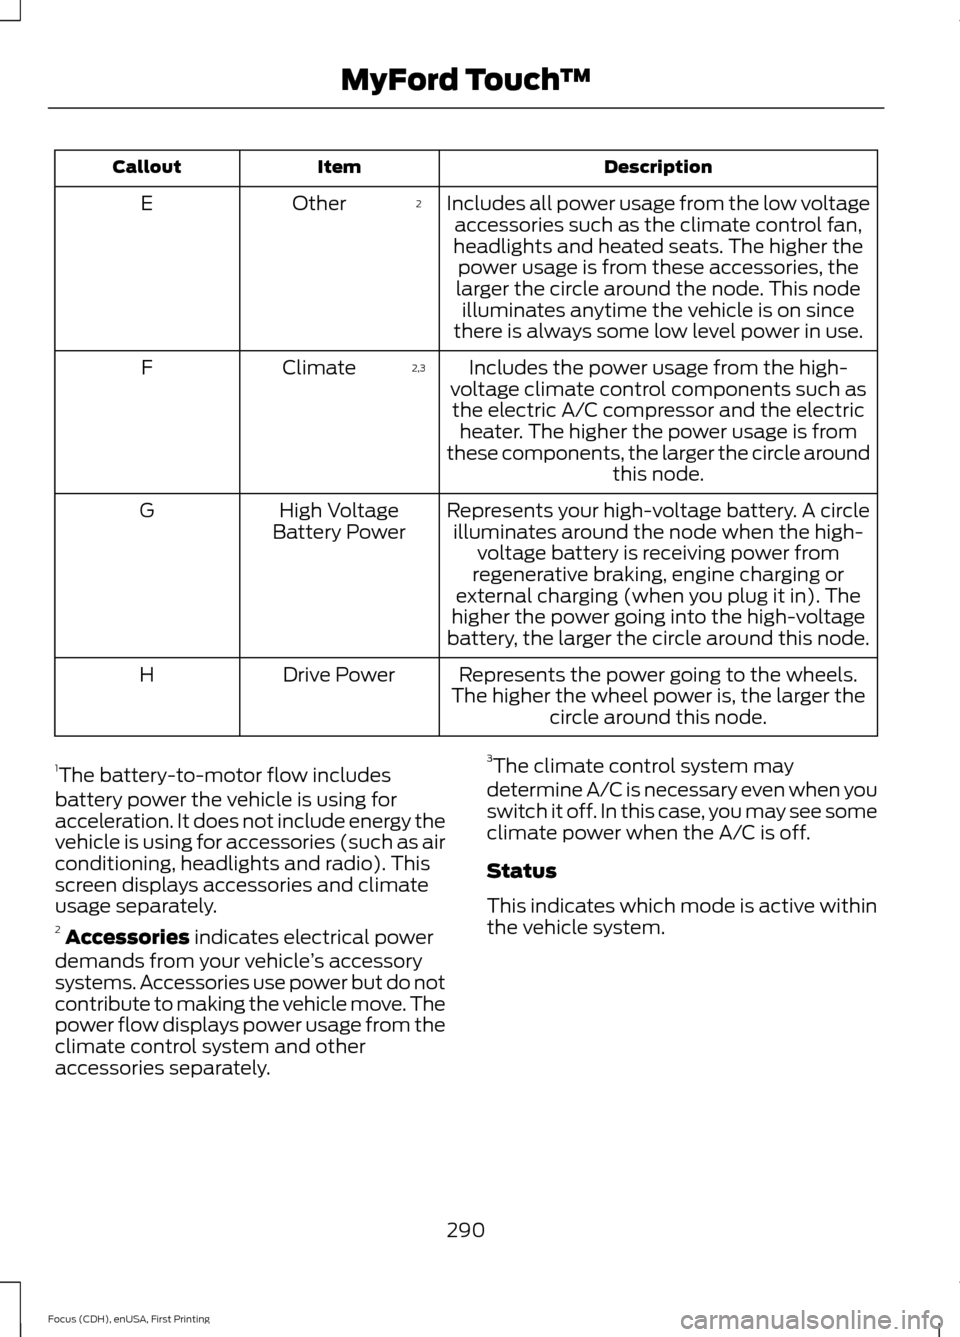
Description
Item
Callout
Includes all power usage from the low voltageaccessories such as the climate control fan,
headlights and heated seats. The higher the power usage is from these accessories, the
larger the circle around the node. This node illuminates anytime the vehicle is on since
there is always some low level power in use.
2
Other
E
Includes the power usage from the high-
voltage climate control components such as the electric A/C compressor and the electric heater. The higher the power usage is from
these components, the larger the circle around this node.
2,3
Climate
F
Represents your high-voltage battery. A circleilluminates around the node when the high- voltage battery is receiving power from
regenerative braking, engine charging or
external charging (when you plug it in). The
higher the power going into the high-voltage
battery, the larger the circle around this node.
High Voltage
Battery Power
G
Represents the power going to the wheels.
The higher the wheel power is, the larger the circle around this node.
Drive Power
H
1 The battery-to-motor flow includes
battery power the vehicle is using for
acceleration. It does not include energy the
vehicle is using for accessories (such as air
conditioning, headlights and radio). This
screen displays accessories and climate
usage separately.
2 Accessories indicates electrical power
demands from your vehicle ’s accessory
systems. Accessories use power but do not
contribute to making the vehicle move. The
power flow displays power usage from the
climate control system and other
accessories separately. 3
The climate control system may
determine A/C is necessary even when you
switch it off. In this case, you may see some
climate power when the A/C is off.
Status
This indicates which mode is active within
the vehicle system.
290
Focus (CDH), enUSA, First Printing MyFord Touch
™
Page 324 of 369
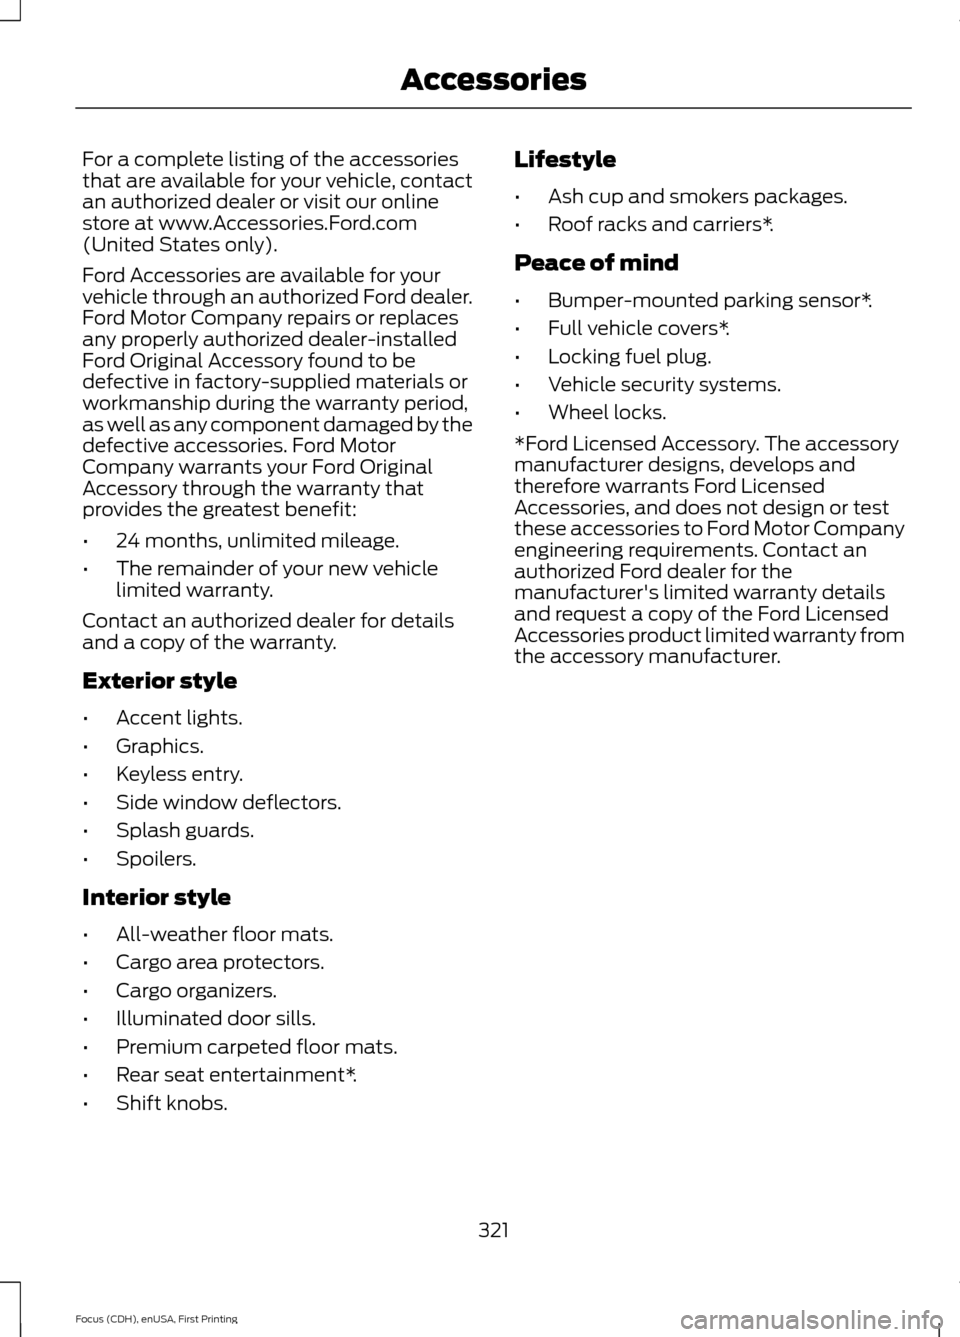
For a complete listing of the accessories
that are available for your vehicle, contact
an authorized dealer or visit our online
store at www.Accessories.Ford.com
(United States only).
Ford Accessories are available for your
vehicle through an authorized Ford dealer.
Ford Motor Company repairs or replaces
any properly authorized dealer-installed
Ford Original Accessory found to be
defective in factory-supplied materials or
workmanship during the warranty period,
as well as any component damaged by the
defective accessories. Ford Motor
Company warrants your Ford Original
Accessory through the warranty that
provides the greatest benefit:
•
24 months, unlimited mileage.
• The remainder of your new vehicle
limited warranty.
Contact an authorized dealer for details
and a copy of the warranty.
Exterior style
• Accent lights.
• Graphics.
• Keyless entry.
• Side window deflectors.
• Splash guards.
• Spoilers.
Interior style
• All-weather floor mats.
• Cargo area protectors.
• Cargo organizers.
• Illuminated door sills.
• Premium carpeted floor mats.
• Rear seat entertainment*.
• Shift knobs. Lifestyle
•
Ash cup and smokers packages.
• Roof racks and carriers*.
Peace of mind
• Bumper-mounted parking sensor*.
• Full vehicle covers*.
• Locking fuel plug.
• Vehicle security systems.
• Wheel locks.
*Ford Licensed Accessory. The accessory
manufacturer designs, develops and
therefore warrants Ford Licensed
Accessories, and does not design or test
these accessories to Ford Motor Company
engineering requirements. Contact an
authorized Ford dealer for the
manufacturer's limited warranty details
and request a copy of the Ford Licensed
Accessories product limited warranty from
the accessory manufacturer.
321
Focus (CDH), enUSA, First Printing Accessories
Page 351 of 369
Ford Motor Company has recommended
maintenance intervals for various parts
and component systems based upon
engineering testing. Ford Motor Company
relies upon this testing to determine the
most appropriate mileage for replacement
of oils and fluids to protect your vehicle at
the lowest overall cost to you and
recommends against maintenance
schedules that deviate from the scheduled
maintenance information.
We strongly recommend the use of only
genuine Ford, Motorcraft or
Ford-authorized re-manufactured
replacement parts engineered for your
vehicle.
Additives and Chemicals
This owner's manual and the Ford
Workshop Manual list the recommended
additives and chemicals for your vehicle.
We do not recommend using chemicals or
additives not approved by us as part of
your vehicle
’s normal maintenance. Please
consult your warranty information. Oils, Fluids and Flushing
In many cases, fluid discoloration is a
normal operating characteristic and, by
itself, does not necessarily indicate a
concern or that the fluid needs to be
changed. However, a qualified expert, such
as the factory-trained technicians at your
dealership, should inspect discolored fluids
that also show signs of overheating or
foreign material contamination
immediately.
Make sure to change your vehicle
’s oils and
fluids at the specified intervals or in
conjunction with a repair. Flushing is a
viable way to change fluid for many vehicle
sub-systems during scheduled
maintenance. It is critical that systems are
flushed only with new fluid that is the same
as that required to fill and operate the
system or using a Ford-approved flushing
chemical.
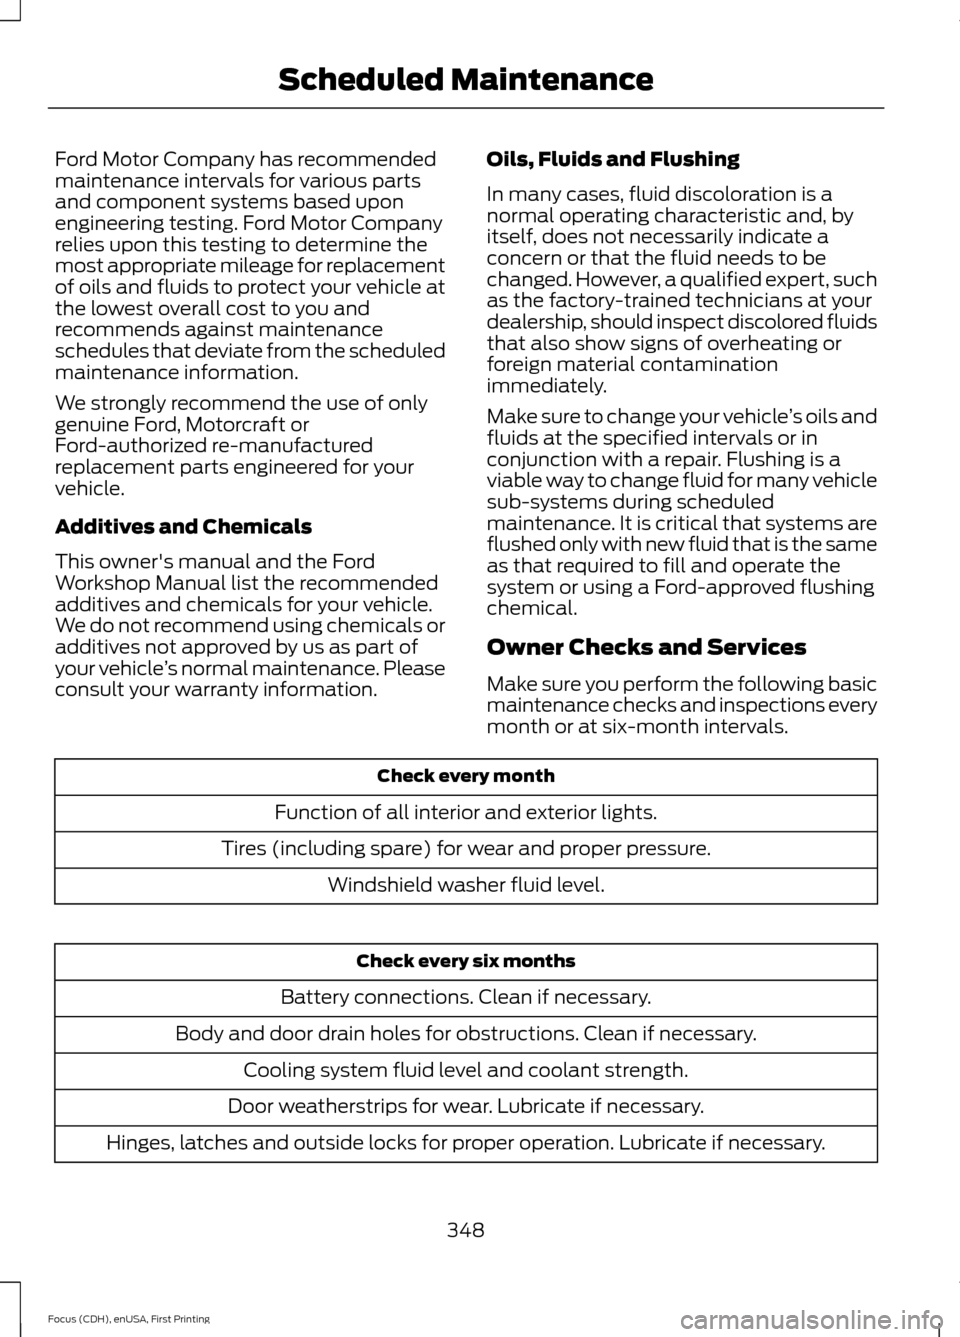
Owner Checks and Services
Make sure you perform the following basic
maintenance checks and inspections every
month or at six-month intervals. Check every month
Function of all interior and exterior lights.
Tires (including spare) for wear and proper pressure. Windshield washer fluid level. Check every six months
Battery connections. Clean if necessary.
Body and door drain holes for obstructions. Clean if necessary. Cooling system fluid level and coolant strength.
Door weatherstrips for wear. Lubricate if necessary.
Hinges, latches and outside locks for proper operation. Lubricate if necessary.
348
Focus (CDH), enUSA, First Printing Scheduled Maintenance