2015 FORD F250 SUPER DUTY tow
[x] Cancel search: towPage 138 of 470
temperatures, and be clearly markedSuitable for Use with OutdoorAppliances. Do not use an indoorextension cord outdoors. This couldresult in an electric shock or become afire hazard.
•Use as short an extension cord aspossible.
•Do not use multiple extension cords.
•Make sure that when in operation, theextension cord plug and heater cordplug connections are free and clear ofwater. This could cause an electricshock or fire.
•Make sure your vehicle is parked in aclean area, clear of combustibles.
•Make sure the heater, heater cord andextension cord are firmly connected.
•Check for heat anywhere in theelectrical hookup once the system hasbeen operating for approximately 30minutes.
•Make sure the system is unplugged andproperly stowed before driving yourvehicle. Make sure the protective coverseals the prongs of the block heatercord plug when not in use.
•Make sure the heater system ischecked for proper operation beforewinter.
Using the Engine Block Heater
Make sure the receptacle terminals areclean and dry prior to use. Clean them witha dry cloth if necessary.
The heater uses 0.4 to 1.0 kilowatt-hoursof energy per hour of use. The system doesnot have a thermostat. It achievesmaximum temperature afterapproximately three hours of operation.Using the heater longer than three hoursdoes not improve system performance andunnecessarily uses electricity.
135
Super Duty (), enUSA
Starting and Stopping the Engine
Page 143 of 470
FUEL CONSUMPTION
Empty reserve is the amount of fuelremaining in the tank after the fuel gaugeindicates empty. The amount of usablefuel in the empty reserve varies and shouldnot be relied upon to increase driving range.
•The usable capacity of the fuel tank isthe amount of fuel that can be addedinto the tank after the gauge indicatesempty
•The advertised capacity is the total fueltank size. See Capacities andSpecifications (page 301). It is thecombined usable capacity plus theempty reserve.
•Due to the empty reserve, you may notbe able to refuel the full amount of theadvertised capacity of the fuel tankeven when the fuel gauge reads empty.
Filling the Tank
For consistent results when filling the fueltank:
•Turn the ignition off before fueling; aninaccurate reading results if the engineis left running.
•Use the same fill rate(low-medium-high) each time the tankis filled.
•Allow no more than two automaticclick-offs when filling.
Results are most accurate when the fillingmethod is consistent.
Calculating Fuel Economy
Do not measure fuel economy during thefirst 1000 miles (1600 kilometers) ofdriving (this is your engine’s break-inperiod); a more accurate measurement isobtained after 2000 miles - 3000 miles(3200 kilometers - 4800 kilometers). Also,fuel expense, frequency of fill ups or fuelgauge readings are not accurate ways tomeasure fuel economy.
1.Fill the fuel tank completely and recordthe initial odometer reading.
2. Each time you fill the tank, record theamount of fuel added.
3.After at least 3 to 5 tank fill ups, fill thefuel tank and record the currentodometer reading.
4. Subtract your initial odometer readingfrom the current odometer reading.
5. Calculate fuel economy by dividingmiles traveled by gallons used (ForMetric: Multiply liters used by 100, thendivide by kilometers traveled).
Keep a record for at least 1 month andrecord the type of driving (city or highway).This provides an accurate estimate of thevehicle’s fuel economy under currentdriving conditions. Additionally, keepingrecords during summer and winter showhow temperature impacts fuel economy.In general, lower temperatures mean lowerfuel economy.
Conditions
•Heavily loading a vehicle or towing atrailer may reduce fuel economy at anyspeed.
•Carrying unnecessary weight mayreduce fuel economy (approximately1 mpg [0.4 km/L] is lost for every 400pounds [180 kilograms] of weightcarried).
140
Super Duty (), enUSA
Fuel and Refueling
Page 147 of 470

AUTOMATIC TRANSMISSION
WARNING
Always set the parking brake fullyand make sure the gearshift islatched in P (Park). Turn the ignitionto the off position and remove the keywhenever you leave your vehicle.
Understanding the Shift Positionsof the 5–Speed AutomaticTransmission (If Equipped)
Putting your vehicle in or out of gear:
1. Fully press down the brake pedal.
2. Move the gearshift lever into thedesired gear.
3. Come to a complete stop.
4. Move the gearshift lever and securelylatch it in P (Park)
P (Park)
This position locks the transmission andprevents the rear wheels from turning.
R (Reverse)
With the gearshift lever in R (Reverse), thevehicle will move backward. Always cometo a complete stop before shifting into andout of R (Reverse).
N (Neutral)
With the gearshift lever in N (Neutral), thevehicle can be started and is free to roll.Hold the brake pedal down while in thisposition.
D (Overdrive) with tow/haul off
D (Overdrive) with tow/haul off is thenormal driving position for the best fueleconomy. The overdrive function allowsautomatic upshifts and downshifts throughgears one through five.
D (Overdrive) with tow/haul on
The tow/haul feature improvestransmission operation when towing atrailer or a heavy load. All transmissiongear ranges are available when usingtow/haul.
To activate tow/haul, press thebutton on the end of thegearshift lever. The TOW HAULindicator light will illuminate in theinstrument cluster.
Tow/haul delays upshifts to reducefrequency of transmission shifting.Tow/haul also provides engine braking inall forward gears when the transmission isin the D (Overdrive) position; this enginebraking will slow the vehicle and assist thedriver in controlling the vehicle whendescending a grade. Depending on drivingconditions and load conditions, the
144
Super Duty (), enUSA
TransmissionE161511
P R N D 3 2 1 E163182 E161509
Page 148 of 470

transmission may downshift, slow thevehicle and control the vehicle speed whendescending a hill, without the acceleratorpedal being pressed. The amount ofdownshift braking provided will vary basedupon the amount the brake pedal ispressed.
To deactivate the tow/haul feature andreturn to normal driving mode, press thebutton on the end of the gearshift lever.The TOW HAUL light will no longer beilluminated.
When you shut-off and restart the engine,the transmission will automatically returnto normal D (Overdrive) mode (tow/hauloff).
WARNING
Do not use the tow/haul or enginebrake features when driving in icy orslippery conditions as the increasedengine braking can cause the rear wheelsto slide and your vehicle to swing aroundwith the possible loss of vehicle control.
3 (Third)
Transmission starts and operates in thirdgear only
Used for improved traction on slipperyroads. Selecting 3 (Third) provides enginebraking.
2 (Second)
Use 2 (Second) to start-up on slipperyroads or to provide additional enginebraking on downgrades.
1 (First)
•Provides maximum engine braking
•Allows upshifts by moving gearshiftlever
•The transmission will not downshiftinto 1 (First) at high speeds; it willdownshift to a lower gear and thenshift into 1 (First) when the vehiclereaches slower speeds.
Forced downshifts
•Allowed in D (Overdrive) with thetow/haul feature on or off
•Press the accelerator to the floor
•Allows transmission to select anappropriate gear
Understanding the Shift Positionsof a 6–Speed AutomaticTransmission (If Equipped)
Putting your vehicle in or out of gear:
1. Fully press down the brake pedal.
2. Move the gearshift lever into thedesired gear.
3. Come to a complete stop.
4. Move the gearshift lever and securelylatch it in P (Park)
P (Park)
This position locks the transmission andprevents the rear wheels from turning.
145
Super Duty (), enUSA
TransmissionE163183
Page 149 of 470

R (Reverse)
With the gearshift lever in R (Reverse), thevehicle will move backward. Always cometo a complete stop before shifting into andout of R (Reverse).
N (Neutral)
With the gearshift lever in N (Neutral), thevehicle can be started and is free to roll.Hold the brake pedal down while in thisposition.
D (Overdrive) with tow/haul off
D (Overdrive) with tow/haul off is thenormal driving position for the best fueleconomy. The overdrive function allowsautomatic upshifts and downshifts throughgears one through six.
D (Overdrive) with tow/haul on
The tow/haul feature improvestransmission operation when towing atrailer or a heavy load. All transmissiongear ranges are available when usingtow/haul.
To activate tow/haul, press thebutton on the end of thegearshift lever. The TOW HAULindicator light will illuminate in theinstrument cluster.
Tow/haul delays upshifts to reducefrequency of transmission shifting.Tow/haul also provides engine braking inall forward gears when the transmission isin the D (Overdrive) position; this enginebraking will slow the vehicle and assist thedriver in controlling the vehicle whendescending a grade. Depending on drivingconditions and load conditions, thetransmission may downshift, slow thevehicle and control the vehicle speed whendescending a hill, without the acceleratorpedal being pressed. The amount ofdownshift braking provided will vary basedupon the amount the brake pedal ispressed.
Tow/haul may be automatically activated(without pressing the tow/haul button).This provides engine braking to assist thevehicles braking system when goingdownhill and repetitive braking is sensed.Once the tow/haul mode has beenautomatically activated it will notautomatically deactivate.
To deactivate the tow/haul feature andreturn to normal driving mode, press thebutton on the end of the gearshift lever.The TOW HAUL light will no longer beilluminated.
Tow/haul will also deactivate when thevehicle is powered down for a few minutes.
WARNING
Do not use the tow/haul or enginebrake features when driving in icy orslippery conditions as the increasedengine braking can cause the rear wheelsto slide and your vehicle to swing aroundwith the possible loss of vehicle control.
146
Super Duty (), enUSA
TransmissionE163182 E161509
Page 150 of 470
M (Manual) without Overdrive
With the gearshift lever in M (Manual), thedriver can change gears up or down asdesired. This is called SelectShiftAutomatic™ transmission (SST) mode.By moving the gearshift lever from driveposition D (Overdrive) to M (Manual) younow have control of selecting the gear youdesire using buttons on the shift lever.
To return to normal D (Overdrive) position,move the shift lever back from M to D.
The transmission will operate in gears onethrough six.
2 (Second)
Use 2 (Second) to start-up on slipperyroads or to provide additional enginebraking on downgrades.
1 (First)
•Provides maximum engine braking
•Allows upshifts by moving gearshiftlever
•The transmission will not downshiftinto 1 (First) at high speeds; it willdownshift to a lower gear and thenshift into 1 (First) when the vehiclereaches slower speeds.
Forced downshifts
•Allowed in D (Overdrive) with thetow/haul feature on or off
•Press the accelerator to the floor
•Allows transmission to select anappropriate gear
Understanding your SelectShiftAutomatic® transmission (If Equipped)
Your vehicle is equipped with a SelectShiftAutomatic transmission gearshift lever.SelectShift Automatic transmission givesyou the ability to change gears up or down(without a clutch) as desired.
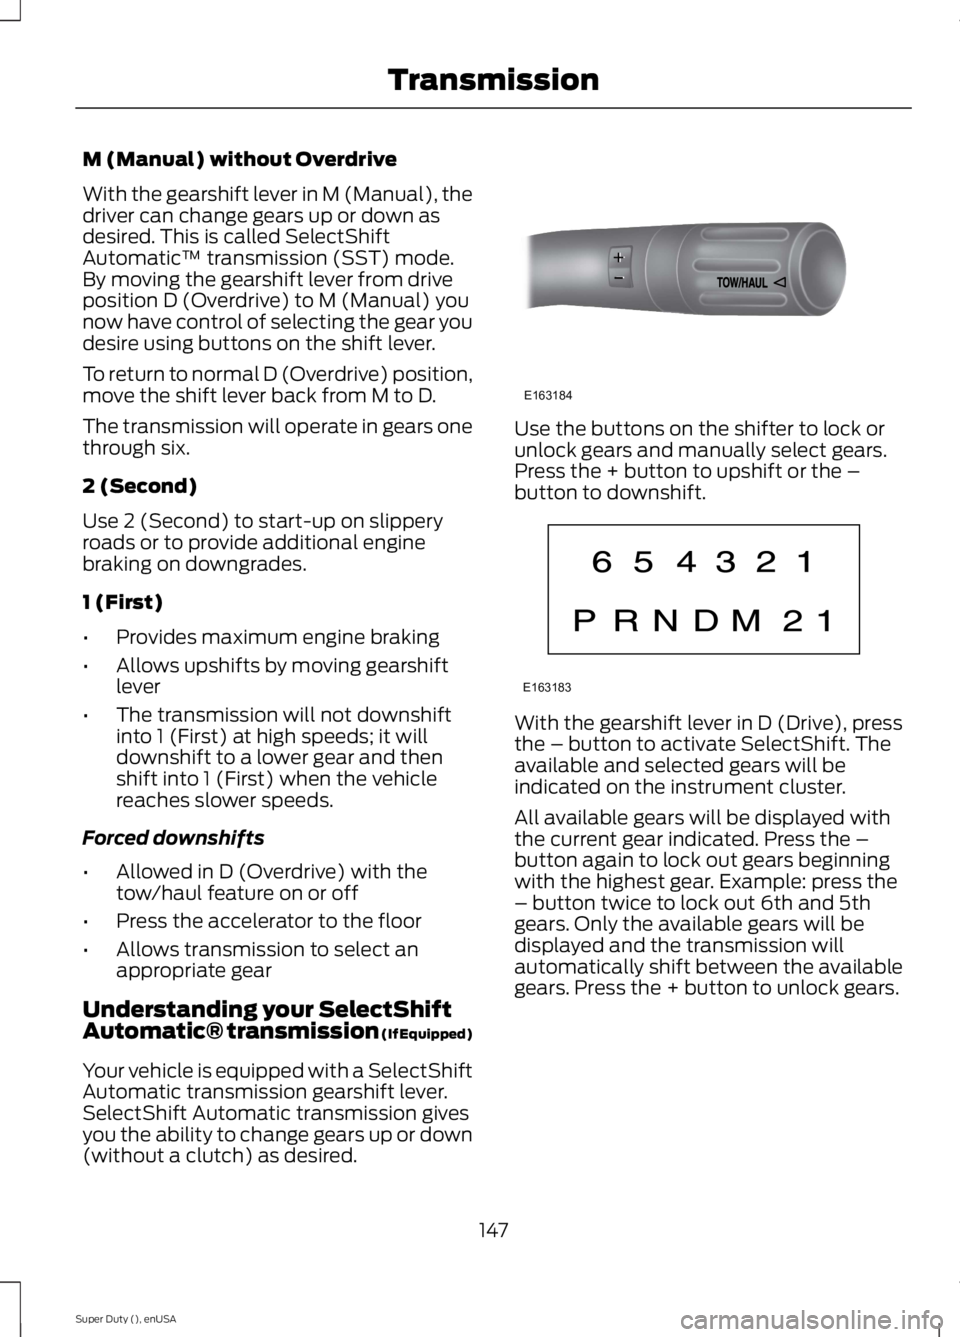
Use the buttons on the shifter to lock orunlock gears and manually select gears.Press the + button to upshift or the –button to downshift.
With the gearshift lever in D (Drive), pressthe – button to activate SelectShift. Theavailable and selected gears will beindicated on the instrument cluster.
All available gears will be displayed withthe current gear indicated. Press the –button again to lock out gears beginningwith the highest gear. Example: press the– button twice to lock out 6th and 5thgears. Only the available gears will bedisplayed and the transmission willautomatically shift between the availablegears. Press the + button to unlock gears.
147
Super Duty (), enUSA
TransmissionE163184 E163183
Page 152 of 470
WARNINGS
When doing this procedure, you willbe taking the vehicle out of parkwhich means the vehicle can rollfreely. To avoid unwanted vehiclemovement, always fully set the parkingbrake prior to doing this procedure. Usewheel chocks if appropriate.
If the parking brake is fully released,but the brake warning lamp remainsilluminated, the brakes may not beworking properly. See your authorizeddealer.
Your vehicle is equipped with a brake-shiftinterlock feature that prevents thegearshift lever from being moved from P(Park) when the ignition is in the 3 (on)position and the brake pedal is not pressed.
If you cannot move the gearshift lever outof P (Park) position with the ignition in the4 (on) position and the brake pedalpressed, a malfunction may have occurred.It is possible that a fuse has blown or thevehicle’s brake lamps are not operatingproperly. See Fuse Specification Chart(page 223).
If the fuse is not blown and the brakelamps are working properly, the followingprocedure will allow you to move thegearshift lever from P (Park):
1. Apply the parking brake. Turn theignition key to 1 (off), then remove thekey.
2. Move the steering column to the fulldown and full rearward position(toward the driver’s seat).
3. Remove the gearshift lever boot.
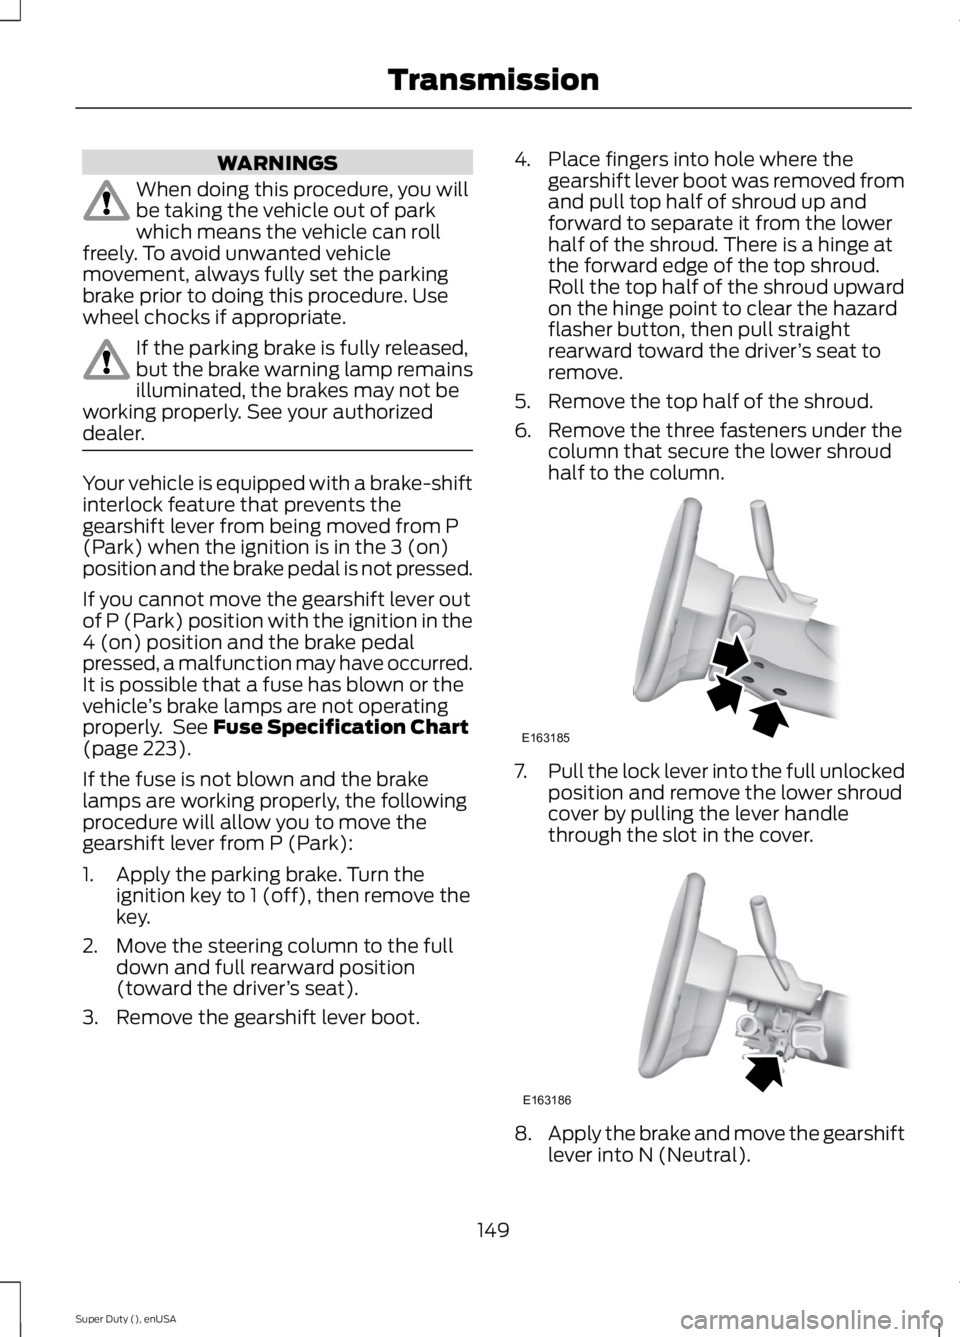
4. Place fingers into hole where thegearshift lever boot was removed fromand pull top half of shroud up andforward to separate it from the lowerhalf of the shroud. There is a hinge atthe forward edge of the top shroud.Roll the top half of the shroud upwardon the hinge point to clear the hazardflasher button, then pull straightrearward toward the driver’s seat toremove.
5. Remove the top half of the shroud.
6. Remove the three fasteners under thecolumn that secure the lower shroudhalf to the column.
7.Pull the lock lever into the full unlockedposition and remove the lower shroudcover by pulling the lever handlethrough the slot in the cover.
8.Apply the brake and move the gearshiftlever into N (Neutral).
149
Super Duty (), enUSA
TransmissionE163185 E163186
Page 153 of 470
9. Start the vehicle.
Perform Steps 4 through 8 in reverse order,making sure to engage the hinge pivotsbetween the upper and lower halves of theshroud. Keep slight pressure in the forwarddirection as the halves are rotatedtogether.
If Your Vehicle Gets Stuck In Mudor Snow
Note:Do not rock the vehicle if the engineis not at normal operating temperature ordamage to the transmission may occur.
Note:Do not rock the vehicle for more thana minute or damage to the transmission andtires may occur, or the engine may overheat.
If your vehicle gets stuck in mud or snow,it may be rocked out by shifting betweenforward and reverse gears, stoppingbetween shifts in a steady pattern. Presslightly on the accelerator in each gear.
POWER TAKE-OFF
Auxiliary equipment called power take-off,or PTO, is often added to the engine ortransmission to operate utility equipment.Examples include a wheel-lift for towtrucks, cranes, tools for construction or tireservice, and pumping fluids. PTOapplications draw auxiliary horsepowerfrom the powertrain, often while thevehicle is stationary. In this condition, thereis limited cooling air flow through theradiator and around the vehicle thatnormally occurs when a vehicle is moving.The aftermarket PTO system installer,having the most knowledge of the finalapplication, is responsible for determiningwhether additional chassis heat protectionor powertrain cooling is required, andalerting the user to the safe and properoperation.
Ford Super Duty Vehicles are approved foruse as a stationary (including split shaftcapability) or mobile power source, withinlimits and operating guidelines detailed inthe Ford Truck Body Builders Layout Book,found at www.fleet.ford.com/truckbbas,and through the Ford Truck Body BuildersAdvisory Service.
150
Super Duty (), enUSA
Transmission