2015 FORD F SERIES MOTORHOME AND COMMERCIAL CHASSIS light
[x] Cancel search: lightPage 48 of 144
6.Check that the trailer is level orslightly nose down toward yourvehicle. If not, adjust the ballheight accordingly and repeatSteps 1-6.
7.Lock the bar tension adjusterin place.
8.Check that the trailer tonguesecurely attaches and locksonto the hitch.
9.Install safety chains, lightingand trailer brake controls asrequired by law or the trailermanufacturer.
Safety Chains
Note:Never attach safety chainsto the bumper.
Always connect the safety chains
to the hook retainers of yourvehicle hitch.
To connect the safety chains,cross them under the trailertongue and allow enough slack forturning tight corners. Do not allowthe chains to drag on the ground.
Trailer Brakes
WARNING
Do not connect a trailer'shydraulic brake systemdirectly to your vehicle's brakesystem. Your vehicle may not haveenough braking power and yourchances of having a collisiongreatly increase.
Electric brakes and manual,automatic or surge-type trailerbrakes are safe if you install themproperly and adjust them to themanufacturer's specifications. Thetrailer brakes must meet local andfederal regulations.
The rating for the tow vehicle'sbraking system operation is atthe gross vehicle weight rating,not the gross combined weightrating.
Separate functioning brakesystems are required for safecontrol of towed vehicles andtrailers weighing more than1500 pounds (680 kilograms)when loaded.
Trailer Lamps
WARNING
Never connect any trailerlamp wiring to the vehicle'stail lamp wiring; this may damagethe electrical system resulting infire. Contact your authorizeddealer as soon as possible forassistance in proper trailer towwiring installation. Additionalelectrical equipment may berequired.
Trailer lamps are required on mosttowed vehicles. Make sure allrunning lights, brake lights,direction indicators and hazardlights are working.
45Motorhome (), enUSATowing
Page 52 of 144
BREAKING-IN
You need to break in new tires forapproximately 300 miles (480kilometers). During this time, your vehiclemay exhibit some unusual drivingcharacteristics.
Avoid driving too fast during the first 1000miles (1600 kilometers). Vary your speedfrequently and change up through thegears early. Do not labor the engine.
Do not tow during the first 1000 miles(1600 kilometers).
ECONOMICAL DRIVING
Your fuel economy is affected by severalthings, such as how you drive, theconditions you drive under, and how youmaintain your vehicle.
You may improve your fuel economy bykeeping these things in mind:
•Accelerate and slow down in a smooth,moderate fashion.
•Drive at steady speeds withoutstopping.
•Anticipate stops; slowing down mayeliminate the need to stop.
•Combine errands and minimizestop-and-go driving.
•Close the windows for high-speeddriving.
•Drive at reasonable speeds (travelingat 55 mph [88 km/h] uses 15% lessfuel than traveling at 65 mph [105km/h]).
•Keep the tires properly inflated and useonly the recommended size.
•Use the recommended engine oil.
•Perform all regularly scheduledmaintenance.
Avoid these actions; they reduce your fueleconomy:
•Sudden accelerations or hardaccelerations.
•Revving the engine before turning it off.
•Idle for periods longer than one minute.
•Warm up your vehicle on coldmornings.
•Use the air conditioner or frontdefroster.
•Use the speed control in hilly terrain.
•Rest your foot on the brake pedal whiledriving.
•Drive a heavily loaded vehicle or tow atrailer.
•Carry unnecessary weight(approximately 1 mpg [0.4 km/L] islost for every 400 lb [180 kilogram] ofweight carried).
•Driving with the wheels out ofalignment.
Conditions
•Heavily loading a vehicle or towing atrailer may reduce fuel economy at anyspeed.
•Adding certain accessories to yourvehicle (for example bug deflectors,rollbars, light bars, running boards, skiracks or luggage racks) may reducefuel economy.
•To maximize the fuel economy, drivewith the tonneau cover installed (ifequipped).
•Using fuel blended with alcohol maylower fuel economy.
•Fuel economy may decrease with lowertemperatures during the first 8–10miles (12–16 kilometers) of driving.
•Driving on flat terrain offers improvedfuel economy as compared to drivingon hilly terrain.
49Motorhome (), enUSADriving Hints
Page 53 of 144
•Transmissions give their best fueleconomy when operated in the topcruise gear and with steady pressureon the gas pedal.
•Four-wheel-drive operation (ifequipped) is less fuel efficient thantwo-wheel-drive operation.
•Close the windows for high-speeddriving.
DRIVING THROUGH WATER
WARNING
Do not drive through flowing or deepwater as you may lose control of yourvehicle.
Note:Driving through standing water cancause vehicle damage.
Note:Engine damage can occur if waterenters the air filter.
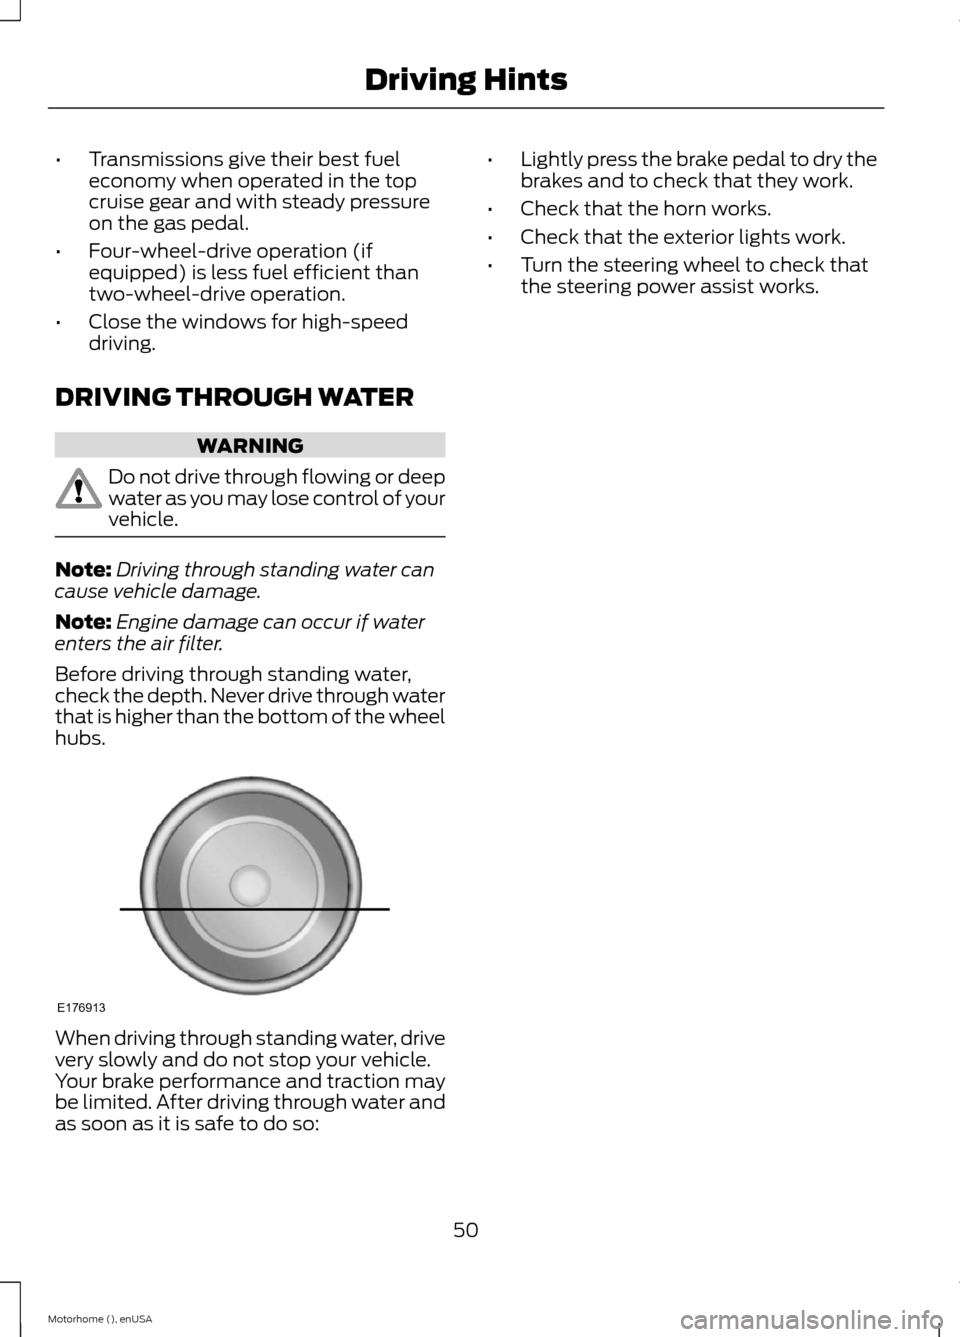
Before driving through standing water,check the depth. Never drive through waterthat is higher than the bottom of the wheelhubs.
When driving through standing water, drivevery slowly and do not stop your vehicle.Your brake performance and traction maybe limited. After driving through water andas soon as it is safe to do so:
•Lightly press the brake pedal to dry thebrakes and to check that they work.
•Check that the horn works.
•Check that the exterior lights work.
•Turn the steering wheel to check thatthe steering power assist works.
50Motorhome (), enUSADriving HintsE176913
Page 65 of 144
Protected componentsFuse amp ratingFuse or relay number
Engine heated exhaust gas oxygen sensor#11 and #21.Mass air flow sensor with intake airtemperature.Vapor management valve.
Powertrain control module memory.5A*4Powertrain control module relay coil.
Powertrain control module power.20A*5
Instrument panel dimmer module.20A*6Instrument panel fuse #41.Park lamp feeds.Trailer tow running lamp relay coil.
Ignition coils.20A*7Radio capacitors.
Hydromax – Anti-lock brake systemmodule.30A*8
Powertrain control module.10A*9Starter ground relay coil.Starter main relay coil.
Daytime running lamps.20A*10
Fuel pump relay coil.20A*11Powertrain control module power.
Instrument panel - backup lamp feed.25A*12Trailer tow back-up lamps feed.
Trailer tow electric brake controller feed.30A**13
Instrument panel battery feed (fuse #9, 15,21).60A**14
Lighting primary fuse.
Trailer tow park lamps.20A**15
Anti-lock brake system module –Hydromax.60A**16
Anti-lock brake system module – Hydro-boost.40A**
Horn feed.20A**17
62Motorhome (), enUSAFuses
Page 66 of 144
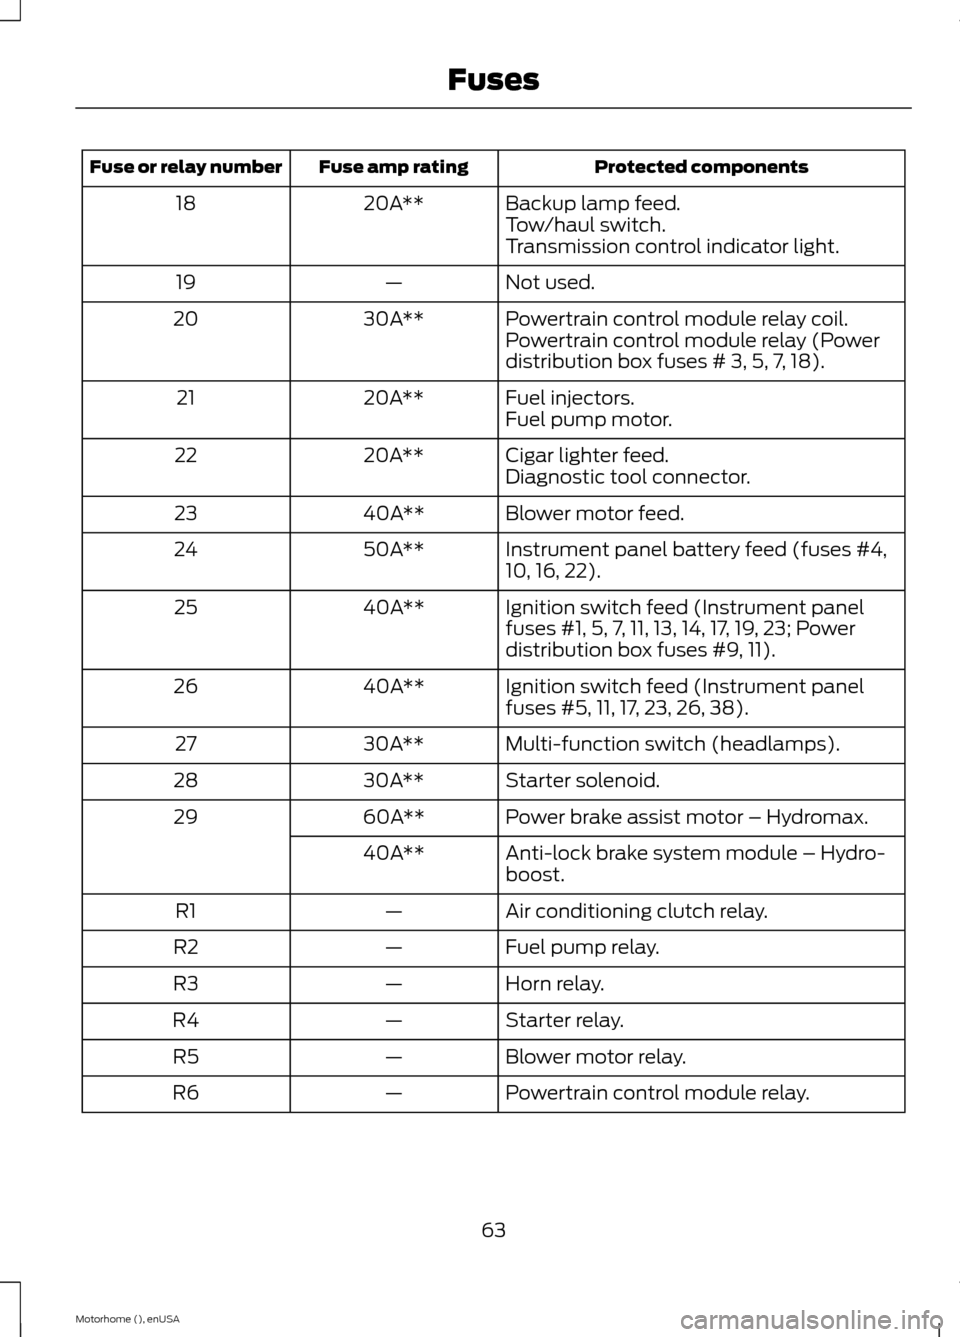
Protected componentsFuse amp ratingFuse or relay number
Backup lamp feed.20A**18Tow/haul switch.Transmission control indicator light.
Not used.—19
Powertrain control module relay coil.30A**20Powertrain control module relay (Powerdistribution box fuses # 3, 5, 7, 18).
Fuel injectors.20A**21Fuel pump motor.
Cigar lighter feed.20A**22Diagnostic tool connector.
Blower motor feed.40A**23
Instrument panel battery feed (fuses #4,10, 16, 22).50A**24
Ignition switch feed (Instrument panelfuses #1, 5, 7, 11, 13, 14, 17, 19, 23; Powerdistribution box fuses #9, 11).
40A**25
Ignition switch feed (Instrument panelfuses #5, 11, 17, 23, 26, 38).40A**26
Multi-function switch (headlamps).30A**27
Starter solenoid.30A**28
Power brake assist motor – Hydromax.60A**29
Anti-lock brake system module – Hydro-boost.40A**
Air conditioning clutch relay.—R1
Fuel pump relay.—R2
Horn relay.—R3
Starter relay.—R4
Blower motor relay.—R5
Powertrain control module relay.—R6
63Motorhome (), enUSAFuses
Page 69 of 144
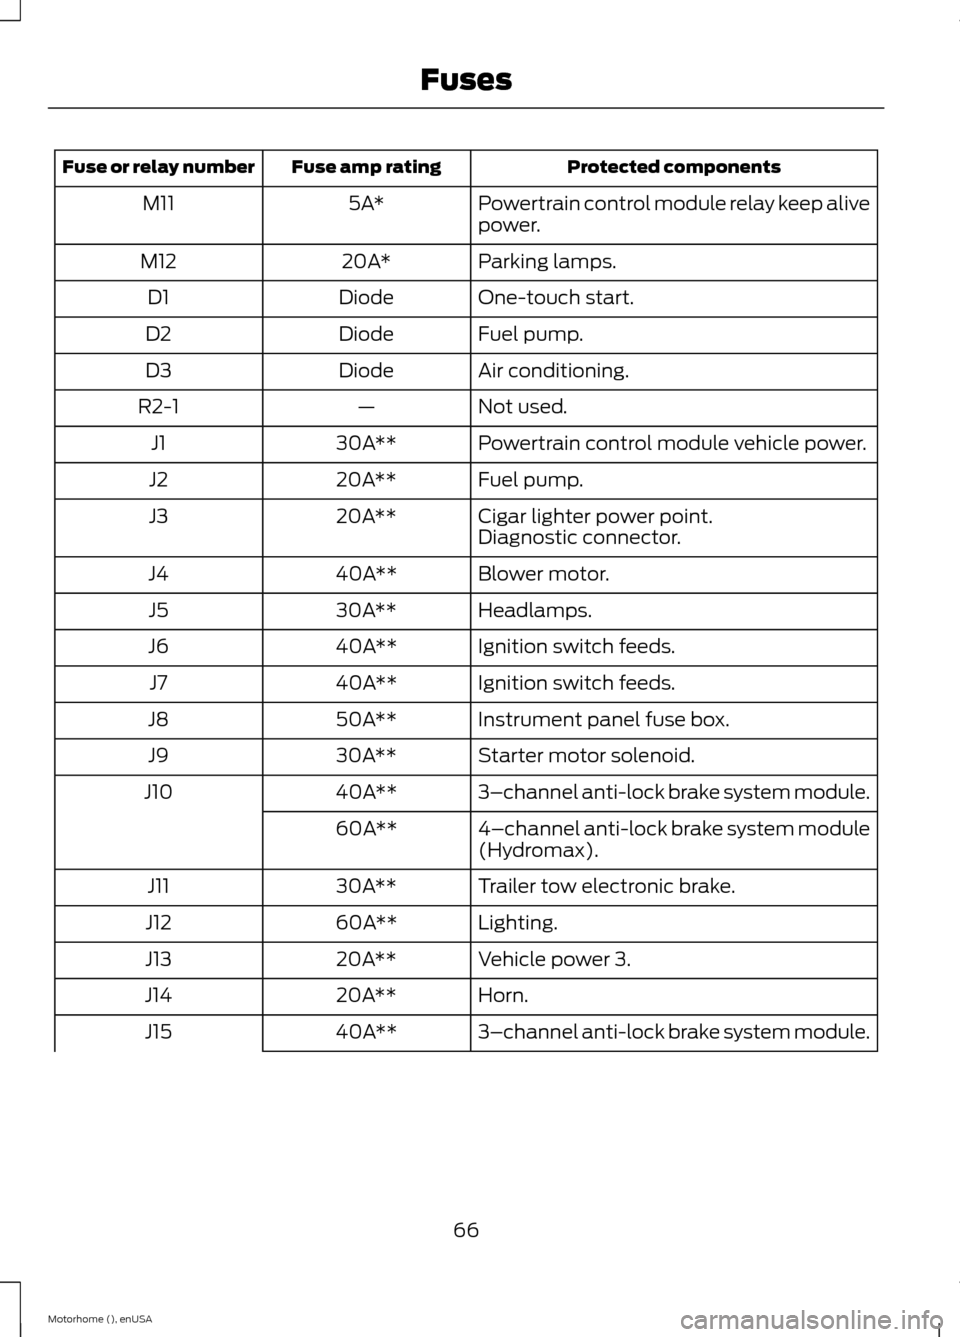
Protected componentsFuse amp ratingFuse or relay number
Powertrain control module relay keep alivepower.5A*M11
Parking lamps.20A*M12
One-touch start.DiodeD1
Fuel pump.DiodeD2
Air conditioning.DiodeD3
Not used.—R2-1
Powertrain control module vehicle power.30A**J1
Fuel pump.20A**J2
Cigar lighter power point.20A**J3Diagnostic connector.
Blower motor.40A**J4
Headlamps.30A**J5
Ignition switch feeds.40A**J6
Ignition switch feeds.40A**J7
Instrument panel fuse box.50A**J8
Starter motor solenoid.30A**J9
3–channel anti-lock brake system module.40A**J10
4–channel anti-lock brake system module(Hydromax).60A**
Trailer tow electronic brake.30A**J11
Lighting.60A**J12
Vehicle power 3.20A**J13
Horn.20A**J14
3–channel anti-lock brake system module.40A**J15
66Motorhome (), enUSAFuses
Page 78 of 144
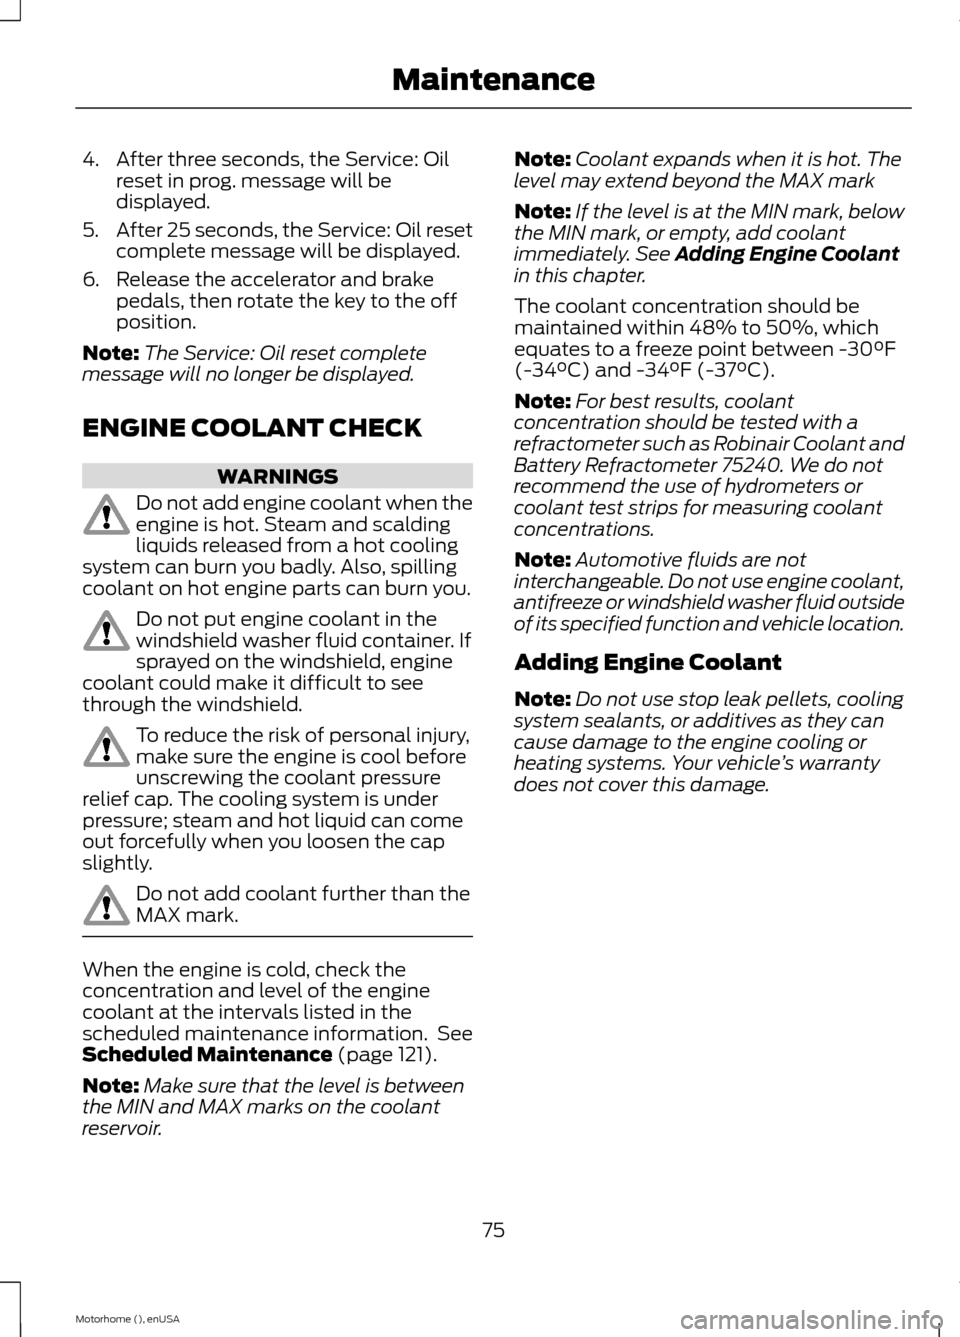
4.After three seconds, the Service: Oilreset in prog. message will bedisplayed.
5.After 25 seconds, the Service: Oil resetcomplete message will be displayed.
6.Release the accelerator and brakepedals, then rotate the key to the offposition.
Note:The Service: Oil reset completemessage will no longer be displayed.
ENGINE COOLANT CHECK
WARNINGS
Do not add engine coolant when theengine is hot. Steam and scaldingliquids released from a hot coolingsystem can burn you badly. Also, spillingcoolant on hot engine parts can burn you.
Do not put engine coolant in thewindshield washer fluid container. Ifsprayed on the windshield, enginecoolant could make it difficult to seethrough the windshield.
To reduce the risk of personal injury,make sure the engine is cool beforeunscrewing the coolant pressurerelief cap. The cooling system is underpressure; steam and hot liquid can comeout forcefully when you loosen the capslightly.
Do not add coolant further than theMAX mark.
When the engine is cold, check theconcentration and level of the enginecoolant at the intervals listed in thescheduled maintenance information. SeeScheduled Maintenance (page 121).
Note:Make sure that the level is betweenthe MIN and MAX marks on the coolantreservoir.
Note:Coolant expands when it is hot. Thelevel may extend beyond the MAX mark
Note:If the level is at the MIN mark, belowthe MIN mark, or empty, add coolantimmediately. See Adding Engine Coolantin this chapter.
The coolant concentration should bemaintained within 48% to 50%, whichequates to a freeze point between -30°F(-34°C) and -34°F (-37°C).
Note:For best results, coolantconcentration should be tested with arefractometer such as Robinair Coolant andBattery Refractometer 75240. We do notrecommend the use of hydrometers orcoolant test strips for measuring coolantconcentrations.
Note:Automotive fluids are notinterchangeable. Do not use engine coolant,antifreeze or windshield washer fluid outsideof its specified function and vehicle location.
Adding Engine Coolant
Note:Do not use stop leak pellets, coolingsystem sealants, or additives as they cancause damage to the engine cooling orheating systems. Your vehicle’s warrantydoes not cover this damage.
75Motorhome (), enUSAMaintenance
Page 80 of 144
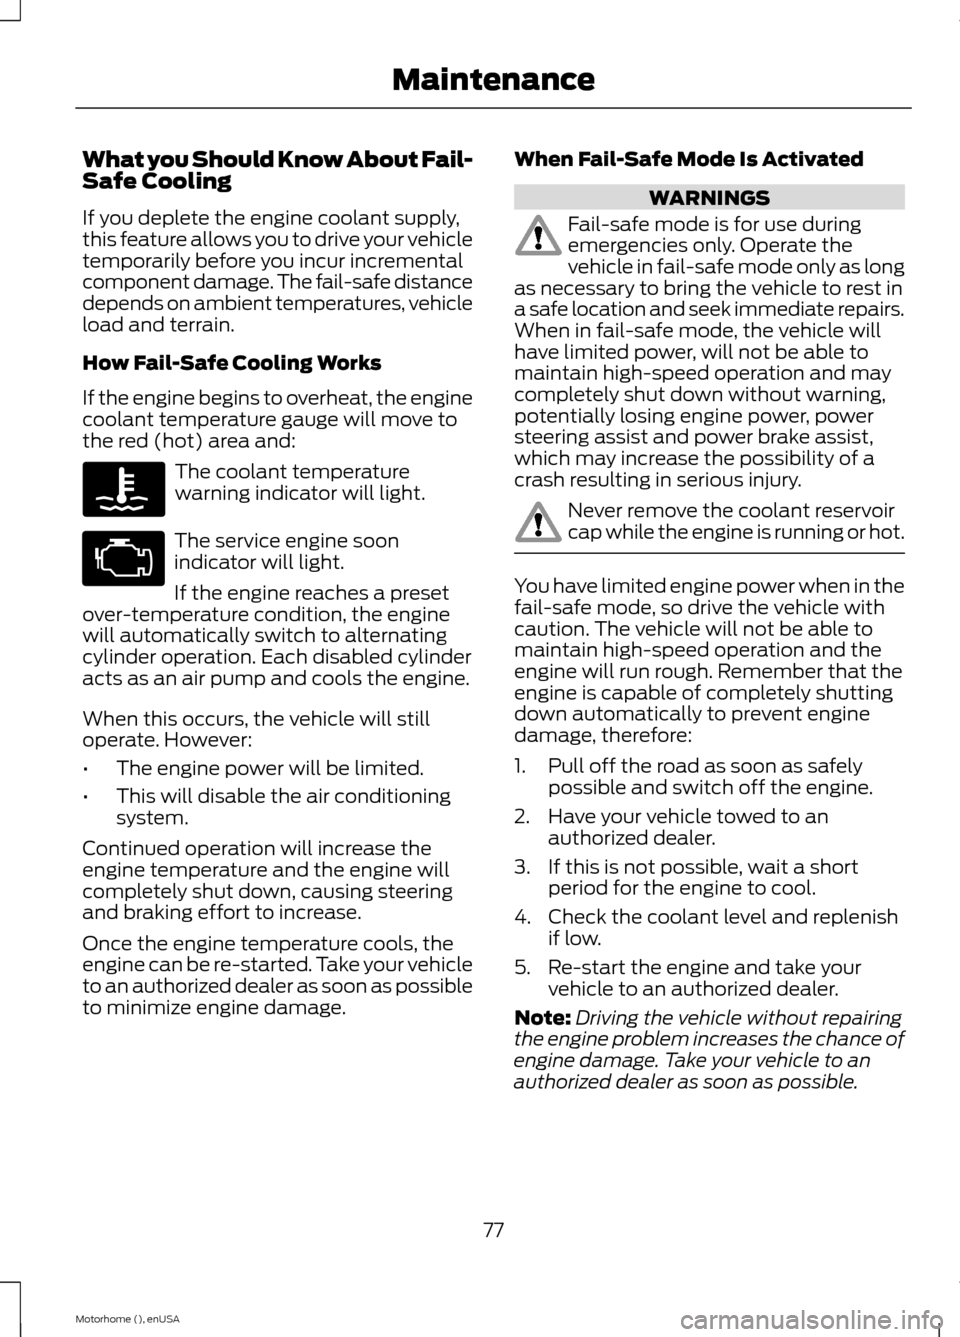
What you Should Know About Fail-Safe Cooling
If you deplete the engine coolant supply,this feature allows you to drive your vehicletemporarily before you incur incrementalcomponent damage. The fail-safe distancedepends on ambient temperatures, vehicleload and terrain.
How Fail-Safe Cooling Works
If the engine begins to overheat, the enginecoolant temperature gauge will move tothe red (hot) area and:
The coolant temperaturewarning indicator will light.
The service engine soonindicator will light.
If the engine reaches a presetover-temperature condition, the enginewill automatically switch to alternatingcylinder operation. Each disabled cylinderacts as an air pump and cools the engine.
When this occurs, the vehicle will stilloperate. However:
•The engine power will be limited.
•This will disable the air conditioningsystem.
Continued operation will increase theengine temperature and the engine willcompletely shut down, causing steeringand braking effort to increase.
Once the engine temperature cools, theengine can be re-started. Take your vehicleto an authorized dealer as soon as possibleto minimize engine damage.
When Fail-Safe Mode Is Activated
WARNINGS
Fail-safe mode is for use duringemergencies only. Operate thevehicle in fail-safe mode only as longas necessary to bring the vehicle to rest ina safe location and seek immediate repairs.When in fail-safe mode, the vehicle willhave limited power, will not be able tomaintain high-speed operation and maycompletely shut down without warning,potentially losing engine power, powersteering assist and power brake assist,which may increase the possibility of acrash resulting in serious injury.
Never remove the coolant reservoircap while the engine is running or hot.
You have limited engine power when in thefail-safe mode, so drive the vehicle withcaution. The vehicle will not be able tomaintain high-speed operation and theengine will run rough. Remember that theengine is capable of completely shuttingdown automatically to prevent enginedamage, therefore:
1.Pull off the road as soon as safelypossible and switch off the engine.
2.Have your vehicle towed to anauthorized dealer.
3.If this is not possible, wait a shortperiod for the engine to cool.
4.Check the coolant level and replenishif low.
5.Re-start the engine and take yourvehicle to an authorized dealer.
Note:Driving the vehicle without repairingthe engine problem increases the chance ofengine damage. Take your vehicle to anauthorized dealer as soon as possible.
77Motorhome (), enUSAMaintenance