Page 37 of 144

•You take corners too fast.
•The road surface is poor.
PARKING BRAKE
WARNING
Always set the parking brake fullyand make sure the transmissionselector lever is placed in position P.Failure to set the parking brake and engagepark could result in vehicle roll-away,property damage or bodily injury. Turn theignition to the lock position and removethe key whenever you leave your vehicle.
Apply the parking brake whenever yourvehicle is parked. Press the pedaldownward to set the parking brake.
The brake warning lamp in theinstrument cluster illuminateswhen the ignition is turned onuntil the parking brake is released.
The parking brake is not recommended tostop a moving vehicle. However, if thenormal brakes fail, the parking brake canbe used to stop your vehicle in anemergency. Since the parking brake appliesonly the transmission mounted parkingbrake assembly, the vehicle's stoppingdistance will increase greatly and thehandling of your vehicle will be adverselyaffected.
To release the parking brake:
1.Press your foot brake pedal firmly.
2.Pull the parking brake release lever.
34Motorhome (), enUSABrakesE144522
Page 49 of 144

Before Towing a Trailer
Practice turning, stopping andbacking up to get the feel of yourvehicle-trailer combination beforestarting on a trip. When turning,make wider turns so the trailerwheels clear curbs and otherobstacles.
When Towing a Trailer
•Do not drive faster than70 mph (113 km/h) during thefirst 500 mi (800 km).
•Do not make full-throttlestarts.
•Check your hitch, electricalconnections and trailer wheellug nuts thoroughly after youhave traveled 50 mi (80 km).
•When stopped in congested orheavy traffic during hotweather, place the gearshift inpark (P) to aid engine andtransmission cooling and tohelp air conditioningperformance.
•Switch off the speed controlwith heavy loads or in hillyterrain. The speed control mayturn off automatically whenyou are towing on long, steep
grades.
•Shift to a lower gear whendriving down a long or steephill. Do not apply the brakescontinuously, as they mayoverheat and become lesseffective.
•If your transmission is equippedwith a Grade Assist orTow/Haul feature, use thisfeature when towing. Thisprovides engine braking andhelps eliminate excessivetransmission shifting foroptimum fuel economy andtransmission cooling.
•Allow more distance forstopping with a trailerattached. Anticipate stops andbrake gradually.
•Avoid parking on a grade.However, if you must park on agrade:
1.Turn the steering wheel topoint your vehicle tires awayfrom traffic flow.
2.Set your vehicle parking brake.
3.Place the automatictransmission in park (P).
4.Place wheel chocks in the frontand back of the trailer wheels.(Chocks not included withvehicle.)
Launching or Retrieving a Boator Personal Watercraft (PWC)
Note:Disconnect the wiring to thetrailer before backing the trailerinto the water.
Note:Reconnect the wiring to thetrailer after removing the trailerfrom the water.
46Motorhome (), enUSATowing
Page 69 of 144
Protected componentsFuse amp ratingFuse or relay number
Powertrain control module relay keep alivepower.5A*M11
Parking lamps.20A*M12
One-touch start.DiodeD1
Fuel pump.DiodeD2
Air conditioning.DiodeD3
Not used.—R2-1
Powertrain control module vehicle power.30A**J1
Fuel pump.20A**J2
Cigar lighter power point.20A**J3Diagnostic connector.
Blower motor.40A**J4
Headlamps.30A**J5
Ignition switch feeds.40A**J6
Ignition switch feeds.40A**J7
Instrument panel fuse box.50A**J8
Starter motor solenoid.30A**J9
3–channel anti-lock brake system module.40A**J10
4–channel anti-lock brake system module(Hydromax).60A**
Trailer tow electronic brake.30A**J11
Lighting.60A**J12
Vehicle power 3.20A**J13
Horn.20A**J14
3–channel anti-lock brake system module.40A**J15
66Motorhome (), enUSAFuses
Page 70 of 144
Protected componentsFuse amp ratingFuse or relay number
4–channel anti-lock brake system module.60A**
Trailer tow parking lamps.20A**J16
*Mini fuse.**J-case fuse.
Diode and Relay Module
Locate the module box with the powerdistribution box in from of the radiator.
Protected componentsRelay location
One-touch integrated start (ATO diode).1
Not used.2
Not used.3
Daytime running lamps power relay.4
Hydromax – brake on/off signal isolating relay.5
Reverse lamps relay.6
Starter ground relay.7
Trailer tow parking lamps relay.8
67Motorhome (), enUSAFusesE161520
Page 72 of 144
Protected componentsFuse amp ratingFuse or relay number
Blower relay coil.15A4
Right turn.15A5
ABS run.10A6
Body builder headlamp.10A7
Daytime running lamps.5A8
Body builder headlamp.10A9
Not used.—10
Cluster battery (+12V) #1.10A11
UPS BTSI.5A12
Cluster battery (+12V) #2.10A13
Switch illumination.10A14
Body builder battery (+12V) feed.20A15
Not used.—16
Trailer tow run.20A17
Body builder run.10A18
Brake lamp feed.10A19
Body builder run.10A20
R/S.10A21
Wiper module battery (+12V).30A22
Reverse lamps.10A23
Body builder radio.5A24
Trailer tow reverse lamps.10A25
Cluster R/S.10A26
Daytime running lamps.20A27
Daytime running lamps.—Relay 1Parking brake.
Daytime running lamps on/off.—Relay 2
69Motorhome (), enUSAFuses
Page 74 of 144

GENERAL INFORMATION
Have your vehicle serviced regularly to helpmaintain its roadworthiness and resalevalue. There is a large network ofauthorized dealers that are there to helpyou with their professional servicingexpertise. We believe that their speciallytrained technicians are best qualified toservice your vehicle properly and expertly.They are supported by a wide range ofhighly specialized tools developedspecifically for servicing your vehicle.
To help you service your vehicle, weprovide scheduled maintenanceinformation which makes tracking routineservice easy. See ScheduledMaintenance (page 121).
If your vehicle requires professional service,an authorized dealer can provide thenecessary parts and service. Check yourwarranty information to find out whichparts and services are covered.
Use only recommended fuels, lubricants,fluids and service parts conforming tospecifications. Motorcraft® parts aredesigned and built to provide the bestperformance in your vehicle.
Precautions
•Do not work on a hot engine.
•Make sure that nothing gets caught inmoving parts.
•Do not work on a vehicle with theengine running in an enclosed space,unless you are sure you have enoughventilation.
•Keep all open flames and other burningmaterial (such as cigarettes) awayfrom the battery and all fuel relatedparts.
Working with the Engine Off
1.Set the parking brake and shift to park(P).
2.Switch off the engine.
3.Block the wheels.
Working with the Engine On
WARNING
To reduce the risk of vehicle damageand/or personal burn injuries, do notstart your engine with the air cleanerremoved and do not remove it while theengine is running.
1.Set the parking brake and shift to park(P).
2.Block the wheels
71Motorhome (), enUSAMaintenance
Page 81 of 144

AUTOMATIC TRANSMISSION
FLUID CHECK
WARNING
The dipstick cap and surroundingcomponents may be hot; gloves arerecommended.
Note:Automatic transmission fluidexpands when warmed. To obtain anaccurate fluid check, drive the vehicle untilit is at normal operating temperature(approximately 20 miles [30 km]). If yourvehicle has been operated for an extendedperiod at high speeds, in city traffic duringhot weather or pulling a trailer, the vehicleshould be turned off for about 30 minutesto allow fluid to cool to normal operatingtemperature 150°F - 170°F (66°C - 77°C)before checking.
Refer to your scheduled maintenanceinformation for scheduled intervals for fluidchecks and changes.
Your transmission does not consume fluid.However, the fluid level should be checkedif the transmission is not working properly,(i.e., if the transmission slips or shiftsslowly) or if you notice some sign of fluidleakage. To check the fluid level:
1.Drive the vehicle 20 miles (30 km) oruntil it reaches normal operatingtemperature
2.Park the vehicle on a level surface andengage the parking brake
3.With the engine running, parking brakeengaged and your foot on the brakepedal, move the gearshift lever throughall of the gear ranges. Allow sufficienttime for each gear to engage
4.Latch the gearshift lever in P (Park)and leave the engine running.
5.Remove the dipstick, wiping it cleanwith a clean, dry lint free rag. Ifnecessary, refer to Under HoodOverview in this chapter for thelocation of the dipstick.
6.Install the dipstick making sure it is fullyseated in the filler tube.
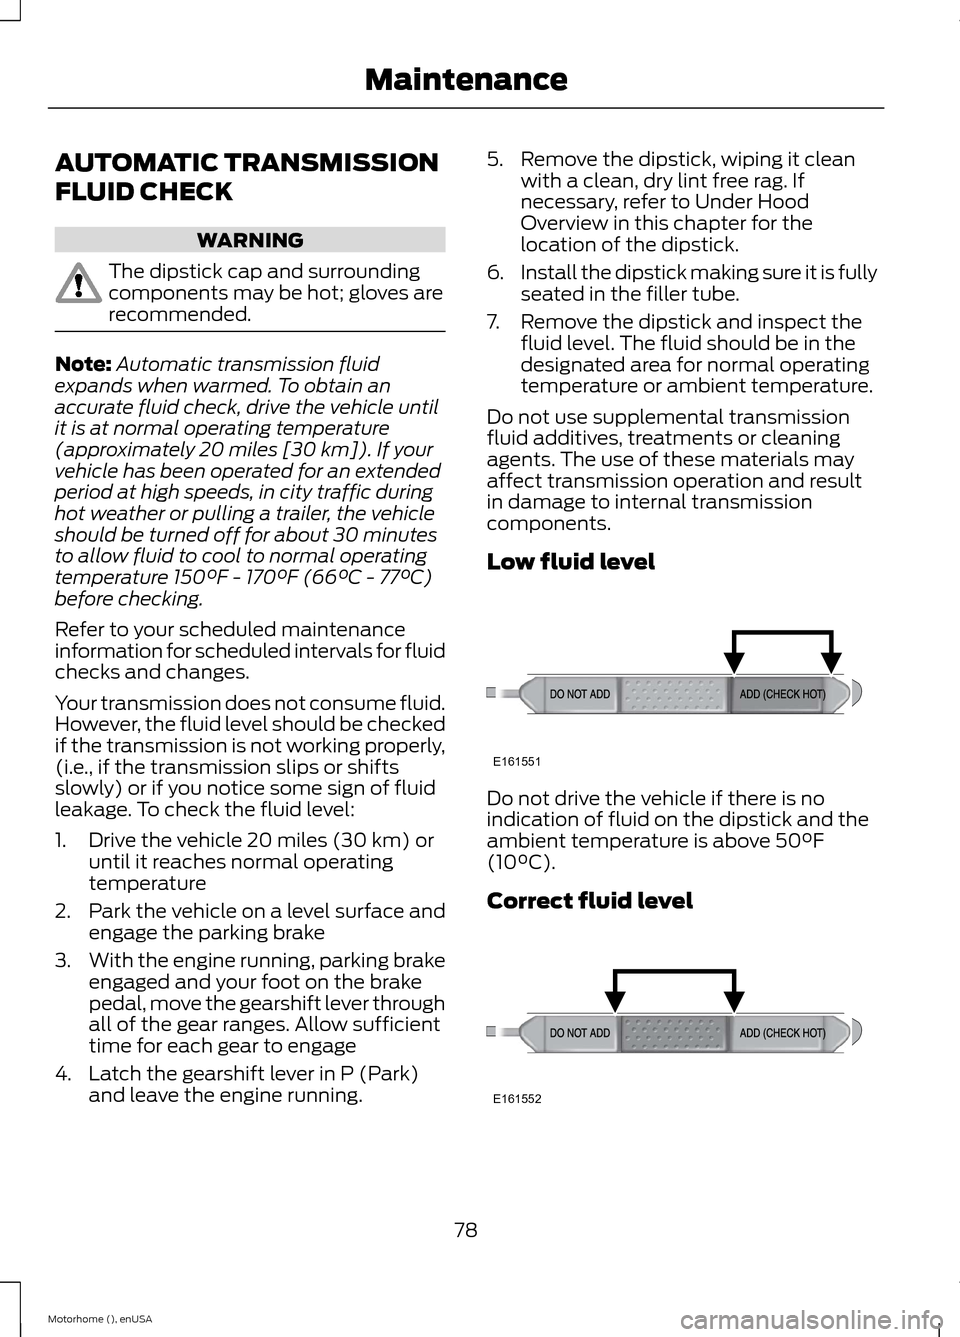
7.Remove the dipstick and inspect thefluid level. The fluid should be in thedesignated area for normal operatingtemperature or ambient temperature.
Do not use supplemental transmissionfluid additives, treatments or cleaningagents. The use of these materials mayaffect transmission operation and resultin damage to internal transmissioncomponents.
Low fluid level
Do not drive the vehicle if there is noindication of fluid on the dipstick and theambient temperature is above 50°F(10°C).
Correct fluid level
78Motorhome (), enUSAMaintenanceE161551 E161552
Page 84 of 144
Parking brake fluid
Note:Do not fill the parking brake throughthe vent plug (A) (located on top of thetransmission).
Check the parking brake fluid level only ifthere is visible signs of fluid leakage. Ifnecessary, fill the parking brake assemblyto the bottom of the filler plug hole (B)(located on the driver side of thetransmission). See Capacities andSpecifications (page 114).
POWER STEERING FLUID
CHECK
Note:The power steering cap has both acold and hot indicator on the dipstick.
1.Start the engine and let it run until itreaches normal operating temperature(the engine coolant temperature gaugeindicator will be near the center of thenormal area between H and C).
2.While the engine idles, turn the steeringwheel left and right several times.
3.Turn the engine off.
81Motorhome (), enUSAMaintenanceE161556AB E161557