2015 FORD EXPLORER lights
[x] Cancel search: lightsPage 222 of 596
HILL START ASSIST
WARNING:The hill start assist feature does not replace the
parking brake. When you leave the vehicle, always apply the
parking brake and shift the transmission into park (P).
WARNING:You must remain in the vehicle once you have
activated the hill start assist feature.
WARNING:During all times, you are responsible for controlling
the vehicle, supervising the hill start assist system and
intervening, if required.
WARNING:If the engine is revved excessively, or if a
malfunction is detected when the hill start assist feature is active,
the hill start assist feature will be deactivated.
Hill start assist keeps your vehicle stationary long enough to move your
foot from the brake pedal to the accelerator pedal when your vehicle is
on a slope.
The brakes are released automatically once the engine has developed
sufficient drive to prevent the vehicle from rolling down the slope. This
is an advantage when pulling away on a slope, (for example from a car
park ramp, traffic lights or when reversing uphill into a parking space).
Using Hill Start Assist
1. Press the brake pedal to bring the vehicle to a complete standstill.
Keep the brake pedal pressed.
2. If the sensors detect that the vehicle is on a slope, the hill start assist
feature will be activated automatically.
3. When you remove your foot from the brake pedal, the vehicle will
remain on the slope without rolling away for approximately two or three
seconds. This hold time will automatically be extended if you are in the
process of driving off.
4. Drive off in the normal manner. The brakes will be released
automatically.
Brakes221
2015 Explorer(exp)
Owners Guide gf, 2nd Printing, September 2014
USA(fus)
Page 223 of 596
PRINCIPLES OF OPERATION
The traction control system helps avoid drive wheel spin and loss of
traction.
If your vehicle begins to slide, the system applies the brakes to individual
wheels and, when needed, reduces engine power at the same time. If the
wheels spin when accelerating on slippery or loose surfaces, the system
reduces engine power in order to increase traction.
USING TRACTION CONTROL
In certain situations (for example, stuck in snow or mud), turning the
traction control off may be beneficial as this allows the wheels to spin
with full engine power. Turn the traction control system off through the
information display. See theInformation Displayschapter.
System Indicator Lights and Messages
WARNING:If a failure has been detected within the Traction
Control System, the stability control light will illuminate steadily.
Verify that the Traction Control System was not manually disabled
using the information display control. If the stability control light still
illuminates steadily, have the system serviced by an authorized dealer
immediately. Operating your vehicle with Traction Control disabled
could lead to an increased risk of loss of vehicle control, vehicle
rollover, personal injury and death.
The stability control light temporarily illuminates on engine
start-up and flashes when a driving condition activates the
stability system.
The stability control off light temporarily illuminates on engine
start-up and stays on when the traction control system is
turned off or if a problem occurs in the stability system.
When the traction control system is turned off or on, a message appears
in the information display showing system status.
222Traction Control
2015 Explorer(exp)
Owners Guide gf, 2nd Printing, September 2014
USA(fus)
Page 239 of 596
Enhanced Park Aids
Note:Enhanced park aids is only available when the transmission is in R
(Reverse).
Note:The reverse sensing system is not effective at speeds above 3 mph
(5 km/h) and may not detect certain angular or moving objects.
The enhanced park aids allows the driver to view the area that is being
detected by the reverse sensing system. The system uses red, yellow and
green highlights which appear on top of the video image when an object
is detected by the reverse sensing system. The alert highlights the
closest object detected. The reverse sensing alert can be disabled and if
enhanced park aids is enabled, highlighted areas are still displayed.
Selectable settings for this feature are ON and OFF.
Manual Zoom
WARNING:When manual zoom is on, the full area behind the
vehicle is not shown. Be aware of your surroundings when using
the manual zoom feature.
Note:Manual zoom is only available when the transmission is in R
(Reverse).
Note:When manual zoom is enabled, only the centerline is shown.
Allows the driver to get a closer view of an object behind the vehicle.
The zoomed image keeps the bumper in the image to provide a
reference. The zoom is only active while the transmission is in R
(Reverse), When the transmission is shifted out of R (Reverse), the
feature automatically turns off and must be reset when it is used again.
Selectable settings for this feature are OFF and ON. Press the zoom
button to change the view. The default setting for the manual zoom is
OFF.
Rear Camera Delay
When shifting the transmission out of R (Reverse) and into any gear
other than P (Park), the camera image remains in the display until the
vehicle speed reaches 6 mph (10 km/h). This occurs when the rear
camera delay feature is on, or until a radio button is selected.
Selectable settings for this feature are ON and OFF. The default setting
for the rear camera delay is OFF.
238Parking Aids
2015 Explorer(exp)
Owners Guide gf, 2nd Printing, September 2014
USA(fus)
Page 257 of 596
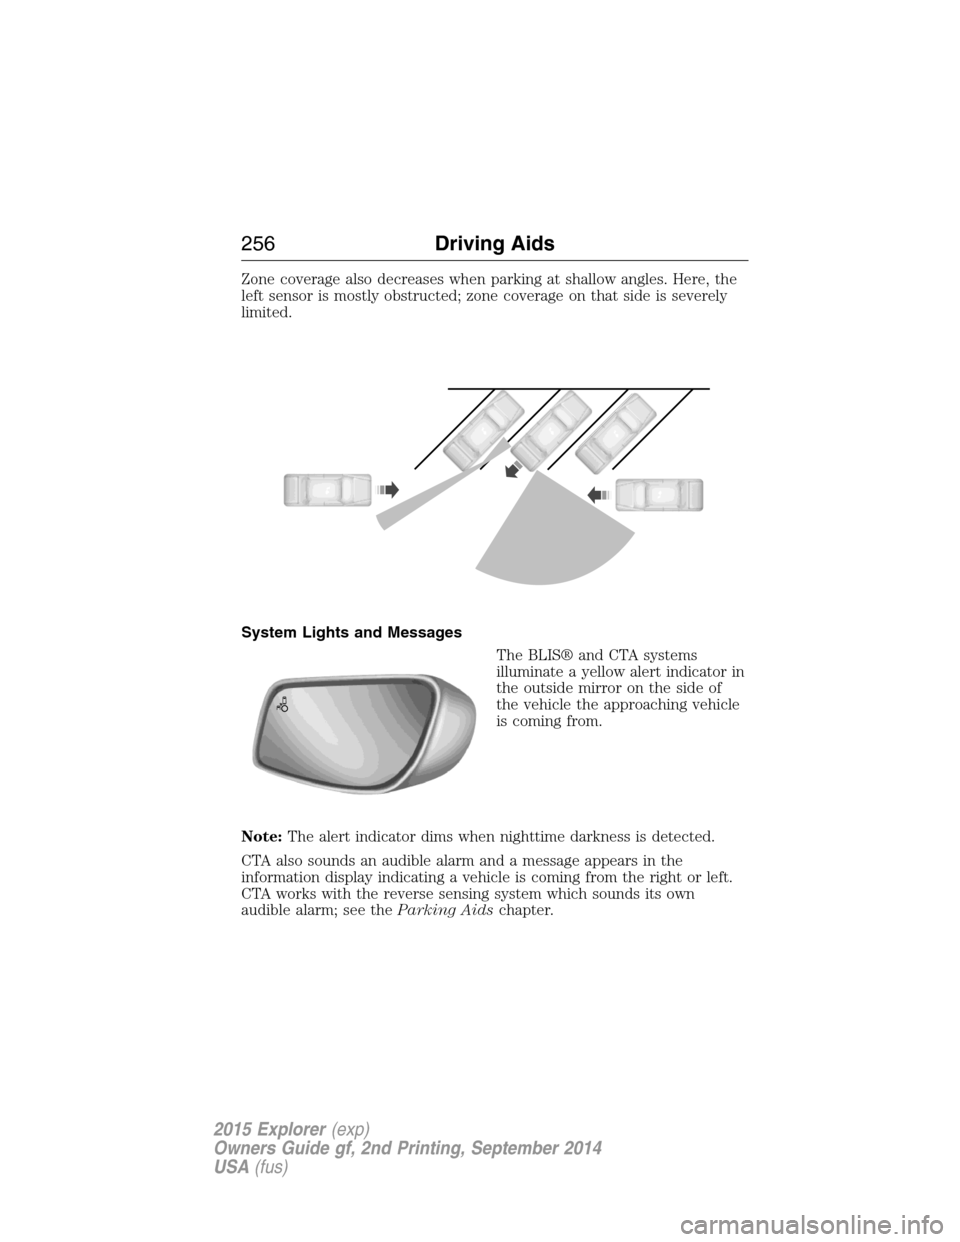
Zone coverage also decreases when parking at shallow angles. Here, the
left sensor is mostly obstructed; zone coverage on that side is severely
limited.
System Lights and Messages
The BLIS® and CTA systems
illuminate a yellow alert indicator in
the outside mirror on the side of
the vehicle the approaching vehicle
is coming from.
Note:The alert indicator dims when nighttime darkness is detected.
CTA also sounds an audible alarm and a message appears in the
information display indicating a vehicle is coming from the right or left.
CTA works with the reverse sensing system which sounds its own
audible alarm; see theParking Aidschapter.
256Driving Aids
2015 Explorer(exp)
Owners Guide gf, 2nd Printing, September 2014
USA(fus)
Page 277 of 596

Trailer Towing Connector (Vehicles with a Trailer Towing Package
and 7–Pin Connector)
When attaching the trailer wiring connector to
your vehicle, only use a proper fitting connector
that works with the vehicle and trailer functions. If
your vehicle has a trailer towing package, it may
have a 7–pin connector. Some connectors may
have the SAE J2863 logo, which confirms that it is
the proper wiring connector and works correctly
with your vehicle.
Color Function
1. Yellow Left turn signal and stop lamp
2. White Ground (-)
3. Blue Electric brakes
4. Green Right turn signal and stop lamp
5. Orange Battery (+)
6. Brown Running lights
7. Grey Reverse lights
Trailer Hitch Cover
Your vehicle is equipped with a removable trailer hitch trim cover. To
remove the trim cover:
1. Loosen the two
1�4-turn fasteners
(A) in the bottom of the cover by
turning them counterclockwise. Pull
the cover rearward to remove it.
The fasteners remain attached to
the cover.
AA
276Towing
2015 Explorer(exp)
Owners Guide gf, 2nd Printing, September 2014
USA(fus)
Page 279 of 596
Safety Chains
Note:Never attach safety chains to the bumper.
Always connect the safety chains to the hook retainers of your vehicle
hitch.
To connect the safety chains, cross them under the trailer tongue and
allow enough slack for turning tight corners. Do not allow the chains to
drag on the ground.
Trailer Brakes
WARNING:Do not connect a trailer’s hydraulic brake system
directly to your vehicle’s brake system. Your vehicle may not have
enough braking power and your chances of having a collision greatly
increase.
Electric brakes and manual, automatic or surge-type trailer brakes are
safe if you install them properly and adjust them to the manufacturer’s
specifications. The trailer brakes must meet local and federal regulations.
The rating for the tow vehicle’s braking system operation is at
the gross vehicle weight rating, not the gross combined weight
rating.
Separate functioning brake systems are required for safe control
of towed vehicles and trailers weighing more than 1500 pounds
(680 kilograms) when loaded.
Trailer Lamps
WARNING:Never connect any trailer lamp wiring to the
vehicle’s tail lamp wiring; this may damage the electrical system
resulting in a fire. Contact an authorized dealer as soon as possible for
assistance in proper trailer tow wiring installation. Additional electrical
equipment may be required.
Trailer lamps are required on most towed vehicles. Make sure all running
lights, brake lights, turn signals and hazard lights are working.
Before Towing a Trailer
Practice turning, stopping and backing up to get the feel of your
vehicle-trailer combination before starting on a trip. When turning, make
wider turns so the trailer wheels clear curbs and other obstacles.
278Towing
2015 Explorer(exp)
Owners Guide gf, 2nd Printing, September 2014
USA(fus)
Page 285 of 596
•Add particular accessories to your vehicle (e.g.; bug deflectors,
rollbars or light bars, running boards, ski racks).
•Drive with the wheels out of alignment.
DRIVING THROUGH WATER
WARNING:Do not drive through flowing or deep water as you
may lose control of your vehicle.
Note:Driving through standing water can cause vehicle damage.
Note:Engine damage can occur if water enters the air filter.
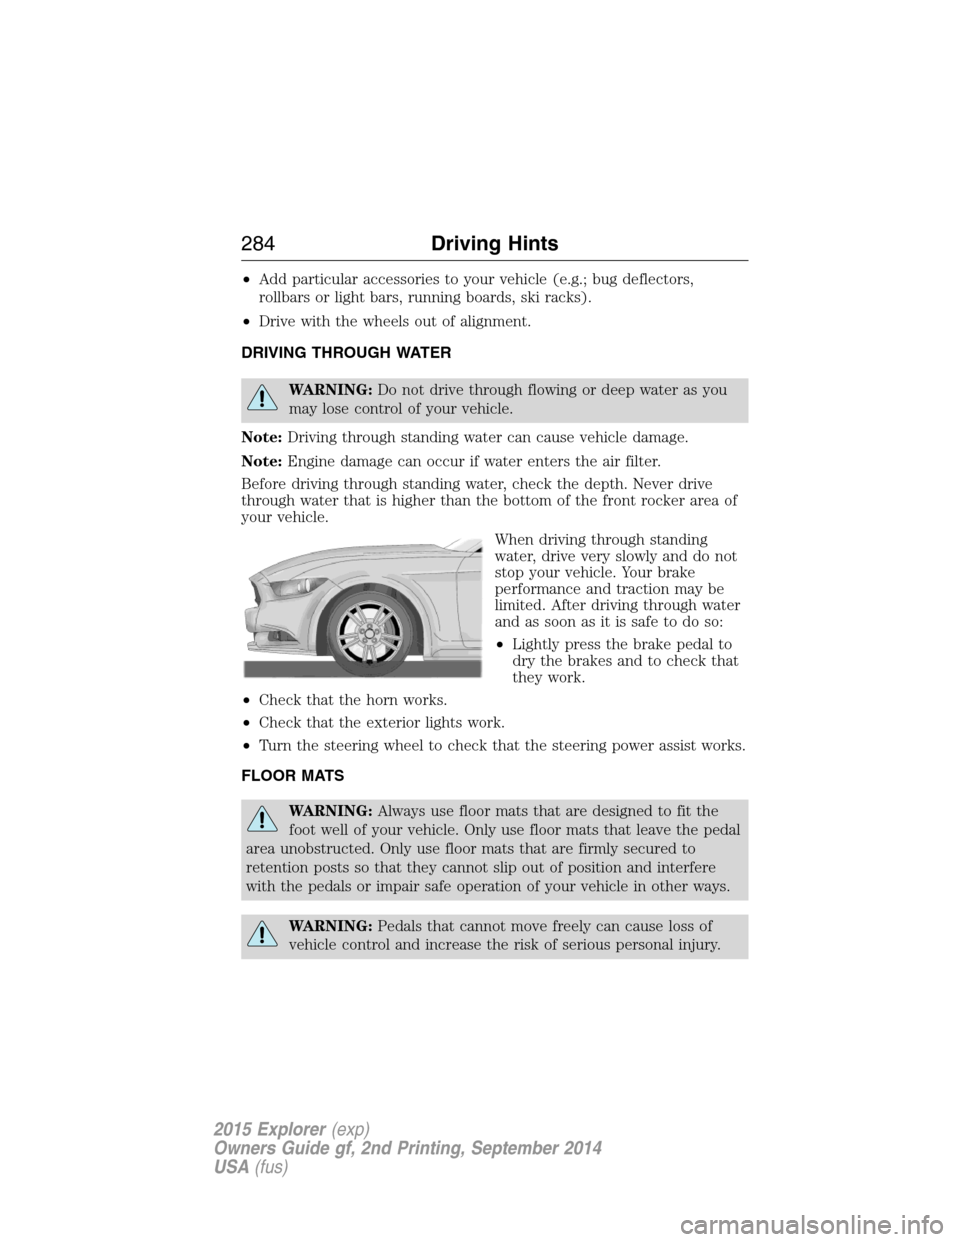
Before driving through standing water, check the depth. Never drive
through water that is higher than the bottom of the front rocker area of
your vehicle.
When driving through standing
water, drive very slowly and do not
stop your vehicle. Your brake
performance and traction may be
limited. After driving through water
and as soon as it is safe to do so:
•Lightly press the brake pedal to
dry the brakes and to check that
they work.
•Check that the horn works.
•Check that the exterior lights work.
•Turn the steering wheel to check that the steering power assist works.
FLOOR MATS
WARNING:Always use floor mats that are designed to fit the
foot well of your vehicle. Only use floor mats that leave the pedal
area unobstructed. Only use floor mats that are firmly secured to
retention posts so that they cannot slip out of position and interfere
with the pedals or impair safe operation of your vehicle in other ways.
WARNING:Pedals that cannot move freely can cause loss of
vehicle control and increase the risk of serious personal injury.
284Driving Hints
2015 Explorer(exp)
Owners Guide gf, 2nd Printing, September 2014
USA(fus)
Page 341 of 596
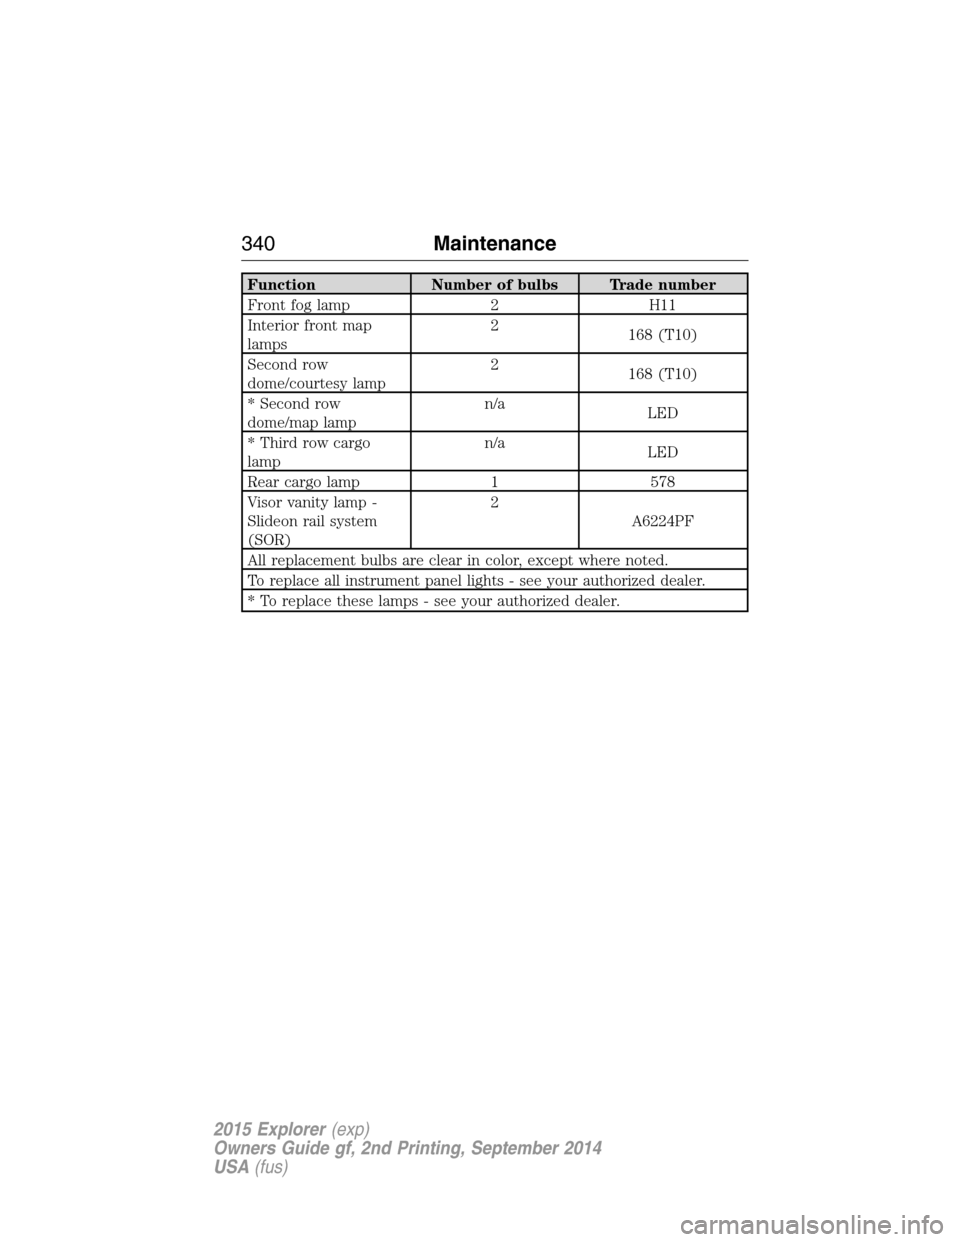
Function Number of bulbs Trade number
Front fog lamp 2 H11
Interior front map
lamps2
168 (T10)
Second row
dome/courtesy lamp2
168 (T10)
* Second row
dome/map lampn/a
LED
* Third row cargo
lampn/a
LED
Rear cargo lamp 1 578
Visor vanity lamp -
Slideon rail system
(SOR)2
A6224PF
All replacement bulbs are clear in color, except where noted.
To replace all instrument panel lights - see your authorized dealer.
* To replace these lamps - see your authorized dealer.
340Maintenance
2015 Explorer(exp)
Owners Guide gf, 2nd Printing, September 2014
USA(fus)