2015 FORD EXPLORER transmission
[x] Cancel search: transmissionPage 102 of 596
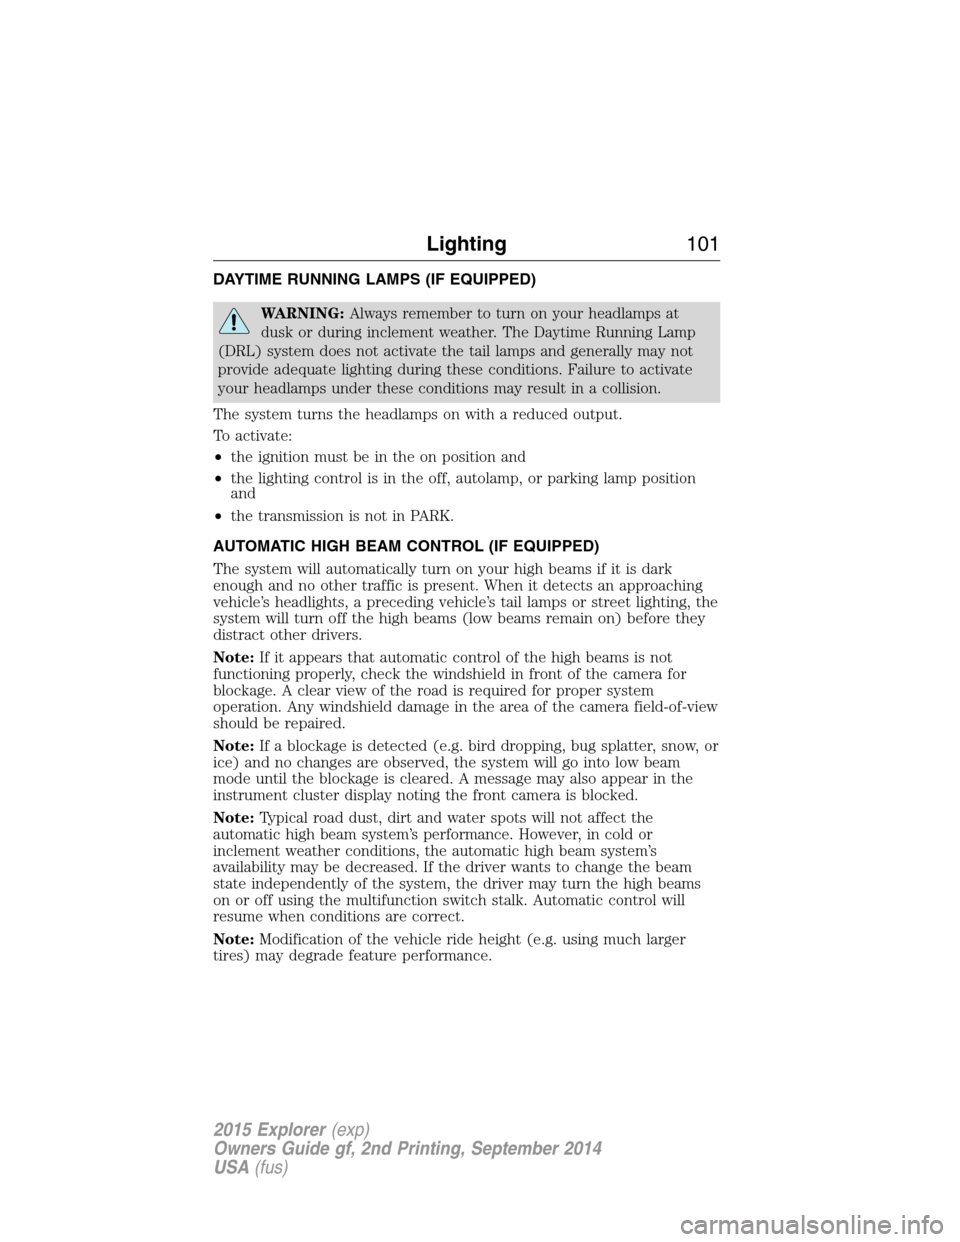
DAYTIME RUNNING LAMPS (IF EQUIPPED)
WARNING:Always remember to turn on your headlamps at
dusk or during inclement weather. The Daytime Running Lamp
(DRL) system does not activate the tail lamps and generally may not
provide adequate lighting during these conditions. Failure to activate
your headlamps under these conditions may result in a collision.
The system turns the headlamps on with a reduced output.
To activate:
•the ignition must be in the on position and
•the lighting control is in the off, autolamp, or parking lamp position
and
•the transmission is not in PARK.
AUTOMATIC HIGH BEAM CONTROL (IF EQUIPPED)
The system will automatically turn on your high beams if it is dark
enough and no other traffic is present. When it detects an approaching
vehicle’s headlights, a preceding vehicle’s tail lamps or street lighting, the
system will turn off the high beams (low beams remain on) before they
distract other drivers.
Note:If it appears that automatic control of the high beams is not
functioning properly, check the windshield in front of the camera for
blockage. A clear view of the road is required for proper system
operation. Any windshield damage in the area of the camera field-of-view
should be repaired.
Note:If a blockage is detected (e.g. bird dropping, bug splatter, snow, or
ice) and no changes are observed, the system will go into low beam
mode until the blockage is cleared. A message may also appear in the
instrument cluster display noting the front camera is blocked.
Note:Typical road dust, dirt and water spots will not affect the
automatic high beam system’s performance. However, in cold or
inclement weather conditions, the automatic high beam system’s
availability may be decreased. If the driver wants to change the beam
state independently of the system, the driver may turn the high beams
on or off using the multifunction switch stalk. Automatic control will
resume when conditions are correct.
Note:Modification of the vehicle ride height (e.g. using much larger
tires) may degrade feature performance.
Lighting101
2015 Explorer(exp)
Owners Guide gf, 2nd Printing, September 2014
USA(fus)
Page 122 of 596

Speed control (RTT) (if equipped)
The speed control system indicator light changes color to
indicate what mode the system is in:
•On (gray light–type 1 and type 2): Illuminates when the speed control
system is turned on. Turns off when the speed control system is
turned off.
•Engaged (white light-type 1, green light-type 2): Illuminates when the
speed control system is engaged. Turns off when the speed control
system is disengaged.
Stability Control System
Displays when the AdvanceTrac®/Traction control is active. If
the light remains on, have the system serviced immediately.
Stability Control System Off
Illuminates when AdvanceTrac®/Traction control has been
disabled by the driver.
Transmission Tow/Haul Feature (RTT) (if equipped)
Displays when the Tow/Haul feature has been activated. If the
light flashes steadily, have the system serviced immediately,
damage to the transmission could occur.
Turn signal
Illuminates when the left or right turn signal or the hazard
warning flasher is turned on. If the indicators stay on or flash
faster, check for a burned out bulb.
Instrument Cluster121
2015 Explorer(exp)
Owners Guide gf, 2nd Printing, September 2014
USA(fus)
Page 130 of 596
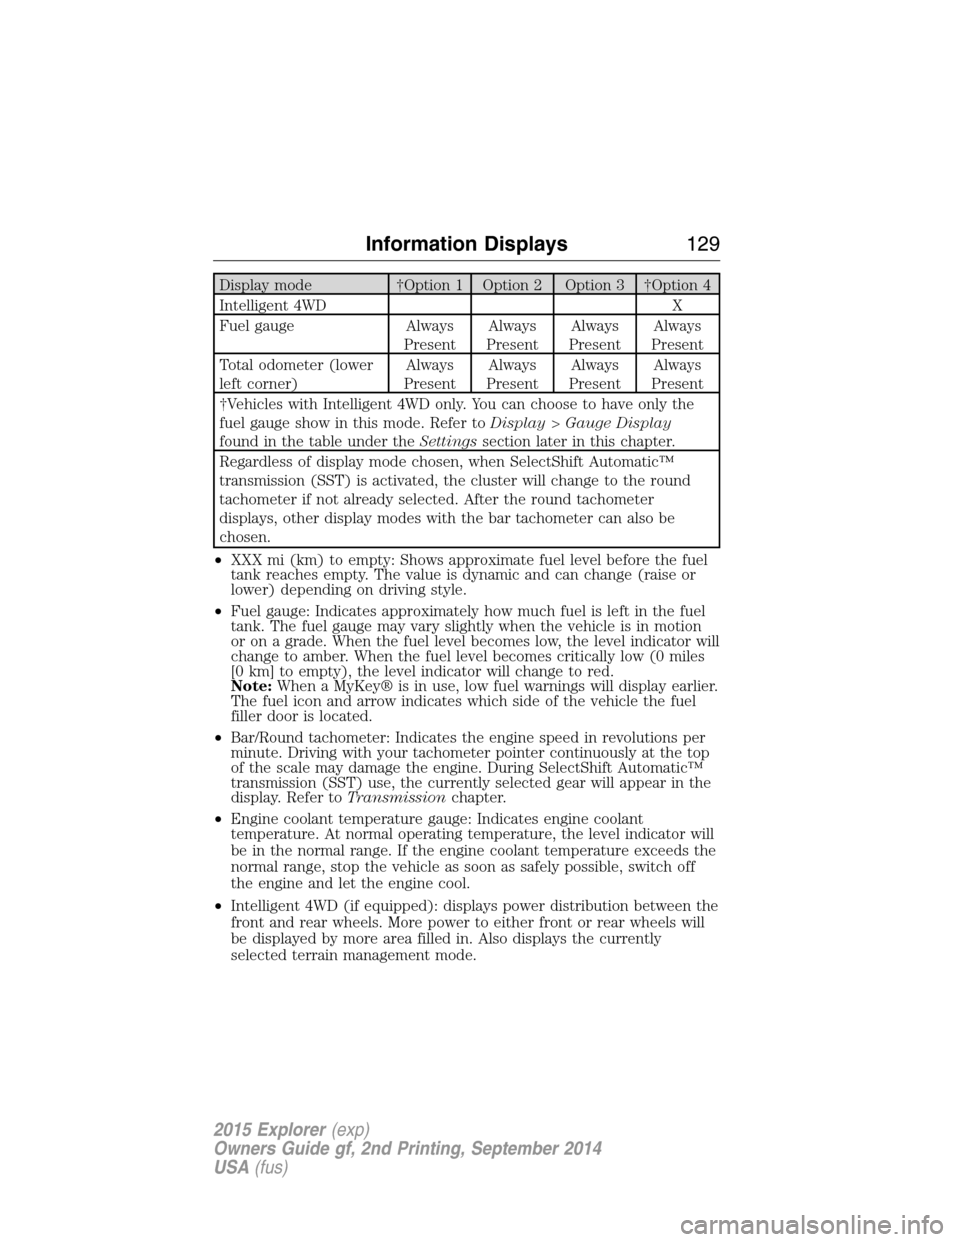
Display mode †Option 1 Option 2 Option 3 †Option 4
Intelligent 4WD X
Fuel gauge Always
PresentAlways
PresentAlways
PresentAlways
Present
Total odometer (lower
left corner)Always
PresentAlways
PresentAlways
PresentAlways
Present
†Vehicles with Intelligent 4WD only. You can choose to have only the
fuel gauge show in this mode. Refer toDisplay>Gauge Display
found in the table under theSettingssection later in this chapter.
Regardless of display mode chosen, when SelectShift Automatic™
transmission (SST) is activated, the cluster will change to the round
tachometer if not already selected. After the round tachometer
displays, other display modes with the bar tachometer can also be
chosen.
•XXX mi (km) to empty: Shows approximate fuel level before the fuel
tank reaches empty. The value is dynamic and can change (raise or
lower) depending on driving style.
•Fuel gauge: Indicates approximately how much fuel is left in the fuel
tank. The fuel gauge may vary slightly when the vehicle is in motion
or on a grade. When the fuel level becomes low, the level indicator will
change to amber. When the fuel level becomes critically low (0 miles
[0 km] to empty), the level indicator will change to red.
Note:When a MyKey® is in use, low fuel warnings will display earlier.
The fuel icon and arrow indicates which side of the vehicle the fuel
filler door is located.
•Bar/Round tachometer: Indicates the engine speed in revolutions per
minute. Driving with your tachometer pointer continuously at the top
of the scale may damage the engine. During SelectShift Automatic™
transmission (SST) use, the currently selected gear will appear in the
display. Refer toTransmissionchapter.
•Engine coolant temperature gauge: Indicates engine coolant
temperature. At normal operating temperature, the level indicator will
be in the normal range. If the engine coolant temperature exceeds the
normal range, stop the vehicle as soon as safely possible, switch off
the engine and let the engine cool.
•Intelligent 4WD (if equipped): displays power distribution between the
front and rear wheels. More power to either front or rear wheels will
be displayed by more area filled in. Also displays the currently
selected terrain management mode.
Information Displays129
2015 Explorer(exp)
Owners Guide gf, 2nd Printing, September 2014
USA(fus)
Page 142 of 596
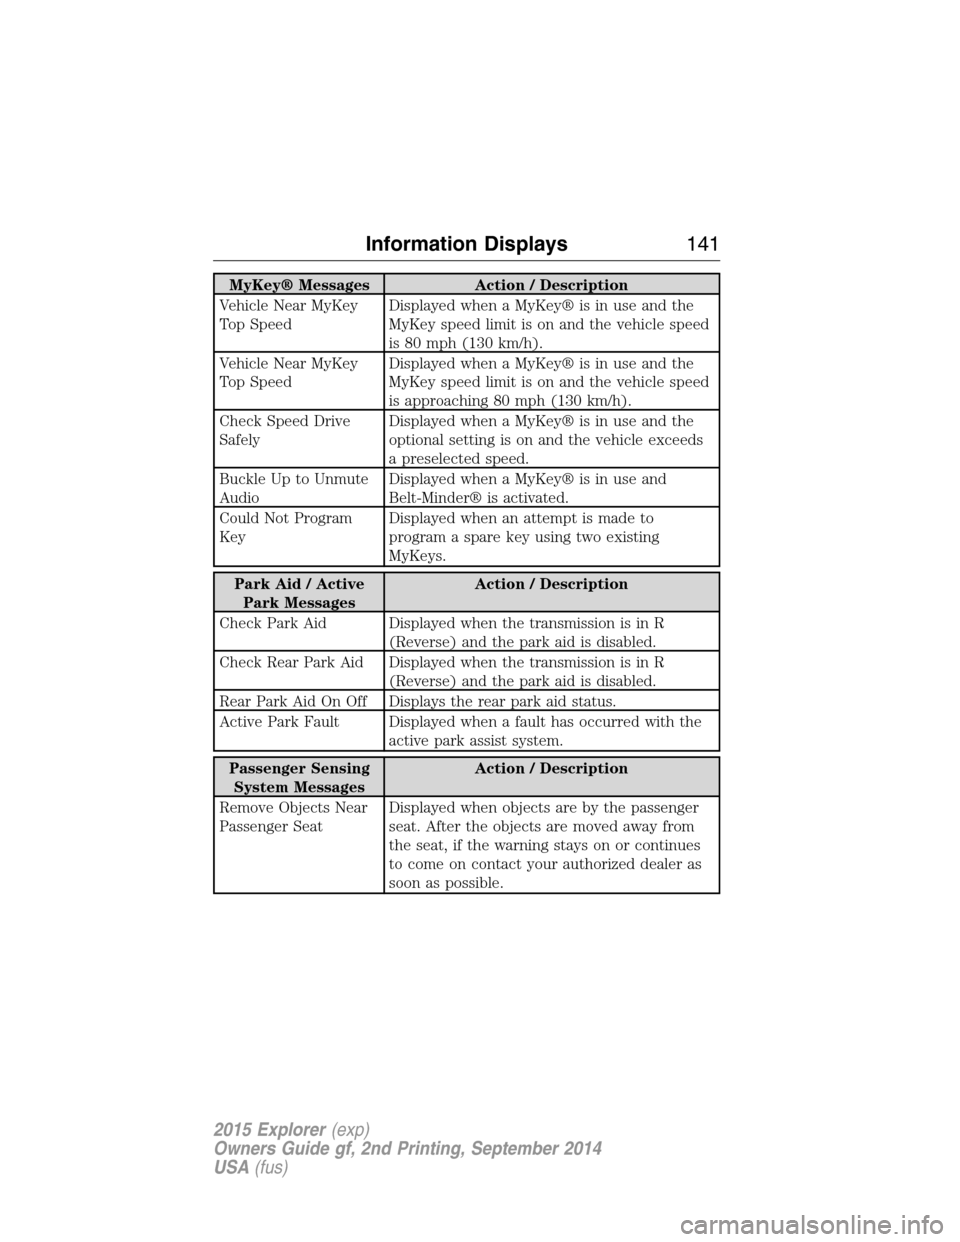
MyKey® Messages Action / Description
Vehicle Near MyKey
Top SpeedDisplayed when a MyKey® is in use and the
MyKey speed limit is on and the vehicle speed
is 80 mph (130 km/h).
Vehicle Near MyKey
Top SpeedDisplayed when a MyKey® is in use and the
MyKey speed limit is on and the vehicle speed
is approaching 80 mph (130 km/h).
Check Speed Drive
SafelyDisplayed when a MyKey® is in use and the
optional setting is on and the vehicle exceeds
a preselected speed.
Buckle Up to Unmute
AudioDisplayed when a MyKey® is in use and
Belt-Minder® is activated.
Could Not Program
KeyDisplayed when an attempt is made to
program a spare key using two existing
MyKeys.
Park Aid / Active
Park MessagesAction / Description
Check Park Aid Displayed when the transmission is in R
(Reverse) and the park aid is disabled.
Check Rear Park Aid Displayed when the transmission is in R
(Reverse) and the park aid is disabled.
Rear Park Aid On Off Displays the rear park aid status.
Active Park Fault Displayed when a fault has occurred with the
active park assist system.
Passenger Sensing
System MessagesAction / Description
Remove Objects Near
Passenger SeatDisplayed when objects are by the passenger
seat. After the objects are moved away from
the seat, if the warning stays on or continues
to come on contact your authorized dealer as
soon as possible.
Information Displays141
2015 Explorer(exp)
Owners Guide gf, 2nd Printing, September 2014
USA(fus)
Page 143 of 596
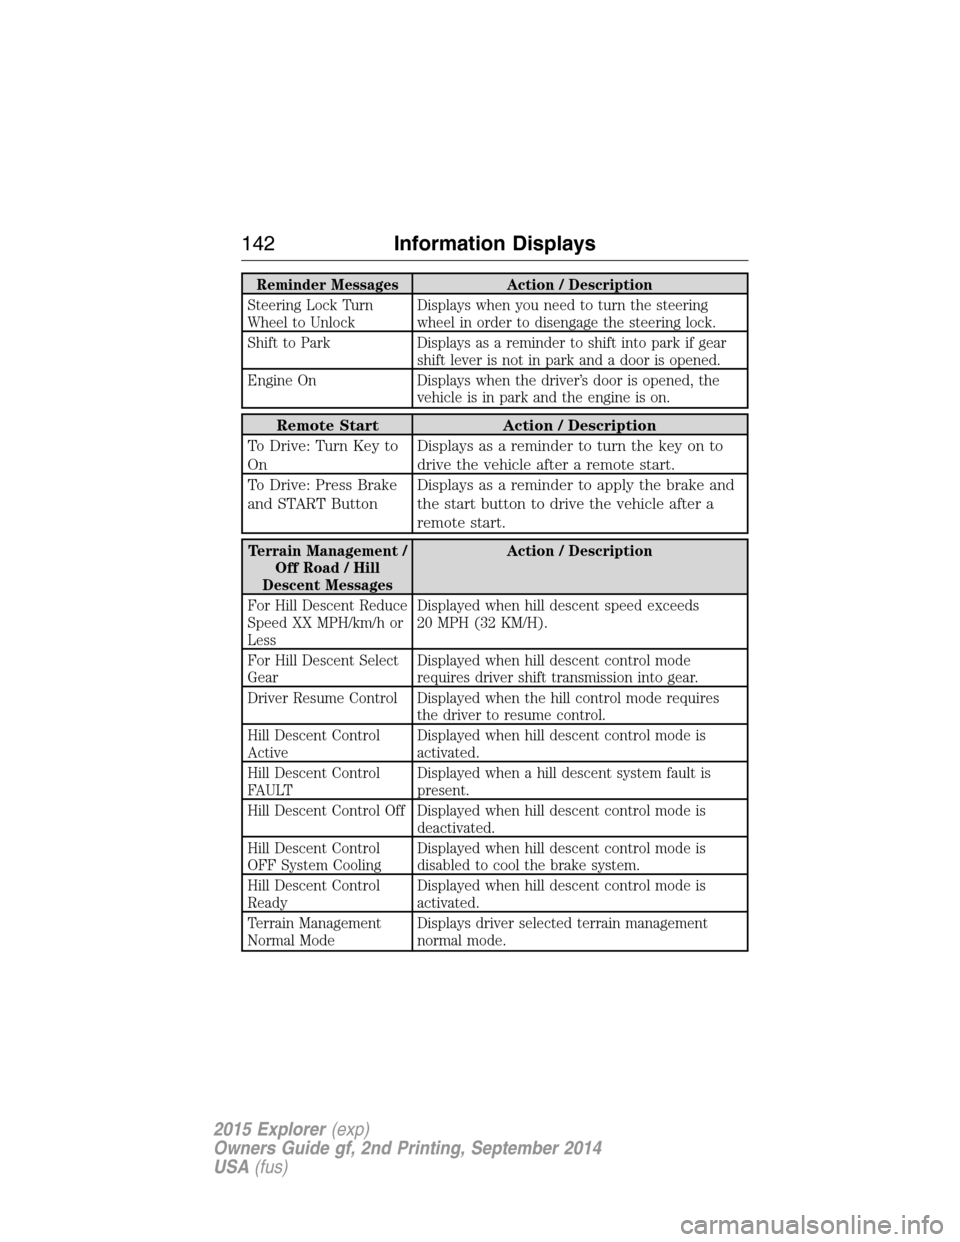
Reminder Messages Action / Description
Steering Lock Turn
Wheel to UnlockDisplays when you need to turn the steering
wheel in order to disengage the steering lock.
Shift to Park Displays as a reminder to shift into park if gear
shift lever is not in park and a door is opened.
Engine On Displays when the driver’s door is opened, the
vehicle is in park and the engine is on.
Remote Start Action / Description
To Drive: Turn Key to
OnDisplays as a reminder to turn the key on to
drive the vehicle after a remote start.
To Drive: Press Brake
and START ButtonDisplays as a reminder to apply the brake and
the start button to drive the vehicle after a
remote start.
Terrain Management /
Off Road / Hill
Descent MessagesAction / Description
For Hill Descent Reduce
Speed XX MPH/km/h or
LessDisplayed when hill descent speed exceeds
20 MPH (32 KM/H).
For Hill Descent Select
GearDisplayed when hill descent control mode
requires driver shift transmission into gear.
Driver Resume Control Displayed when the hill control mode requires
the driver to resume control.
Hill Descent Control
ActiveDisplayed when hill descent control mode is
activated.
Hill Descent Control
FAULTDisplayed when a hill descent system fault is
present.
Hill Descent Control Off Displayed when hill descent control mode is
deactivated.
Hill Descent Control
OFF System CoolingDisplayed when hill descent control mode is
disabled to cool the brake system.
Hill Descent Control
ReadyDisplayed when hill descent control mode is
activated.
Terrain Management
Normal ModeDisplays driver selected terrain management
normal mode.
142Information Displays
2015 Explorer(exp)
Owners Guide gf, 2nd Printing, September 2014
USA(fus)
Page 163 of 596

MEMORY FUNCTION (IF EQUIPPED)
This memory control, located on the
driver door, allows automatic
positioning of the driver seat and
power mirrors to three
programmable positions. You may
also have this feature for the
steering column and power
adjustable foot pedals.
Programming a memory position
1. Switch the ignition on.
2. Adjust the memory features to your desired positions using the
associated controls.
3. Press and hold the desired pre-set button for about two seconds until
you hear a single tone.
Note:You can save up to three pre-set memory positions.
Recalling a memory position
Press and release the desired memory pre-set button to recall a saved
memory position.
Note:A pre-set memory position can only be recalled when the ignition
is off, or when the transmission is in park (P) or neutral (N) if the
ignition is on.
A pre-set memory position can also be recalled by:
•Pressing the unlock button on your intelligent access key fob if it is
linked to a pre-set position.
•Unlocking the intelligent driver door handle if a linked key fob is
present.
•Entering a personal entry code on the Securicode keypad. SeeLocks.
Note:Using a linked key fob to recall your memory position when the
ignition is off will move the seat and steering column to the Easy Entry
position (if the feature is enabled).
Note:Pressing any seat or mirror adjustment control (or any memory
button) during a memory recall cancels the operation.
Recalling memory positions with the remote control
To program the memory feature to a remote control, see theKeys and
Remote Controlchapter.
162Seats
2015 Explorer(exp)
Owners Guide gf, 2nd Printing, September 2014
USA(fus)
Page 164 of 596
Easy Entry and Exit Feature
This feature can move the seat rearward and the optional power steering
column up and forward to allow extra room to exit the vehicle.
This occurs when:
•You place the transmission in neutral (N) or park (P).
•You turn the ignition off.
The seat and steering wheel will move to their original positions when:
•You turn the ignition on.
Turn the Easy Entry/Exit feature on or off through the information
display settings menu. See theInformation Displayschapter.
HEATED SEATS (IF EQUIPPED)
WARNING:Persons who are unable to feel pain to the skin
because of advanced age, chronic illness, diabetes, spinal cord
injury, medication, alcohol use, exhaustion, or other physical conditions,
must exercise care when using the seat heater. The seat heater may
cause burns even at low temperatures, especially if used for long
periods of time. Do not place anything on the seat that insulates against
heat, such as a blanket or cushion, because this may cause the seat
heater to overheat. Do not puncture the seat with pins, needles, or
other pointed objects because this may damage the heating element
which may cause the seat heater to overheat. An overheated seat may
cause serious personal injury.
The heated seats will only function when the ignition is in the on
position.
Note:Do not do the following:
•Place heavy objects on the seat
•Operate the seat heater if water or any other liquid is spilled on the
seat. Allow the seat to dry thoroughly.
To operate the heated seats:
Press the heated seat symbol to cycle through the various
heat settings and off. Warmer settings are indicated by
more indicator lights.
Seats163
2015 Explorer(exp)
Owners Guide gf, 2nd Printing, September 2014
USA(fus)
Page 177 of 596
Note:In order to allow the seat to complete the stowed position, do not
place objects under the seat before stowing. Remove all objects from the
seat and stowage tub.
Note:In the unlikely event that the third-row power seat stops
prematurely or travels to an unexpected position, press the FOLD button
(C) to reset the seat and return it to a normal position.
These seats feature a power one-touch operation that allows you fold
and stow the seats.
•The power fold seats work only when the transmission is in park (P)
and the liftgate is open.
•If the ignition is off and the feature is still running, the battery saver
will turn it off after 10 minutes. Press unlock on the remote entry key
transmitter to reactivate the power seats or unlock it with the keyless
entry keypad. See theKeys and Remote Controlchapter.
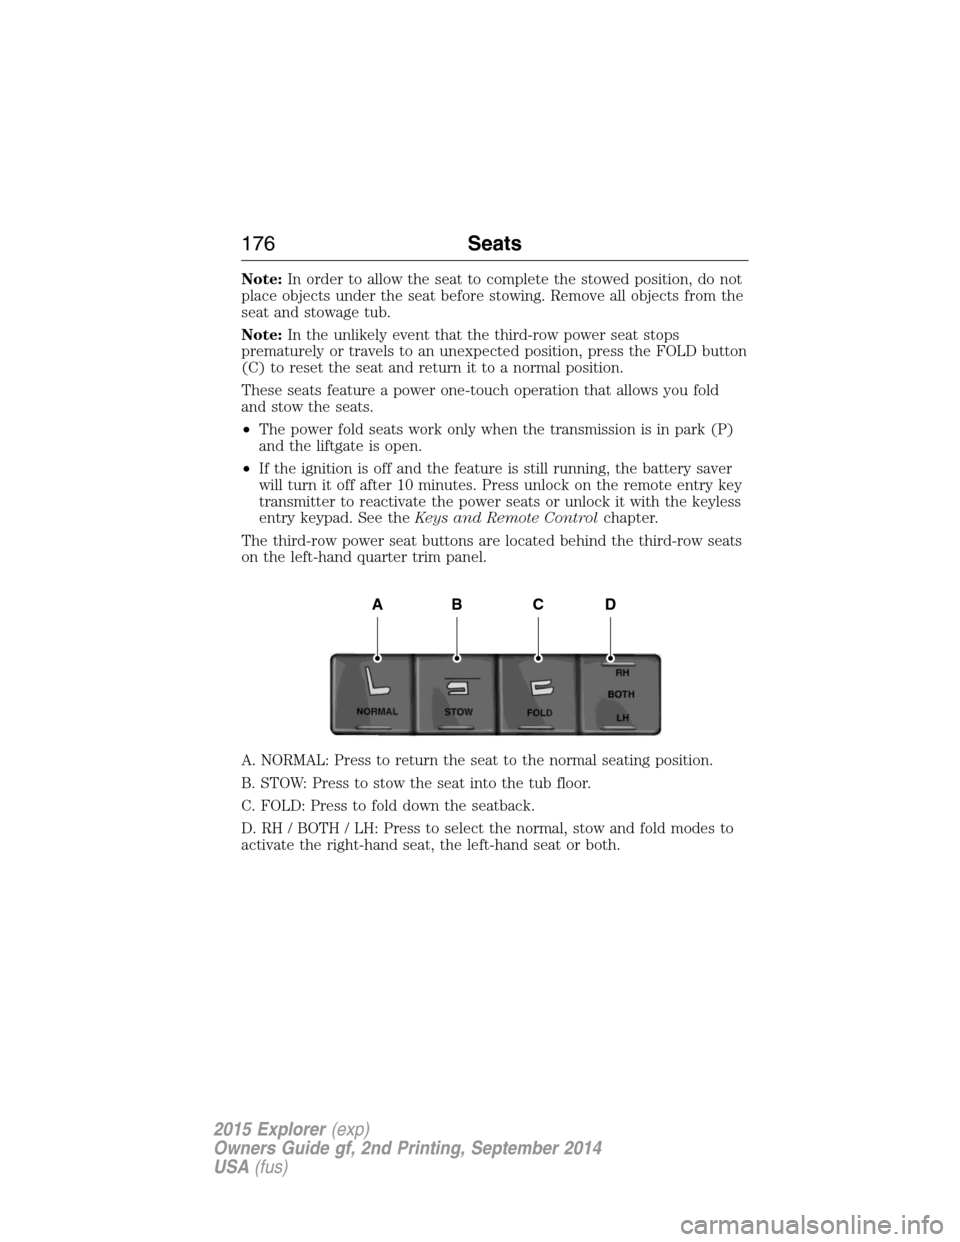
The third-row power seat buttons are located behind the third-row seats
on the left-hand quarter trim panel.
A. NORMAL: Press to return the seat to the normal seating position.
B. STOW: Press to stow the seat into the tub floor.
C. FOLD: Press to fold down the seatback.
D. RH / BOTH / LH: Press to select the normal, stow and fold modes to
activate the right-hand seat, the left-hand seat or both.
ABCD
176Seats
2015 Explorer(exp)
Owners Guide gf, 2nd Printing, September 2014
USA(fus)