2015 FORD EXPLORER cooling
[x] Cancel search: coolingPage 153 of 596
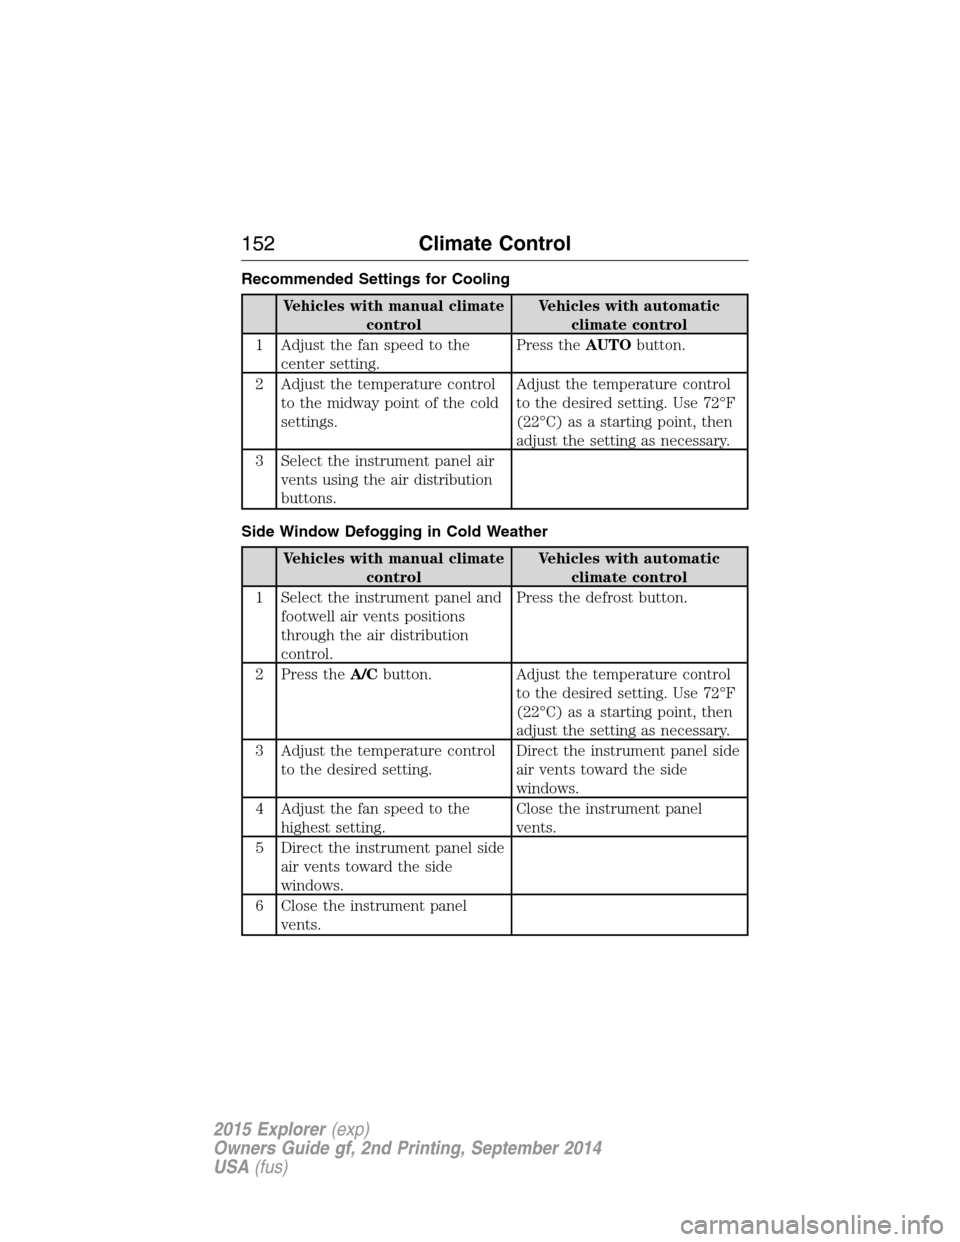
Recommended Settings for Cooling
Vehicles with manual climate
controlVehicles with automatic
climate control
1 Adjust the fan speed to the
center setting.Press theAUTObutton.
2 Adjust the temperature control
to the midway point of the cold
settings.Adjust the temperature control
to the desired setting. Use 72°F
(22°C) as a starting point, then
adjust the setting as necessary.
3 Select the instrument panel air
vents using the air distribution
buttons.
Side Window Defogging in Cold Weather
Vehicles with manual climate
controlVehicles with automatic
climate control
1 Select the instrument panel and
footwell air vents positions
through the air distribution
control.Press the defrost button.
2 Press theA/Cbutton. Adjust the temperature control
to the desired setting. Use 72°F
(22°C) as a starting point, then
adjust the setting as necessary.
3 Adjust the temperature control
to the desired setting.Direct the instrument panel side
air vents toward the side
windows.
4 Adjust the fan speed to the
highest setting.Close the instrument panel
vents.
5 Direct the instrument panel side
air vents toward the side
windows.
6 Close the instrument panel
vents.
152Climate Control
2015 Explorer(exp)
Owners Guide gf, 2nd Printing, September 2014
USA(fus)
Page 165 of 596
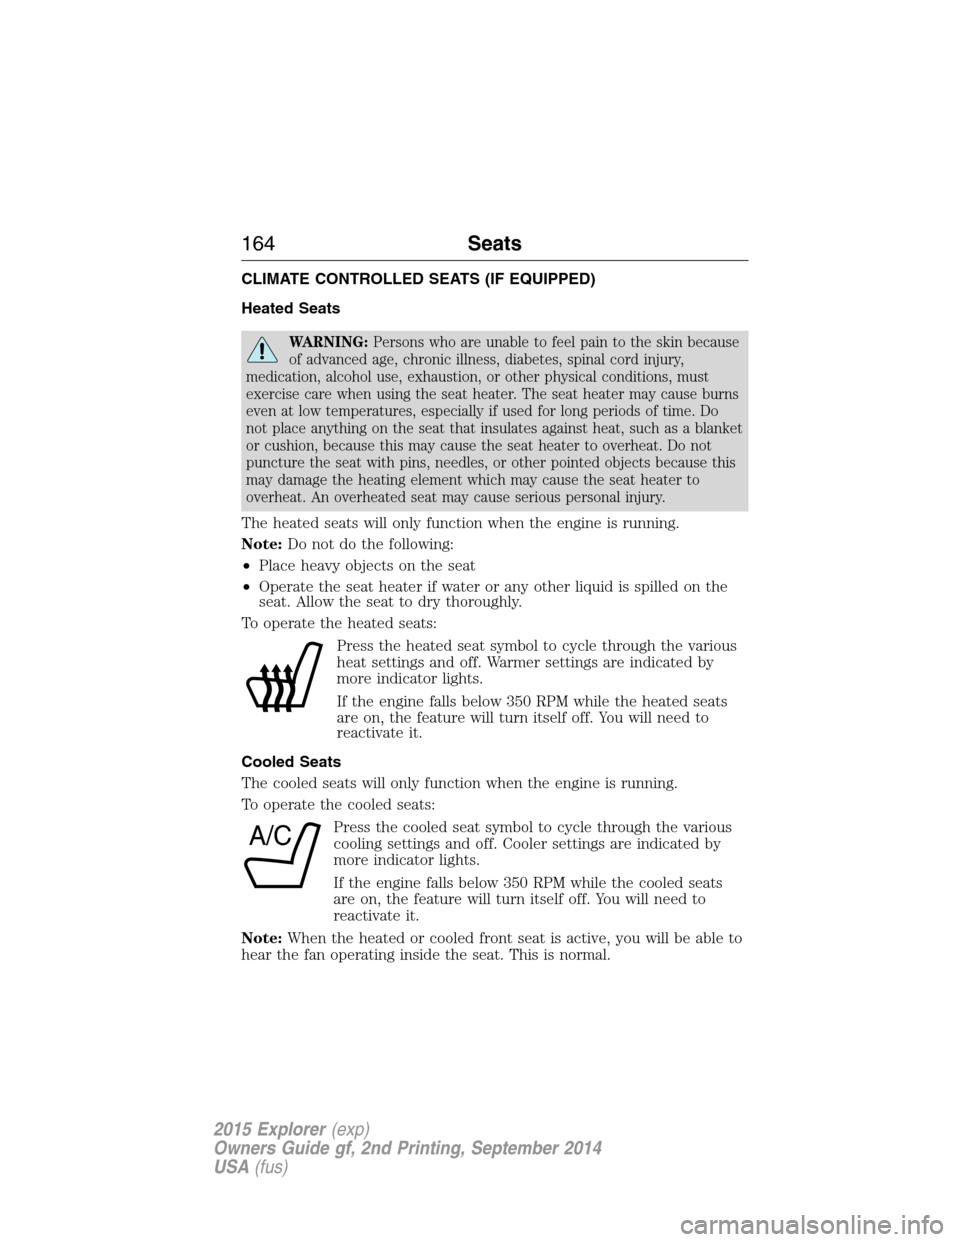
CLIMATE CONTROLLED SEATS (IF EQUIPPED)
Heated Seats
WARNING:Persons who are unable to feel pain to the skin because
of advanced age, chronic illness, diabetes, spinal cord injury,
medication, alcohol use, exhaustion, or other physical conditions, must
exercise care when using the seat heater. The seat heater may cause burns
even at low temperatures, especially if used for long periods of time. Do
not place anything on the seat that insulates against heat, such as a blanket
or cushion, because this may cause the seat heater to overheat. Do not
puncture the seat with pins, needles, or other pointed objects because this
may damage the heating element which may cause the seat heater to
overheat. An overheated seat may cause serious personal injury.
The heated seats will only function when the engine is running.
Note:Do not do the following:
•Place heavy objects on the seat
•Operate the seat heater if water or any other liquid is spilled on the
seat. Allow the seat to dry thoroughly.
To operate the heated seats:
Press the heated seat symbol to cycle through the various
heat settings and off. Warmer settings are indicated by
more indicator lights.
If the engine falls below 350 RPM while the heated seats
are on, the feature will turn itself off. You will need to
reactivate it.
Cooled Seats
The cooled seats will only function when the engine is running.
To operate the cooled seats:
Press the cooled seat symbol to cycle through the various
cooling settings and off. Cooler settings are indicated by
more indicator lights.
If the engine falls below 350 RPM while the cooled seats
are on, the feature will turn itself off. You will need to
reactivate it.
Note:When the heated or cooled front seat is active, you will be able to
hear the fan operating inside the seat. This is normal.
A/C
164Seats
2015 Explorer(exp)
Owners Guide gf, 2nd Printing, September 2014
USA(fus)
Page 227 of 596
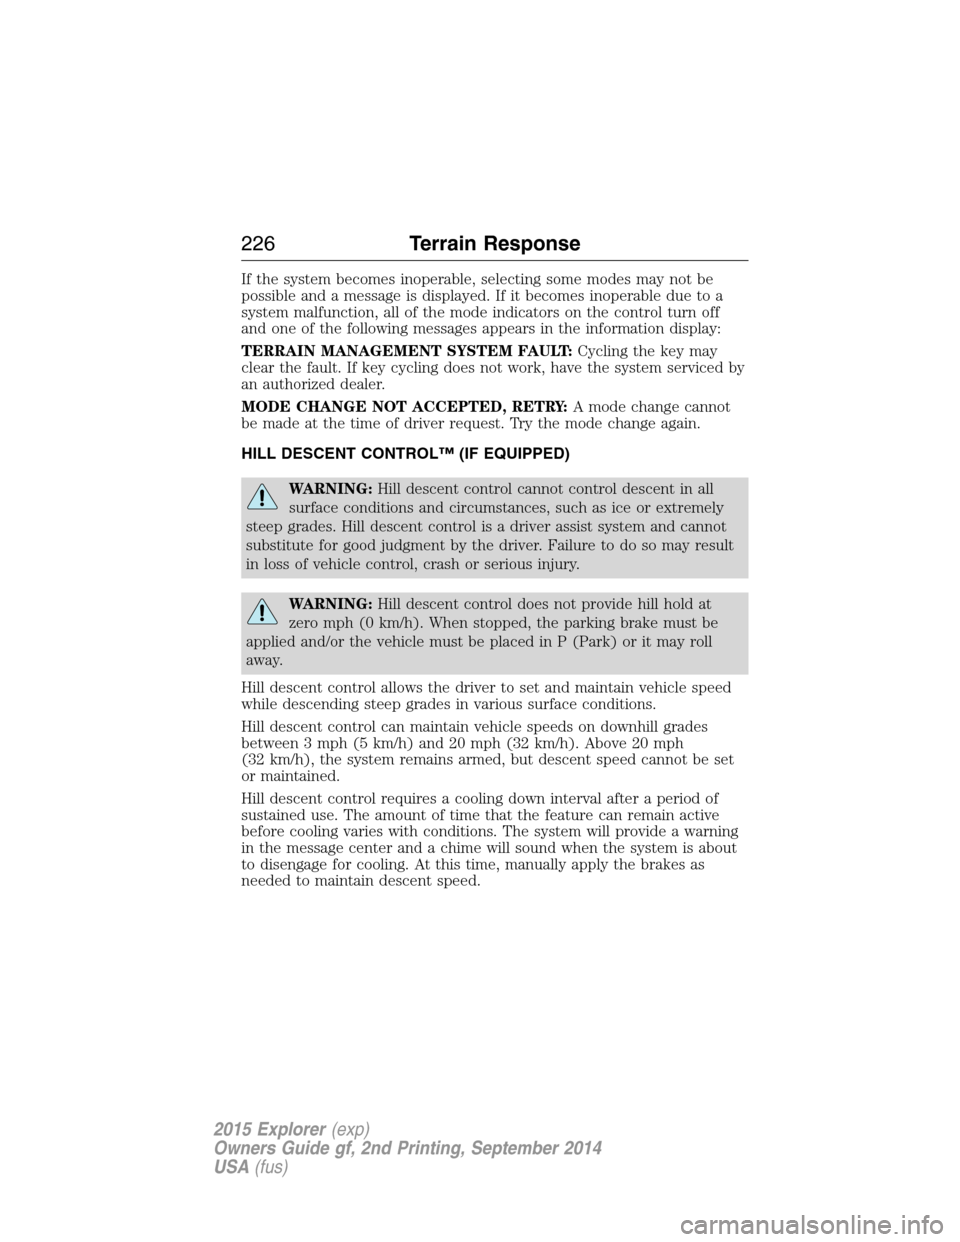
If the system becomes inoperable, selecting some modes may not be
possible and a message is displayed. If it becomes inoperable due to a
system malfunction, all of the mode indicators on the control turn off
and one of the following messages appears in the information display:
TERRAIN MANAGEMENT SYSTEM FAULT:Cycling the key may
clear the fault. If key cycling does not work, have the system serviced by
an authorized dealer.
MODE CHANGE NOT ACCEPTED, RETRY:A mode change cannot
be made at the time of driver request. Try the mode change again.
HILL DESCENT CONTROL™ (IF EQUIPPED)
WARNING:Hill descent control cannot control descent in all
surface conditions and circumstances, such as ice or extremely
steep grades. Hill descent control is a driver assist system and cannot
substitute for good judgment by the driver. Failure to do so may result
in loss of vehicle control, crash or serious injury.
WARNING:Hill descent control does not provide hill hold at
zero mph (0 km/h). When stopped, the parking brake must be
applied and/or the vehicle must be placed in P (Park) or it may roll
away.
Hill descent control allows the driver to set and maintain vehicle speed
while descending steep grades in various surface conditions.
Hill descent control can maintain vehicle speeds on downhill grades
between 3 mph (5 km/h) and 20 mph (32 km/h). Above 20 mph
(32 km/h), the system remains armed, but descent speed cannot be set
or maintained.
Hill descent control requires a cooling down interval after a period of
sustained use. The amount of time that the feature can remain active
before cooling varies with conditions. The system will provide a warning
in the message center and a chime will sound when the system is about
to disengage for cooling. At this time, manually apply the brakes as
needed to maintain descent speed.
226Terrain Response
2015 Explorer(exp)
Owners Guide gf, 2nd Printing, September 2014
USA(fus)
Page 280 of 596
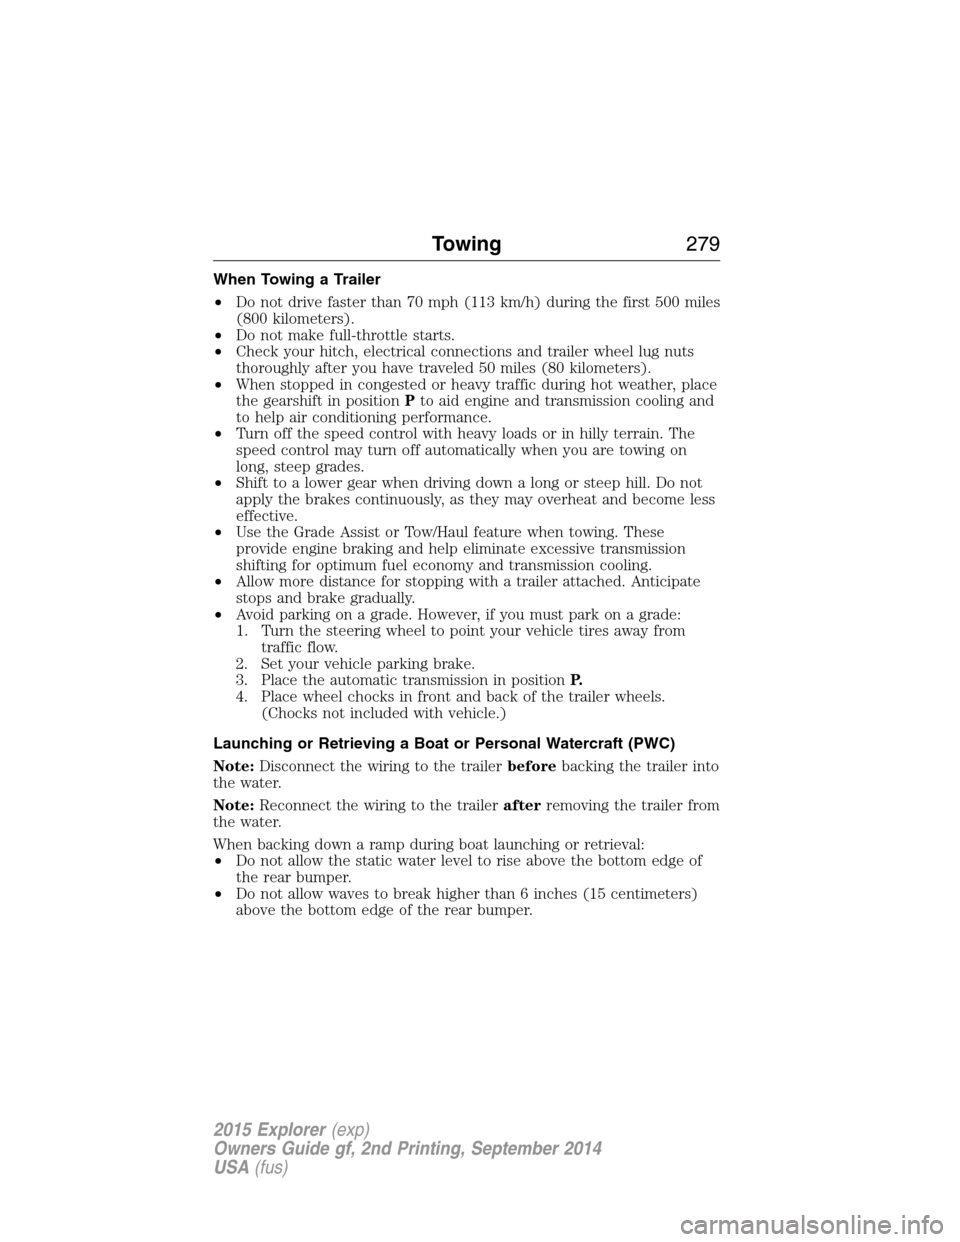
When Towing a Trailer
•Do not drive faster than 70 mph (113 km/h) during the first 500 miles
(800 kilometers).
•Do not make full-throttle starts.
•Check your hitch, electrical connections and trailer wheel lug nuts
thoroughly after you have traveled 50 miles (80 kilometers).
•When stopped in congested or heavy traffic during hot weather, place
the gearshift in positionPto aid engine and transmission cooling and
to help air conditioning performance.
•Turn off the speed control with heavy loads or in hilly terrain. The
speed control may turn off automatically when you are towing on
long, steep grades.
•Shift to a lower gear when driving down a long or steep hill. Do not
apply the brakes continuously, as they may overheat and become less
effective.
•Use the Grade Assist or Tow/Haul feature when towing. These
provide engine braking and help eliminate excessive transmission
shifting for optimum fuel economy and transmission cooling.
•Allow more distance for stopping with a trailer attached. Anticipate
stops and brake gradually.
•Avoid parking on a grade. However, if you must park on a grade:
1. Turn the steering wheel to point your vehicle tires away from
traffic flow.
2. Set your vehicle parking brake.
3. Place the automatic transmission in positionP.
4. Place wheel chocks in front and back of the trailer wheels.
(Chocks not included with vehicle.)
Launching or Retrieving a Boat or Personal Watercraft (PWC)
Note:Disconnect the wiring to the trailerbeforebacking the trailer into
the water.
Note:Reconnect the wiring to the trailerafterremoving the trailer from
the water.
When backing down a ramp during boat launching or retrieval:
•Do not allow the static water level to rise above the bottom edge of
the rear bumper.
•Do not allow waves to break higher than 6 inches (15 centimeters)
above the bottom edge of the rear bumper.
Towing279
2015 Explorer(exp)
Owners Guide gf, 2nd Printing, September 2014
USA(fus)
Page 290 of 596
Note:When you try to restart your vehicle after a fuel shutoff, the
vehicle makes sure that various systems are safe to restart. Once your
vehicle determines that the systems are safe, then the vehicle will allow
you to restart.
Note:In the event that your vehicle does not restart after your third
attempt, contact an authorized dealer.
JUMP-STARTING THE VEHICLE
WARNING:The gases around the battery can explode if exposed
to flames, sparks, or lit cigarettes. An explosion could result in
injury or vehicle damage.
WARNING:Batteries contain sulfuric acid which can burn skin,
eyes and clothing, if contacted.
Do not attempt to push-start your automatic transmission vehicle.
Automatic transmissions do not have push-start capability. Attempting to
push-start a vehicle with an automatic transmission may cause
transmission damage.
When the battery is disconnected or a new battery is installed, the
automatic transmission must relearn its shift strategy. As a result, the
transmission may exhibit a combination of firm and soft shifts. This
operation is considered normal and will not affect function or durability
of the transmission. Over time, the adaptive learning process will fully
update transmission operation.
Preparing Your Vehicle
Note:Use only a 12–volt supply to start your vehicle.
Note:Do not disconnect the battery of the disabled vehicle as this could
damage the vehicle’s electrical system.
1. Park the booster vehicle close to the hood of the disabled vehicle
making sure the two vehicles do not touch. Set the parking brake on
both vehicles and stay clear of the engine cooling fan and other moving
parts.
2. Check all battery terminals. Remove the positive terminal cover (if
equipped) and any excessive corrosion before you attach the battery
cables. Ensure that vent caps are tight and level.
3. Turn the heater fan on in both vehicles to protect from any electrical
surges. Turn all other accessories off.
Roadside Emergencies289
2015 Explorer(exp)
Owners Guide gf, 2nd Printing, September 2014
USA(fus)
Page 302 of 596
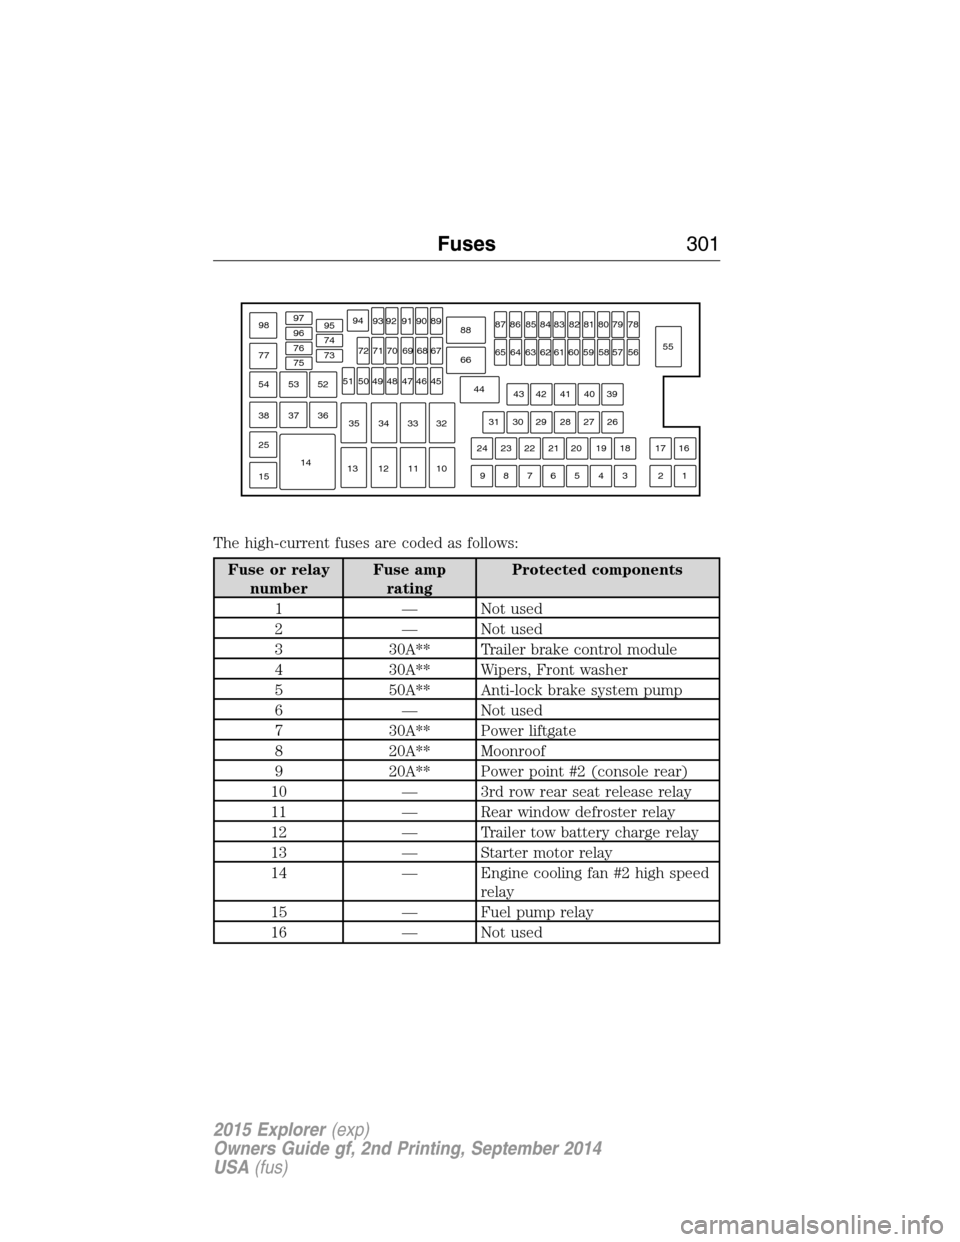
The high-current fuses are coded as follows:
Fuse or relay
numberFuse amp
ratingProtected components
1 — Not used
2 — Not used
3 30A** Trailer brake control module
4 30A** Wipers, Front washer
5 50A** Anti-lock brake system pump
6 — Not used
7 30A** Power liftgate
8 20A** Moonroof
9 20A** Power point #2 (console rear)
10 — 3rd row rear seat release relay
11 — Rear window defroster relay
12 — Trailer tow battery charge relay
13 — Starter motor relay
14 — Engine cooling fan #2 high speed
relay
15 — Fuel pump relay
16 — Not used
97
98
77969594
93 92 91 90 89
88
66
4478
56
39
26
18 1617
312 4 5 6 7 8 919 20 21 22 23 2427 28 29 30 3140 41 42 4355
57 58 59 60 61 62 63 64 6579 80 81 82 83 84 85 86 87
67
45
32
10 11 12 1333 34 3546 47 48 49 50 5168 69 70 71 72 74
73 76
75
53
37 36 54
38
25
151452
Fuses301
2015 Explorer(exp)
Owners Guide gf, 2nd Printing, September 2014
USA(fus)
Page 303 of 596

Fuse or relay
numberFuse amp
ratingProtected components
17 40A** 110-volt AC power point
18 40A** Front blower motor
19 30A** Starter motor
20 20A** Power point #1, cigar lighter
21 20A** Power point #3 (cargo area)
22 30A** Third row seat module
23 30A** Driver power seat, Memory
module
24 30A** Trailer tow battery charge
25 — Not used
26 40A** Rear window defroster, Heated
mirrors
27 20A** Power point (console)
28 30A** Climate controlled seats
29 40A** Engine cooling fan #1 high speed
power, Engine cooling fan #1 and
#2 low speed primary fuse
30 40A** Engine cooling fan #2 high speed
fuse
31 25A** Engine cooling fan #1 and #2 low
speed secondary fuse
32 — Auxiliary blower motor relay
33 — Engine cooling fan #1 and #2 low
speed relay #2
34 — Blower motor relay
35 — Engine cooling fan #1 high speed
relay, Engine cooling fan #1 and
#2 low speed relay #1
36 — Not used
37 — Trailer tow right stop/turn lamps
relay
38 — Trailer tow backup relay
302Fuses
2015 Explorer(exp)
Owners Guide gf, 2nd Printing, September 2014
USA(fus)
Page 318 of 596
If the level is below the COLD FILL RANGE, add coolant immediately.
SeeAdding Engine Coolantin this chapter.
The coolant concentration should be maintained within 48% to 50%, which
equates to a freeze point between -30 °F (-34 °C) and -34 °F (-37 °C).
Note:For best results, coolant concentration should be tested with a
refractometer such as Robinair Coolant and Battery Refractometer
75240. Ford does not recommend the use of hydrometers or coolant test
strips for measuring coolant concentration.
Note:Automotive fluids are not interchangeable. Do not use engine
coolant/antifreeze or windshield washer fluid outside of its specified
function and vehicle location.
Adding Engine Coolant
WARNING:Do not add engine coolant when the engine is hot.
Steam and scalding liquids released from a hot cooling system
can burn you badly. Also, you can be burned if you spill coolant on hot
engine parts.
WARNING:Do not put engine coolant in the windshield washer
fluid container. If sprayed on the windshield, engine coolant
could make it difficult to see through the windshield.
WARNING:To reduce the risk of personal injury, make sure the
engine is cool before unscrewing the coolant pressure relief cap.
The cooling system is under pressure; steam and hot liquid can come
out forcefully when the cap is loosened slightly.
WARNING:Do not add coolant further than the MAX mark.
Note:Do not use stop leak pellets, cooling system sealants or additives
as they can cause damage to the engine cooling or heating systems. This
damage would not be covered under your vehicle’s warranty.
Note:During normal vehicle operation, the engine coolant may change
color from orange to pink or light red. As long as the engine coolant is
clear and uncontaminated, this color change does not indicate the engine
coolant has degraded nor does it require the engine coolant to be
drained, the system to be flushed, or the engine coolant to be replaced.
Maintenance317
2015 Explorer(exp)
Owners Guide gf, 2nd Printing, September 2014
USA(fus)