2015 FORD EXPEDITION ignition
[x] Cancel search: ignitionPage 200 of 564
Brake-shift interlock
WARNING:Do not drive your vehicle until you verify that the
brake lamps are working.
WARNING:When doing this procedure, you will be taking the
vehicle out of park which means the vehicle can roll freely. To
avoid unwanted vehicle movement, always fully set the parking brake
prior to doing this procedure. Use wheel chocks if appropriate.
WARNING:If the parking brake is fully released, but the brake
warning lamp remains illuminated, the brakes may not be
working properly. See your authorized dealer as soon as possible.
This vehicle is equipped with a brake-shift interlock feature that prevents
the gearshift lever from being moved from P (Park) when the ignition is
in the 3 (on) position and the brake pedal is not pressed.
If you cannot move the gearshift lever out of P (Park) with ignition in
the on position and the brake pedal pressed, it is possible that a fuse has
blown or the vehicle’s brake lamps are not operating properly. Refer to
theFuseschapter.
If the fuse is not blown and the brake lamps are working properly, the
following procedure will allow you to move the gearshift lever from P
(Park):
1. Apply the parking brake. Turn the ignition key to 1 (off), then remove
the key.
2. Move the steering column to the full down and full rearward position
(toward the driver’s seat).
3. Remove the gearshift lever boot.
4. Place fingers into hole where the gearshift lever boot was removed
from and pull top half of shroud up and forward to separate it from the
lower half of the shroud. There is a hinge at the forward edge of the top
shroud. Roll the top half of the shroud upward on the hinge point to
clear the hazard flasher button, then pull straight rearward toward the
driver’s seat to remove.
5. Remove the top half of the shroud.
Transmission199
2015 Expedition(exd)
Owners Guide gf, 1st Printing, July 2014
USA(fus)
Page 202 of 564
WARNING:If the parking brake is fully released, but the brake
warning lamp remains illuminated, the brakes may not be
working properly. See your authorized dealer.
This vehicle is equipped with a brake-shift interlock feature that prevents
the gearshift lever from being moved from P (Park) when the ignition is
in the on position unless the brake pedal is pressed.
If you cannot move the gearshift lever out of P (Park) with ignition in
the on position and the brake pedal pressed, it is possible that a fuse has
blown or the vehicle’s brake lamps are not operating properly. Refer to
theFuseschapter for more information.
If the fuse is not blown and the brake lamps are working properly, the
following procedure will allow you to move the gearshift lever from P
(Park):
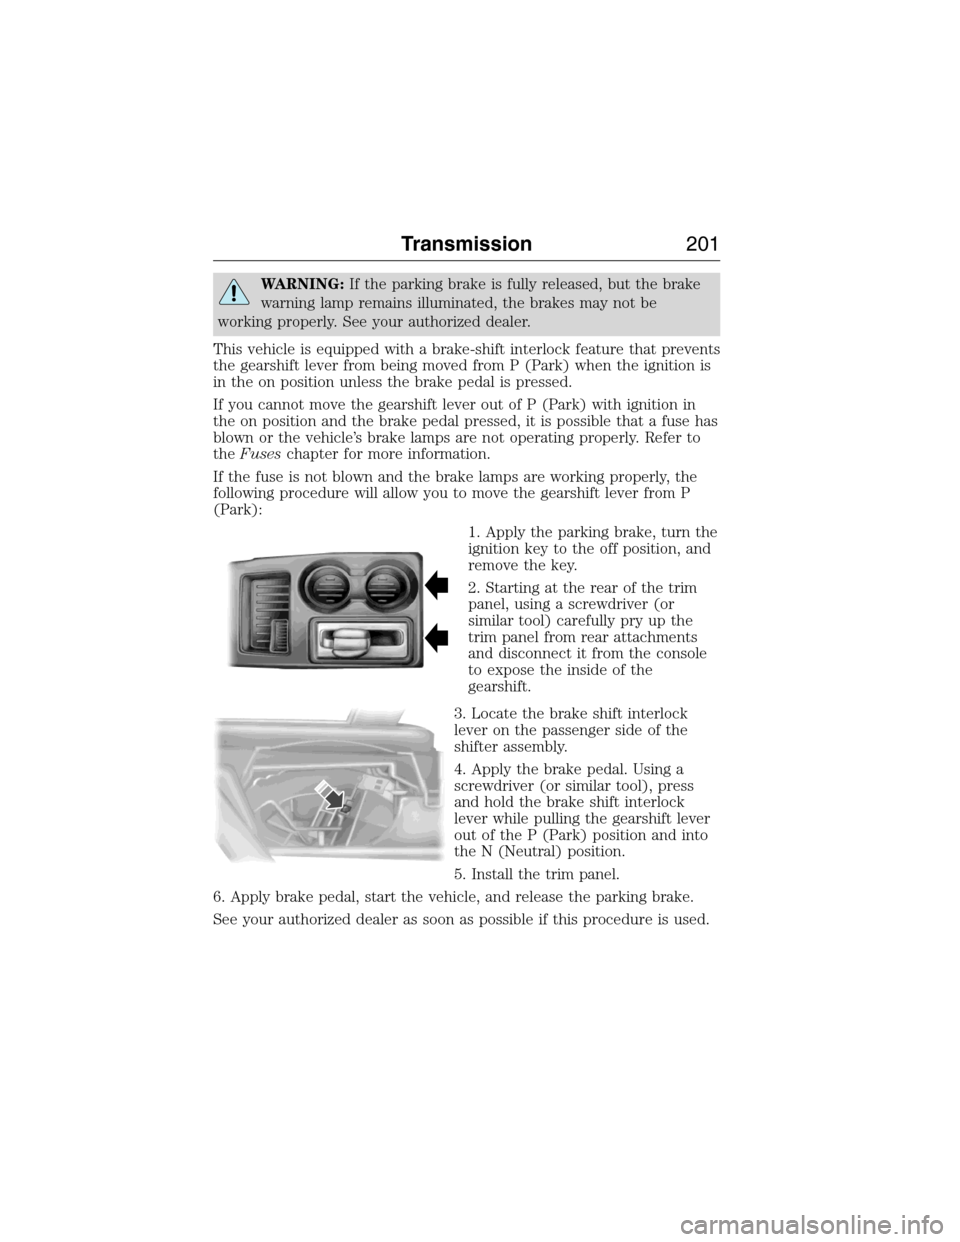
1. Apply the parking brake, turn the
ignition key to the off position, and
remove the key.
2. Starting at the rear of the trim
panel, using a screwdriver (or
similar tool) carefully pry up the
trim panel from rear attachments
and disconnect it from the console
to expose the inside of the
gearshift.
3. Locate the brake shift interlock
lever on the passenger side of the
shifter assembly.
4. Apply the brake pedal. Using a
screwdriver (or similar tool), press
and hold the brake shift interlock
lever while pulling the gearshift lever
out of the P (Park) position and into
the N (Neutral) position.
5. Install the trim panel.
6. Apply brake pedal, start the vehicle, and release the parking brake.
See your authorized dealer as soon as possible if this procedure is used.
Transmission201
2015 Expedition(exd)
Owners Guide gf, 1st Printing, July 2014
USA(fus)
Page 210 of 564
Mud and water
Note:Driving through deep water may damage the vehicle.
If you must drive through high water, drive slowly. Traction or brake
capability may be limited.
When driving through water, determine the depth; avoid water higher
than the bottom of the hubs (if possible) and proceed slowly. If the
ignition system gets wet, the vehicle may stall.
Once through water, always try the brakes. Wet brakes do not stop the
vehicle as effectively as dry brakes. Drying can be improved by moving
your vehicle slowly while applying light pressure on the brake pedal.
Be cautious of sudden changes in vehicle speed or direction when you
are driving in mud. Even 4WD vehicles can lose traction in slick mud. As
when you are driving over sand, apply the accelerator slowly and avoid
spinning your wheels. If the vehicle does slide, steer in the direction of
the slide until you regain control of the vehicle.
If the transmission, transfer case or front axle are submerged in water,
their fluids should be checked and changed, if necessary.
If the front or rear axle is submerged in water, the axle lubricant should
be replaced.
After driving through mud, clean off residue stuck to rotating driveshafts
and tires. Excess mud stuck on tires and rotating driveshafts causes an
imbalance that could damage drive components.
“Tread Lightly” is an educational
program designed to increase public
awareness of land-use regulations and
responsibilities in our nations
wilderness areas. Ford Motor
Company joins the U.S. Forest Service
and the Bureau of Land Management in encouraging you to help preserve
our national forest and other public and private lands by “treading lightly.”
Driving on hilly or sloping terrain
Note:Avoid driving crosswise or turning on steep slopes or hills.
Although natural obstacles may make it necessary to travel diagonally up
or down a hill or steep incline, you should always try to drive straight up
or straight down. . A danger lies in losing traction, slipping sideways and
possibly rolling over. Whenever driving on a hill, determine beforehand
the route you will use. Do not drive over the crest of a hill without
seeing what conditions are on the other side. Do not drive in reverse
over a hill without the aid of an observer.
Four-Wheel Drive (If Equipped)209
2015 Expedition(exd)
Owners Guide gf, 1st Printing, July 2014
USA(fus)
Page 213 of 564
GENERAL INFORMATION
Note:Occasional brake noise is normal. If a metal-to-metal, continuous
grinding or continuous squeal sound is present, the brake linings may be
worn out. Have them inspected by an authorized dealer. If your vehicle
has continuous vibration or shudder in the steering wheel while braking,
have your vehicle inspected by an authorized dealer.
Note:Brake dust may accumulate on the wheels, even under normal
driving conditions. Some dust is inevitable as the brakes wear and does
not contribute to brake noise. See theVehicle Carechapter for wheel
cleaning instructions.
See theInstrument Clusterchapter for information on the
brake system warning light.
Wet brakes result in reduced braking efficiency. Gently press the brake
pedal a few times when driving from a car wash or standing water to dry
the brakes.
Brake Over Accelerator
In the event the accelerator pedal becomes stuck or entrapped, apply
steady and firm pressure to the brake pedal to slow your vehicle and
reduce engine power. If you experience this condition, apply the brakes
and bring your vehicle to a safe stop. Turn the engine off, shift to park
(P) and apply the parking brake. Inspect the accelerator pedal and the
area around it for any items or debris that may be obstructing its
movement. If none are found and the condition persists, have your
vehicle towed to the nearest authorized dealer.
Anti-Lock Brake System
This system helps you maintain steering control during emergency stops
by keeping the brakes from locking.
This lamp momentarily illuminates when you turn the ignition
on. If the light does not illuminate during start-up, remains on
or flashes, the anti-lock brake system may be disabled. Have
the system checked by an authorized dealer. If the anti-lock brake
system is disabled, normal braking is still effective.
If the brake warning lamp illuminates when you release the
parking brake, have the system checked by an authorized
dealer.
212Brakes
2015 Expedition(exd)
Owners Guide gf, 1st Printing, July 2014
USA(fus)
Page 223 of 564
The sensing system warns the driver of obstacles within a certain range
of the bumper area. The system turns on automatically whenever the
ignition is switched on.
When receiving a detection warning, the radio volume is reduced to a
predetermined level. After the warning goes away, the radio volume
returns to the previous level.
Using the Front and Rear Sensing System
Rear Sensing System
The rear sensors are only active when the transmission is in R (Reverse).
As the vehicle moves closer to the obstacle, the rate of the audible
warning increases. When the obstacle is fewer than 10 inches (25
centimeters) away, the warning sounds continuously. If a stationary or
receding object is detected farther than 10 inches (25 centimeters) from
the side of the vehicle, the tone sounds for only three seconds. Once the
system detects an object approaching, the warning sounds again.
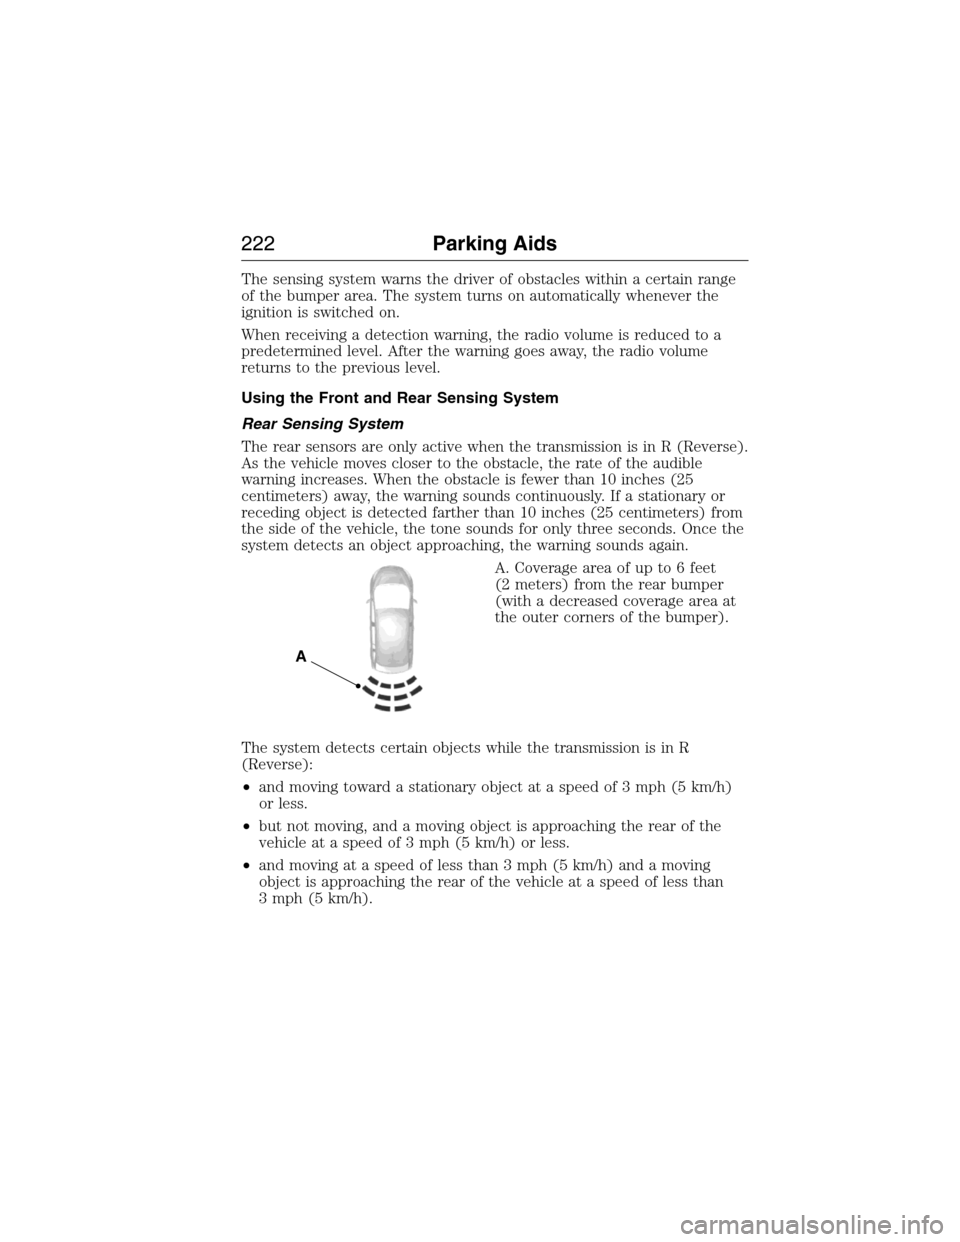
A. Coverage area of up to 6 feet
(2 meters) from the rear bumper
(with a decreased coverage area at
the outer corners of the bumper).
The system detects certain objects while the transmission is in R
(Reverse):
•and moving toward a stationary object at a speed of 3 mph (5 km/h)
or less.
•but not moving, and a moving object is approaching the rear of the
vehicle at a speed of 3 mph (5 km/h) or less.
•and moving at a speed of less than 3 mph (5 km/h) and a moving
object is approaching the rear of the vehicle at a speed of less than
3 mph (5 km/h).
A
222Parking Aids
2015 Expedition(exd)
Owners Guide gf, 1st Printing, July 2014
USA(fus)
Page 230 of 564
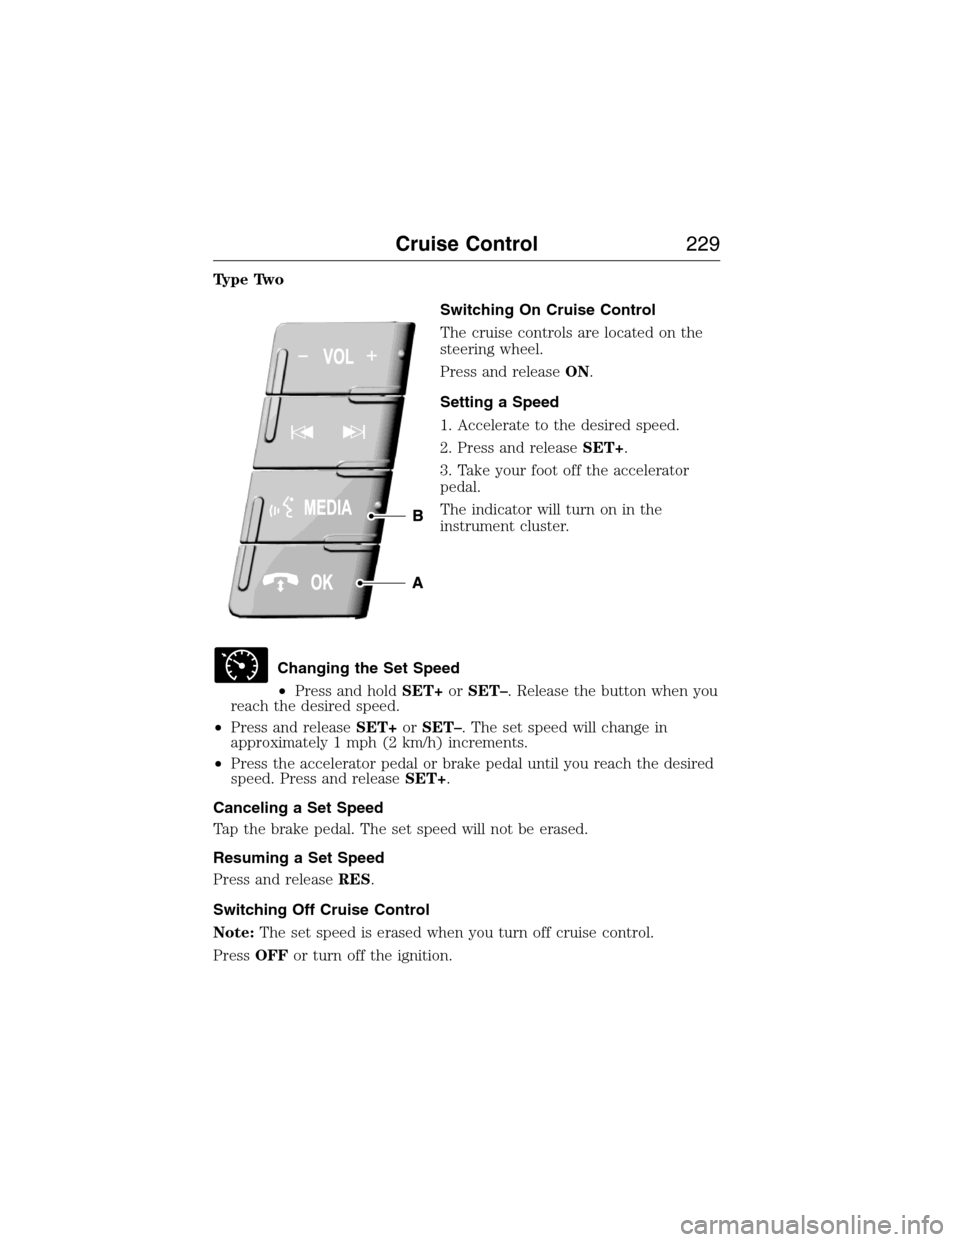
Type Two
Switching On Cruise Control
The cruise controls are located on the
steering wheel.
Press and releaseON.
Setting a Speed
1. Accelerate to the desired speed.
2. Press and releaseSET+.
3. Take your foot off the accelerator
pedal.
The indicator will turn on in the
instrument cluster.
Changing the Set Speed
•Press and holdSET+orSET–. Release the button when you
reach the desired speed.
•Press and releaseSET+orSET–. The set speed will change in
approximately 1 mph (2 km/h) increments.
•Press the accelerator pedal or brake pedal until you reach the desired
speed. Press and releaseSET+.
Canceling a Set Speed
Tap the brake pedal. The set speed will not be erased.
Resuming a Set Speed
Press and releaseRES.
Switching Off Cruise Control
Note:The set speed is erased when you turn off cruise control.
PressOFFor turn off the ignition.
Cruise Control229
2015 Expedition(exd)
Owners Guide gf, 1st Printing, July 2014
USA(fus)
Page 234 of 564

System Sensors
WARNING:Just prior to the system recognizing a blocked
condition and alerting the driver, the number of missed objects
will increase. To help avoid injuries, NEVER use the BLIS® as a
replacement for using the side and rear view mirrors and looking over
your shoulder before changing lanes. BLIS® is not a replacement for
careful driving.
Note:It is possible to get a blockage warning with no blockage present;
this is rare and known as a false blockage warning. A false blocked
condition either self-corrects or clears after a key cycle.
The system uses radar sensors
which are located behind the
bumper fascia on each side of the
vehicle. Do not allow these areas to
become obstructed by mud, snow or
bumper stickers, as this can cause
degraded system performance.
If the system detects a degraded performance condition, a blocked
sensor warning or low visibility warning will appear in the information
display and the alert indicator illuminates in the appropriate mirror(s).
The information display warning can be cleared but the alert indicator
remains illuminated.
When the blockage is removed, the system can be reset in two ways: 1)
when at least two objects are detected while driving, or 2) turn the
ignition key from on to off, then back on. If the blockage is still present
after the key cycle, the system senses again that it is blocked after
driving in traffic.
Reasons for messages being displayed
The radar surface is
dirty or obstructedClean the fascia area in front of the radar or
remove the obstruction.
The radar surface is
not dirty or obstructedDrive normally in traffic for a few minutes to
allow the radar to detect passing vehicles so it
can clear the blocked state.
Driving Aids233
2015 Expedition(exd)
Owners Guide gf, 1st Printing, July 2014
USA(fus)
Page 236 of 564
Switching the Systems Off and On
One or both systems can be switched off temporarily by using the
information display control; refer to theInformation Displaychapter.
When you switch off the Blind Spot Information System, you will not
receive alerts and the information display will display a system off
message. The yellow alert indicator in the outside mirror will also flash
twice. The system switches back on whenever you switch the ignition on.
You can also have one or both systems switched off permanently at an
authorized dealer. Once switched off, the system can only be switched
back on at an authorized dealer.
STEERING
Electric Power Steering
WARNING:The electric power steering system has diagnostic
checks that continuously monitor the system to ensure proper
operation. When a system error is detected a steering message will
appear in the information display.
WARNING:The electric power steering system has diagnostic
checks that continuously monitor the system to ensure proper
operation of the electronic system. When an electronic error is
detected, a message will be displayed in the information display. If this
happens, stop the vehicle in a safe place, and turn off the engine. After
at least 10 seconds, reset the system by restarting the engine, and
watch the information display for a steering message. If a steering
message returns, or returns while driving, take the vehicle to your
dealer to have it checked.
WARNING:Obtain immediate service if a system error is
detected. You may not notice any difference in the feel of your
steering, but a serious condition may exist. Failure to do so may result
in loss of steering control.
Your vehicle is equipped with an electric power-assisted steering system.
There is no fluid reservoir to check or fill.
If your vehicle loses electrical power while you are driving (or if the
ignition is turned off), you can steer the vehicle manually, but it takes
more effort. Extreme continuous steering may increase the effort it takes
Driving Aids235
2015 Expedition(exd)
Owners Guide gf, 1st Printing, July 2014
USA(fus)