Page 77 of 564
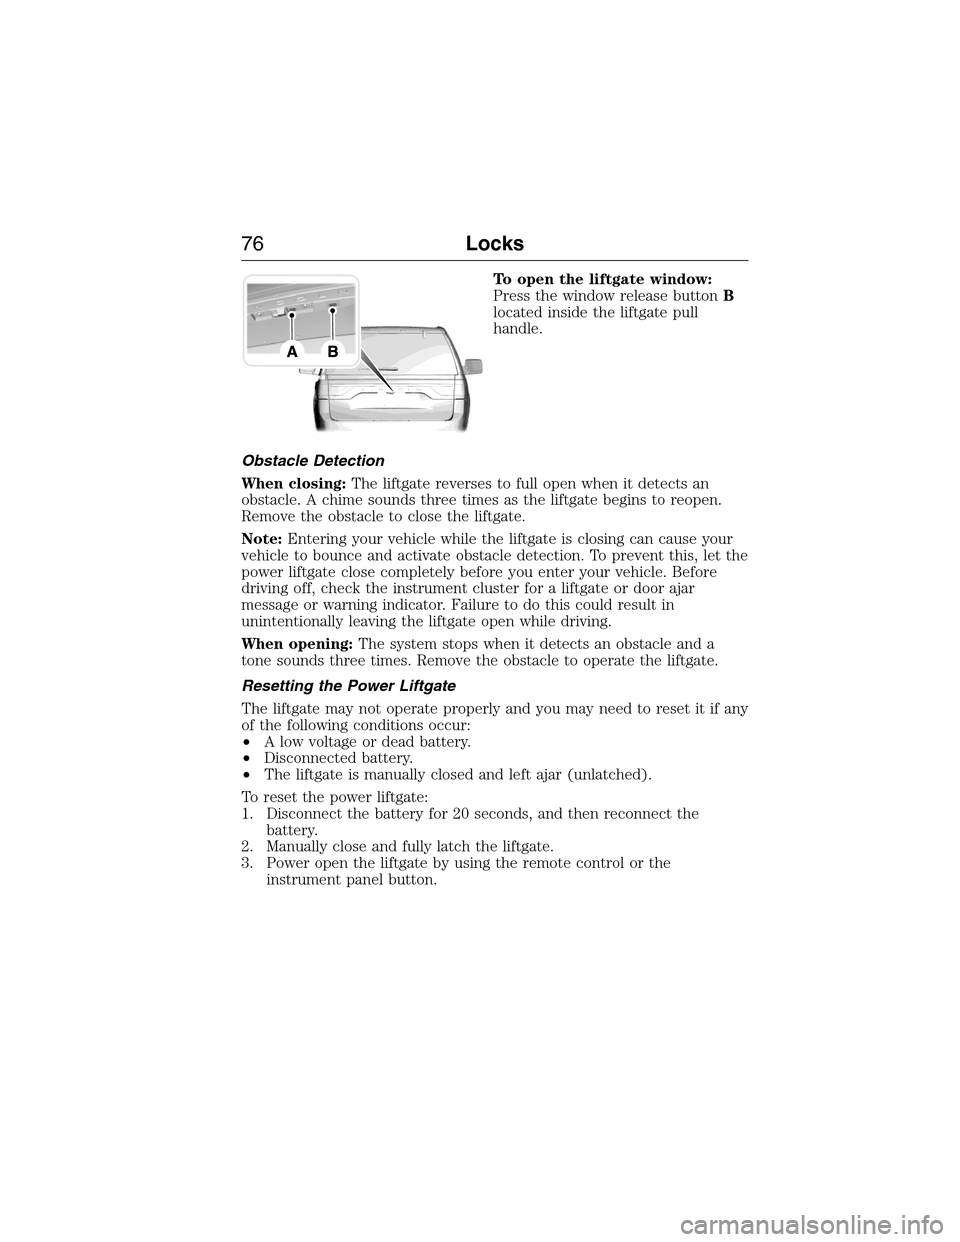
To open the liftgate window:
Press the window release buttonB
located inside the liftgate pull
handle.
Obstacle Detection
When closing:The liftgate reverses to full open when it detects an
obstacle. A chime sounds three times as the liftgate begins to reopen.
Remove the obstacle to close the liftgate.
Note:Entering your vehicle while the liftgate is closing can cause your
vehicle to bounce and activate obstacle detection. To prevent this, let the
power liftgate close completely before you enter your vehicle. Before
driving off, check the instrument cluster for a liftgate or door ajar
message or warning indicator. Failure to do this could result in
unintentionally leaving the liftgate open while driving.
When opening:The system stops when it detects an obstacle and a
tone sounds three times. Remove the obstacle to operate the liftgate.
Resetting the Power Liftgate
The liftgate may not operate properly and you may need to reset it if any
of the following conditions occur:
•A low voltage or dead battery.
•Disconnected battery.
•The liftgate is manually closed and left ajar (unlatched).
To reset the power liftgate:
1. Disconnect the battery for 20 seconds, and then reconnect the
battery.
2. Manually close and fully latch the liftgate.
3. Power open the liftgate by using the remote control or the
instrument panel button.
76Locks
2015 Expedition(exd)
Owners Guide gf, 1st Printing, July 2014
USA(fus)
Page 79 of 564
Erasing a Personal Code
1. Enter the factory-set 5-digit code.
2. Press and release1•2on the keypad within five seconds.
3. Press and hold1•2for two seconds. This must be done within five
seconds of completing Step 2.
All personal codes are now erased and only the factory-set 5-digit code
will work.
Anti-Scan Feature
The keypad will go into an anti-scan mode if you enter the wrong code
seven times (35 consecutive button presses). This mode disables the
keypad for one minute and the keypad lamp will flash.
The anti-scan feature will turn off after:
•one minute of keypad inactivity
•pressing the unlock button on the remote control
•switching the ignition on
•unlocking the vehicle using intelligent access.
Unlocking and Locking the Doors
To unlock the driver door:Enter the factory-set 5-digit code or your
personal code. You must press each number within five seconds of each
other. The interior lamps will illuminate.Note:All doors will unlock if
the two-stage unlocking feature is disabled. Refer toLocking and
Unlockingearlier in this chapter.
To unlock all doors:Enter the factory-set code or your personal code,
then press3•4within five seconds.
To lock all doors:Press and hold7•8and9•0at the same time with
the driver door closed. You do not need to enter the keypad code first.
78Locks
2015 Expedition(exd)
Owners Guide gf, 1st Printing, July 2014
USA(fus)
Page 81 of 564
Replacement Keys
Note:Your vehicle may come with two integrated keyhead transmitters.
The integrated keyhead transmitter functions as a programmed ignition
key that operates all the locks and starts the vehicle, as well as a remote
control.
If your programmed transmitters or standard SecuriLock coded keys are
lost or stolen and you do not have an extra coded key, you will need to
have your vehicle towed to an authorized dealer. The key codes need to
be erased from your vehicle and new coded keys will need to be
programmed.
Store an extra programmed key away from the vehicle in a safe place to
help prevent any inconveniences. See an authorized dealer to purchase
additional spare or replacement keys.
Programming a Spare Key
Note:A maximum of eight coded keys can be programmed to your
vehicle. Only four of these eight can be integrated keyhead transmitters.
You can program your own integrated keyhead transmitters or standard
SecuriLock coded keys to your vehicle. This procedure will program both
the engine immobilizer key code and the remote entry portion of the
remote control to your vehicle.
Only use integrated keyhead transmitters or standard SecuriLock keys.
You must have two previously programmed coded keys and the new
unprogrammed key readily accessible. See your authorized dealer to have
the spare key programmed if two previously programmed coded keys are
not available.
Read and understand the entire procedure before you begin.
1. Insert the first previously programmed coded key into the ignition.
2. Turn the ignition from off to on. Keep the ignition on for at least three
seconds, but no more than 10 seconds.
3. Turn the ignition off and remove the first coded key from the ignition.
4. After three seconds but within 10 seconds of turning the ignition off,
insert the second previously coded key into the ignition.
5. Turn the ignition from off to on. Keep the ignition on for at least three
seconds, but no more than 10 seconds.
80Security
2015 Expedition(exd)
Owners Guide gf, 1st Printing, July 2014
USA(fus)
Page 83 of 564
ANTI-THEFT ALARM
The system will warn you of unauthorized entry to your vehicle.
The turn signal lamps will flash and the horn will sound when:
•any door or the hood is opened without using the key or the remote
control
•the ignition is turned on with an invalid key.
Take all keys and remote controls to your authorized dealer if there is
any potential alarm problem with your vehicle.
Arming the Alarm
The system is ready to arm whenever the ignition is off. Lock the vehicle
to arm the alarm.
The turn signal lamps will flash once after locking the vehicle to indicate
the alarm is in the pre-armed mode and will become fully armed in
20 seconds.
Disarming the Alarm
To disarm the alarm, do any of the following:
•Press the power door unlock button within the 20-second pre-armed
mode.
•Press the unlock button on the remote control.
•Unlock the doors with the keyless entry pad.
•Turn the ignition on with a valid key.
•Press the panic button on the remote control. The alarm system will
still be armed, but this shuts off the horn and turn lamps when the
alarm is sounding.
Note:If the driver’s door is unlocked with a key, a chime will sound
when you open the door. You will have 12 seconds to disarm the alarm
using any of the actions above, otherwise the alarm will trigger.
82Security
2015 Expedition(exd)
Owners Guide gf, 1st Printing, July 2014
USA(fus)
Page 96 of 564
DIRECTION INDICATORS
•Push down to activate the left
turn signal.
•Push up to activate the right turn
signal.
INTERIOR LAMPS
Front Row Map Lamps (If Equipped)
To turn on the map lamps, press the
outer edge of the clear lens. The
front row map lamp lights when:
•any door is opened.
•the instrument panel dimmer
switch is rotated until the courtesy
lamps come on.
•the remote entry controls are pressed and the ignition is off.
Front Row Map and Dome Lamps (If Equipped)
The dome lamp lights when:
•any door is opened,
•the instrument panel dimmer
switch is rotated up until the
courtesy lamps come on, and
•any of the remote entry controls are pressed and the ignition is off.
The map lamps are activated by pressing the controls on either side of
the lens.
120
Lighting95
2015 Expedition(exd)
Owners Guide gf, 1st Printing, July 2014
USA(fus)
Page 97 of 564
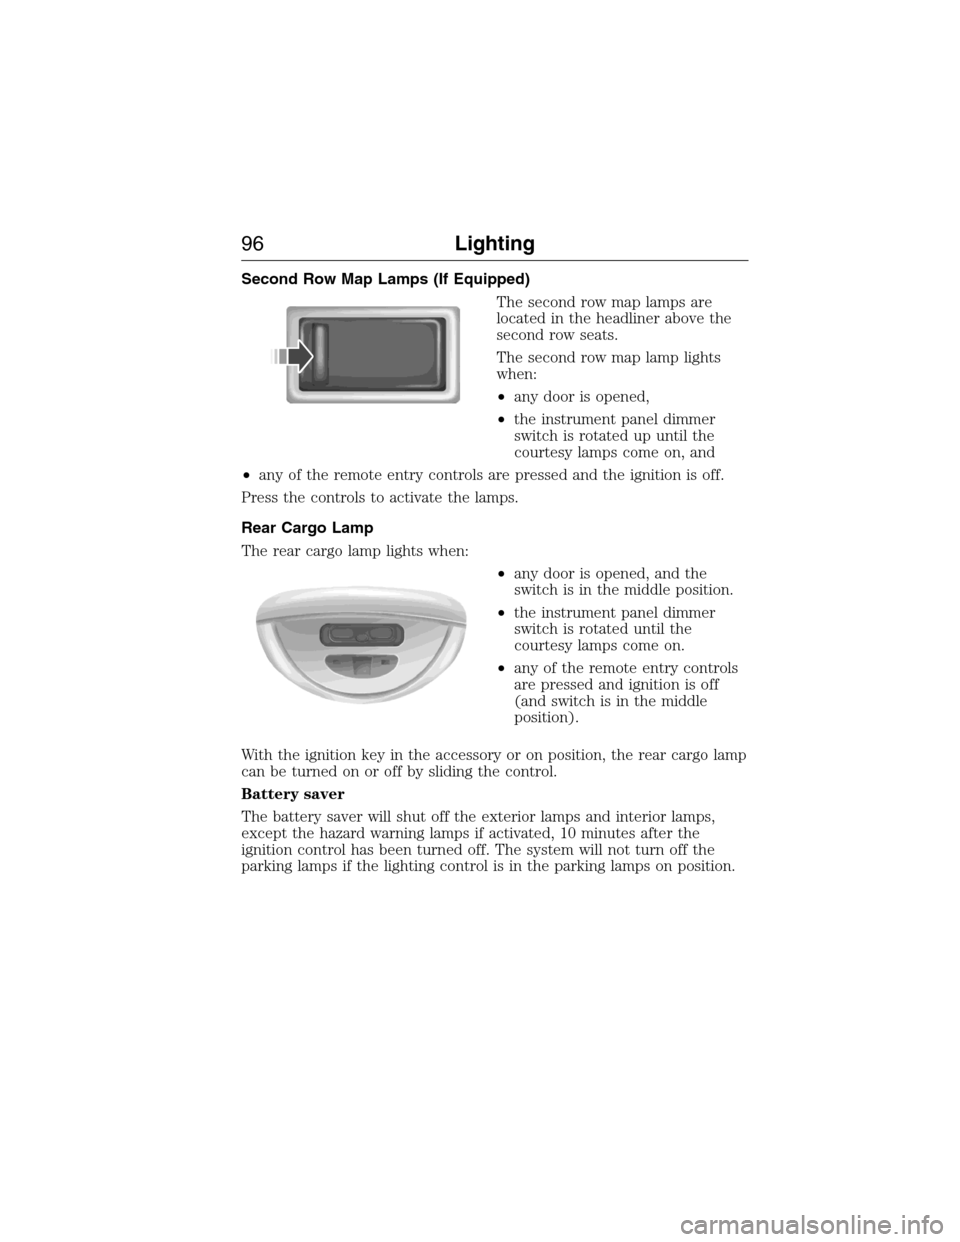
Second Row Map Lamps (If Equipped)
The second row map lamps are
located in the headliner above the
second row seats.
The second row map lamp lights
when:
•any door is opened,
•the instrument panel dimmer
switch is rotated up until the
courtesy lamps come on, and
•any of the remote entry controls are pressed and the ignition is off.
Press the controls to activate the lamps.
Rear Cargo Lamp
The rear cargo lamp lights when:
•any door is opened, and the
switch is in the middle position.
•the instrument panel dimmer
switch is rotated until the
courtesy lamps come on.
•any of the remote entry controls
are pressed and ignition is off
(and switch is in the middle
position).
With the ignition key in the accessory or on position, the rear cargo lamp
can be turned on or off by sliding the control.
Battery saver
The battery saver will shut off the exterior lamps and interior lamps,
except the hazard warning lamps if activated, 10 minutes after the
ignition control has been turned off. The system will not turn off the
parking lamps if the lighting control is in the parking lamps on position.
96Lighting
2015 Expedition(exd)
Owners Guide gf, 1st Printing, July 2014
USA(fus)
Page 115 of 564
Driver Assist
In this mode, you can configure different driver setting choices.
Note:Some items are optional and may not appear.
Driver Assist
DTE CalculationNormal history used or Towing history
used
Engine Hours Engine Hours XXXXX
Engine Idle Hours Engine Idle Hours XXXXX
Settings
In this mode, you can configure different driver setting choices.
Note:Some items are optional and may not appear.
Settings
VehicleTrlr Sway Control - check enabled or uncheck
disabled
Trilr Brake Mode Elect., Surge, None
Elect. over Hydraulic
Lighting Autolamp
DelaySelect time
interval
LocksAutolock - check enabled or
uncheck disabled
Autounlock - check enabled
or uncheck disabled
Remote
UnlockAll Doors or
Driver
Oil Life RestSet to XXX% — Hold OK to
Reset
Power Liftgate Enable or Disable switch
Wipers Courtesy Wipe
11 4Information Displays
2015 Expedition(exd)
Owners Guide gf, 1st Printing, July 2014
USA(fus)
Page 120 of 564
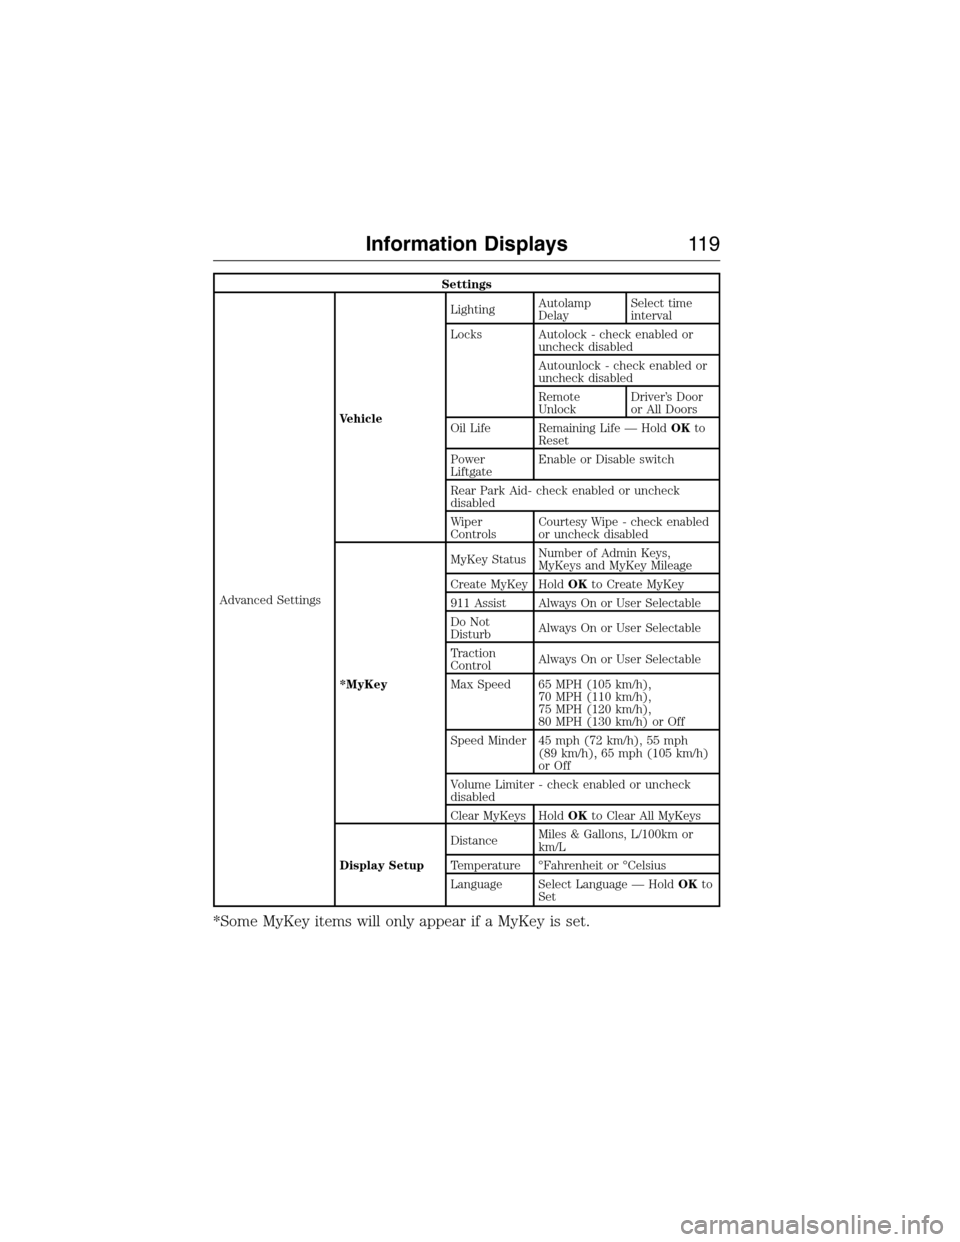
Settings
Advanced SettingsVehicleLightingAutolamp
DelaySelect time
interval
Locks Autolock - check enabled or
uncheck disabled
Autounlock - check enabled or
uncheck disabled
Remote
UnlockDriver’s Door
or All Doors
Oil Life Remaining Life — HoldOKto
Reset
Power
LiftgateEnable or Disable switch
Rear Park Aid- check enabled or uncheck
disabled
Wiper
ControlsCourtesy Wipe - check enabled
or uncheck disabled
*MyKeyMyKey StatusNumber of Admin Keys,
MyKeys and MyKey Mileage
Create MyKey HoldOKto Create MyKey
911 Assist Always On or User Selectable
Do Not
DisturbAlways On or User Selectable
Traction
ControlAlways On or User Selectable
Max Speed 65 MPH (105 km/h),
70 MPH (110 km/h),
75 MPH (120 km/h),
80 MPH (130 km/h) or Off
Speed Minder 45 mph (72 km/h), 55 mph
(89 km/h), 65 mph (105 km/h)
or Off
Volume Limiter - check enabled or uncheck
disabled
Clear MyKeys HoldOKto Clear All MyKeys
Display SetupDistanceMiles & Gallons, L/100km or
km/L
Temperature °Fahrenheit or °Celsius
Language Select Language — HoldOKto
Set
*Some MyKey items will only appear if a MyKey is set.
Information Displays11 9
2015 Expedition(exd)
Owners Guide gf, 1st Printing, July 2014
USA(fus)