Page 264 of 564
7. Leave the transmission in positionN.
•If your vehicle has an ignition key, turn the ignition as far as it
goes toward the off position (it does not turn fully off when the
transmission is in positionN.)You must leave the key in the
ignition while towing. To lock and unlock your vehicle, use the
keyless entry keypad or extra set of keys.
•If your vehicle has intelligent access, turn the ignition off by
pressing the engine START/STOP button once without pressing on
the brake pedal. You do not need to leave your keys in the
vehicle. You can lock and unlock your vehicle as you normally do.
WARNING:Do not disconnect the battery during recreational
towing. Doing so will prevent the transfer case from shifting
properly and may cause the vehicle to roll even if the transmission is in
P (Park).
WARNING:Shifting the transfer case to its neutral position for
recreational towing may cause the vehicle to be able to roll even
if the transmission is in P (Park). The driver or others could be injured.
Make sure the foot brake is depressed and the vehicle is in a secure
and safe position while the transfer case is being shifted to its neutral
position.
WARNING:Failing to put the transfer case in its neutral position
will damage vehicle components.
Note:You can check four-wheel-down towing status at any time by
opening the driver’s door or turning the ignition to the accessory or on
position and verifying theNEUTRAL TOW ENABLED LEAVE
TRANSMISSION IN NEUTRALmessage displays in the cluster.
Exiting four-wheel-down towing
To exit four-wheel-down towing and return the transfer case to its 2H
position:
1. With your vehicle still properly secured to the tow vehicle, put the
ignition in the on position:
•If your vehicle has an ignition key, turn the key to on. Do not
start the engine.
•If your vehicle has intelligent access, press the engine
START/STOP button twice without pressing the brake pedal. Do
not start the engine.
Towing263
2015 Expedition(exd)
Owners Guide gf, 1st Printing, July 2014
USA(fus)
Page 265 of 564
2. Press and hold the brake pedal.
3. Shift the transmission out ofNand into any gear.
4. Release the brake pedal.
•If completed successfully, the instrument cluster displays4X2and
NEUTRAL TOW DISABLED.
•If the indicator light and message do not display, you must
perform the procedure again from the beginning.
•You may hear an audible noise as the transfer case shifts out of its
neutral position. This is normal.
•IfSHIFT DELAY PULL FORWARDdisplays in the instrument
cluster, transfer case gear tooth blockage is present. See the
instructions after this section.
5. Apply the parking brake, and then disconnect the vehicle from the
tow vehicle.
6. Release the parking brake, start the engine, and shift the
transmission to positionDto make sure the transfer case is out of
positionN.
7. If the transfer case does not successfully shift out of positionN,set
the parking brake until you can have your vehicle serviced.
Resolving the SHIFT DELAY PULL FORWARD Message
If the instrument cluster displaysSHIFT DELAY PULL FORWARD
perform the following:
1. Press and hold the brake pedal.
2. Put the transmission into positionN,and then start the engine.
3. With the engine running, shift the transmission to positionDand let
the vehicle roll forward, up to 3 feet (1 meter). You may hear an
audible noise as the transfer case shifts out of its neutral position.
This is normal.
4. Make sure the instrument cluster displaysNEUTRAL TOW
DISABLED.
264Towing
2015 Expedition(exd)
Owners Guide gf, 1st Printing, July 2014
USA(fus)
Page 289 of 564

Fuse or relay
locationFuse amp rating Protected circuits
9 10A SYNC, power lift gate, electric finish
panel, display
10 10A Run accessory relay
11 10A Passive entry/start module
12 15A Interior lighting, puddle lamps
13 15A Right turn and stop/turn signals
14 15A Left turn and stop/turn signals
15 15A Reverse lamp, center high mount
stop lamp, EC mirror
16 10A Right front low beam
17 10A Left front low beam
18 10A Brake shift interlock/start button
LED/keypad illumination, third row
power folding seat, passive entry
touch start
19 — Not used
20 20A Lock/unlock relays
21 — Not used
22 20A Horn
23 15A SWCM, cluster
24 15A Adjustable pedals/power adjustable
column, Datalink
25 15A Liftgate release decklid, liftglass
release motor
26 5A Push to start switch
27 20A Passive entry/start module
28 15A Ignition switch, key inhibit switch
29 20A Radio, GPS
30 15A Front park lamps
31 5A Trailer brake on/off
32 15A Power vent, rear windows, power
inverter
33 10A CCD suspension module
288Fuses
2015 Expedition(exd)
Owners Guide gf, 1st Printing, July 2014
USA(fus)
Page 359 of 564
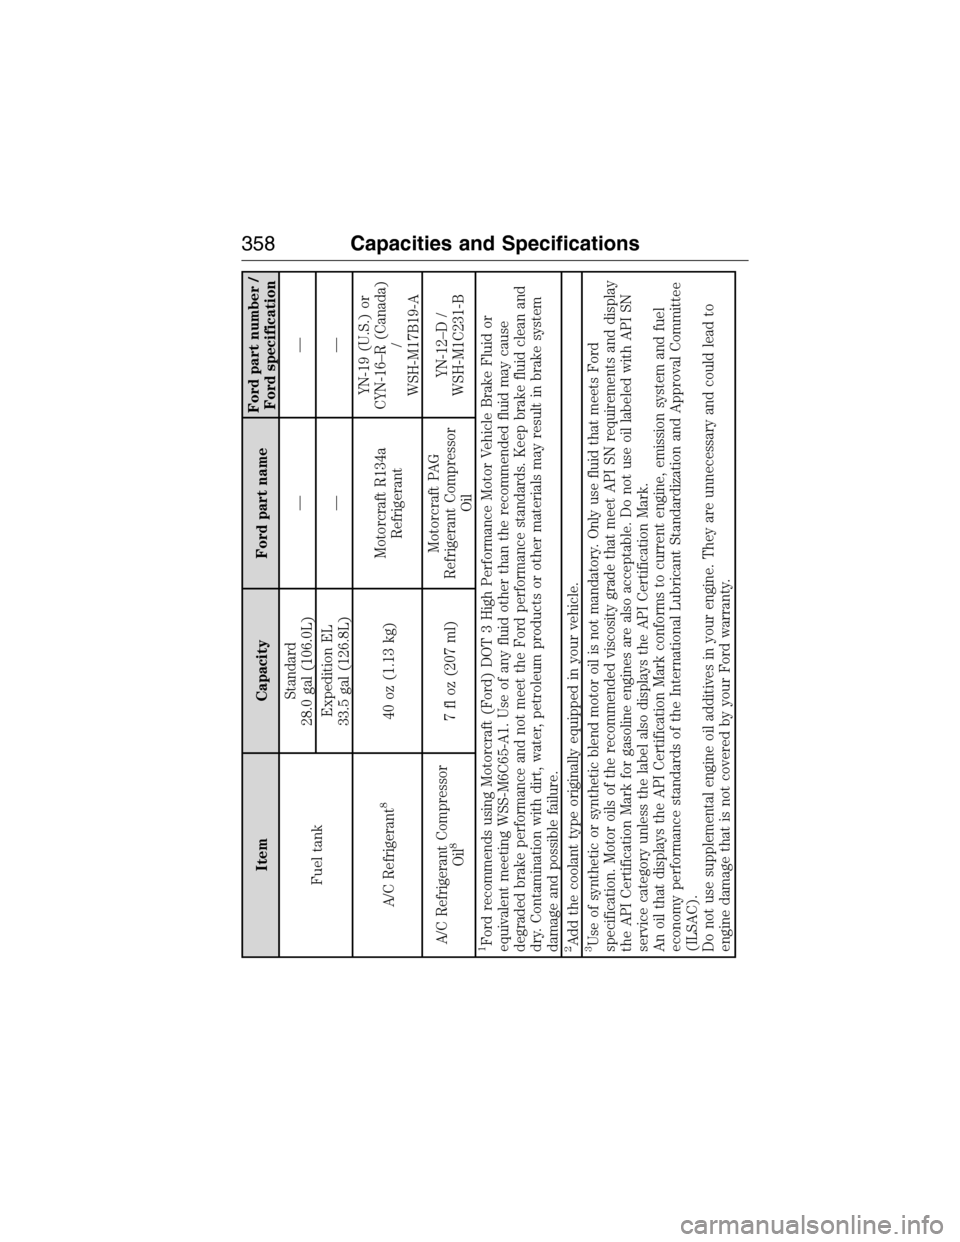
Item Capacity Ford part nameFord part number /
Ford specification
Fuel tankStandard
28.0 gal (106.0L)——
Expedition EL
33.5 gal (126.8L)——
A/C Refrigerant
8
40 oz (1.13 kg)Motorcraft R134a
RefrigerantYN-19 (U.S.) or
CYN-16–R (Canada)
/
WSH-M17B19-A
A/C Refrigerant Compressor
Oil
8
7 fl oz (207 ml)Motorcraft PAG
Refrigerant Compressor
OilYN-12–D /
WSH-M1C231-B
1Ford recommends using Motorcraft (Ford) DOT 3 High Performance Motor Vehicle Brake Fluid or
equivalent meeting WSS-M6C65-A1. Use of any fluid other than the recommended fluid may cause
degraded brake performance and not meet the Ford performance standards. Keep brake fluid clean and
dry. Contamination with dirt, water, petroleum products or other materials may result in brake system
damage and possible failure.2Add the coolant type originally equipped in your vehicle.3Use of synthetic or synthetic blend motor oil is not mandatory. Only use fluid that meets Ford
specification. Motor oils of the recommended viscosity grade that meet API SN requirements and display
the API Certification Mark for gasoline engines are also acceptable. Do not use oil labeled with API SN
service category unless the label also displays the API Certification Mark.
An oil that displays the API Certification Mark conforms to current engine, emission system and fuel
economy performance standards of the International Lubricant Standardization and Approval Committee
(ILSAC).
Do not use supplemental engine oil additives in your engine. They are unnecessary and could lead to
engine damage that is not covered by your Ford warranty.
358Capacities and Specifications
2015 Expedition(exd)
Owners Guide gf, 1st Printing, July 2014
USA(fus)
Page 370 of 564
MP3 Track and Folder Structure
Audio systems capable of recognizing and playing MP3 individual tracks
and folder structures work as follows:
•There are two different modes for MP3 disc playback: MP3 track
mode (system default) and MP3 folder mode.
•MP3 track mode ignores any folder structure on the MP3 disc. The
player numbers each MP3 track on the disc (noted by the .mp3 file
extension) from T001 to a maximum of T255.Note:The maximum
number of playable MP3 files may be less depending on the structure
of the CD and exact model of radio present.
•MP3 folder mode represents a folder structure consisting of one level
of folders. The CD player numbers all MP3 tracks on the disc (noted
by the .mp3 file extension) and all folders containing MP3 files, from
F001 (folder) T001 (track) to F253 T255.
•Creating discs with only one level of folders helps with navigation
through the disc files.
If you are burning your own MP3 discs, it is important to understand
how the system reads the structures you create. While various files may
be present, (files with extensions other than mp3), only files with the
.mp3 extension are played; other files are ignored by the system. This
enables you to use the same MP3 disc for a variety of tasks on your work
computer, home computer and your in-vehicle system.
In track mode, the system displays and plays the structure as if it were
only one level deep (all .mp3 files play, regardless of being in a specific
folder). In folder mode, the system only plays the .mp3 files in the
current folder.
Audio System369
2015 Expedition(exd)
Owners Guide gf, 1st Printing, July 2014
USA(fus)
Page 371 of 564
AM/FM/CD/SYNC/SIRIUS
WARNING:Driving while distracted can result in loss of vehicle
control, crash and injury. We strongly recommend that you use
extreme caution when using any device that may take your focus off
the road. Your primary responsibility is the safe operation of your
vehicle. We recommend against the use of any hand-held device while
driving and encourage the use of voice-operated systems when possible.
Make sure you are aware of all applicable local laws that may affect the
use of electronic devices while driving.
Note:Some features, such as Sirius satellite radio, may not be available
in your location. Check with an authorized dealer.
A.Display screen:Shows audio and SYNC information.
370Audio System
2015 Expedition(exd)
Owners Guide gf, 1st Printing, July 2014
USA(fus)
Page 375 of 564
Audio Settings
Speed Compensated
VolumeAutomatically adjusts the volume to
compensate for speed and wind noise. You can
set the system between 0 and +7.
SoundSelect to adjust settings for Treble, Middle,
Bass, Fade and Balance.
Occupancy ModeSelect to optimize sound quality for the chosen
seating position.
CD Settings
Scan AllSelect to scan all disc selections.
Scan FolderSelect to scan all music in the current MP3
folder.
CD CompressionSelect to bring soft and loud passages together
for a more consistent listening level.
Clock Settings
Set TimeSelect to set the time.
Set DateSelect to set the calendar date.
24h ModeSelect to view clock time in a 12–hour mode or
24–hour mode.
Display Settings
DimmingSelect to change display brightness.
LanguageSelect to display the language in English,
French or Spanish.
Temp. SettingSelect to display the outside temperature in
Fahrenheit or Celsius.
374Audio System
2015 Expedition(exd)
Owners Guide gf, 1st Printing, July 2014
USA(fus)
Page 377 of 564
E.VOL and Power:
•Press this button to switch the system off and on.
•Turn it to adjust the volume.
F.Eject:Press this button to eject a CD.
G.CD Slot:Insert a CD.
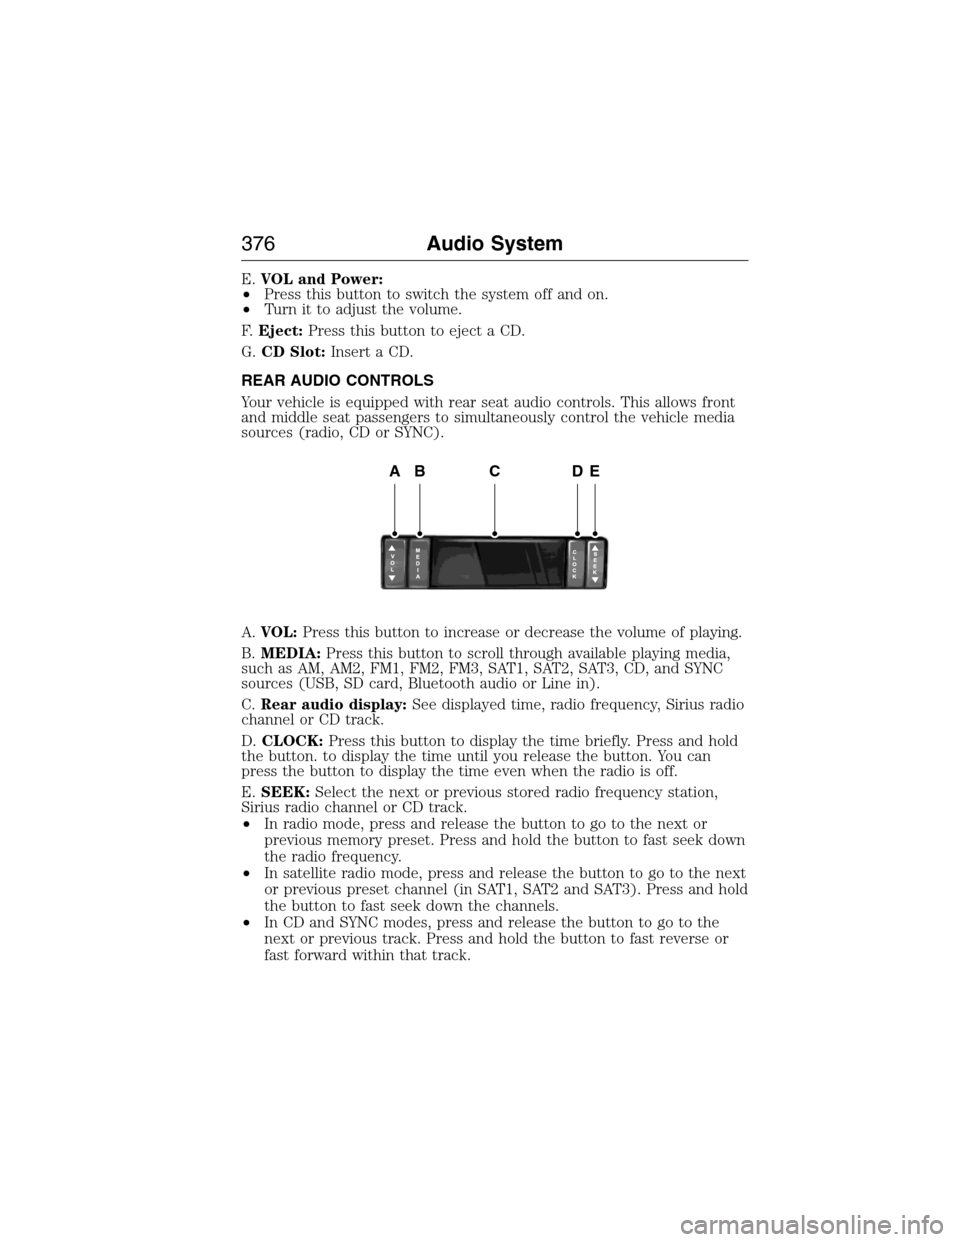
REAR AUDIO CONTROLS
Your vehicle is equipped with rear seat audio controls. This allows front
and middle seat passengers to simultaneously control the vehicle media
sources (radio, CD or SYNC).
A.VOL:Press this button to increase or decrease the volume of playing.
B.MEDIA:Press this button to scroll through available playing media,
such as AM, AM2, FM1, FM2, FM3, SAT1, SAT2, SAT3, CD, and SYNC
sources (USB, SD card, Bluetooth audio or Line in).
C.Rear audio display:See displayed time, radio frequency, Sirius radio
channel or CD track.
D.CLOCK:Press this button to display the time briefly. Press and hold
the button. to display the time until you release the button. You can
press the button to display the time even when the radio is off.
E.SEEK:Select the next or previous stored radio frequency station,
Sirius radio channel or CD track.
•In radio mode, press and release the button to go to the next or
previous memory preset. Press and hold the button to fast seek down
the radio frequency.
•In satellite radio mode, press and release the button to go to the next
or previous preset channel (in SAT1, SAT2 and SAT3). Press and hold
the button to fast seek down the channels.
•In CD and SYNC modes, press and release the button to go to the
next or previous track. Press and hold the button to fast reverse or
fast forward within that track.
ABCDE
376Audio System
2015 Expedition(exd)
Owners Guide gf, 1st Printing, July 2014
USA(fus)