Page 16 of 323
.
BONNET OPENING LEVER
❒Opening/closing .................................. 59
STEERING WHEEL
ADJUSTMENT UNLOCKING LEVER
❒Operation ........................................... 32
DOORS
❒Lock/Unlock ....................................... 19
SEATS
❒Adjustments ....................................... 24❒Driver’s seat adjustments .................... 24
❒Passenger seat adjustments ............... 25
❒Rear seat access ................................ 26
❒Seat that folds to table ........................ 26
❒Third row seats ................................... 26
4F0V0541
12
GRAPHICAL INDEX
Page 63 of 323

REAR FOG LIGHTS
Press the
button with the dipped
beam headlights or front fog lights
on to turn the rear fog lights on. The
warning light on the panel
switches on.
Press the button again to turn the
lights off, or turn off the dipped
beam headlights and/or the front fog
lights (where provided).
BONNET
Opening
Proceed as follows:
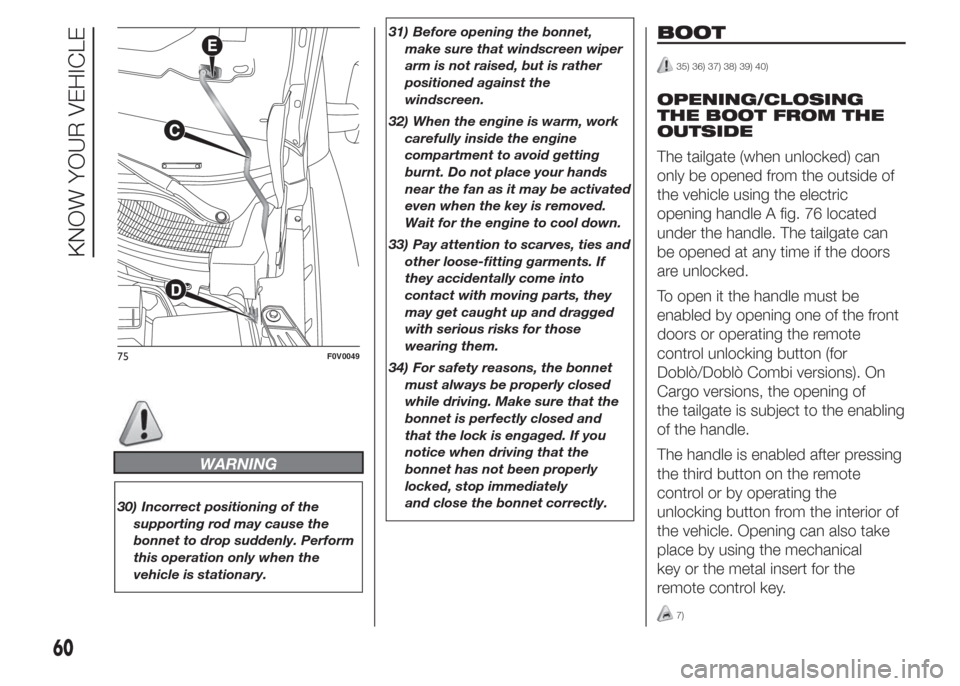
❒pull lever A fig. 73 in the direction
indicated by the arrow;
❒operate lever B fig. 74, lift the bonnet
and, at the same time, release the
supporting rod C fig. 75 from its
catch D, then insert the end of the
rod into housing E in the bonnet
(large hole) and push to safety
position (small hole), as shown in the
figure.
30) 31) 32) 33)
Closing
Proceed as follows:
❒Hold the bonnet up with one hand
and with the other remove rod C
from housing E and fit it back into its
catch D;
❒Lower the bonnet to approximately
20 centimetres above the engine
compartment and let it come down.
Make sure that the bonnet is
completely closed and not just
secured in safety position. If it is not
perfectly closed, do not try to press
the bonnet down but open it and
repeat the procedure.
34)
73F0V0047
74F0V0048
59
Page 64 of 323

WARNING
30) Incorrect positioning of the
supporting rod may cause the
bonnet to drop suddenly. Perform
this operation only when the
vehicle is stationary.31) Before opening the bonnet,
make sure that windscreen wiper
arm is not raised, but is rather
positioned against the
windscreen.
32) When the engine is warm, work
carefully inside the engine
compartment to avoid getting
burnt. Do not place your hands
near the fan as it may be activated
even when the key is removed.
Wait for the engine to cool down.
33) Pay attention to scarves, ties and
other loose-fitting garments. If
they accidentally come into
contact with moving parts, they
may get caught up and dragged
with serious risks for those
wearing them.
34) For safety reasons, the bonnet
must always be properly closed
while driving. Make sure that the
bonnet is perfectly closed and
that the lock is engaged. If you
notice when driving that the
bonnet has not been properly
locked, stop immediately
and close the bonnet correctly.
BOOT
35) 36) 37) 38) 39) 40)
OPENING/CLOSING
THE BOOT FROM THE
OUTSIDE
The tailgate (when unlocked) can
only be opened from the outside of
the vehicle using the electric
opening handle A fig. 76 located
under the handle. The tailgate can
be opened at any time if the doors
are unlocked.
To open it the handle must be
enabled by opening one of the front
doors or operating the remote
control unlocking button (for
Doblò/Doblò Combi versions). On
Cargo versions, the opening of
the tailgate is subject to the enabling
of the handle.
The handle is enabled after pressing
the third button on the remote
control or by operating the
unlocking button from the interior of
the vehicle. Opening can also take
place by using the mechanical
key or the metal insert for the
remote control key.
7)
75F0V0049
60
KNOW YOUR VEHICLE
Page 147 of 323

Versions without
dummy pole fig. 144
In the event of vehicle inactivity,
special attention must be paid to the
disconnection of the battery power
supply.
Proceed as follows: detach the
connector A (by pressing button B)
from sensor C for monitoring the
status of the battery installed on the
negative battery pole D. This sensor
should never be disconnected
from the pole except if the battery is
replaced.
81)
EMERGENCY
STARTING
In the case of emergency starting,
never connect the negative lead
(–) of the auxiliary battery to the
negative pole C of the vehicle
battery, but rather to either the
dummy pole B or to an
engine/gearbox earth point fig. 145.
82) 83) 84) 85)
WARNING
81) If the battery needs to be
replaced, always contact a Fiat
Dealership. Replace the battery
with a new one of the same type
and specifications.
82) Before opening the bonnet,
make sure that the vehicle is
switched off and the key is in the
OFF position. Please follow the
instructions on the decal near the
front crossmember. It is advisable
to extract the key when there
are other people in the vehicle.
83) The vehicle should always be
evacuated after the key has been
removed or turned to the OFF
position. When refuelling, make
sure that the vehicle is switched
off with the key in the OFF
position.
144F0V0218
145F0V0043
143
Page 226 of 323

IDENTIFICATION
DATA
It is advisable to take note of the
identification codes. The following
identification codes are printed and
shown on the plates:
❒VIN plate.
❒Chassis marking.
❒Bodywork paint identification plate.
❒Engine marking.
VIN PLATE
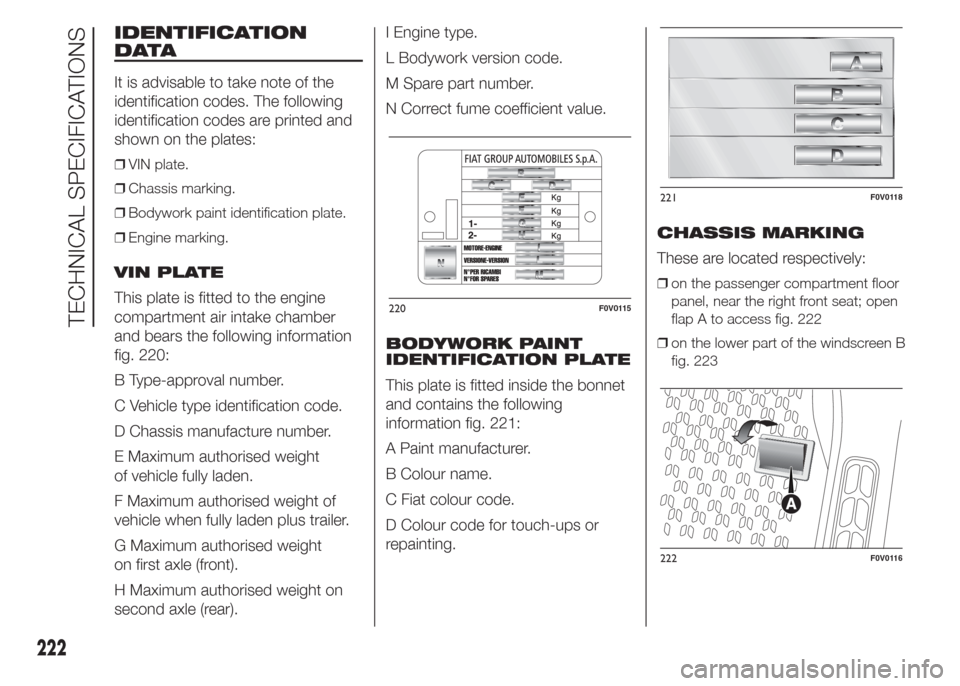
This plate is fitted to the engine
compartment air intake chamber
and bears the following information
fig. 220:
B Type-approval number.
C Vehicle type identification code.
D Chassis manufacture number.
E Maximum authorised weight
of vehicle fully laden.
F Maximum authorised weight of
vehicle when fully laden plus trailer.
G Maximum authorised weight
on first axle (front).
H Maximum authorised weight on
second axle (rear).I Engine type.
L Bodywork version code.
M Spare part number.
N Correct fume coefficient value.
BODYWORK PAINT
IDENTIFICATION PLATE
This plate is fitted inside the bonnet
and contains the following
information fig. 221:
A Paint manufacturer.
B Colour name.
C Fiat colour code.
D Colour code for touch-ups or
repainting.CHASSIS MARKING
These are located respectively:❒on the passenger compartment floor
panel, near the right front seat; open
flap A to access fig. 222
❒on the lower part of the windscreen B
fig. 223
220F0V0115
221F0V0118
222F0V0116
222
TECHNICAL SPECIFICATIONS