2015 FIAT DOBLO COMBI boot
[x] Cancel search: bootPage 17 of 323

KNOW YOUR VEHICLE
In-depth knowledge of your new
vehicle starts here.
The booklet that you are reading
simply and directly explains how it is
made and how it works.
That’s why we advise you to read it
seated comfortably on board, so
that you can see what is described
here for yourself.THE KEYS....................................... 14
IGNITION DEVICE ........................... 17
SYMBOLS ...................................... 18
THE FIAT CODE SYSTEM ............... 18
DOORS ........................................... 19
SEATS ............................................ 24
PARTITIONS ................................... 29
HEAD RESTRAINTS ........................ 31
STEERING WHEEL ......................... 32
REAR VIEW MIRRORS .................... 32
EXTERIOR LIGHTS ......................... 34
INTERIOR LIGHTS .......................... 36
WINDSCREEN/REAR WINDOW
WIPER ............................................ 40
HEATING AND VENTILATION
SYSTEM ......................................... 42
DIFFUSERS..................................... 43
HEATING AND VENTILATION.......... 44
MANUAL CLIMATE CONTROL
SYSTEM ......................................... 47
AUTOMATIC CLIMATE CONTROL
SYSTEM ......................................... 50
ELECTRIC WINDOWS .................... 56
CONTROLS .................................... 58
BONNET ......................................... 59
BOOT ............................................. 60
INTERIOR FITTINGS ....................... 64
ROOF RACK/SKI RACK .................. 68HEADLIGHTS.................................. 69
RADIO............................................. 70
PROTECTING THE
ENVIRONMENT .............................. 71
13
Page 18 of 323

THE KEYS
KEY WITHOUT REMOTE
CONTROL
The metal insert A fig. 5 of the key is
fixed.
The key operates:
❒the ignition device;
❒the door lock;
❒opening and closing of the fuel tank
cap.
KEY WITH REMOTE
CONTROL
The metal insert A fig.6-fig.7is
retractable and it operates:
❒the ignition device;
❒the door lock;❒opening and closing of the fuel tank
cap.
To extract the metal insert, press
button B fig. 6 - fig. 7.
To refit it in the grip proceed as
follows:
❒hold down button B and turn the
metal insert A;
❒release button B and turn the metal
insert A completely until the locking
click is heard to ensure correct
closure.
1)
Cargo versions fig. 6
The
button unlocks the front
doors (including the boot, the rear
swing doors and the sliding side
doors for versions/markets where
provided).
Button
is used for locking all the
doors.
The
button unlocks the boot, the
rear swing doors and the sliding
side doors (depending on the
version).
Combi/Panorama
versions fig. 7
The
button unlocks the front
doors (including the boot, the rear
swing doors and the sliding side
doors for versions/markets where
provided).
5F0V0003
6 - Cargo versionsF0V0004
7 - Combi/Panorama versionsF0V0536
14
KNOW YOUR VEHICLE
Page 19 of 323

Buttonis used for locking all the
doors.
The
button unlocks the boot,
the rear swing doors and the sliding
side doors (depending on the
version).
Changing battery - key
with remote control
To replace the remote control
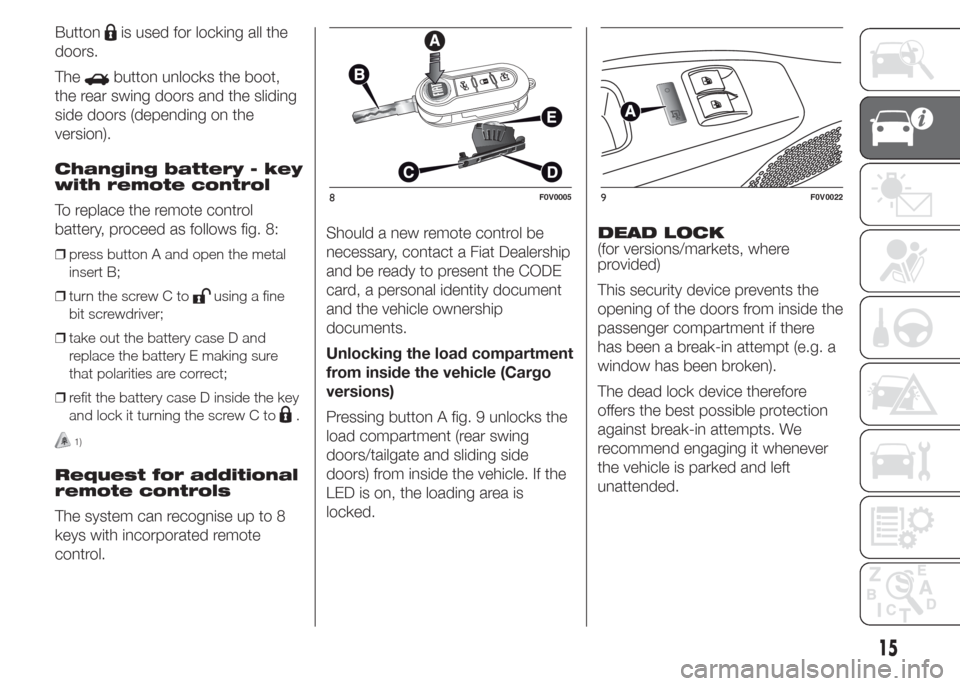
battery, proceed as follows fig. 8:
❒press button A and open the metal
insert B;
❒turn the screw C to
using a fine
bit screwdriver;
❒take out the battery case D and
replace the battery E making sure
that polarities are correct;
❒refit the battery case D inside the key
and lock it turning the screw C to
.
1)
Request for additional
remote controls
The system can recognise up to 8
keys with incorporated remote
control.Should a new remote control be
necessary, contact a Fiat Dealership
and be ready to present the CODE
card, a personal identity document
and the vehicle ownership
documents.
Unlocking the load compartment
from inside the vehicle (Cargo
versions)
Pressing button A fig. 9 unlocks the
load compartment (rear swing
doors/tailgate and sliding side
doors) from inside the vehicle. If the
LED is on, the loading area is
locked.DEAD LOCK
(for versions/markets, where
provided)
This security device prevents the
opening of the doors from inside the
passenger compartment if there
has been a break-in attempt (e.g. a
window has been broken).
The dead lock device therefore
offers the best possible protection
against break-in attempts. We
recommend engaging it whenever
the vehicle is parked and left
unattended.
8F0V00059F0V0022
15
Page 25 of 323

position 1 - device engaged (door
locked);
position 2 - device not engaged
(door may be opened from the
inside).
The device remains engaged even if
the doors are electrically unlocked.
12)
KEY EMERGENCY
LOCK (KEL) DEVICE
The sliding side doors are provided
with a device for locking all the
doors using the lock in the case of a
power fault. The device can be
engaged, with the sliding side doors
open, as follows fig. 16:
❒Position 2: device not engaged
(doors released)❒position 1: device engaged (fit the
metal insert of the ignition key in
its seat and rotate clockwise), door
locked
The device is released and thus the
doors can be opened as follows:
in the event that electrical operation
is restored:
❒by remote control
or
❒opening a front door by inserting the
key into the key pawl. if the power is
not restored;
❒opening the driver side door by key
pawl and the other doors
(passenger's side and sliding side
door) pulling the inner handle.
DOUBLE REAR SWING
DOORS
The double rear swing doors are
fitted with a link system that stops
them when they have opened to an
angle of approximately 90 degrees.
To open them wider to an angle
of 180 degrees, push the locking
device A fig. 17 (one on each side)
as shown in the diagram and
simultaneously open the doors.
13)
Using the key latch on the door, you
can do the following:
❒for Cargo versions with swing
door/boot: centrally unlock the load
compartment (sliding side doors +
rear swing doors/boot), centrally lock
all the doors;
15F0V0186
16F0V0383
17F0V0067
21
Page 64 of 323

WARNING
30) Incorrect positioning of the
supporting rod may cause the
bonnet to drop suddenly. Perform
this operation only when the
vehicle is stationary.31) Before opening the bonnet,
make sure that windscreen wiper
arm is not raised, but is rather
positioned against the
windscreen.
32) When the engine is warm, work
carefully inside the engine
compartment to avoid getting
burnt. Do not place your hands
near the fan as it may be activated
even when the key is removed.
Wait for the engine to cool down.
33) Pay attention to scarves, ties and
other loose-fitting garments. If
they accidentally come into
contact with moving parts, they
may get caught up and dragged
with serious risks for those
wearing them.
34) For safety reasons, the bonnet
must always be properly closed
while driving. Make sure that the
bonnet is perfectly closed and
that the lock is engaged. If you
notice when driving that the
bonnet has not been properly
locked, stop immediately
and close the bonnet correctly.
BOOT
35) 36) 37) 38) 39) 40)
OPENING/CLOSING
THE BOOT FROM THE
OUTSIDE
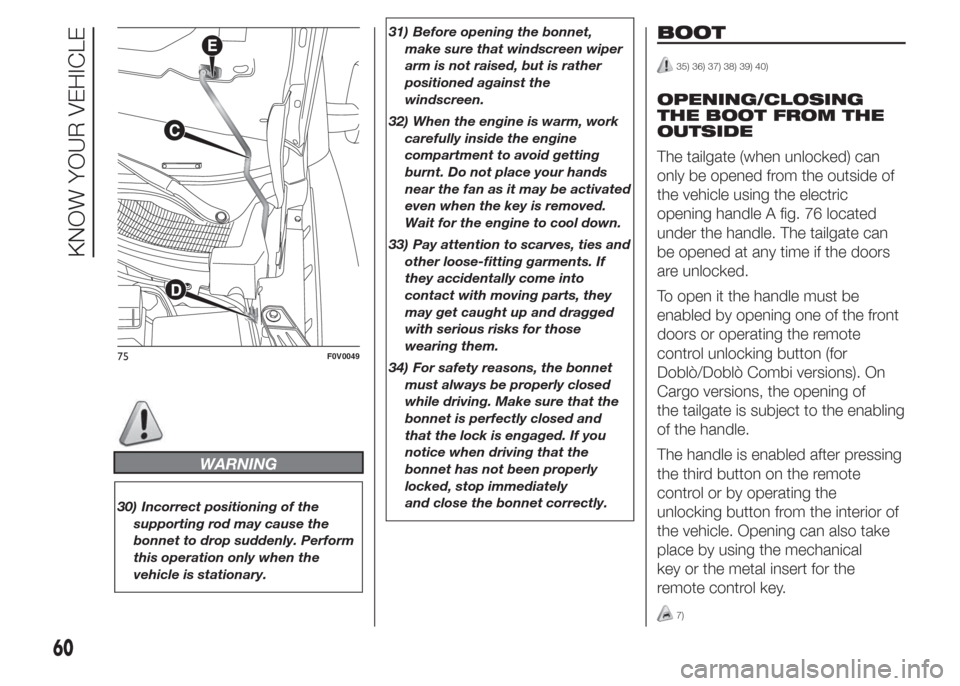
The tailgate (when unlocked) can
only be opened from the outside of
the vehicle using the electric
opening handle A fig. 76 located
under the handle. The tailgate can
be opened at any time if the doors
are unlocked.
To open it the handle must be
enabled by opening one of the front
doors or operating the remote
control unlocking button (for
Doblò/Doblò Combi versions). On
Cargo versions, the opening of
the tailgate is subject to the enabling
of the handle.
The handle is enabled after pressing
the third button on the remote
control or by operating the
unlocking button from the interior of
the vehicle. Opening can also take
place by using the mechanical
key or the metal insert for the
remote control key.
7)
75F0V0049
60
KNOW YOUR VEHICLE
Page 65 of 323

EMERGENCY OPENING
FROM THE INSIDE
In the event of an emergency, you
can open the boot from inside
the vehicle as follows:
❒open the sliding side door and fully
fold the rear seats;
❒from inside the boot, press lever A
fig. 78 and open the tailgate.
EMERGENCY OPENING
OF THE SWING DOORS
FROM THE INSIDE
In the event of an emergency, you
can open the boot from inside
the vehicle as follows:
❒open the sliding side door and lower
the backrest of the rear seat to give
you access to the load compartment
(Doblò/Doblò Combi versions);
or
❒open the sliding side door (Cargo
versions);
❒use device A fig. 79 located on the
inside of the right-hand swing door;
❒open the left-hand swing door by
pulling on its handle (see "Doors"
in this section).
REMOVING THE
PARCEL SHELF
The parcel shelf consists of two
parts. To remove it completely,
proceed as follows:
❒open the rear swing door; raise the
front part A fig. 80, unhooking pin A
fig. 81 from its housing
❒raise rear part B fig. 80, unhooking
pins B and C fig. 81 from their
housings.
If the seat is completely folded
down, remove the parcel shelf as
described and store it horizontally
between the back of the front seats
and the folded rear seat.
To refit the parcel shelf, follow the
same procedure in reverse.
76F0V0370
77F0V0340
78F0V013579F0V0080
61
Page 66 of 323

EXTENDING THE BOOT
Proceed as follows:
❒open the rear doors and remove the
parcel shelf (as described previously);
❒completely lower the rear seat head
restraints;
❒move the seat belt to the side,
making sure that it is fully extended
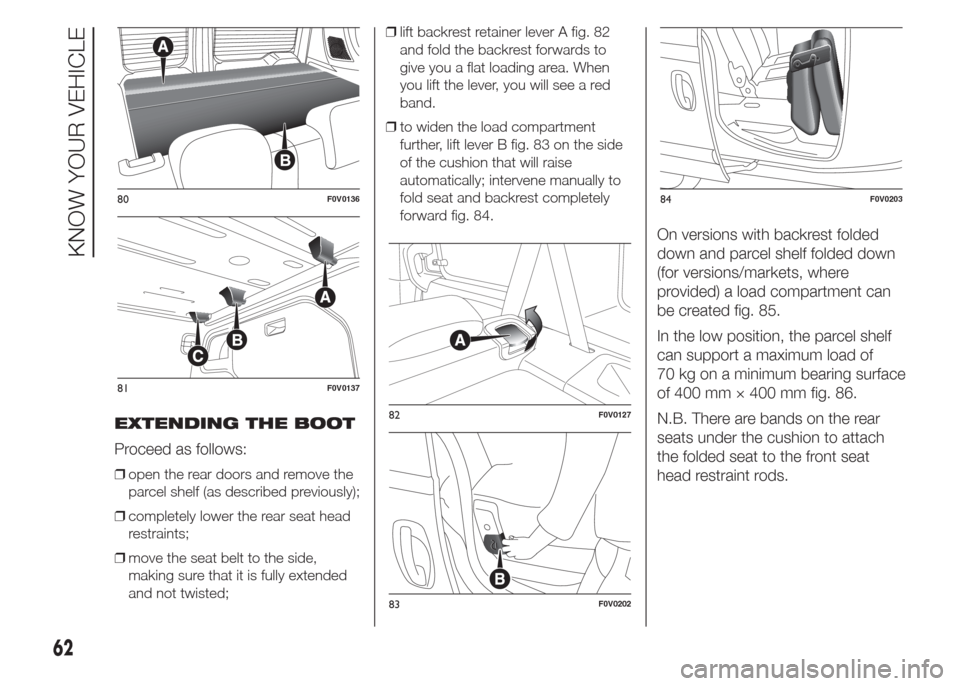
and not twisted;❒lift backrest retainer lever A fig. 82
and fold the backrest forwards to
give you a flat loading area. When
you lift the lever, you will see a red
band.
❒to widen the load compartment
further, lift lever B fig. 83 on the side
of the cushion that will raise
automatically; intervene manually to
fold seat and backrest completely
forward fig. 84.
On versions with backrest folded
down and parcel shelf folded down
(for versions/markets, where
provided) a load compartment can
be created fig. 85.
In the low position, the parcel shelf
can support a maximum load of
70 kg on a minimum bearing surface
of 400 mm × 400 mm fig. 86.
N.B. There are bands on the rear
seats under the cushion to attach
the folded seat to the front seat
head restraint rods.
80F0V0136
81F0V0137
82F0V0127
83F0V0202
84F0V0203
62
KNOW YOUR VEHICLE
Page 67 of 323

SECURING YOUR LOAD
To make it easier to secure your
load, there are hooks (in various
quantities depending on the trim)
fixed to the floor fig. 87 - fig. 88.
WARNING
35) If you are travelling in areas with
few filling stations and you want
to transport fuel in a spare tank,
comply with the law by using only
an approved, suitably secured
tank. However, the risks of fire in
the case of collision increase
anyway.
36) Never exceed the maximum
allowed load in the boot, see
the “Technical specifications”
chapter. Also make sure that the
objects you place in the boot have
been properly secured, to avoid
them from being thrown forward
consequent to sudden braking
and injuring your passengers.
37) If you are travelling in areas with
few filling stations and you want
to transport fuel in a spare tank,
comply with the law by using only
an approved, suitably secured
tank. Anyway, by doing so, you
increase the risk of fire in the
event of an accident with your
vehicle.
85F0V0204
400mm400mm
70 kg
86F0V0212
87F0V0114
88F0V0122
63