Page 2 of 275

We really know your car because we invented, designed and built it: we really know every single detail.
At Fiat Service authorised workshopsyou can find technicians directly trained by us,
offering quality and professionalism for all service operations.
Fiat workshops are always close to you for the regular servicing operations, season checks
and practical recommendations by our experts.
With Fiat Genuine Parts you keep the reliability, comfort and performance features
of your new car unchanged in time: that's why you bought it for.
Always ask for Genuine Parts for the components used on our cars; we recommend them because
they come from our steady commitment in research and development of highly innovative technologies.
For all these reasons: rely on Genuine Parts, because they are the only ones designed
by Fiat for your car.
SAFETY:
BRAKING SYSTEMENVIRONMENT: PARTICULATE FILTERS,
CLIMATE CONTROL MAINTENANCECOMFORT: SUSPENSION
AND WINDSCREEN WIPERS PERFORMANCE: SPARK PLUGS,
INJECTORS AND BATTERIESLINEACCESSORI
ROOF RACK BARS, WHEEL RIMS
WHY CHOOSING
GENUINE PARTS
BRAVO LUM GB QUADR_BRAVO UM GB 03/03/14 10.37 Pagina 2
Page 105 of 275

If the vehicle is fitted with TPMS, when a tyre is
removed, it is advisable to replace the rubber gasket
for the valve as well as the ring nut fixing the sensor.
Have this operation performed at a Fiat Dealership.
If the punctured tyre indication persists on the
instrument panel after the initial conditions have
been restored using the tyre repair kit ("Fix&Go
Automatic"), contact a Fiat Dealership.
Changes in outside temperature may cause tyre
pressures to vary. The TPMS may temporarily
indicate insufficient pressure. In this case, check the
tyre pressure when cold and, if necessary, restore
the inflation values.
If the vehicle is fitted with TPMS, tyre and/or rims
fitting/removal operations require specific
precautions. To avoid damaging the sensors or fitting
them incorrectly, tyre and/or rims fitting/removal
operations should be carried out only by specialists.
Contact a Fiat Dealership.
The tyre repair kit ("Fix&Go Automatic")
provided with the car is compatible with
the TPMS sensors; using sealants not
equivalent with that in the original kit may
adversely affect its operation. If sealants not
equivalent with the original one are used, it
is recommended to have the TPMS sensors
checked by a qualified repair centre.
101GETTING TO
KNOW YOUR CAR
SAFETY
STARTING AND
DRIVING
WARNING LIGHTS
AND MESSAGES
IN AN EMERGENCY
SERVICING AND
MAINTENANCE
TECHNICAL
SPECIFICATIONS
INDEX
Page 136 of 275

WINDOW BAG
(for versions/markets, where provided)
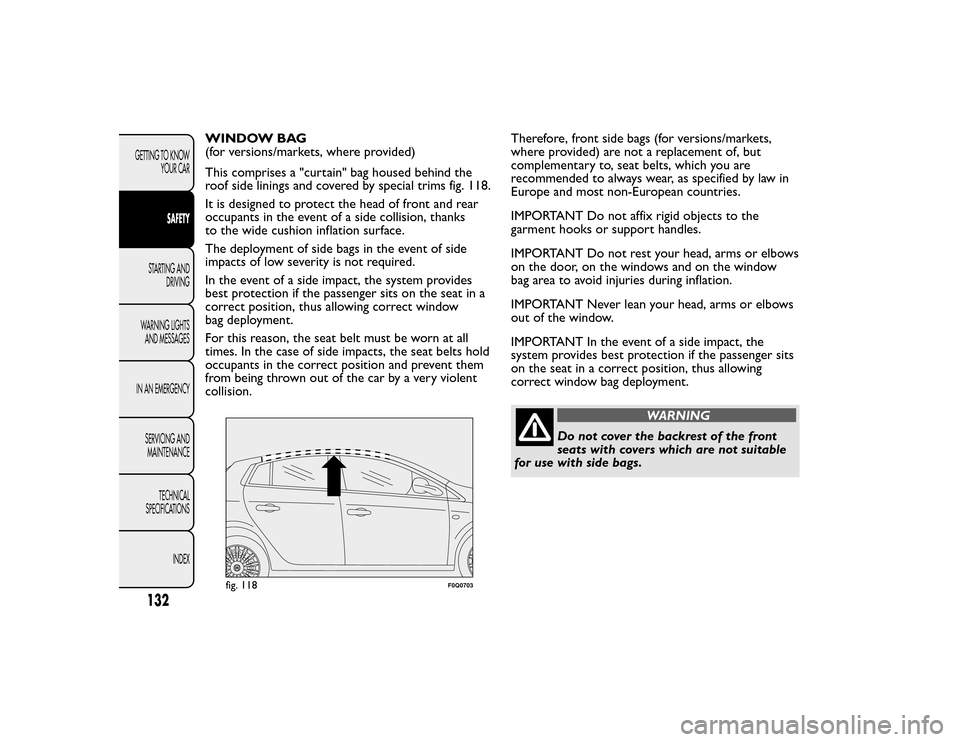
This comprises a "curtain" bag housed behind the
roof side linings and covered by special trims fig. 118.
It is designed to protect the head of front and rear
occupants in the event of a side collision, thanks
to the wide cushion inflation surface.
The deployment of side bags in the event of side
impacts of low severity is not required.
In the event of a side impact, the system provides
best protection if the passenger sits on the seat in a
correct position, thus allowing correct window
bag deployment.
For this reason, the seat belt must be worn at all
times. In the case of side impacts, the seat belts hold
occupants in the correct position and prevent them
from being thrown out of the car by a very violent
collision.Therefore, front side bags (for versions/markets,
where provided) are not a replacement of, but
complementary to, seat belts, which you are
recommended to always wear, as specified by law in
Europe and most non-European countries.
IMPORTANT Do not affix rigid objects to the
garment hooks or support handles.
IMPORTANT Do not rest your head, arms or elbows
on the door, on the windows and on the window
bag area to avoid injuries during inflation.
IMPORTANT Never lean your head, arms or elbows
out of the window.
IMPORTANT In the event of a side impact, the
system provides best protection if the passenger sits
on the seat in a correct position, thus allowing
correct window bag deployment.
WARNING
Do not cover the backrest of the front
seats with covers which are not suitable
for use with side bags.
fig. 118
F0Q0703
132GETTING TO KNOW YOUR CAR
SAFETY
STARTING AND DRIVING
WARNING LIGHTS AND MESSAGES
IN AN EMERGENCY SERVICING ANDMAINTENANCE
TECHNICAL
SPECIFICATIONS
INDEX
Page 169 of 275

❒for versions equipped with space-saver wheel,
loosen fastener E fig. 124, take tool box F, position
it near the wheel to be changed and then take
space-saver wheel G;
❒ remove hub cap H fig. 125 (versions with steel
rims) or remove the hub cap (versions with alloy
rims);
❒ loosen the bolts of the wheel to be replaced by
about one turn with the wrench provided L
fig. 126; if you have alloy rims, rock the car to
make it easier to separate the rim from the wheel
hub;
❒ operate device M fig. 127 so as to extend the jack,
until groove N on the upper part of the jack fits
correctly into the lower profile P visible on the car
body next to the indication Q (at approx. 72 cm
from the centre of the front wheel or 75 cm from
the centre of the rear wheel); ❒
alert any bystander that the car is about to be
raised; all persons should be kept away from
the car and nobody must touch it until it has been
lowered;
fig. 125
F0Q0393
fig. 126
F0Q0394
fig. 127
F0Q0395
165GETTING TO KNOW
YOUR CAR
SAFETY
STARTING AND
DRIVING
WARNING LIGHTS
AND MESSAGES
IN AN
EMERGENCY
SERVICING AND
MAINTENANCE
TECHNICAL
SPECIFICATIONS
INDEX
Page 170 of 275

❒fit handle R fig. 127 to operate the jack and raise
the car until the wheel is a few centimetres above
the ground;
❒ fully loosen the fastening bolts and remove the
wheel.
❒ make sure the contact surfaces between
space-saver wheel and hub are clean so that the
fastening bolts will not come loose;
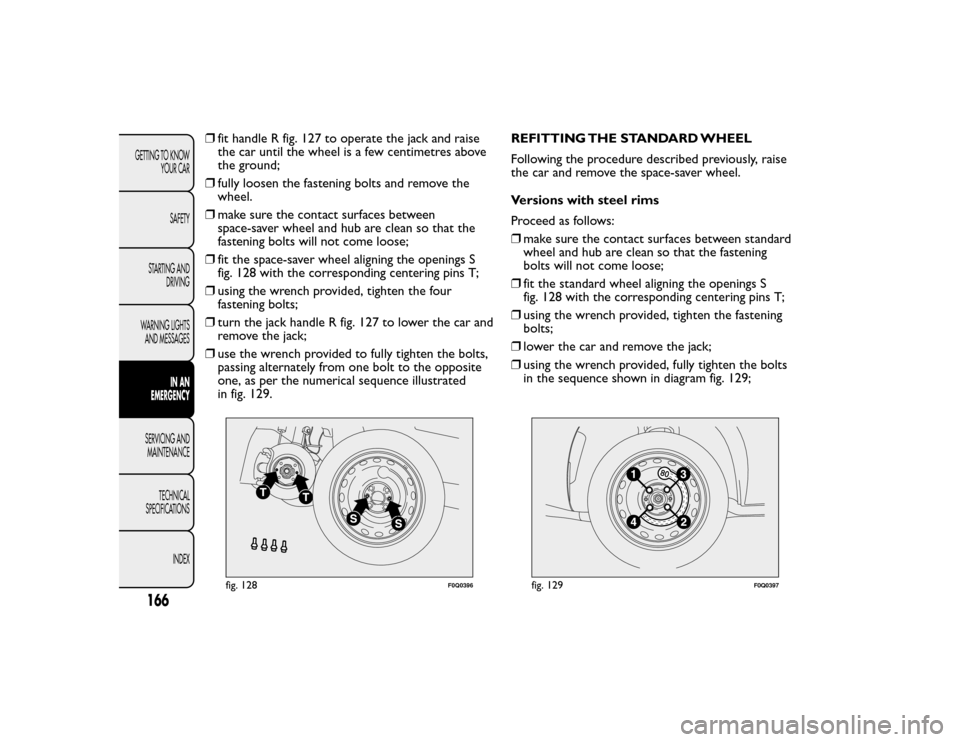
❒ fit the space-saver wheel aligning the openings S
fig. 128 with the corresponding centering pins T;
❒ using the wrench provided, tighten the four
fastening bolts;
❒ turn the jack handle R fig. 127 to lower the car and
remove the jack;
❒ use the wrench provided to fully tighten the bolts,
passing alternately from one bolt to the opposite
one, as per the numerical sequence illustrated
in fig. 129. REFITTING THE STANDARD WHEEL
Following the procedure described previously, raise
the car and remove the space-saver wheel.
Versions with steel rims
Proceed as follows:
❒
make sure the contact surfaces between standard
wheel and hub are clean so that the fastening
bolts will not come loose;
❒ fit the standard wheel aligning the openings S
fig. 128 with the corresponding centering pins T;
❒ using the wrench provided, tighten the fastening
bolts;
❒ lower the car and remove the jack;
❒ using the wrench provided, fully tighten the bolts
in the sequence shown in diagram fig. 129;
fig. 128
F0Q0396
fig. 129
F0Q0397
166GETTING TO KNOW
YOUR CAR
SAFETY
STARTING AND DRIVING
WARNING LIGHTS AND MESSAGES
IN AN
EMERGENCY
SERVICING AND MAINTENANCE
TECHNICAL
SPECIFICATIONS
INDEX
Page 171 of 275

❒fit the hub cap so that the inflation valve can exit
through the special slot visible on the cap itself;
❒ pressure-fit the hub cap starting from the parts
nearest to the inflation valve and continue until
it is completely fitted.
IMPORTANT If it is not fitted properly, the hub cap
may detach itself when the car is running. Versions with alloy rims
Proceed as follows:
❒
tighten centering pin A fig. 130 in one of the fixing
bolt openings on the wheel hub;
❒ place the wheel on the pin and tighten the bolts
using the wrench provided. Bolt insertion is eased
by the use of the extension B provided;
❒ undo centering pin A and tighten the last fastening
bolt;
❒ lower the car and remove the jack;
❒ using the wrench provided, fully tighten the bolts
in the same sequence shown previously for the
space-saver wheel (see fig. 129);
❒ refit the hub cap.
fig. 130
F0Q0217
167GETTING TO KNOW
YOUR CAR
SAFETY
STARTING AND
DRIVING
WARNING LIGHTS
AND MESSAGES
IN AN
EMERGENCY
SERVICING AND
MAINTENANCE
TECHNICAL
SPECIFICATIONS
INDEX
Page 220 of 275

WARNING
Do not cross switch the tyres, moving
them from the right of the car to the
left and vice versa.WARNING
Never submit alloy rims to repainting
treatments requiring the use of
temperatures exceeding 150°C.The mechanical
properties of the wheels could be impaired.
WINDSCREEN/REAR WINDOW
WIPERBLADES
Periodically clean the rubber part using special
products; TUTELA PROFESSIONAL SC 35 is
recommended.
Replace the blades if the rubber edge is deformed or
worn. In any case, it is advisable to replace them
approximately once a year. A few simple precautions
can reduce the possibility of damage to the blades:
❒ if the temperature falls below zero, make sure that
ice has not frozen the rubber against the glass. Use
an antifreeze product to release it if required;
❒ remove any snow from the glass: in addition to
protecting the blades, this prevents effort on
the motor and overheating;
❒ do not operate the windscreen/rear window
wipers on dry glass.
WARNING
Driving with worn windscreen/rear
window wiper blades is a serious hazard,
because visibility is reduced in bad weather.
216GETTING TO KNOW YOUR CAR
SAFETY
STARTING AND DRIVING
WARNING LIGHTS AND MESSAGES
IN AN EMERGENCY SERVICING AND MAINTENANCE
TECHNICAL
SPECIFICATIONS
INDEX
Page 236 of 275
STEERING SYSTEMVersionsTypeTurning circle (kerb to kerb)
(m)
1.6 MultiJet - 2.0 MultiJet Rack and pinion with electric
power steering 10.4 (11.0 with optional 18" alloy
rims)
232GETTING TO KNOWYOUR CAR
SAFETY
STARTING AND DRIVING
WARNING LIGHTS AND MESSAGES
IN AN EMERGENCY SERVICING ANDMAINTENANCE
TECHNICAL
SPECIFICATIONS
INDEX