2015 FIAT 500X refuelling
[x] Cancel search: refuellingPage 4 of 240

READ THIS CAREFULLYREFUELLING
Petrol engines: only refuel with unleaded petrol with octane rating (RON) not less than 95 in compliance with the European specification
EN228. Do not use petrol containing methanol or ethanol E85. Using these mixtures may cause misfiring and driving issues, as well as
damage fundamental components of the supply system.
For further details on the use of the correct fuel see the "Refuelling the vehicle" paragraph in the "Starting and driving" chapter.
Diesel engines: refuel only with diesel fuel conforming to the European specification EN590. The use of other products or mixtures may
damage the engine beyond repair and consequently invalidate the warranty, due to the damage caused.
For further details on the use of the correct fuel see the "Refuelling the vehicle" paragraph in the "Starting and driving" chapter.
STARTING THE ENGINE
Versions with manual gearbox (petrol engines): make sure that the handbrake is engaged; set the gear lever to neutral, fully depress the
clutch pedal without pressing the accelerator, then turn the ignition key to AVV or press the ignition device button; release the key or the
button as soon as the engine has started.
Versions with manual gearbox (diesel engines): make sure that the handbrake is engaged; set the gear lever to neutral, fully depress the
clutch pedal without pressing the accelerator, then turn the ignition key to MAR and wait for the
warning light to switch off. Bring the
ignition key to AVV or press the ignition device button; release the key or the button as soon as the engine has started.
Versions with automatic transmission: make sure that the handbrake is engaged and that the gear lever is in P (Parking) or N (Neutral),
depress the brake pedal, without pressing the accelerator pedal, then turn the ignition key to AVV or press the ignition device button; release
the key or the button as soon as the engine has started.
PARKING ON FLAMMABLE MATERIAL
The catalytic converter develops high temperatures during operation. Do not park the vehicle on grass, dry leaves, pine needles or other
flammable material: fire hazard.
RESPECTING THE ENVIRONMENT
The vehicle is fitted with a system that carries out a continuous diagnosis of the emission-related components in order to help protect the
environment.
ELECTRICAL ACCESSORIES
If, after buying the vehicle, you decide to add electrical accessories (with the risk of gradually draining the battery), contact a Fiat Dealership.
They can calculate the overall electrical requirement and check that the vehicle's electric system can support the required load.
SCHEDULED SERVICING
Correct maintenance of the vehicle is essential for ensuring that it maintains its performance and its safety features, its environmental
friendliness and low running costs unchanged in time.
15-12-2014 8:23 Pagina 2
Page 60 of 240

Symbol What it means
AUTOMATIC MAIN BEAM HEADLIGHTS FAILURE
The symbol switches on to report a failure of the automatic main beam headlights. Contact a Fiat
Dealership as soon as possible.WATER IN DIESEL FILTER (diesel versions)
The symbol switches on constantly when driving (along with a message in the display), to indicate the
presence of water in the diesel filter.
18)
DPF CLEANING (particulate trap) in progress (diesel versions with DPF only)
The symbol switches on constantly to indicate that the DPF system needs to eliminate the trapped
pollutants (particulate) through the regeneration process.
The symbol does not switch on during every DPF regeneration, but only when driving conditions require
that the driver is notified. To turn off the symbol, keep the vehicle in motion until the regeneration process is
over. On average, the process lasts 15 minutes. Optimal conditions for completing the process are
achieved by travelling at 60 km/h with engine speed above 2000 rpm.
When this symbol switches on, it does not indicate a vehicle failure and thus it should not be taken to a
workshop.
19)
WARNING
18)The presence of water in the fuel supply system circuit may cause severe damage to the injection system and irregular engine operation.
If the
symbol is displayed contact a Fiat Dealership as soon as possible to bleed the system. If the above indications come on
immediately after refuelling, water has probably been poured into the tank: switch the engine off immediately and contact a Fiat Dealership.
19)Vehicle travel speed should always be adapted to the traffic and weather conditions, and must always comply with traffic regulations. The
engine can be stopped even if the DPF warning light is on: however, repeated interruptions of the regeneration process could cause
premature deterioration of the engine oil. For this reason it is always advisable to wait for the symbol to go off before turning off the engine,
following the instructions above. It is not advisable to complete DPF regeneration with the vehicle stationary.
58
KNOWING THE INSTRUMENT PANEL
15-12-2014 8:23 Pagina 58
Page 101 of 240

STARTING AND DRIVING
Let’s get to the "heart" of the vehicle:
seeing how you can exploit all of its
potential to the full.
We’ll look at how to drive it safely in any
situation, so that it can be a welcome
companion, with our comfort and
our wallets in mind.STARTING THE ENGINE .................100
ELECTRIC PARKING BRAKE (EPB).101
MANUAL GEARBOX .......................10
AUTOMATIC TRANSMISSION.........10
START&STOP SYSTEM ..................107
SPEED LIMITER ..............................108
ELECTRONIC CRUISE CONTROL ..109
MOOD SELECTOR (DRIVING
MODE SELECTOR) .........................110
PARK ASSIST SYSTEM ..................112
LANE ASSIST SYSTEM (LANE
CROSSING WARNING) ...................114
REAR VIEW CAMERA .....................116
TOWING TRAILERS ........................117
REFUELLING THE VEHICLE ...........119
99
15-12-2014 8:23 Pagina 99
5 4
Page 121 of 240

REFUELLING THE
VEHICLE
122) 123) 124)
PETROL ENGINESOnly use unleaded petrol with a number
of octanes (R.O.N.) not lower than 95
(EN 228 specification).DIESEL ENGINES
50)
Only use Diesel for motor vehicles (EN
590 specification).
When using or parking the vehicle for a
long time in the mountains or cold
areas, it is advisable to refuel using
locally available diesel. In this case, it is
also advisable to keep the tank over
50% full.REFUELLING
PROCEDURE"Capless Fuel" is a device at the
opening for the fuel tank which opens
and recloses automatically when the
fuel supply gun is introduced/removed.
The "Capless Fuel" device is provided
with an inhibitor which prevents
refuelling with incorrect fuel.
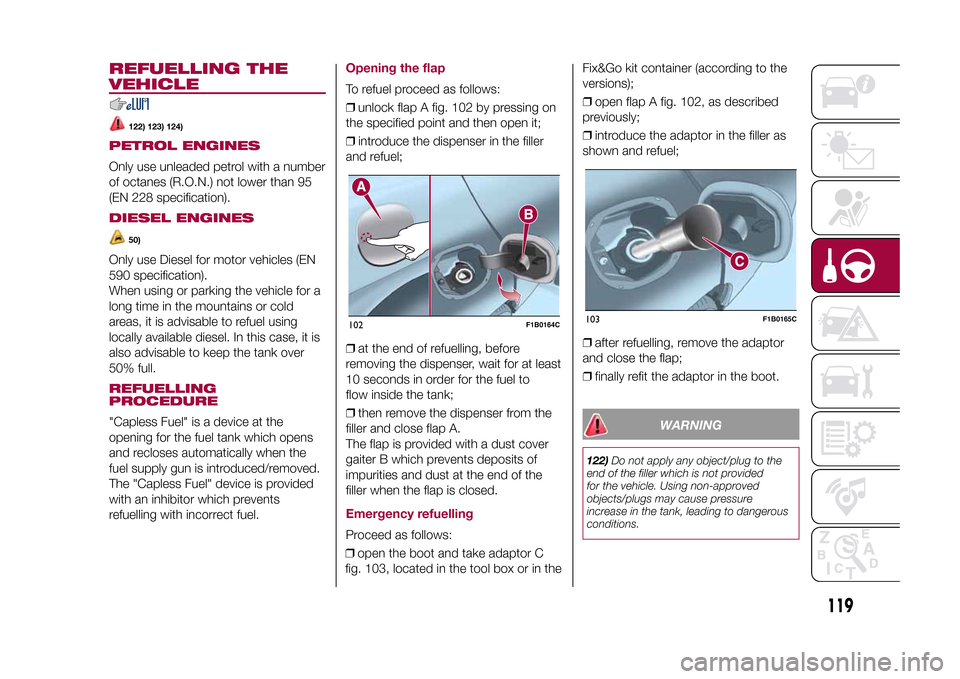
Opening the flapTo refuel proceed as follows:
❒unlock flap A fig. 102 by pressing on
the specified point and then open it;
❒introduce the dispenser in the filler
and refuel;
❒at the end of refuelling, before
removing the dispenser, wait for at least
10 seconds in order for the fuel to
flow inside the tank;
❒then remove the dispenser from the
filler and close flap A.
The flap is provided with a dust cover
gaiter B which prevents deposits of
impurities and dust at the end of the
filler when the flap is closed.Emergency refuellingProceed as follows:
❒open the boot and take adaptor C
fig. 103, located in the tool box or in theFix&Go kit container (according to the
versions);
❒open flap A fig. 102, as described
previously;
❒introduce the adaptor in the filler as
shown and refuel;
❒after refuelling, remove the adaptor
and close the flap;
❒finally refit the adaptor in the boot.
WARNING
122)Do not apply any object/plug to the
end of the filler which is not provided
for the vehicle. Using non-approved
objects/plugs may cause pressure
increase in the tank, leading to dangerous
conditions.
102
F1B0164C
103
F1B0165C
119
15-12-2014 8:23 Pagina 119
Page 135 of 240

CHANGING A WHEELJACKPlease note that:
❒the weight of the jack is 2.8 kg;
❒The jack requires no adjustment;
❒the jack cannot be repaired and in
the event of a fault it must be replaced
by another original one;
❒No tool other than its cranking device
may be fitted on the jack.CHANGING PROCEDURE
132) 133) 134) 135) 136) 137) 138) 139)
Proceed as follows:
❒stop the vehicle in a position that is
not dangerous for oncoming traffic
where you can change the wheel safely.
The ground should be flat if possible,
and sufficiently firm;
❒stop the engine, engage the hazard
warning lights and the electric parking
brake;
❒engage first gear or reverse or, for
versions with automatic transmission,
move the lever to position P (Park);
❒wear the reflective safety jacket
(compulsory by law in certain countries)
before getting out of the vehicle;❒open the boot and position the
reconfigurable load platform in
an inclined position (see "Boot" in the
"Knowing your vehicle" chapter);
❒take the tool bag provided, which is
secured to the boot cover with specific
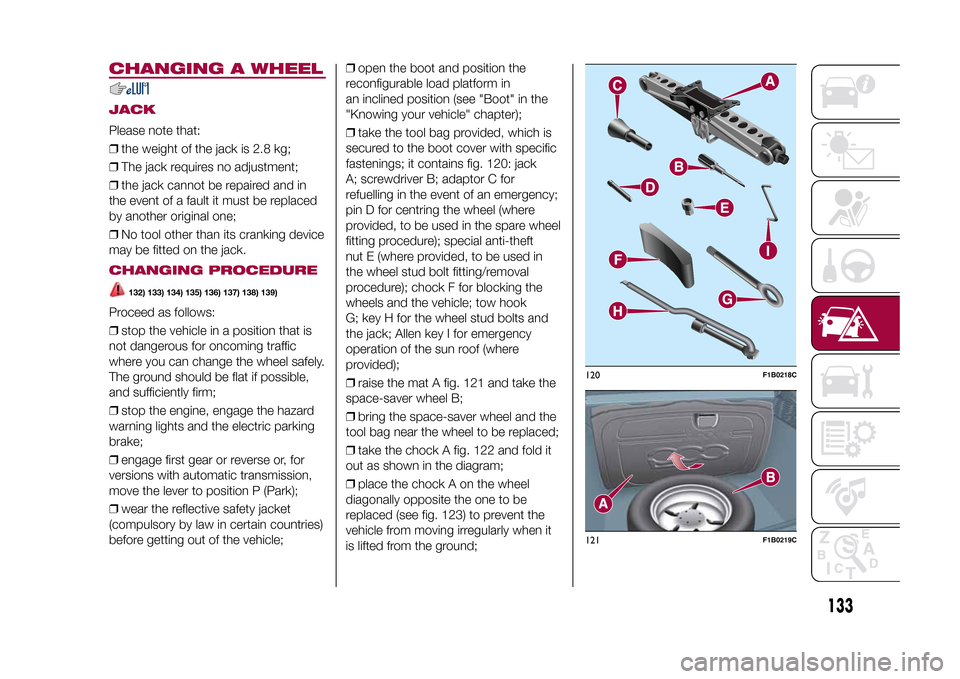
fastenings; it contains fig. 120: jack
A; screwdriver B; adaptor C for
refuelling in the event of an emergency;
pin D for centring the wheel (where
provided, to be used in the spare wheel
fitting procedure); special anti-theft
nut E (where provided, to be used in
the wheel stud bolt fitting/removal
procedure); chock F for blocking the
wheels and the vehicle; tow hook
G; key H for the wheel stud bolts and
the jack; Allen key I for emergency
operation of the sun roof (where
provided);
❒raise the mat A fig. 121 and take the
space-saver wheel B;
❒bring the space-saver wheel and the
tool bag near the wheel to be replaced;
❒take the chock A fig. 122 and fold it
out as shown in the diagram;
❒place the chock A on the wheel
diagonally opposite the one to be
replaced (see fig. 123) to prevent the
vehicle from moving irregularly when it
is lifted from the ground;
120
F1B0218C
121
F1B0219C
133
15-12-2014 8:23 Pagina 133
Page 138 of 240

137)The jack is a tool developed and
designed only for changing a wheel, if a
tyre gets punctured or damaged, on the
vehicle with which it is supplied or on other
vehicles of the same model. It must not
be used, for example, to jack other vehicle
models or objects. Never use the jack to
carry out maintenance or repairs under the
vehicle. Never position yourself under a
jacked vehicle. Should it be necessary to
work under the vehicle, contact a Fiat
Dealership. Incorrectly positioning the jack
may cause the vehicle to fall: use it only
in the positions indicated. Do not use the
jack for loads higher than the one shown
on its label.
138)The space-saver wheel cannot be
fitted with snow chains. If a front (drive) tyre
is punctured and chains are needed, use
a standard wheel from the rear axle and
install the space-saver wheel on the rear
axle. In this way, with two normal drive
wheels at the front axle, it is possible to use
snow chains (this instruction is also valid
for 4x4 versions).
139)Never tamper with the inflation valve.
Never introduce tools of any kind between
the rim and the tyre. Check tyre and
space-saver wheel pressures regularly,
complying with the values given in the
"Technical specifications" chapter.
FIX&GO AUTOMATIC
KIT(where provided)DESCRIPTION
140) 141) 142) 143) 144) 145) 146) 147)54)3)
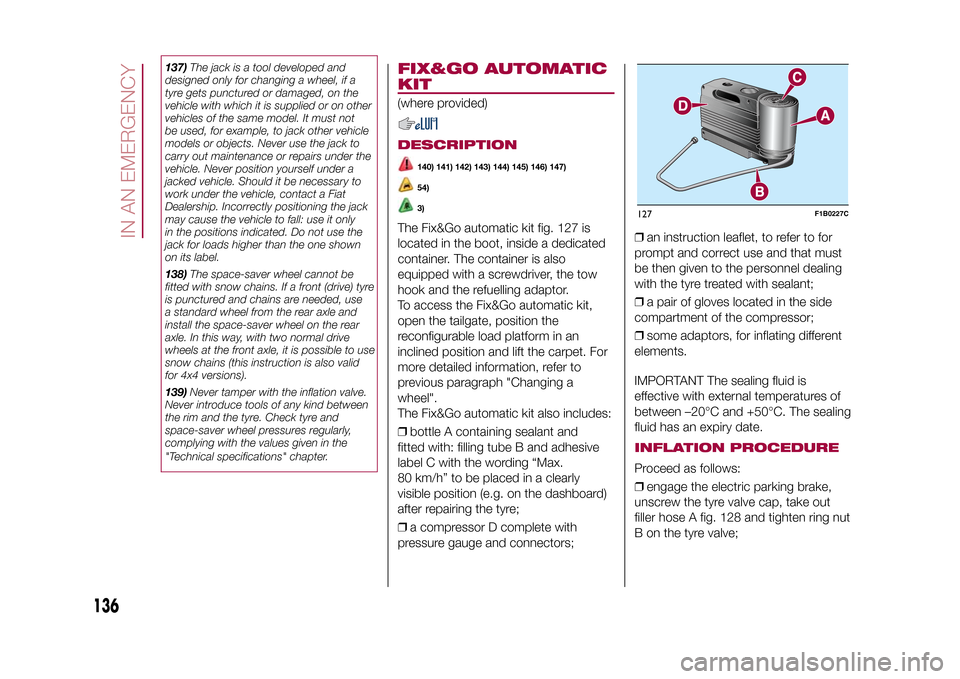
The Fix&Go automatic kit fig. 127 is
located in the boot, inside a dedicated
container. The container is also
equipped with a screwdriver, the tow
hook and the refuelling adaptor.
To access the Fix&Go automatic kit,
open the tailgate, position the
reconfigurable load platform in an
inclined position and lift the carpet. For
more detailed information, refer to
previous paragraph "Changing a
wheel".
The Fix&Go automatic kit also includes:
❒bottle A containing sealant and
fitted with: filling tube B and adhesive
label C with the wording “Max.
80 km/h” to be placed in a clearly
visible position (e.g. on the dashboard)
after repairing the tyre;
❒a compressor D complete with
pressure gauge and connectors;❒an instruction leaflet, to refer to for
prompt and correct use and that must
be then given to the personnel dealing
with the tyre treated with sealant;
❒a pair of gloves located in the side
compartment of the compressor;
❒some adaptors, for inflating different
elements.
IMPORTANT The sealing fluid is
effective with external temperatures of
between –20°C and +50°C. The sealing
fluid has an expiry date.
INFLATION PROCEDUREProceed as follows:
❒engage the electric parking brake,
unscrew the tyre valve cap, take out
filler hose A fig. 128 and tighten ring nut
B on the tyre valve;127
F1B0227C
136
IN AN EMERGENCY
15-12-2014 8:23 Pagina 136
Page 141 of 240

❒connect one end of the cable used
for negative (–) to the negative terminal
(–) of the auxiliary battery;
❒Connect the other end of the cable
used for negative (–) to an engine earth
(a visible metal part of the engine
or gearbox/transmission of the vehicle
with flat battery) away from the battery
and the fuel injection system;
❒start the vehicle engine with the
auxiliary battery, let it run for a
few minutes at idling. Start the engine
of the vehicle with flat battery.
Cable disconnection.Once the engine is started, remove the
leads, reversing the order above.
If after a few attempts the engine does
not start, do not persist but contact
a Fiat Dealership.If it is often necessary to perform an
emergency starting, have the vehicle
battery and the recharging system
checked by a Fiat Dealership.
IMPORTANT Any accessories (e.g.
mobile phones, etc.) connected to the
vehicle power sockets, draw current
even if they are not used. These
devices, if left connected too much time
with engine off, may cause the battery
to drain with following reduction of
its life and/or failure to start the engine.
WARNING
148)Before opening the bonnet, make
sure that the engine is off and that the
ignition key is in the STOP position. Follow
the indications on the plate underneath
the bonnet. We recommend that you
remove the key from the ignition if other
people remain in the vehicle. The vehicle
should always be left after the key has
been removed or turned to the STOP
position. During refuelling, make sure that
the engine is off (and that the ignition key is
in the STOP position).
149)Do not get too close to the radiator
cooling fan: the electric fan may start;
danger of injury. Scarves, ties and other
loose clothing may be pulled by moving
parts.150)Remove any metal objects (e.g. rings,
watches, bracelets), that might cause an
accidental electrical contact and cause
serious injury.
151)Batteries contain acid which may burn
skin and eyes. Batteries produce
hydrogen, which is easily flammable and
explosive. Therefore, keep away flames or
devices which may cause sparks.
WARNING
55)Never use a fast battery-charger to
start the engine as this could damage the
electronic systems of your vehicle,
particularly the ignition and fuel supply
control units.
56)Do not connect the cable to the
negative terminal (–) of the flat battery. The
following spark could lead to battery
explosion and cause serious harm. Only
use the specific earth point; do not use any
other exposed metallic part.
129
F1B0217C
139
15-12-2014 8:23 Pagina 139
Page 237 of 240

Fuel consumption .......................... 186
Fuel cut-off system......................... 140
Full Brake Control (system) ............. 68
Fuse boxes .................................... 128
Fuses (replacement) ....................... 128G
SI (Gear Shift Indicator)............... 41
H
azard warning lights ................... 122
– Emergency braking ................... 122
Headlight alignment adjustment ..... 23
Headlight alignment corrector ........ 23
Headlights (cleaning) ...................... 169
Head restraints............................... 18
Heated steering wheel.................... 19
Heavy-duty use of the vehicle
(scheduled servicing) .................... 155
HHC (system)................................. 63
Identification data
– chassis marking ........................ 173
– engine marking.......................... 173
– VIN plate ................................... 173
Ignition device ................................ 9
Ignition key emergency removal
(automatic transmission)............... 141
Important information and
recommendations ........................ 226
Interior lights .................................. 24
Interiors (cleaning) .......................... 170
i-Size child restraint systems .......... 86ISOFIX child restraint system
(installation) .................................. 84
iTPMS (indirect Tyre Pressure
Monitoring System) ...................... 72
Jump starting ................................ 138K
eyless Entry (system) .................. 13
Keys
– electronic key ............................ 8
– key with remote control ............. 8
Lane Assist system ....................... 114
Lane Change ................................. 23
Lifting the vehicle ........................... 167
Light switch.................................... 21M
ain beam headlights .................. 22
Main beam headlights
– Automatic main beam
headlights ................................. 23
Main menu ..................................... 42
Manual climate control system ....... 27
Manual gearbox ............................. 104
Mood Selector ............................... 110
N
umber plate lights (bulb
replacement) ................................ 127
O
ccupant protection systems ....... 75
P
aintwork (cleaning and
maintenance) ............................... 168
Park Assist (system) ....................... 112
Parking lights ................................. 22
PBA (system) ................................. 63Performance (top speed) ................ 186
Periodic checks (scheduled
servicing)...................................... 155
Prescriptions for handling the
vehicle at the end of its life ........... 189
Pretensioners ................................. 79
– Load limiters.............................. 79
R
ain sensor .................................. 25
RCP system ................................... 67
Rear direction indicators (bulb
replacement) ................................ 126
Rear seats...................................... 17
Rear side lights (bulb
replacement) ................................ 126
Rear view camera .......................... 116
Rear View Camera ......................... 116
Rear view mirrors ........................... 20
Rear window washer
– windscreen/rear window
washing fluid level ..................... 160
Rear window wiper
– blade replacement..................... 165
Rear window wiper/washer ............ 26
Reconfigurable load platform.......... 36
Refuelling procedure ...................... 119
– Emergency refuelling ................. 119
Refuelling the vehicle ...................... 119
Replacing a bulb ............................ 122
Replacing an external bulb ............. 125
Rims and tyres (dimensions)........... 176
S
BR (Seat Belt Reminder) ............. 77