2015 FIAT 500X ignition
[x] Cancel search: ignitionPage 110 of 240

System deactivationA message will appear on the display
when the system is deactivated. In this
condition, the LED on the fig. 93 button
is on.SAFETY FUNCTIONSWhen the engine is stopped through
the Start&Stop system, if the driver
releases their seat belt or opens the
driver's or passenger's door, the engine
can be restarted only by using the
ignition device.
This condition is indicated to the driver
both through a buzzer and a message
on the display.
WARNING
114)If the battery needs to be replaced,
always contact a Fiat Dealership. Replace
the battery using a new one of the same
type (HEAVY DUTY) and having the same
specifications.
WARNING
40)If the climate comfort is to be favoured,
the Start&Stop system can be deactivated,
for a continuous operation of the climate
control system.
SPEED LIMITERDESCRIPTIONThis device allows the speed of the
vehicle to be limited to values which
can be set by the driver.
The maximum speed can be set both
with vehicle stationary and in motion.
The minimum speed that can be set is
30 km/h.
When the device is active, the vehicle
speed depends on the pressure at
the accelerator pedal, until the
programmed speed limit is reached
(see "Speed limit programming"
paragraph).ACTIVATING THE DEVICETo activate the device press button A
fig. 94 on the steering wheel.
AUTOMATIC
DEACTIVATION OF THE
DEVICEThe device deactivates automatically in
the event of fault in the system. In this
case, contact a Fiat Dealership.
94
F1B0141C
108
STARTING AND DRIVING
15-12-2014 8:23 Pagina 108
Page 112 of 240

DEACTIVATING THE
DEVICELightly pressing the brake pedal or
pressing the CANC button deactivates
the electronic Cruise Control without
deleting the stored speed.DEACTIVATING THE
DEVICEThe electronic Cruise Control is
deactivated by pressing button A fig. 95
or bringing the ignition device to STOP.
WARNING
115)While travelling with the device
activated, do not move the gear lever to
neutral.
116)In the event of device faults or failures,
go to a Fiat Dealership.
117)The electronic Cruise Control can be
dangerous if the system cannot keep a
constant speed. In specific conditions
speed may be excessive, resulting in the
risk of losing control of the vehicle and
causing accidents. Do not use the device
in heavy traffic or on winding, icy, snowy or
slippery roads.
MOOD SELECTOR
(driving mode
selector)The Mood Selector is a device that
allows the driver to select three different
driving modes (vehicle response)
according to their needs and to the
road and traffic conditions, by manually
adjusting the central tunnel knob ring
nut A fig. 96.- "Auto" mode- "Traction" mode (4x4 or 4x2 versions
depending on the trim level)- "All Weather" mode (only 4x2 versions
depending on the trim level)- "Sport" mode.The device, through the on-board
electronic system, operates on the
vehicle's dynamic control systems:
engine, steering, ESC system, 4x4
system (if available), gearbox/
transmission, and is interfaced with the
instrument panel.
The rotating ring nut is monostable
type. In other words, it always returns
to the central position when released.
The acceptance by the system of
the requested driving mode is signalled
by the LED, located besides the
symbol, coming on, and by the
corresponding symbol appearing on the
instrument panel display.
When the engine is started the system
normally stays in the driving mode
that was active before switching off; for
versions/markets where provided the
system always sets itself to "Auto"
mode at start-up.
96
F1B0044C
110
STARTING AND DRIVING
15-12-2014 8:23 Pagina 110
Page 134 of 240

BOOT FUSE BOXNOTE The configuration of the boot may vary in accordance with the equipment on the vehicle.Fuse box BUSERSFUSE AMPEREHI-FI system F2 20
Electric sun roof F3 20
Front seat electric lumbar adjustment (driver guide) F4 7.5
Electric front seat adjustment (driver side) F5 30
Electric front seat adjustment (driver side and passenger side) F6 7.5
Electric front seat lumbar adjustment (driver side and passenger
side)F7 30
WARNING
128)If the fuse blows again contact a Fiat Dealership.
129)Never replace a fuse with another with a higher amp rating; DANGER OF FIRE
130)If a fuse NOT described on this page and on the previous one blows, contact a Fiat Dealership.
131)Before replacing a fuse, make sure that the ignition device has been taken to STOP, that the ignition key, if mechanical, has been
removed and that all the other devices are switched off and/or deactivated.
WARNING
52)Never replace a blown fuse with metal wires or other material.
53)If it is necessary to wash the engine compartment, take care not to directly hit the fuse box and the window wiper motor with the water
jet.
132
IN AN EMERGENCY
15-12-2014 8:23 Pagina 132
Page 140 of 240

WARNING
54)In the event of a puncture caused by
foreign bodies, the kit may be used to
repair tyres showing damage on the tread
or shoulder up to max. 4 mm diameter.
WARNING
3)Dispose of the bottle and the sealant
properly. Dispose of the components
in compliance with national and local
regulations.
EMERGENCY
STARTING
55)
If the battery is flat, a jump starting can
be performed using the battery and
the cables of another vehicle, or using
an auxiliary battery. In all cases, the
battery used must have a capacity
equal to or a little higher than the flat
one.IMPORTANTDo not use an auxiliary battery or any
other source of external supply with
a voltage above 12 V: the battery, the
starter, the alternator and the electrical
system of the vehicle could be
damaged.
Do not attempt jump starting if the
battery is frozen. The battery could
break and explode!JUMP STARTINGThe vehicle battery is located in the
engine compartment, behind the left
light cluster.
148) 149) 150) 151)
IMPORTANT The positive terminal (+) of
the battery is shielded by a protective
element. Raise it to access the terminal.Proceed as follows:
❒operate the parking brake, move the
lever to P (Park), for versions equipped
with automatic transmission, or neutral,
for versions with manual gearbox,
then set the ignition device to STOP;
❒switch off all the other electrical
appliances in the vehicle;
❒should you be using the battery of
another vehicle, park the other vehicle
within the range of the cables used
for the connection, operate the parking
brake and ensure that its ignition is
off.
IMPORTANT If the procedure below is
carried out incorrectly, it can cause
severe injury to people or damage the
recharging system of one or both
vehicles. Carefully follow the
instructions given below.
Cable connection
56)
Proceed as follows to carry out bump
starting fig. 129:
❒connect one end of the cable used
for positive (+) to the positive terminal
(+) of the vehicle with flat battery;
❒connect the other end of the cable
used for positive (+) to the positive
terminal (+) of the auxiliary battery;
138
IN AN EMERGENCY
15-12-2014 8:23 Pagina 138
Page 141 of 240

❒connect one end of the cable used
for negative (–) to the negative terminal
(–) of the auxiliary battery;
❒Connect the other end of the cable
used for negative (–) to an engine earth
(a visible metal part of the engine
or gearbox/transmission of the vehicle
with flat battery) away from the battery
and the fuel injection system;
❒start the vehicle engine with the
auxiliary battery, let it run for a
few minutes at idling. Start the engine
of the vehicle with flat battery.
Cable disconnection.Once the engine is started, remove the
leads, reversing the order above.
If after a few attempts the engine does
not start, do not persist but contact
a Fiat Dealership.If it is often necessary to perform an
emergency starting, have the vehicle
battery and the recharging system
checked by a Fiat Dealership.
IMPORTANT Any accessories (e.g.
mobile phones, etc.) connected to the
vehicle power sockets, draw current
even if they are not used. These
devices, if left connected too much time
with engine off, may cause the battery
to drain with following reduction of
its life and/or failure to start the engine.
WARNING
148)Before opening the bonnet, make
sure that the engine is off and that the
ignition key is in the STOP position. Follow
the indications on the plate underneath
the bonnet. We recommend that you
remove the key from the ignition if other
people remain in the vehicle. The vehicle
should always be left after the key has
been removed or turned to the STOP
position. During refuelling, make sure that
the engine is off (and that the ignition key is
in the STOP position).
149)Do not get too close to the radiator
cooling fan: the electric fan may start;
danger of injury. Scarves, ties and other
loose clothing may be pulled by moving
parts.150)Remove any metal objects (e.g. rings,
watches, bracelets), that might cause an
accidental electrical contact and cause
serious injury.
151)Batteries contain acid which may burn
skin and eyes. Batteries produce
hydrogen, which is easily flammable and
explosive. Therefore, keep away flames or
devices which may cause sparks.
WARNING
55)Never use a fast battery-charger to
start the engine as this could damage the
electronic systems of your vehicle,
particularly the ignition and fuel supply
control units.
56)Do not connect the cable to the
negative terminal (–) of the flat battery. The
following spark could lead to battery
explosion and cause serious harm. Only
use the specific earth point; do not use any
other exposed metallic part.
129
F1B0217C
139
15-12-2014 8:23 Pagina 139
Page 142 of 240

FUEL CUT-OFF
SYSTEMDESCRIPTIONThis intervenes in the case of an impact
causing:
❒the interruption of the fuel supply with
the engine consequently switching off;
❒the automatic unlocking of the doors;
❒turning on of the lights inside the
vehicle;
❒deactivation of climate control system
ventilation;
❒switching on of the hazard warning
lights (to deactivate the lights press the
button on the dashboard).
On some versions, the intervention of
the system is indicated by a message
shown on the display. In the same way,
a dedicated message on the display
warns the driver if system operation is
compromised.
IMPORTANT Carefully check the vehicle
for fuel leaks, for instance in the engine
compartment, under the vehicle or
near the tank area. After a collision,
bring the ignition device to STOP to
prevent the battery from running down.
FUEL CUT-OFF SYSTEM
RESETTo restore correct operation of the
vehicle, carry out the following
procedure (this procedure must be
started and completed within less than
1 minute):
152)
Operations to be carried out
With direction indicator lever in neutral
position, bring the ignition device to STOP
Bring the ignition device to MAR
Activate the right direction indicator
Activate the left direction indicator
Activate the right direction indicator
Activate the left direction indicator
Deactivate the left direction indicator
Bring the ignition device to STOP
Bring the ignition device to MAR
WARNING
152)If, after an impact, you smell fuel or
notice leaks from the fuel system, do
not reactivate the system to avoid the risk
of fire.
AUTOMATIC
TRANSMISSION
GEAR LEVER
UNLOCKINGIn the event of a fault, to move the gear
lever from P (Park), proceed as follows:
❒stop the engine;
❒engage the electric parking brake;
❒working carefully in the point
indicated by the arrow, remove the trim
A fig. 130 (complete with gaiter) lifting
it upwards (see also fig. 131);130
F1B0028C
131
F1B0055C
140
IN AN EMERGENCY
15-12-2014 8:23 Pagina 140
Page 143 of 240

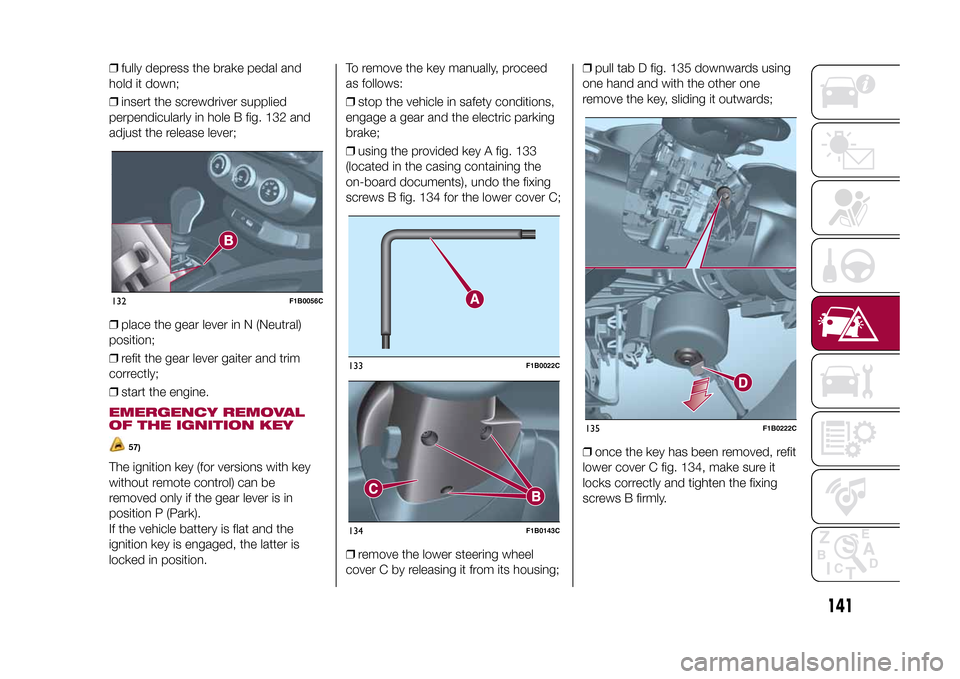
❒fully depress the brake pedal and
hold it down;
❒insert the screwdriver supplied
perpendicularly in hole B fig. 132 and
adjust the release lever;
❒place the gear lever in N (Neutral)
position;
❒refit the gear lever gaiter and trim
correctly;
❒start the engine.EMERGENCY REMOVAL
OF THE IGNITION KEY
57)
The ignition key (for versions with key
without remote control) can be
removed only if the gear lever is in
position P (Park).
If the vehicle battery is flat and the
ignition key is engaged, the latter is
locked in position.To remove the key manually, proceed
as follows:
❒stop the vehicle in safety conditions,
engage a gear and the electric parking
brake;
❒using the provided key A fig. 133
(located in the casing containing the
on-board documents), undo the fixing
screws B fig. 134 for the lower cover C;
❒remove the lower steering wheel
cover C by releasing it from its housing;❒pull tab D fig. 135 downwards using
one hand and with the other one
remove the key, sliding it outwards;
❒once the key has been removed, refit
lower cover C fig. 134, make sure it
locks correctly and tighten the fixing
screws B firmly.132
F1B0056C
133
F1B0022C
134
F1B0143C
135
F1B0222C
141
15-12-2014 8:23 Pagina 141
Page 144 of 240

WARNING
57)It is advisable to contact a Fiat
Dealership to have the refitting procedure
carried out. If you would like to proceed
autonomously, special attention must
be paid to the correct coupling of
the retaining clips. Otherwise, noise might
be heard due to an incorrect fastening
of the lower cover with the upper cover.
TOWING THE
VEHICLEATTACHING THE TOW
HOOK
153) 154) 155)
The tow hook provided is located in the
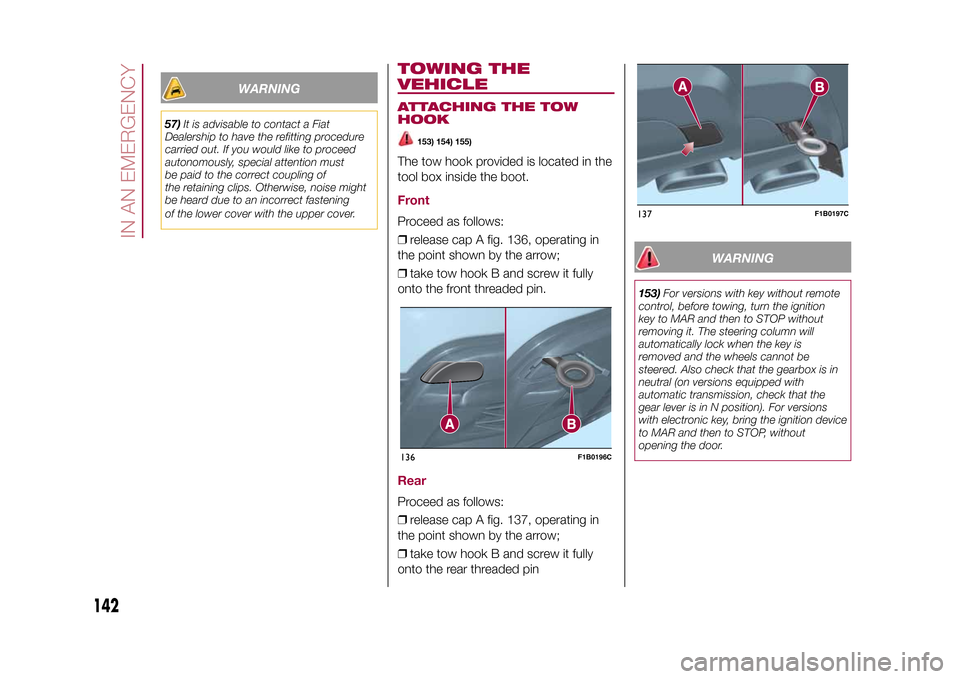
tool box inside the boot.FrontProceed as follows:
❒release cap A fig. 136, operating in
the point shown by the arrow;
❒take tow hook B and screw it fully
onto the front threaded pin.RearProceed as follows:
❒release cap A fig. 137, operating in
the point shown by the arrow;
❒take tow hook B and screw it fully
onto the rear threaded pin
WARNING
153)For versions with key without remote
control, before towing, turn the ignition
key to MAR and then to STOP without
removing it. The steering column will
automatically lock when the key is
removed and the wheels cannot be
steered. Also check that the gearbox is in
neutral (on versions equipped with
automatic transmission, check that the
gear lever is in N position). For versions
with electronic key, bring the ignition device
to MAR and then to STOP, without
opening the door.
136
F1B0196C
137
F1B0197C
142
IN AN EMERGENCY
15-12-2014 8:23 Pagina 142