2015 FIAT 500X tow
[x] Cancel search: towPage 135 of 240
CHANGING A WHEELJACKPlease note that:
❒the weight of the jack is 2.8 kg;
❒The jack requires no adjustment;
❒the jack cannot be repaired and in
the event of a fault it must be replaced
by another original one;
❒No tool other than its cranking device
may be fitted on the jack.CHANGING PROCEDURE
132) 133) 134) 135) 136) 137) 138) 139)
Proceed as follows:
❒stop the vehicle in a position that is
not dangerous for oncoming traffic
where you can change the wheel safely.
The ground should be flat if possible,
and sufficiently firm;
❒stop the engine, engage the hazard
warning lights and the electric parking
brake;
❒engage first gear or reverse or, for
versions with automatic transmission,
move the lever to position P (Park);
❒wear the reflective safety jacket
(compulsory by law in certain countries)
before getting out of the vehicle;❒open the boot and position the
reconfigurable load platform in
an inclined position (see "Boot" in the
"Knowing your vehicle" chapter);
❒take the tool bag provided, which is
secured to the boot cover with specific
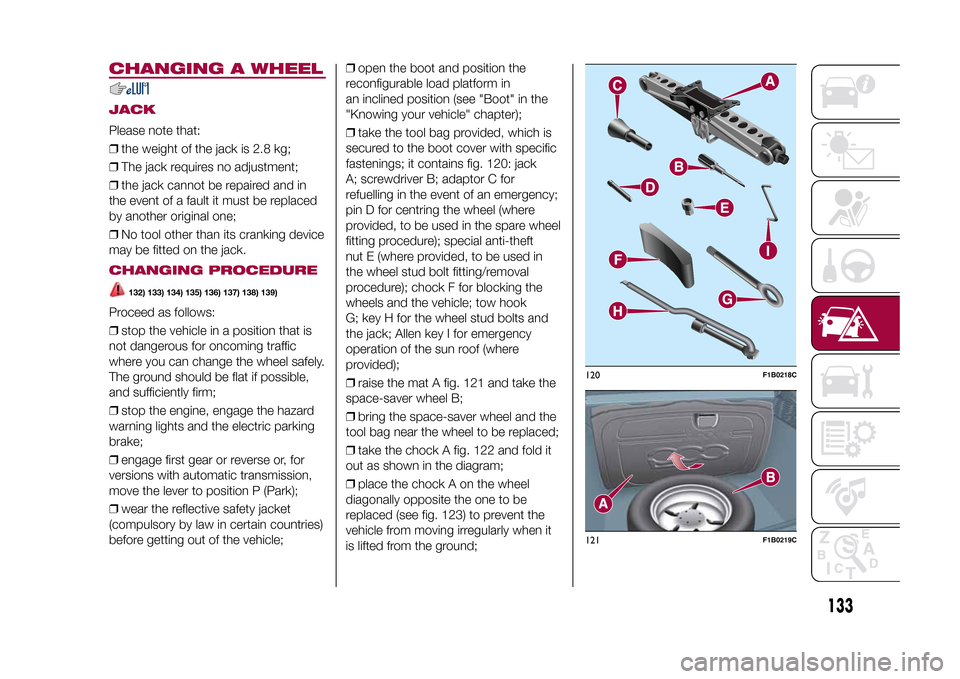
fastenings; it contains fig. 120: jack
A; screwdriver B; adaptor C for
refuelling in the event of an emergency;
pin D for centring the wheel (where
provided, to be used in the spare wheel
fitting procedure); special anti-theft
nut E (where provided, to be used in
the wheel stud bolt fitting/removal
procedure); chock F for blocking the
wheels and the vehicle; tow hook
G; key H for the wheel stud bolts and
the jack; Allen key I for emergency
operation of the sun roof (where
provided);
❒raise the mat A fig. 121 and take the
space-saver wheel B;
❒bring the space-saver wheel and the
tool bag near the wheel to be replaced;
❒take the chock A fig. 122 and fold it
out as shown in the diagram;
❒place the chock A on the wheel
diagonally opposite the one to be
replaced (see fig. 123) to prevent the
vehicle from moving irregularly when it
is lifted from the ground;
120
F1B0218C
121
F1B0219C
133
15-12-2014 8:23 Pagina 133
Page 138 of 240
137)The jack is a tool developed and
designed only for changing a wheel, if a
tyre gets punctured or damaged, on the
vehicle with which it is supplied or on other
vehicles of the same model. It must not
be used, for example, to jack other vehicle
models or objects. Never use the jack to
carry out maintenance or repairs under the
vehicle. Never position yourself under a
jacked vehicle. Should it be necessary to
work under the vehicle, contact a Fiat
Dealership. Incorrectly positioning the jack
may cause the vehicle to fall: use it only
in the positions indicated. Do not use the
jack for loads higher than the one shown
on its label.
138)The space-saver wheel cannot be
fitted with snow chains. If a front (drive) tyre
is punctured and chains are needed, use
a standard wheel from the rear axle and
install the space-saver wheel on the rear
axle. In this way, with two normal drive
wheels at the front axle, it is possible to use
snow chains (this instruction is also valid
for 4x4 versions).
139)Never tamper with the inflation valve.
Never introduce tools of any kind between
the rim and the tyre. Check tyre and
space-saver wheel pressures regularly,
complying with the values given in the
"Technical specifications" chapter.
FIX&GO AUTOMATIC
KIT(where provided)DESCRIPTION
140) 141) 142) 143) 144) 145) 146) 147)54)3)
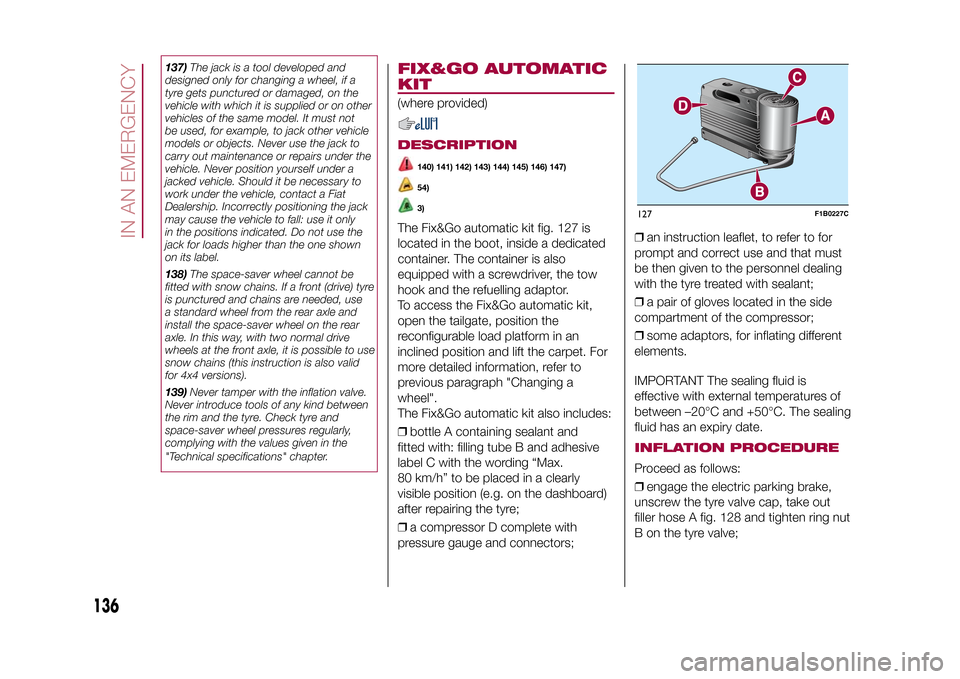
The Fix&Go automatic kit fig. 127 is
located in the boot, inside a dedicated
container. The container is also
equipped with a screwdriver, the tow
hook and the refuelling adaptor.
To access the Fix&Go automatic kit,
open the tailgate, position the
reconfigurable load platform in an
inclined position and lift the carpet. For
more detailed information, refer to
previous paragraph "Changing a
wheel".
The Fix&Go automatic kit also includes:
❒bottle A containing sealant and
fitted with: filling tube B and adhesive
label C with the wording “Max.
80 km/h” to be placed in a clearly
visible position (e.g. on the dashboard)
after repairing the tyre;
❒a compressor D complete with
pressure gauge and connectors;❒an instruction leaflet, to refer to for
prompt and correct use and that must
be then given to the personnel dealing
with the tyre treated with sealant;
❒a pair of gloves located in the side
compartment of the compressor;
❒some adaptors, for inflating different
elements.
IMPORTANT The sealing fluid is
effective with external temperatures of
between –20°C and +50°C. The sealing
fluid has an expiry date.
INFLATION PROCEDUREProceed as follows:
❒engage the electric parking brake,
unscrew the tyre valve cap, take out
filler hose A fig. 128 and tighten ring nut
B on the tyre valve;127
F1B0227C
136
IN AN EMERGENCY
15-12-2014 8:23 Pagina 136
Page 144 of 240
WARNING
57)It is advisable to contact a Fiat
Dealership to have the refitting procedure
carried out. If you would like to proceed
autonomously, special attention must
be paid to the correct coupling of
the retaining clips. Otherwise, noise might
be heard due to an incorrect fastening
of the lower cover with the upper cover.
TOWING THE
VEHICLEATTACHING THE TOW
HOOK
153) 154) 155)
The tow hook provided is located in the
tool box inside the boot.FrontProceed as follows:
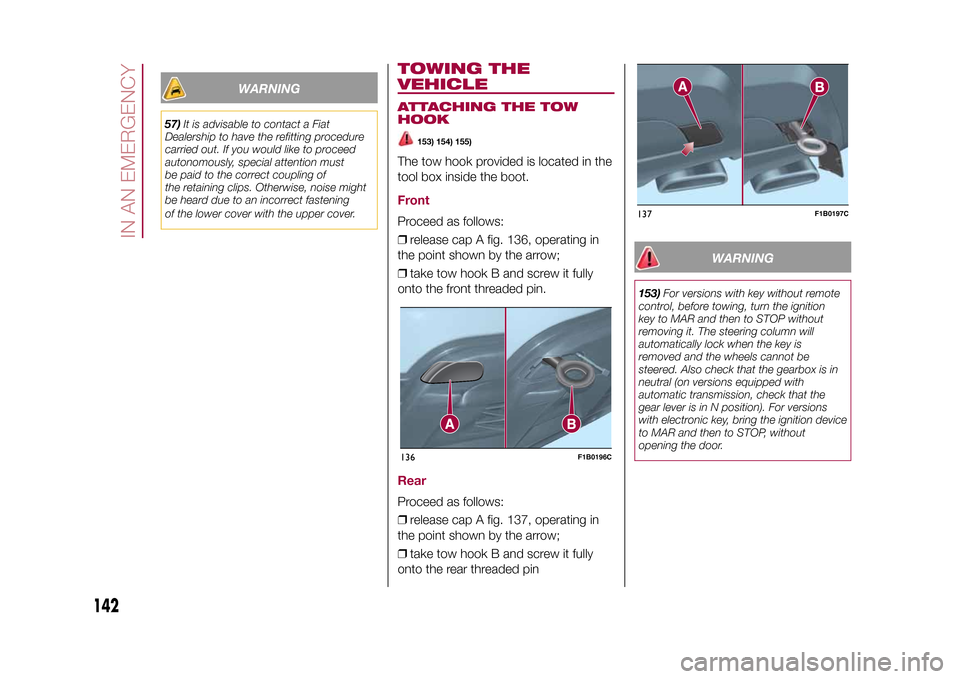
❒release cap A fig. 136, operating in
the point shown by the arrow;
❒take tow hook B and screw it fully
onto the front threaded pin.RearProceed as follows:
❒release cap A fig. 137, operating in
the point shown by the arrow;
❒take tow hook B and screw it fully
onto the rear threaded pin
WARNING
153)For versions with key without remote
control, before towing, turn the ignition
key to MAR and then to STOP without
removing it. The steering column will
automatically lock when the key is
removed and the wheels cannot be
steered. Also check that the gearbox is in
neutral (on versions equipped with
automatic transmission, check that the
gear lever is in N position). For versions
with electronic key, bring the ignition device
to MAR and then to STOP, without
opening the door.
136
F1B0196C
137
F1B0197C
142
IN AN EMERGENCY
15-12-2014 8:23 Pagina 142
Page 145 of 240
154)The brake servo and the
electromechanical power steering will not
work while the vehicle is being towed.
You will therefore need to apply more force
on the brake pedal and steering wheel.
Do not use flexible cables when towing,
and avoid jerky movements. While towing,
make sure that the trailer hitch does not
damage any components it is touching.
When towing the vehicle, you must comply
with all specific traffic regulations and
adopt an appropriate driving behaviour. Do
not start the engine while towing the
vehicle. Before tightening the ring, clean
the threaded housing thoroughly. Make
sure that the ring is fully fastened in the
housing before towing the vehicle.
155)The front and rear tow hooks should
be used only for emergencies on the road.
You are allowed to tow the vehicle for
short distances using an appropriate
device in accordance with the highway
code (a rigid bar), to move the vehicle on
the road in readiness for towing or
transport via a breakdown vehicle. Tow
hooks MUST NOT be used to tow vehicles
off the road or where there are obstacles
and/or for towing operations using ropes or
other non-rigid devices. Respecting the
above conditions, towing must take place
with two vehicles (one towing, the other
towed) aligned as much as possible along
the same centre line.
143
15-12-2014 8:23 Pagina 143
Page 147 of 240

SCHEDULED
SERVICINGCorrect servicing is crucial for
guaranteeing a long life for the vehicle
under the best conditions.
For this reason, Fiat has planned a
series of checks and services at fixed
distance intervals and, for versions/
markets, where provided, at fixed time
intervals, as described in the Scheduled
Servicing Plan.
Regardless of the above, it is always
necessary to carefully follow the
instructions in the Scheduled Servicing
Plan (e.g. periodically check level of
liquids, tyre pressure, etc.).
Scheduled Servicing is offered by all
Fiat Dealerships according to fixed time
or kilometres/miles intervals. If, during
each operation, in addition to the ones
scheduled, the need arises for further
replacements or repairs, these may
be carried out with your explicit
agreement only. If your vehicle is used
frequently for towing, the interval
between one service operation and the
next should be reduced.
IMPORTANTThe Scheduled Servicing services are
set out by the Manufacturer. Failure
to comply with the schedule may
invalidate the warranty.
It is advisable to inform a Fiat
Dealership of any small operating
irregularities without waiting for the next
service.
145
15-12-2014 8:23 Pagina 145
Page 150 of 240
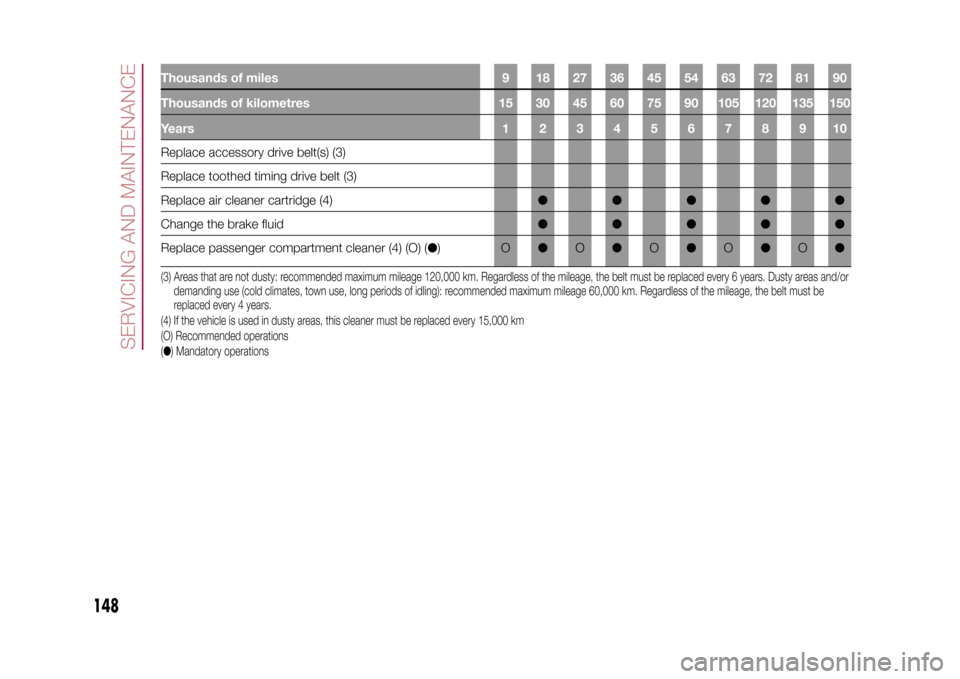
Thousands of miles 9 18 27 36 45 54 63 72 81 90
Thousands of kilometres 15 30 45 60 75 90 105 120 135 150
Years12345678910Replace accessory drive belt(s) (3)
Replace toothed timing drive belt (3)
Replace air cleaner cartridge (4)●●●●●
Change the brake fluid●●●●●
Replace passenger compartment cleaner (4) (O) (●)O●O●O●O●O●(3) Areas that are not dusty: recommended maximum mileage 120,000 km. Regardless of the mileage, the belt must be replaced every 6 years. Dusty areas and/or
demanding use (cold climates, town use, long periods of idling): recommended maximum mileage 60,000 km. Regardless of the mileage, the belt must be
replaced every 4 years.
(4) If the vehicle is used in dusty areas, this cleaner must be replaced every 15,000 km
(O) Recommended operations
(●) Mandatory operations
148
SERVICING AND MAINTENANCE
15-12-2014 8:23 Pagina 148
Page 155 of 240

Thousands of miles 12 24 36 48 60 72 84 96 108 120
Thousands of kilometres 20 40 60 80 100 120 140 160 180 200
Years12345678910Check operation of the wiper/washer system and adjust
jets, if necessary●●●●●
Check cleanliness of bonnet and boot locks, as well as
cleanliness and lubrication of linkages●●●●●
Visually inspect conditions and wear of front disc brake
pads and operation of pad wear indicator●●●●●●●●●●
Visually inspect conditions and wear of rear disc brake
pads and operation of pad wear indicator●●●●●●●●●●
Visual check of accessory drive belt(s) (versions without
automatic tensioner)●
Check tension of accessory drive belt (versions without
automatic tensioner)●●
Visually inspect conditions of toothed timing drive belt●●
Check drive transmission idler unit oil level (PTU) (4x4
versions)●●
Check rear differential oil level (4x4 versions)●●
Change engine oil and replace the oil filter (versions with
DPF) (2)(2) The actual interval for changing engine oil and replacing the engine oil filter depends on the vehicle usage conditions and is signalled by the warning light or
message in the instrument panel. In any case, it must never exceed 2 years. If the vehicle is mainly used in towns and cities, change the engine oil and filter
every year.
153
15-12-2014 8:23 Pagina 153
Page 156 of 240
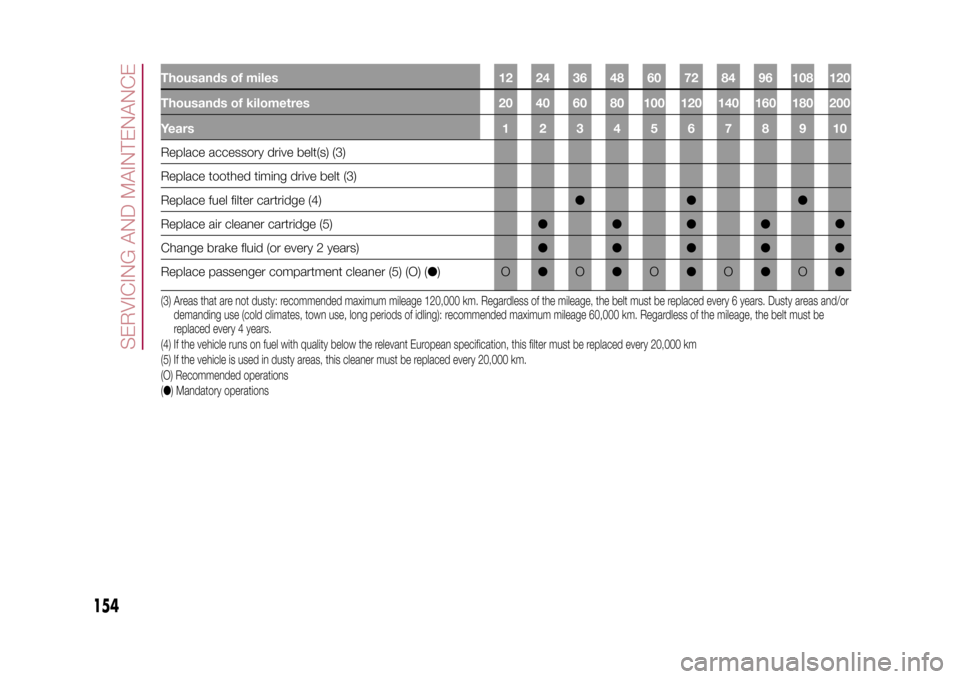
Thousands of miles 12 24 36 48 60 72 84 96 108 120
Thousands of kilometres 20 40 60 80 100 120 140 160 180 200
Years12345678910Replace accessory drive belt(s) (3)
Replace toothed timing drive belt (3)
Replace fuel filter cartridge (4)●●●
Replace air cleaner cartridge (5)●●●●
Change brake fluid (or every 2 years)●●●●●
Replace passenger compartment cleaner (5) (O) (●)O●O●O●O●O●(3) Areas that are not dusty: recommended maximum mileage 120,000 km. Regardless of the mileage, the belt must be replaced every 6 years. Dusty areas and/or
demanding use (cold climates, town use, long periods of idling): recommended maximum mileage 60,000 km. Regardless of the mileage, the belt must be
replaced every 4 years.
(4) If the vehicle runs on fuel with quality below the relevant European specification, this filter must be replaced every 20,000 km
(5) If the vehicle is used in dusty areas, this cleaner must be replaced every 20,000 km.
(O) Recommended operations
(●) Mandatory operations
154
SERVICING AND MAINTENANCE
15-12-2014 8:23 Pagina 154
●