2015 FIAT 500X automatic transmission
[x] Cancel search: automatic transmissionPage 108 of 240
IGNITION LOCK AND
PARK POSITIONVersions equipped with the Keyless
Go system: this function requires the
gear lever to be positioned at P (Park);
then bring the ignition device to STOP.
Versions equipped with key without
remote control: this function requires
the gear lever to be positioned at P
(Park) before extracting the key from
the ignition device.
If the vehicle battery is flat and the
ignition key is engaged, the latter is
locked in position.
To remove the key manually see
paragraph "Automatic transmission
lever unlock" in chapter "In an
emergency".GEAR ENGAGEMENT
DISABLING WITHOUT
BRAKE PEDAL PRESSEDThis system prevents you from moving
the gear lever from position P (Park) if
the brake pedal has not been previously
depressed.To bring the gear lever to a position
other than P (Park), the ignition device
must be in position MAR (engine on
or off) and the brake pedal must be
depressed. Button A fig. 91 on the gear
lever knob must also be pressed.
STEERING WHEEL
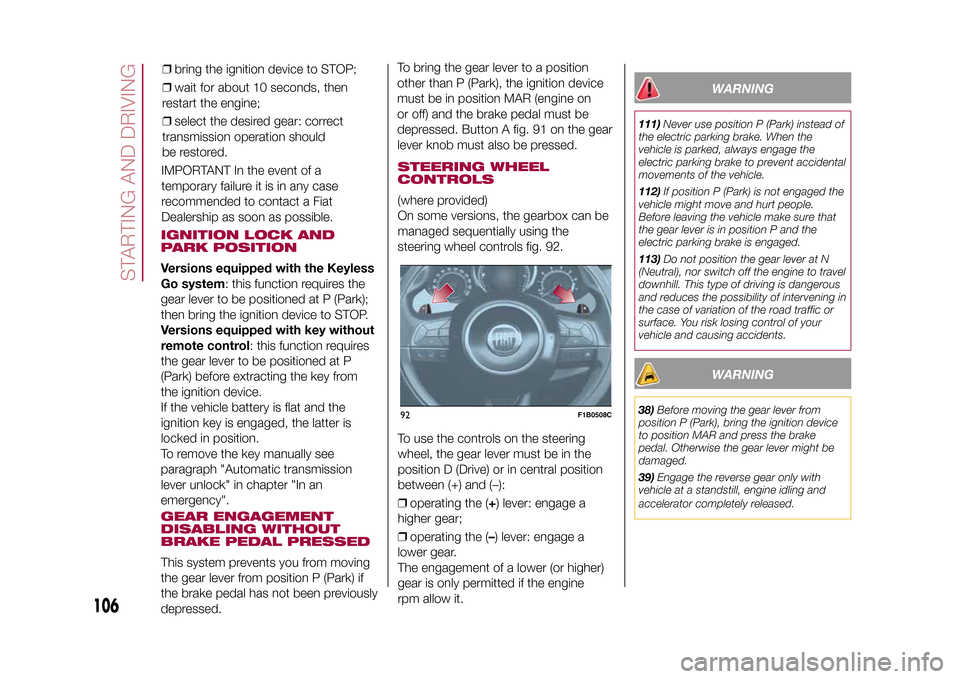
CONTROLS(where provided)
On some versions, the gearbox can be
managed sequentially using the
steering wheel controls fig. 92.
To use the controls on the steering
wheel, the gear lever must be in the
position D (Drive) or in central position
between (+) and (–):
❒operating the (+) lever: engage a
higher gear;
❒operating the (–) lever: engage a
lower gear.
The engagement of a lower (or higher)
gear is only permitted if the engine
rpm allow it.
WARNING
111)Never use position P (Park) instead of
the electric parking brake. When the
vehicle is parked, always engage the
electric parking brake to prevent accidental
movements of the vehicle.
112)If position P (Park) is not engaged the
vehicle might move and hurt people.
Before leaving the vehicle make sure that
the gear lever is in position P and the
electric parking brake is engaged.
113)Do not position the gear lever at N
(Neutral), nor switch off the engine to travel
downhill. This type of driving is dangerous
and reduces the possibility of intervening in
the case of variation of the road traffic or
surface. You risk losing control of your
vehicle and causing accidents.
WARNING
38)Before moving the gear lever from
position P (Park), bring the ignition device
to position MAR and press the brake
pedal. Otherwise the gear lever might be
damaged.
39)Engage the reverse gear only with
vehicle at a standstill, engine idling and
accelerator completely released.
92
F1B0508C
106
STARTING AND DRIVING
15-12-2014 8:23 Pagina 106
IMPORTANT In the event of a
temporary failure it is in any case
recommended to contact a Fiat
Dealership as soon as possible.❒bring the ignition device to STOP;
❒wait for about 10 seconds, then
restart the engine;
❒select the desired gear: correct
transmission operation should
be restored.
Page 109 of 240
START&STOP
SYSTEMThe Start&Stop system automatically
stops the engine each time the vehicle
is stationary and starts it again when
the driver wants to move off.
In this way, the vehicle efficiency is
increased, by reducing consumption,
dangerous gas emissions and noise
pollution.
114)40)
OPERATING MODE
Engine stopping mode
Versions with manual gearboxWith the vehicle stopped, the engine
stops with gearbox in neutral and
clutch pedal released.Versions with automatic transmissionWith vehicle at a standstill and brake
pedal pressed, the engine switches off
if the gear lever is in a position other
than R.
In the event of stops uphill, engine
switching off is disabled to make the
"Hill Hold Control" function available
(works only with running engine).The
warning light on the instrument
panel switches on to signal that the
engine was stopped.
Engine restarting mode
Versions with manual gearboxTo restart the engine, press the clutch
pedal.
If the vehicle does not start when the
clutch is pressed, place the gear lever
in neutral and repeat the procedure.
If the problem persists, contact a Fiat
Dealership.Versions with automatic transmissionTo restart the engine, release the brake
pedal.
With brake pressed, if the gear lever is
in automatic mode - D (Drive) - the
engine can be restarted by moving the
lever to R (Reverse) or N (Neutral) or
"AutoStick".
With brake pressed, if the gear lever is
in "AutoStick" mode, the engine can be
restarted by moving the lever to "+" or
"–", or R (Reverse) or N (Neutral).
When the engine has been stopped
automatically, keeping the brake pedal
pressed, the brake can be released
keeping the engine off by quickly
shifting the gear lever to P (Park).
To restart the engine, just move the
lever out of position P.
SYSTEM MANUAL
ACTIVATION/
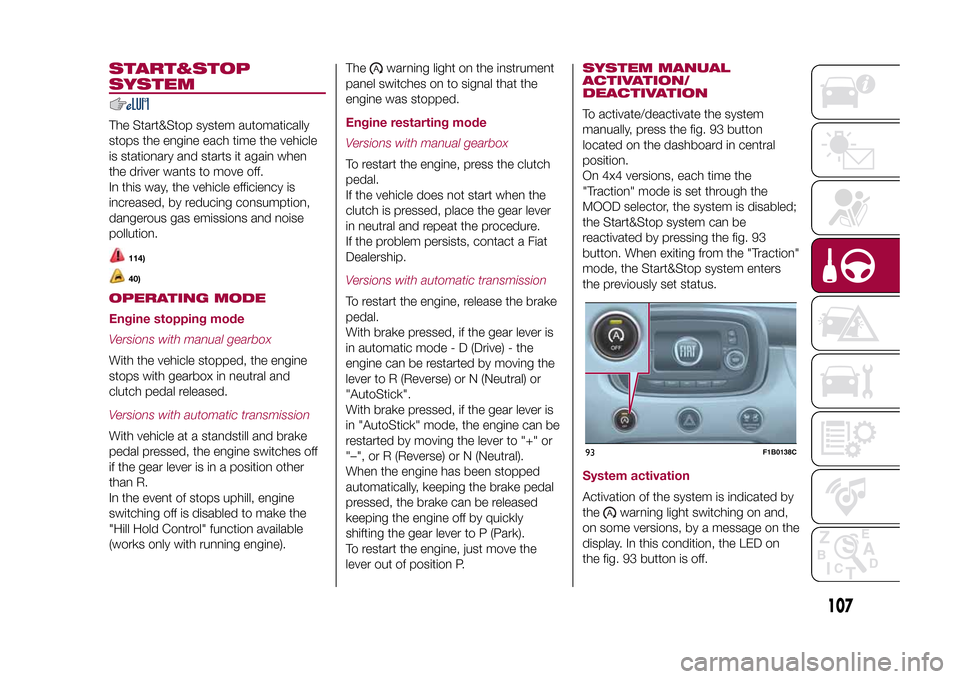
DEACTIVATIONTo activate/deactivate the system
manually, press the fig. 93 button
located on the dashboard in central
position.
On 4x4 versions, each time the
"Traction" mode is set through the
MOOD selector, the system is disabled;
the Start&Stop system can be
reactivated by pressing the fig. 93
button. When exiting from the "Traction"
mode, the Start&Stop system enters
the previously set status.System activationActivation of the system is indicated by
the
warning light switching on and,
on some versions, by a message on the
display. In this condition, the LED on
the fig. 93 button is off.
93
F1B0138C
107
15-12-2014 8:23 Pagina 107
Page 111 of 240

ELECTRONIC
CRUISE CONTROLThis is an electronically controlled
driving assistance device that allows
the desired vehicle speed to be
maintained, without having to press the
accelerator pedal. This device can be
used at a speed above 30 km/h on
long stretches of dry, straight roads
with few variations (e.g. motorways).
It is therefore not recommended to use
this device on extra-urban roads with
traffic. Do not use it in town.ACTIVATING THE DEVICE
115) 116) 117)
To activate the device press button A
fig. 95.
Activation of the device is indicated by
the
warning light on the instrument
panel switching on and, on some
versions, by a message on the display.
If the Speed Limiter is activated, button
Afig. 95 must be pressed twice to
activate the Cruise Control.
The device cannot be engaged in 1
stor
reverse gear: it is advisable to engage
it in 3
rd
gear or higher.IMPORTANT It is dangerous to leave
the device on when it is not used. There
is a risk of inadvertently activating it
and losing control of the vehicle due to
unexpected excessive speed.
SETTING THE DESIRED
SPEEDProceed as follows:
❒to activate the device press button A
fig. 95;
❒when the vehicle has reached the
desired speed, press button SET + (or
SET –) and release it to activate the
device. When the accelerator is
released, the vehicle will keep the
selected speed automatically.
If needed (e.g. when overtaking), you
can increase speed simply by pressing
the accelerator; when you release the
pedal, the vehicle goes back to the
speed stored previously.When travelling downhill with the device
active, the vehicle speed may slightly
exceed the set one.
IMPORTANT Before pressing the SET +
or SET – buttons, the vehicle must be
travelling at a constant speed on a
flat surface.
SPEED INCREASEOnce the electronic Cruise Control has
been activated, the speed can be
increased by pressing button SET +.SPEED DECREASEWith the device activated, the speed
can be decreased by pressing button
SET–.RECALLING THE SPEEDFor versions with automatic
transmission operating in D mode (Drive
- automatic), press and release the
RES button to recall the previously set
speed.
For versions with manual gearbox or
automatic transmission in Autostick
(sequential) mode, before recalling the
previously set speed you should
accelerate until getting close to it, then
press and release the RES button.
95
F1B0140C
109
15-12-2014 8:23 Pagina 109
Page 113 of 240
"Auto" MODEThis mode is aimed at comfort and
safety in normal grip and driving
conditions. On 4x4 versions, this mode
also reduces fuel consumption, since
it automatically disconnects the
transmission from the rear wheels if the
road and driving conditions allow it, in
addition to changing drive torque
distribution between the front and rear
axles.ActivationStarting from the active "Traction/All
Weather" mode, turn the ring nut
anticlockwise, keeping it in this position
for at least half a second, and in any
case until the relevant LED turns on,
and the selected mode is shown on the
display. The LED for the previously set
mode will simultaneously turn off. Upon
release, the ring nut will return to the
central position.
Starting from the active "Sport" mode,
turn the ring nut clockwise, keeping it in
this position for at least half a second,
and in any case until the relevant LED
turns on, and the selected mode is
shown on the display. The LED for the
previously set mode will simultaneously
turn off. Upon release, the ring nut will
return to the central position.
"Traction"/"All Weather" MODEIt is a driving mode for safety in poor
vehicle grip conditions (wet/slippery
road surface, rain, snow). On the 4x4
versions use is also recommended
on unsurfaced roads or off-road.ActivationStarting from the active "Auto" mode,
turn the ring nut clockwise, keeping it in
this position for at least half a second,
and in any case until the relevant LED
turns on, and the selected mode is
shown on the display. The LED for the
previously set mode will simultaneously
turn off. Upon release, the ring nut will
return to the central position.
Starting from the active "Sport" mode,
turn the ring nut anticlockwise, keeping
it in this position for at least half a
second, and in any case until the
relevant LED turns on, and the selected
mode is shown on the display. The
LED for the previously set mode will
simultaneously turn off. Upon release,
the ring nut will return to the central
position.
"Sport" MODEIt is the mode that emphasises the
pleasure of sport driving; it increases
fuel consumption however. Traction
is optimised on 4x4 versions, allowing
the vehicle road-hold performance
to be improved, even on bends.ActivationStarting from the active "Auto" mode,
turn the ring nut anticlockwise, keeping
it in this position for at least half a
second, and in any case until the
relevant LED turns on, and the selected
mode is shown on the display. The
LED for the previously set mode will
simultaneously turn off. Upon release,
the ring nut will return to the central
position.
Starting from the active "Traction/All
Weather" mode, turn the ring nut
clockwise, keeping it in this position for
at least half a second, and in any case
until the relevant LED turns on, and
the selected mode is shown on the
display. The LED for the previously set
mode will simultaneously turn off. Upon
release, the ring nut will return to the
central position.
111
15-12-2014 8:23 Pagina 111
Page 123 of 240
IN AN EMERGENCY
A punctured tyre or a burnt-out bulb?
At times, a problem may interfere
with our journey.
The pages on emergencies can help
you to deal with critical situations
independently and with calm.
In an emergency we recommend that
you call the freephone number found in
the Warranty Booklet.
It is also possible to call the national or
international universal freephone
number to search for the nearest Fiat
Dealership.HAZARD WARNING LIGHTS...........122
BULB REPLACEMENT....................122
REPLACING FUSES........................128
CHANGING A WHEEL ....................133
FIX&GO AUTOMATIC KIT ................136
EMERGENCY STARTING ................138
FUEL CUT-OFF SYSTEM ................140
AUTOMATIC TRANSMISSION
GEAR LEVER UNLOCKING.............140
TOWING THE VEHICLE ..................142
121
15-12-2014 8:23 Pagina 121
Page 135 of 240
CHANGING A WHEELJACKPlease note that:
❒the weight of the jack is 2.8 kg;
❒The jack requires no adjustment;
❒the jack cannot be repaired and in
the event of a fault it must be replaced
by another original one;
❒No tool other than its cranking device
may be fitted on the jack.CHANGING PROCEDURE
132) 133) 134) 135) 136) 137) 138) 139)
Proceed as follows:
❒stop the vehicle in a position that is
not dangerous for oncoming traffic
where you can change the wheel safely.
The ground should be flat if possible,
and sufficiently firm;
❒stop the engine, engage the hazard
warning lights and the electric parking
brake;
❒engage first gear or reverse or, for
versions with automatic transmission,
move the lever to position P (Park);
❒wear the reflective safety jacket
(compulsory by law in certain countries)
before getting out of the vehicle;❒open the boot and position the
reconfigurable load platform in
an inclined position (see "Boot" in the
"Knowing your vehicle" chapter);
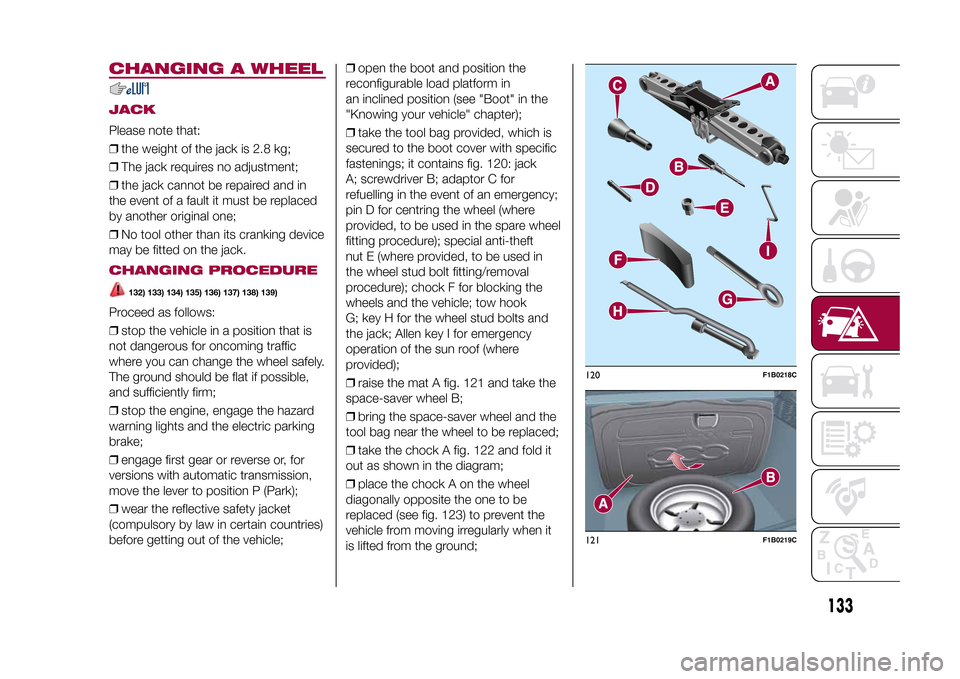
❒take the tool bag provided, which is
secured to the boot cover with specific
fastenings; it contains fig. 120: jack
A; screwdriver B; adaptor C for
refuelling in the event of an emergency;
pin D for centring the wheel (where
provided, to be used in the spare wheel
fitting procedure); special anti-theft
nut E (where provided, to be used in
the wheel stud bolt fitting/removal
procedure); chock F for blocking the
wheels and the vehicle; tow hook
G; key H for the wheel stud bolts and
the jack; Allen key I for emergency
operation of the sun roof (where
provided);
❒raise the mat A fig. 121 and take the
space-saver wheel B;
❒bring the space-saver wheel and the
tool bag near the wheel to be replaced;
❒take the chock A fig. 122 and fold it
out as shown in the diagram;
❒place the chock A on the wheel
diagonally opposite the one to be
replaced (see fig. 123) to prevent the
vehicle from moving irregularly when it
is lifted from the ground;
120
F1B0218C
121
F1B0219C
133
15-12-2014 8:23 Pagina 133
Page 140 of 240
WARNING
54)In the event of a puncture caused by
foreign bodies, the kit may be used to
repair tyres showing damage on the tread
or shoulder up to max. 4 mm diameter.
WARNING
3)Dispose of the bottle and the sealant
properly. Dispose of the components
in compliance with national and local
regulations.
EMERGENCY
STARTING
55)
If the battery is flat, a jump starting can
be performed using the battery and
the cables of another vehicle, or using
an auxiliary battery. In all cases, the
battery used must have a capacity
equal to or a little higher than the flat
one.IMPORTANTDo not use an auxiliary battery or any
other source of external supply with
a voltage above 12 V: the battery, the
starter, the alternator and the electrical
system of the vehicle could be
damaged.
Do not attempt jump starting if the
battery is frozen. The battery could
break and explode!JUMP STARTINGThe vehicle battery is located in the
engine compartment, behind the left
light cluster.
148) 149) 150) 151)
IMPORTANT The positive terminal (+) of
the battery is shielded by a protective
element. Raise it to access the terminal.Proceed as follows:
❒operate the parking brake, move the
lever to P (Park), for versions equipped
with automatic transmission, or neutral,
for versions with manual gearbox,
then set the ignition device to STOP;
❒switch off all the other electrical
appliances in the vehicle;
❒should you be using the battery of
another vehicle, park the other vehicle
within the range of the cables used
for the connection, operate the parking
brake and ensure that its ignition is
off.
IMPORTANT If the procedure below is
carried out incorrectly, it can cause
severe injury to people or damage the
recharging system of one or both
vehicles. Carefully follow the
instructions given below.
Cable connection
56)
Proceed as follows to carry out bump
starting fig. 129:
❒connect one end of the cable used
for positive (+) to the positive terminal
(+) of the vehicle with flat battery;
❒connect the other end of the cable
used for positive (+) to the positive
terminal (+) of the auxiliary battery;
138
IN AN EMERGENCY
15-12-2014 8:23 Pagina 138
Page 142 of 240

FUEL CUT-OFF
SYSTEMDESCRIPTIONThis intervenes in the case of an impact
causing:
❒the interruption of the fuel supply with
the engine consequently switching off;
❒the automatic unlocking of the doors;
❒turning on of the lights inside the
vehicle;
❒deactivation of climate control system
ventilation;
❒switching on of the hazard warning
lights (to deactivate the lights press the
button on the dashboard).
On some versions, the intervention of
the system is indicated by a message
shown on the display. In the same way,
a dedicated message on the display
warns the driver if system operation is
compromised.
IMPORTANT Carefully check the vehicle
for fuel leaks, for instance in the engine
compartment, under the vehicle or
near the tank area. After a collision,
bring the ignition device to STOP to
prevent the battery from running down.
FUEL CUT-OFF SYSTEM
RESETTo restore correct operation of the
vehicle, carry out the following
procedure (this procedure must be
started and completed within less than
1 minute):
152)
Operations to be carried out
With direction indicator lever in neutral
position, bring the ignition device to STOP
Bring the ignition device to MAR
Activate the right direction indicator
Activate the left direction indicator
Activate the right direction indicator
Activate the left direction indicator
Deactivate the left direction indicator
Bring the ignition device to STOP
Bring the ignition device to MAR
WARNING
152)If, after an impact, you smell fuel or
notice leaks from the fuel system, do
not reactivate the system to avoid the risk
of fire.
AUTOMATIC
TRANSMISSION
GEAR LEVER
UNLOCKINGIn the event of a fault, to move the gear
lever from P (Park), proceed as follows:
❒stop the engine;
❒engage the electric parking brake;
❒working carefully in the point
indicated by the arrow, remove the trim
A fig. 130 (complete with gaiter) lifting
it upwards (see also fig. 131);130
F1B0028C
131
F1B0055C
140
IN AN EMERGENCY
15-12-2014 8:23 Pagina 140