2015 FIAT 500X roof
[x] Cancel search: roofPage 38 of 240

The direction indicators will blink twice
and the internal roof light will
simultaneously come on when the boot
is opened; the roof light will
automatically switch off when the
tailgate is closed (see also "Interior
lights").
If the tailgate is left open, the roof light
will automatically switch off to preserve
the battery charge.Emergency opening from the insideProceed as follows:
❒lower the head restraints and fold the
backrests;
❒identify and remove yellow guard A
fig. 44, which is press-fitted on the lock,
using the screwdriver provided;
❒insert the screwdriver in order to
activate tab B fig. 45, for mechanical
release of the lock.
CLOSINGGrip handle A fig. 46 and lower the
tailgate, pressing next to the lock until it
clicks.
IMPORTANT Before closing the boot
make sure that you have the keys since
the boot is automatically locked.
BOOT INITIALISATIONIMPORTANT If the battery is
disconnected or the protection fuse
blows, the boot opening/closing
mechanism must be reinitialised as
follows:
❒close all the doors and the boot;
❒press the
"FIAT" button on the
remote control;
❒press thebutton on the remote
control.
LOAD COMPARTMENT
Reconfigurable load platform
12)
The vehicle is equipped with a
reconfigurable load platform A, which
makes the boot volume modular.
The load platform can be set to 2
different positions:
❒Floor level (low)fig. 47: allows you
to exploit the entire volume of the boot.
❒Threshold level (high)fig. 48: in
conjunction with the lowering of the rear
seat and front passenger side seat
backrests, permits long objects to be
loaded. It also facilitates loading/
unloading of objects in the boot. It also
allows the space underneath (false
bottom) to be used as a further
compartment for stowing objects which
are more fragile or small.
44
F1B0075C
45
F1B0076C
46
F1B0077C
36
GETTING TO KNOW YOUR CAR
15-12-2014 8:23 Pagina 36
Page 98 of 240

SIDE BAGSTo help increase occupants protection
in the event of side impact collisions,
the vehicle is equipped with front side
bags and window bags.Side bagsThese comprise two bags located in
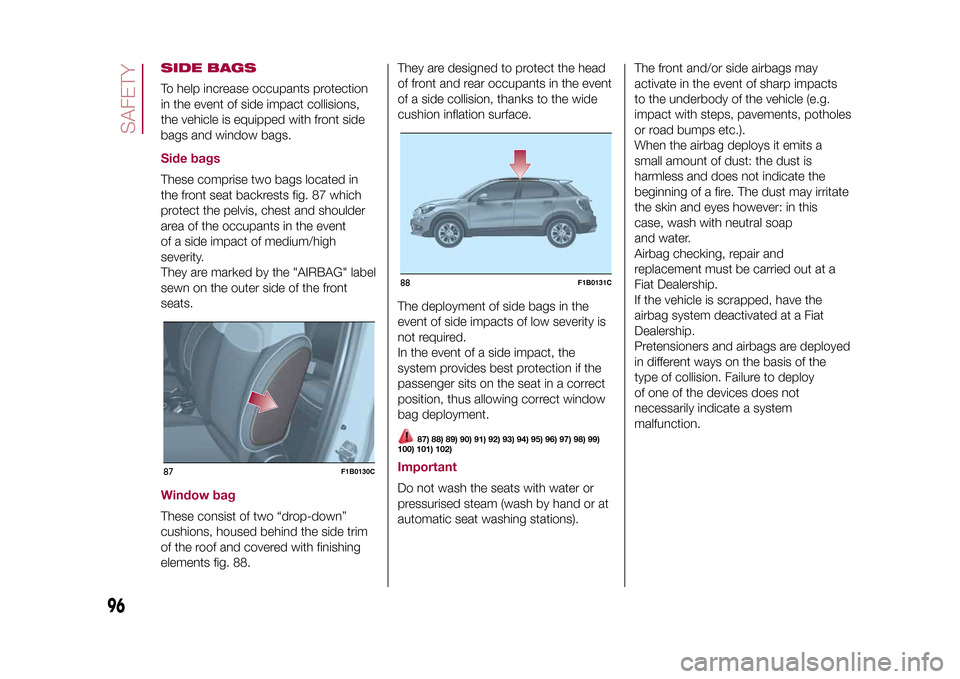
the front seat backrests fig. 87 which
protect the pelvis, chest and shoulder
area of the occupants in the event
of a side impact of medium/high
severity.
They are marked by the "AIRBAG" label
sewn on the outer side of the front
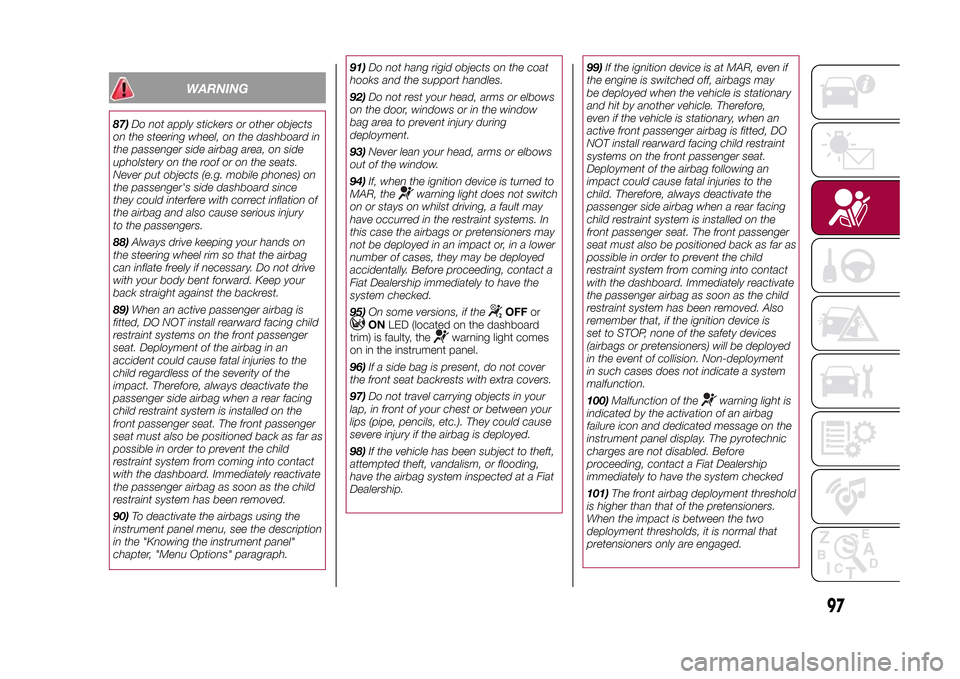
seats.Window bagThese consist of two “drop-down”
cushions, housed behind the side trim
of the roof and covered with finishing
elements fig. 88.They are designed to protect the head
of front and rear occupants in the event
of a side collision, thanks to the wide
cushion inflation surface.
The deployment of side bags in the
event of side impacts of low severity is
not required.
In the event of a side impact, the
system provides best protection if the
passenger sits on the seat in a correct
position, thus allowing correct window
bag deployment.
87) 88) 89) 90) 91) 92) 93) 94) 95) 96) 97) 98) 99)
100) 101) 102)
ImportantDo not wash the seats with water or
pressurised steam (wash by hand or at
automatic seat washing stations).The front and/or side airbags may
activate in the event of sharp impacts
to the underbody of the vehicle (e.g.
impact with steps, pavements, potholes
or road bumps etc.).
When the airbag deploys it emits a
small amount of dust: the dust is
harmless and does not indicate the
beginning of a fire. The dust may irritate
the skin and eyes however: in this
case, wash with neutral soap
and water.
Airbag checking, repair and
replacement must be carried out at a
Fiat Dealership.
If the vehicle is scrapped, have the
airbag system deactivated at a Fiat
Dealership.
Pretensioners and airbags are deployed
in different ways on the basis of the
type of collision. Failure to deploy
of one of the devices does not
necessarily indicate a system
malfunction.
87
F1B0130C
88
F1B0131C
96
SAFETY
15-12-2014 8:23 Pagina 96
Page 99 of 240

WARNING
87)Do not apply stickers or other objects
on the steering wheel, on the dashboard in
the passenger side airbag area, on side
upholstery on the roof or on the seats.
Never put objects (e.g. mobile phones) on
the passenger's side dashboard since
they could interfere with correct inflation of
the airbag and also cause serious injury
to the passengers.
88)Always drive keeping your hands on
the steering wheel rim so that the airbag
can inflate freely if necessary. Do not drive
with your body bent forward. Keep your
back straight against the backrest.
89)When an active passenger airbag is
fitted, DO NOT install rearward facing child
restraint systems on the front passenger
seat. Deployment of the airbag in an
accident could cause fatal injuries to the
child regardless of the severity of the
impact. Therefore, always deactivate the
passenger side airbag when a rear facing
child restraint system is installed on the
front passenger seat. The front passenger
seat must also be positioned back as far as
possible in order to prevent the child
restraint system from coming into contact
with the dashboard. Immediately reactivate
the passenger airbag as soon as the child
restraint system has been removed.
90)To deactivate the airbags using the
instrument panel menu, see the description
in the "Knowing the instrument panel"
chapter, "Menu Options" paragraph.91)Do not hang rigid objects on the coat
hooks and the support handles.
92)Do not rest your head, arms or elbows
on the door, windows or in the window
bag area to prevent injury during
deployment.
93)Never lean your head, arms or elbows
out of the window.
94)If, when the ignition device is turned to
MAR, the
warning light does not switch
on or stays on whilst driving, a fault may
have occurred in the restraint systems. In
this case the airbags or pretensioners may
not be deployed in an impact or, in a lower
number of cases, they may be deployed
accidentally. Before proceeding, contact a
Fiat Dealership immediately to have the
system checked.
95)On some versions, if the
OFFor
ONLED (located on the dashboard
trim) is faulty, the
warning light comes
on in the instrument panel.
96)If a side bag is present, do not cover
the front seat backrests with extra covers.
97)Do not travel carrying objects in your
lap, in front of your chest or between your
lips (pipe, pencils, etc.). They could cause
severe injury if the airbag is deployed.
98)If the vehicle has been subject to theft,
attempted theft, vandalism, or flooding,
have the airbag system inspected at a Fiat
Dealership.99)If the ignition device is at MAR, even if
the engine is switched off, airbags may
be deployed when the vehicle is stationary
and hit by another vehicle. Therefore,
even if the vehicle is stationary, when an
active front passenger airbag is fitted, DO
NOT install rearward facing child restraint
systems on the front passenger seat.
Deployment of the airbag following an
impact could cause fatal injuries to the
child. Therefore, always deactivate the
passenger side airbag when a rear facing
child restraint system is installed on the
front passenger seat. The front passenger
seat must also be positioned back as far as
possible in order to prevent the child
restraint system from coming into contact
with the dashboard. Immediately reactivate
the passenger airbag as soon as the child
restraint system has been removed. Also
remember that, if the ignition device is
set to STOP, none of the safety devices
(airbags or pretensioners) will be deployed
in the event of collision. Non-deployment
in such cases does not indicate a system
malfunction.
100)Malfunction of the
warning light is
indicated by the activation of an airbag
failure icon and dedicated message on the
instrument panel display. The pyrotechnic
charges are not disabled. Before
proceeding, contact a Fiat Dealership
immediately to have the system checked
101)The front airbag deployment threshold
is higher than that of the pretensioners.
When the impact is between the two
deployment thresholds, it is normal that
pretensioners only are engaged.
97
15-12-2014 8:23 Pagina 97
Page 117 of 240

On some versions, a dedicated
message appears on the display when
it is activated and deactivated.Activation conditionsOnce switched on, the system
becomes active only if the following
conditions are met:
❒the driver always keeps at least one
hand on the steering wheel;
❒vehicle speed ranges between 60
km/h and 180 km/h;
❒the lane limit lines are perfectly visible
on both sides;
❒there are suitable visibility conditions;
❒the road is straight or with wide
radius bends;
❒a suitable distance is kept from the
vehicle in front;
❒the direction indicator (for leaving the
lane) is not active;❒the lane limit lines are perfectly visible
on both sides (for activation of the
tactile warning only).
NOTE The system does not apply the
vibration to the steering wheel every
time a safety system is activated
(brakes, ABS, ASR system, ESC
system, Full Brake Control system,
etc.).
WARNING
43)Projecting loads on the roof of the
vehicle may interfere with the correct
operation of the camera. Before starting
make sure the load is correctly positioned,
in order not to cover the camera operating
range.
44)If the windscreen must be replaced
due to scratches, chipping or breakage,
contact exclusively a Fiat Dealership.
Do not replace the windscreen on your
own, risk of malfunction! It is advisable to
replace the windscreen if it is damaged
in the area of the camera.
45)Do not tamper with nor operate on the
camera. Do not close the openings in
the aesthetic cover located under
the interior rear view mirror. In the event of
a failure of the camera, contact a Fiat
Dealership.
46)Do not cover the operating range of the
camera with stickers or other objects.
Also pay attention to other objects on the
bonnet (e.g. a layer of snow) and make
sure they do not interfere with the camera.47)The camera may have limited or absent
operation due to weather conditions such
as: heavy rain, hail, thick fog, heavy snow,
formation of ice layers on the windscreen.
48)Camera operation may also be
compromised by the presence of dust,
condensation, dirt or ice on the
windscreen, by traffic conditions (e.g.
vehicles that are driving not aligned with
yours, vehicle driving in a transverse or
opposite way on the same lane, bend with
a small radius of curvature), by road
surface conditions and by driving
conditions (e.g. off-road driving). Make sure
the windscreen is always clean. Use
specific detergents and clean cloths to
avoid scratching the windscreen. The
camera operation may also be limited or
absent in some driving, traffic and road
surface conditions.
98
F1B0334C
115
15-12-2014 8:23 Pagina 115
Page 126 of 240

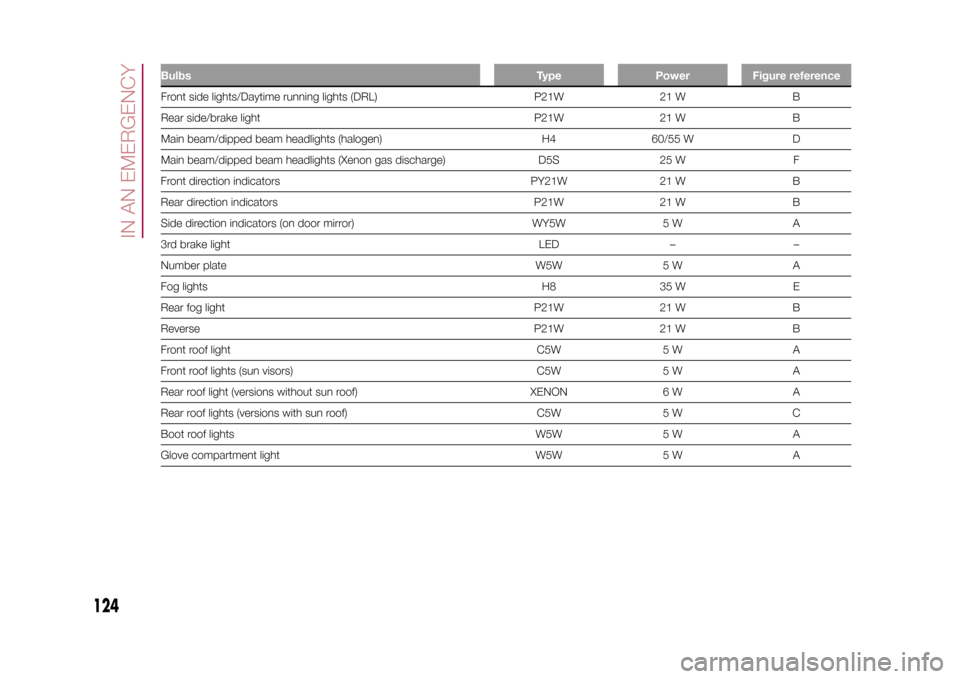
Bulbs Type Power Figure referenceFront side lights/Daytime running lights (DRL) P21W 21 W B
Rear side/brake light P21W 21 W B
Main beam/dipped beam headlights (halogen) H4 60/55 W D
Main beam/dipped beam headlights (Xenon gas discharge) D5S 25 W F
Front direction indicators PY21W 21 W B
Rear direction indicators P21W 21 W B
Side direction indicators (on door mirror) WY5W 5 W A
3rd brake light LED – –
Number plate W5W 5 W A
Fog lights H8 35 W E
Rear fog light P21W 21 W B
Reverse P21W 21 W B
Front roof light C5W 5 W A
Front roof lights (sun visors) C5W 5 W A
Rear roof light (versions without sun roof) XENON 6 W A
Rear roof lights (versions with sun roof) C5W 5 W C
Boot roof lights W5W 5 W A
Glove compartment light W5W 5 W A
124
IN AN EMERGENCY
15-12-2014 8:23 Pagina 124
Page 133 of 240

ENGINE COMPARTMENT FUSE BOXUSERSFUSE AMPEREHornF10 10
Power supply for cigar lighter/power socket F84 20
.
DASHBOARD FUSE BOXUSERSFUSE AMPEREFront electric window (passenger side) F33 20
Front electric window (driver side) F34 20
Supply forUconnect
™
system, Climate Control system, Electric
door mirror folding, EOBD system, USB port/AUX socket, rear
side roof lights (versions with sun roof)F36 15
Dead Lock device (Driver side door unlocking for versions/
markets, where provided)/Door unlocking/Central locking/Electric
tailgate unlockingF38 20
Rear left electric window F47 20
Rear right electric window F48 20
131
15-12-2014 8:23 Pagina 131
Page 134 of 240

BOOT FUSE BOXNOTE The configuration of the boot may vary in accordance with the equipment on the vehicle.Fuse box BUSERSFUSE AMPEREHI-FI system F2 20
Electric sun roof F3 20
Front seat electric lumbar adjustment (driver guide) F4 7.5
Electric front seat adjustment (driver side) F5 30
Electric front seat adjustment (driver side and passenger side) F6 7.5
Electric front seat lumbar adjustment (driver side and passenger
side)F7 30
WARNING
128)If the fuse blows again contact a Fiat Dealership.
129)Never replace a fuse with another with a higher amp rating; DANGER OF FIRE
130)If a fuse NOT described on this page and on the previous one blows, contact a Fiat Dealership.
131)Before replacing a fuse, make sure that the ignition device has been taken to STOP, that the ignition key, if mechanical, has been
removed and that all the other devices are switched off and/or deactivated.
WARNING
52)Never replace a blown fuse with metal wires or other material.
53)If it is necessary to wash the engine compartment, take care not to directly hit the fuse box and the window wiper motor with the water
jet.
132
IN AN EMERGENCY
15-12-2014 8:23 Pagina 132
Page 135 of 240

CHANGING A WHEELJACKPlease note that:
❒the weight of the jack is 2.8 kg;
❒The jack requires no adjustment;
❒the jack cannot be repaired and in
the event of a fault it must be replaced
by another original one;
❒No tool other than its cranking device
may be fitted on the jack.CHANGING PROCEDURE
132) 133) 134) 135) 136) 137) 138) 139)
Proceed as follows:
❒stop the vehicle in a position that is
not dangerous for oncoming traffic
where you can change the wheel safely.
The ground should be flat if possible,
and sufficiently firm;
❒stop the engine, engage the hazard
warning lights and the electric parking
brake;
❒engage first gear or reverse or, for
versions with automatic transmission,
move the lever to position P (Park);
❒wear the reflective safety jacket
(compulsory by law in certain countries)
before getting out of the vehicle;❒open the boot and position the
reconfigurable load platform in
an inclined position (see "Boot" in the
"Knowing your vehicle" chapter);
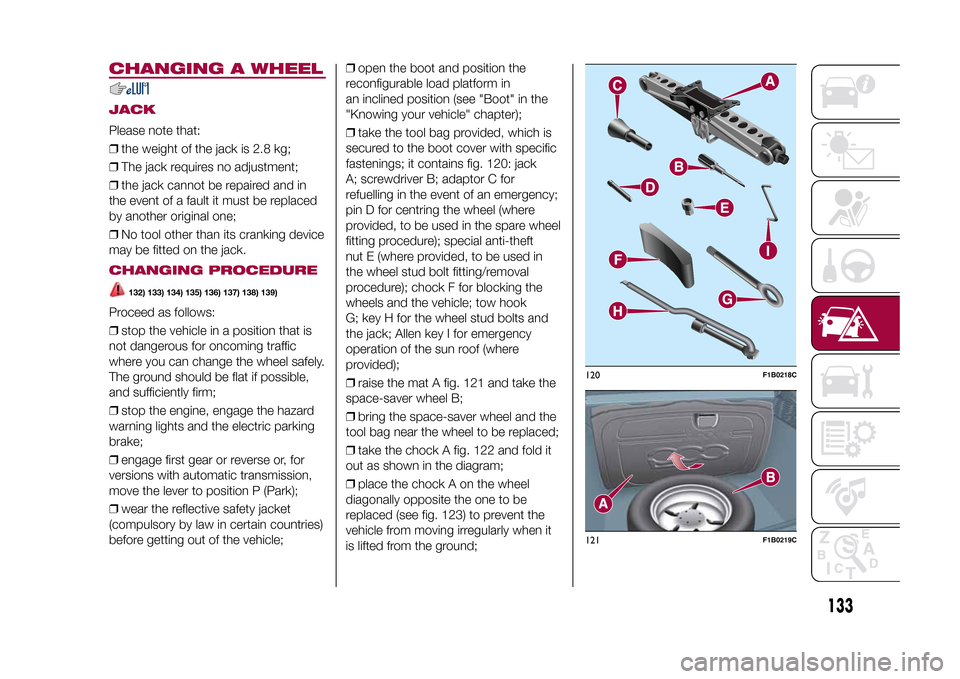
❒take the tool bag provided, which is
secured to the boot cover with specific
fastenings; it contains fig. 120: jack
A; screwdriver B; adaptor C for
refuelling in the event of an emergency;
pin D for centring the wheel (where
provided, to be used in the spare wheel
fitting procedure); special anti-theft
nut E (where provided, to be used in
the wheel stud bolt fitting/removal
procedure); chock F for blocking the
wheels and the vehicle; tow hook
G; key H for the wheel stud bolts and
the jack; Allen key I for emergency
operation of the sun roof (where
provided);
❒raise the mat A fig. 121 and take the
space-saver wheel B;
❒bring the space-saver wheel and the
tool bag near the wheel to be replaced;
❒take the chock A fig. 122 and fold it
out as shown in the diagram;
❒place the chock A on the wheel
diagonally opposite the one to be
replaced (see fig. 123) to prevent the
vehicle from moving irregularly when it
is lifted from the ground;
120
F1B0218C
121
F1B0219C
133
15-12-2014 8:23 Pagina 133