2015 FIAT 500L ad blue
[x] Cancel search: ad bluePage 84 of 148

Voice Text Reply (Not Compatible With iPhone®)
NOTE:
Voice texting reply and voice texting features require a compatible mobile device enabled
with Bluetooth® Message Access Profile (MAP).iPhone®, and some other smartphones,
may not entirely support Bluetooth® MAP.Visit UconnectPhone.com for the latest sys-
tem and device compatibility.
•Due to the extremely large number of mobile phone manufacturers, your mobile de-
vice may not be listed.For further assistance, contact Uconnect Customer Care @
1-877-855-8400 for U.S.residents or, 1-800-465-2001 (English) / 1-800-387-9983
(French) for Canadian residents.
Once your Uconnect® system is paired with a compatible mobile device, the system can
announce a new incoming text message, and read it to your over the vehicle audio sys-
tem.You can reply to the message using Voice Recognition by selecting, or saying, one of
the 18 pre-defined messages.
Here’s How:
1.Push the Uconnect® Phone buttonand wait for the beep, then say “reply.”
Uconnect® will give the following prompt: “Please say the message you would like to
send.”
2.Wait for the beep and say one of the pre-defined messages.(If you are not sure, you
can say “help”).Uconnect® will then read the pre-defined messages allowed.
3.As soon as you hear the message you would like to send, you can interrupt the list of
prompts by pushing the Uconnect® phone button and saying the phrase.Uconnect®
will confirm the message by reading it back to you.
4.Push the Phone button and say “Send.”
PRE-DEFINED VOICE TEXT REPLY RESPONSES
Yes.Stuck in Traffic.See you later.
No.Start without me.I’ll be Late.
Okay.Where are you?I will be <5, 10, 15,...etc.>minutes late.Call me.Are you there yet?
I’ll call you later.I need directions.See you in <5, 10,15,...etc.> of minutes.I’m on my way.Can’t talk right now.I’m lost.Thanks.
Want to dictate a personal message?
•You must first register with Uconnect® Access (U.S.residents only) to take advantage
of a new, cloud-based Voice Texting service, an enhancement to Voice Text Reply
(Uconnect® 6.5AN systems ONLY).
ELECTRONICS
82
Page 85 of 148

Helpful Tips And Common Questions To Improve Bluetooth®
Performance With Your Uconnect® System
Mobile Phone won’t reconnect to system after pairing:
•Set mobile phone to auto-connect or trusted device in mobile phone Bluetooth® set-
tings (Blackberry devices).
•Perform a factory reset on your mobile phone.Refer to your mobile phone manufac-
turer or cellular provider for instructions.
•Many mobile phones do not automatically reconnect after being restarted (hard re-
boot).Your mobile phone can still be connected manually.Close all applications that
may be operating (refer to mobile phone manufacturer’s instructions), and follow “Pair-
ing (Wirelessly Connecting) Your Mobile Phone To The Uconnect® System.”
Mobile Phone won’t pair to system:
•Perform a hard reset in the mobile phone by removing the battery (if removable —
see your mobile phone’s owner manual).
•Delete pairing history in mobile phone and Uconnect system; usually found in phone’s
Bluetooth® connection settings.
•Verify you are selecting “Uconnect” in the discovered Bluetooth® devices on your mo-
bile phone.
•If your vehicle system generates a pin code the default is 0000.
Mobile Phonebook didn’t download:
•Check “Do not ask again,” then accept the “phonebook download” request on your
mobile phone.
•Up to 5,000 contact names with four numbers per contact will transfer to the
Uconnect® 6.5AN system phonebook.
•Up to 2,000 contact names with six numbers per contact will transfer to the
Uconnect® 5.0 system phonebook.
Text messaging won’t work:
•Check “Do not ask again,” then accept the “connect to your messages” request on
your mobile phone.
•Verify that your mobile phone has the Bluetooth® feature (Message Access Profile).
Can’t make a conference call:
•CDMA (Code-Division Multiple Access) carriers do not support conference calling.
Refer to your mobile phone user’s manual for further information.
Making calls while connected to AUX:
•Plugging in your mobile phone to AUX while connected to Bluetooth® will disable
Hands-Free Calling.Do not make calls while your mobile phone is plugged into the
AUX jack.
ELECTRONICS
83
Page 87 of 148

EVIC Control Buttons
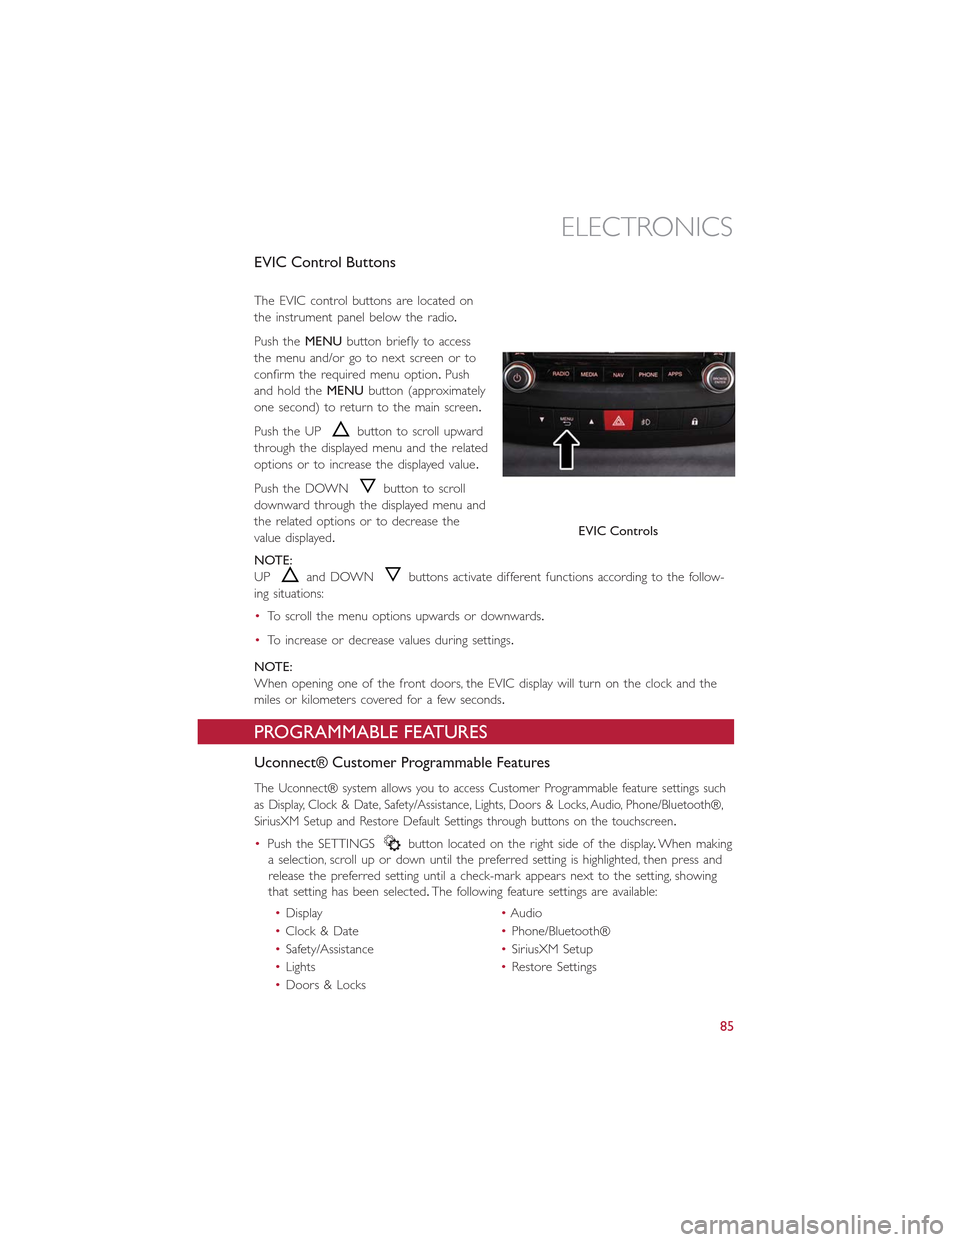
The EVIC control buttons are located on
the instrument panel below the radio.
Push theMENUbutton briefly to access
the menu and/or go to next screen or to
confirm the required menu option.Push
and hold theMENUbutton (approximately
one second) to return to the main screen.
Push the UPbutton to scroll upward
through the displayed menu and the related
options or to increase the displayed value.
Push the DOWNbutton to scroll
downward through the displayed menu and
the related options or to decrease the
value displayed.
NOTE:
UPand DOWNbuttons activate different functions according to the follow-
ing situations:
•To scroll the menu options upwards or downwards.
•To increase or decrease values during settings.
NOTE:
When opening one of the front doors, the EVIC display will turn on the clock and the
miles or kilometers covered for a few seconds.
PROGRAMMABLE FEATURES
Uconnect® Customer Programmable Features
The Uconnect® system allows you to access Customer Programmable feature settings such
as Display, Clock & Date, Safety/Assistance, Lights, Doors & Locks, Audio, Phone/Bluetooth®,
SiriusXM Setup and Restore Default Settings through buttons on the touchscreen.
•Push the SETTINGSbutton located on the right side of the display.When making
a selection, scroll up or down until the preferred setting is highlighted, then press and
release the preferred setting until a check-mark appears next to the setting, showing
that setting has been selected.The following feature settings are available:
•Display•Audio
•Clock & Date•Phone/Bluetooth®
•Safety/Assistance•SiriusXM Setup
•Lights•Restore Settings
•Doors & Locks
EVIC Controls
ELECTRONICS
85
Page 91 of 148

WARNING!
To Avoid Serious Injury or Death DO NOT:
•insert any objects into the receptacles
•touch with wet hands
Close the lid when not in use.If this outlet is mishandled, it may cause an electric shock
and failure.
POWER OUTLET
A standard 12 Volt (13 Amp) power outlet, located in the floor console, is available for
added convenience.This power outlet can power mobile phones, electronics and other
low power devices.
•The power outlet is located in front of the shift lever, between the two cup-holders.
NOTE:
•Do not exceed the maximum power of
160 Watts (13 Amps) at 12 Volts.If the
160 Watt (13 Amp) power rating is ex-
ceeded, the fuse protecting the system
will need to be replaced.
•Power outlets are designed for accessory
plugs only.Do not insert any other ob-
ject in the power outlet as this will dam-
age the outlet and blow the fuse.Im-
proper use of the power outlet can
cause damage not covered by your new
vehicle warranty.
•F85 Fuse 15A Blue Power Outlet.
Power Outlet
ELECTRONICS
89
Page 132 of 148

FUSES
Underhood Fuses
The Front Distribution Unit is located on the right side of the engine compartment, next
to the battery.To access the fuses, press the release tabs and remove the cover.
The ID number of the electrical compo-
nent corresponding to each fuse can be
found on the back of the cover.
Cavity Maxi Fuse Mini Fuse Description
F01 60 Amp Blue – Body Controller
F02 60 Amp Blue –Body Controller Rear Distribu-tion Unit
F03 20 Amp Yellow – Ignition Switch
F04 40 Amp Orange – Anti-Lock Brake Pump
F05 70 Amp Tan – Electric Power Steering
F06 30 Amp Green – Radiator Fan - Low Speed
F07 50 Amp Red – Radiator Fan - High Speed
F08 40 Amp Orange – Blower Motor
F09 – 7.5 Amp Brown Transmission
F10 – 15 Amp Blue Horn
F11 – 10 Amp Red Powertrain
F14 – 20 Amp Yellow Power Outlet 115V
F15 – 15 Amp Blue Transmission
F16 – 7.5 Amp Brown Transmission Powertrain
F17 – 10 Amp Red Powertrain
F18 – 5 Amp TanPowertrain (Multiair – IfEquipped)
F19 – 7.5 Amp Brown Air Conditioning
F20 – 30 Amp Green Rear Defroster
Front Distribution Unit
MAINTAINING YOUR VEHICLE
130
Page 133 of 148

Cavity Maxi Fuse Mini Fuse Description
F21 – 15 Amp Blue Fuel Pump
F23 – 20 Amp Yellow Anti-Lock Brake Valves
F24 – 7.5 Amp Brown Stability Control System
F30 – 5 Amp Tan After Run Pump
F81 70 Amp Tan – PTC (Secondary)
F82 40 Amp Orange – Transmission
F83 40 Amp Orange – PTC (Primary)
F84 7.5 Amp Brown Transmission
F85 15 Amp Blue Front Power Outlet 12V
F86 – 15 Amp Blue Rear Power Outlet 12V
F88 7.5 Amp Brown Heated Mirrors
Interior Fuses
The interior fuse panel is part of the Body Control Module (BCM) and is located on the
driver's side under the instrument panel.
CavityVehicle FuseNumberMini Fuse Description
1 F12 7.5 Amp Brown Right Low Beam
2 F32 7.5 Amp BrownFront and Rear Ceiling LightsTr u n k a n d D o o r C o u r t e s y L i g h t s
3 F53 7.5 Amp Brown Instrument Panel Node
4 F38 20 Amp Yellow Central Door Locking
5 F36 15 Amp BlueDiagnostic Socket, Car Radio,Climate Control System, TPMS,Sunroof
6 F90 7.5 Amp Brown Left High Beam
Interior Fuse Panel
MAINTAINING YOUR VEHICLE
131
Page 134 of 148

CavityVehicle FuseNumberMini Fuse Description
7 F91 7.5 Amp Brown Right High Beam
8 F92 7.5 Amp Brown Left Fog Light
9 F93 7.5 Amp Brown Right Fog Light
10 F33 5 Amp Tan BSM, ESP
11 F34 20 Amp Yellow Rear Left Passenger Window
12 F49 20 Amp Yellow Rear Right Passenger Window
13 F43 20 Amp Yellow Bi-Directional Washer
14 F48 20 Amp Yellow Passenger Power Window
15 F13 7.5 Amp BrownLeft Low Beam, Headlamp Level-ing
16 F50 7.5 Amp Brown Airbag
17 F51 5 Amp Tan
Car Radio Switch, Climate Con-trol System, Stop Light, Clutch,Reverse Gear, Sunroof, ParkingSensor, Rear Camera
18 F37 7.5 Amp BrownStop Light Switch, InstrumentPanel Node
19 F49 5 Amp TanExterior Mirror, GPS, Electric Mir-ror, Parking Sensor
20 F31 5 Amp Tan Climate Control, Seat Regulation
21 F47 20 Amp Yellow Driver Power Window
Rear Interior Fuses
The rear interior fuse panel is located on the driver's side in the rear compartment.
CavityVehicle FuseNumberMini Fuse Description
1F6115AmpBlueLumbarRegulationSeats
2 F62 15 Amp Blue Heated Seats
3 F64 20 Amp Yellow Hi Fi System
4 F65 20 Amp Yellow Sun Blind
5 F66 20 Amp Yellow Sunroof
MAINTAINING YOUR VEHICLE
132
Page 142 of 148

FREQUENTLY ASKED QUESTIONS
GETTING STARTED
•How do I install my LATCH Equipped Child Seat? pg.16
•How do I adjust my rear seat? pg.23
ELECTRONICS
•What Sound System do I have? pg.40
•How do I set the clock on my radio? pg.43
•How do I set the presets on my radio? pg.45
•How do I use my USB/Audio Jack (AUX)? pg.47
•How do I pair my cell phone via Uconnect® Phone (Bluetooth® Hands Free Calling)?
pg.76
UTILITY
•How much can I tow with my FIAT 500L? pg.90
•How do I tow my FIAT 500L behind another vehicle? pg.140
WHAT TO DO IN EMERGENCIES
•What do I do if my TPMS warning light is blinking? pg.93
•How do I Jump-Start my vehicle? pg.113
•What should I do if my engine overheats? pg.98
•How do I change a flat tire? pg.99
MAINTAINING YOUR VEHICLE
•Where is my underhood fuse block located? pg.130
•Where is my interior fuse block located? pg.131
•What type of oil do I use? pg.124
•How often should I change my engines oil? pg.126
•What should my tire pressure be set at? pg.133
FREQUENTLY ASKED QUESTIONS
140