2015 FIAT 500L LIVING display
[x] Cancel search: displayPage 87 of 224
Main recommendations to carry
children safely
❒Install the child restraint systems on
the rear seat, which is the most
protected position in the event of an
impact.
❒Keep children in rearward facing child
restraint systems for as long as
possible, until 3–4 years old if possible.
❒Should a rearward facing child
restraint system be installed on the rear
seats, it is advisable to position it as
far forward as the position of the front
seat allows.
❒If the passenger's front airbag is
deactivated always check the
dedicated LED on the trim located on
the dashboard switches on, to make
sure that it has actually been
deactivated.
❒Carefully follow the instructions
supplied with the child restraint system
itself. Keep the instructions in the
vehicle along with the other documents
and this handbook. Do not use
second-hand child restraint systems
without instructions.
❒Only one child is to be strapped into
each restraint system; never carry
two children using one child restraint
system.
❒Always check that the seat belts do
not rest on the child’s neck.❒Always check that the seat belt is
well fastened by pulling on it.
❒While travelling, do not let the child sit
incorrectly or unfasten the belts.
❒Never allow a child to put the belt's
diagonal section under an arm or
behind their back.
❒Never carry children on your lap,
even newborns. No one can hold
a child in the case of an accident.
❒In the event of an accident, replace
the child restraint system with a new
one.
WARNING
75)SEVERE DANGER When a front
passenger airbag is fitted, do not install
rearward facing child restraint systems on
the front passenger seat. Deployment of
the airbag in an accident could cause fatal
injuries to the child regardless of the
severity of the collision. It is advisable to
always carry children in a child restraint
system on the rear seat, which is the most
protected position in the event of an
impact.
76)On the sun visor there is a label with
suitable symbols reminding the user that it
is compulsory to deactivate the airbag if
a rearward facing child restraint system is
fitted. Always comply with the instructions
on the passenger's side sun visor (see
the "Supplementary Restraint System
(SRS) - Airbag" paragraph).77)Should it be necessary to carry a child
on the passenger side front seat in a
rearward facing child restraint system, the
passenger side front airbag and side bag
must be deactivated through the display
main Menu (see the instructions in the
"Display" paragraph, "Knowing the
instrument panel" chapter), verifying
deactivation by checking whether the LED
has switched on in the trim located
on the dashboard. Move the passenger's
seat as far back as possible to avoid
contact between the child restraint system
and the dashboard.
78)Do not adjust the front or rear seat if a
child is seated on it or on the dedicated
child restraint system.
79)Incorrect fitting of the child restraint
system may result in an inefficient
protection system. In the event of an
accident the child restraint system may
become loose and the child may be
injured, even fatally. When fitting a restraint
system for newborns or children, strictly
comply with the instructions provided
by the Manufacturer.
80)When the child restraint system is not
used, secure it with the seat belt or with
the ISOFIX anchorages, or remove it from
the vehicle. Do not leave it unsecured
inside the passenger compartment. In this
way, in the case of sudden braking or an
accident, it will not cause injuries to the
occupants.
81)After installing a child restraint system,
do not move the seat: always remove
the child restraint system before making
any adjustment.
85
9-1-2015 12:9 Pagina 85
Page 89 of 224
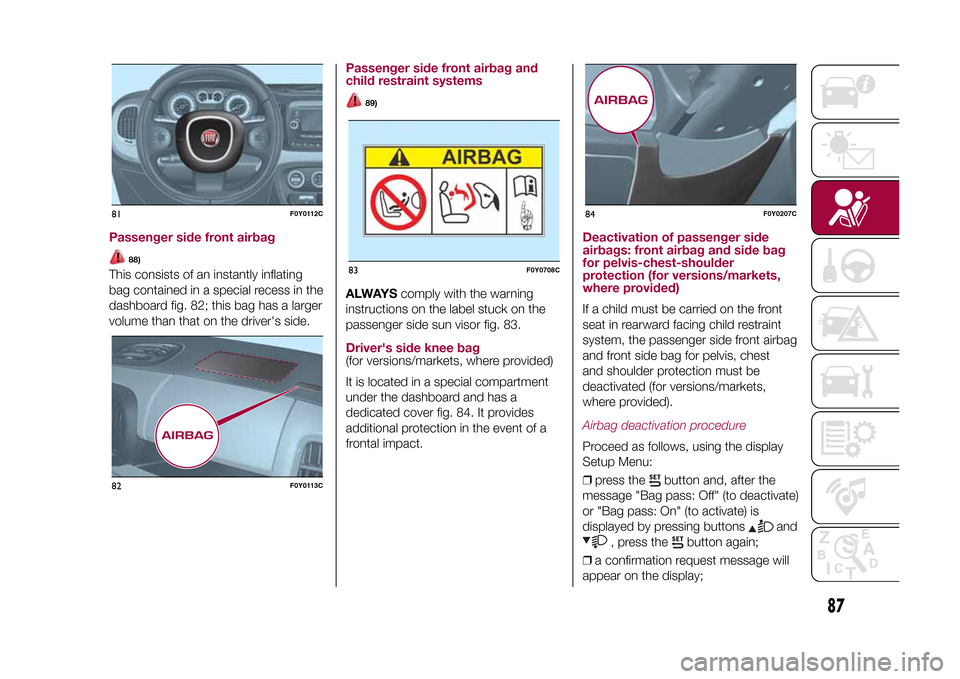
Passenger side front airbag
88)
This consists of an instantly inflating
bag contained in a special recess in the
dashboard fig. 82; this bag has a larger
volume than that on the driver's side.
Passenger side front airbag and
child restraint systems
89)
ALWAYScomply with the warning
instructions on the label stuck on the
passenger side sun visor fig. 83.Driver's side knee bag(for versions/markets, where provided)
It is located in a special compartment
under the dashboard and has a
dedicated cover fig. 84. It provides
additional protection in the event of a
frontal impact.
Deactivation of passenger side
airbags: front airbag and side bag
for pelvis-chest-shoulder
protection (for versions/markets,
where provided)If a child must be carried on the front
seat in rearward facing child restraint
system, the passenger side front airbag
and front side bag for pelvis, chest
and shoulder protection must be
deactivated (for versions/markets,
where provided).Airbag deactivation procedureProceed as follows, using the display
Setup Menu:
❒press the
button and, after the
message "Bag pass: Off" (to deactivate)
or "Bag pass: On" (to activate) is
displayed by pressing buttons
and
, press the
button again;
❒a confirmation request message will
appear on the display;
81
F0Y0112C
82
F0Y0113C
83
F0Y0708C
84
F0Y0207C
87
9-1-2015 12:9 Pagina 87
Page 90 of 224
❒by pressing the
or
buttons
select "Yes" (to confirm activation/
deactivation) or "No" (to cancel);
❒press the
button briefly; a
message confirming the selection is
displayed and you return to the menu
screen; Hold down the button to return
to the standard screen without storing.
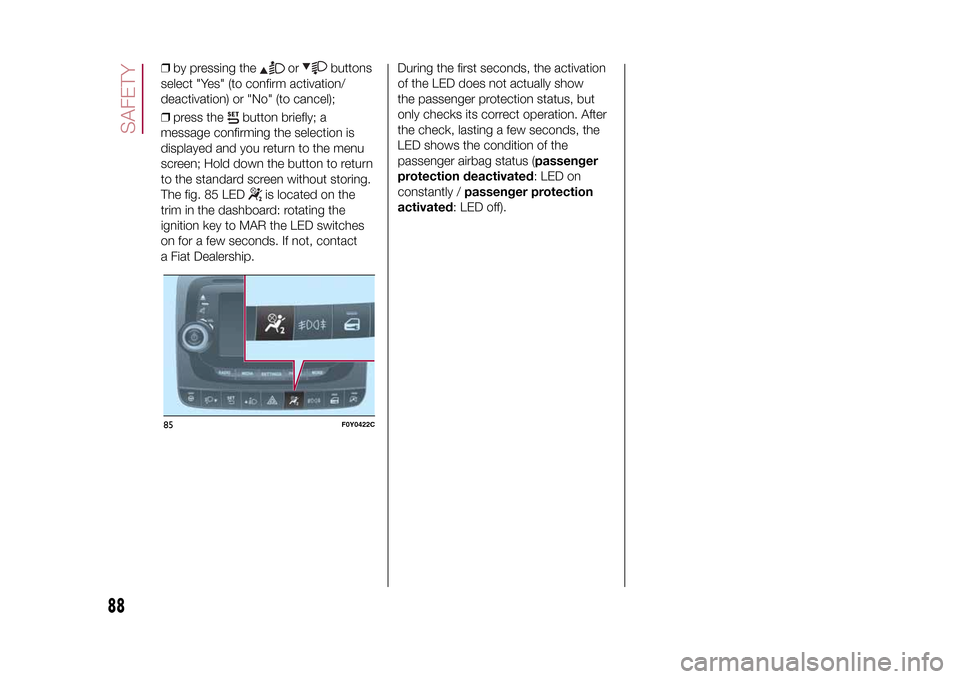
The fig. 85 LED
is located on the
trim in the dashboard: rotating the
ignition key to MAR the LED switches
on for a few seconds. If not, contact
a Fiat Dealership.During the first seconds, the activation
of the LED does not actually show
the passenger protection status, but
only checks its correct operation. After
the check, lasting a few seconds, the
LED shows the condition of the
passenger airbag status (passenger
protection deactivated: LED on
constantly /passenger protection
activated: LED off).
85
F0Y0422C
88
SAFETY
9-1-2015 12:9 Pagina 88
Page 98 of 224
WARNING
104)Depress the clutch pedal fully to
change gear correctly. Therefore, the floor
area underneath the pedal unit must not
be obstructed in any way. Ensure that the
floor mat is always laid flat and does not
interfere with use of the pedals.
WARNING
56)Do not drive with your hand resting on
the gear lever as the force exerted, even
if slight, could lead over time to premature
wear of the gearbox internal components.
USING THE
DUALOGIC
GEARBOX(for versions/markets, where provided)
105)
57)
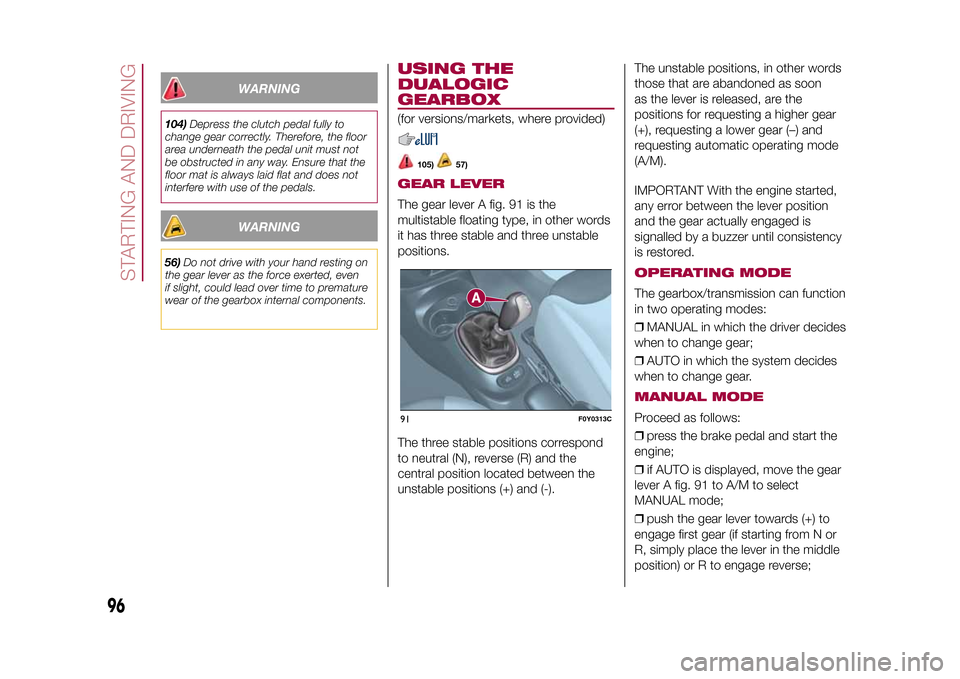
GEAR LEVERThe gear lever A fig. 91 is the
multistable floating type, in other words
it has three stable and three unstable
positions.
The three stable positions correspond
to neutral (N), reverse (R) and the
central position located between the
unstable positions (+) and (-).The unstable positions, in other words
those that are abandoned as soon
as the lever is released, are the
positions for requesting a higher gear
(+), requesting a lower gear (–) and
requesting automatic operating mode
(A/M).
IMPORTANT With the engine started,
any error between the lever position
and the gear actually engaged is
signalled by a buzzer until consistency
is restored.
OPERATING MODEThe gearbox/transmission can function
in two operating modes:
❒MANUAL in which the driver decides
when to change gear;
❒AUTO in which the system decides
when to change gear.MANUAL MODEProceed as follows:
❒press the brake pedal and start the
engine;
❒if AUTO is displayed, move the gear
lever A fig. 91 to A/M to select
MANUAL mode;
❒push the gear lever towards (+) to
engage first gear (if starting from N or
R, simply place the lever in the middle
position) or R to engage reverse;
91
F0Y0313C
96
STARTING AND DRIVING
9-1-2015 12:9 Pagina 96
Page 99 of 224
❒release the brake pedal and press
the accelerator pedal;
❒in driving conditions, push the gear
lever towards (+) to engage the next
gear up or towards (–) to engage the
next gear down.AUTOMATIC LOGIC
(AUTO)Proceed as follows:
❒press the brake pedal and start the
engine;
❒if AUTO is not displayed, move the
gear lever A fig. 91 to A/M to select
AUTOMATIC mode;
❒push the gear lever towards (+) to
engage first gear (if starting from N or
R, simply place the lever in the middle
position), or R to engage reverse;
❒release the brake pedal and press
the accelerator pedal: the gear most
suited to the vehicle speed will be
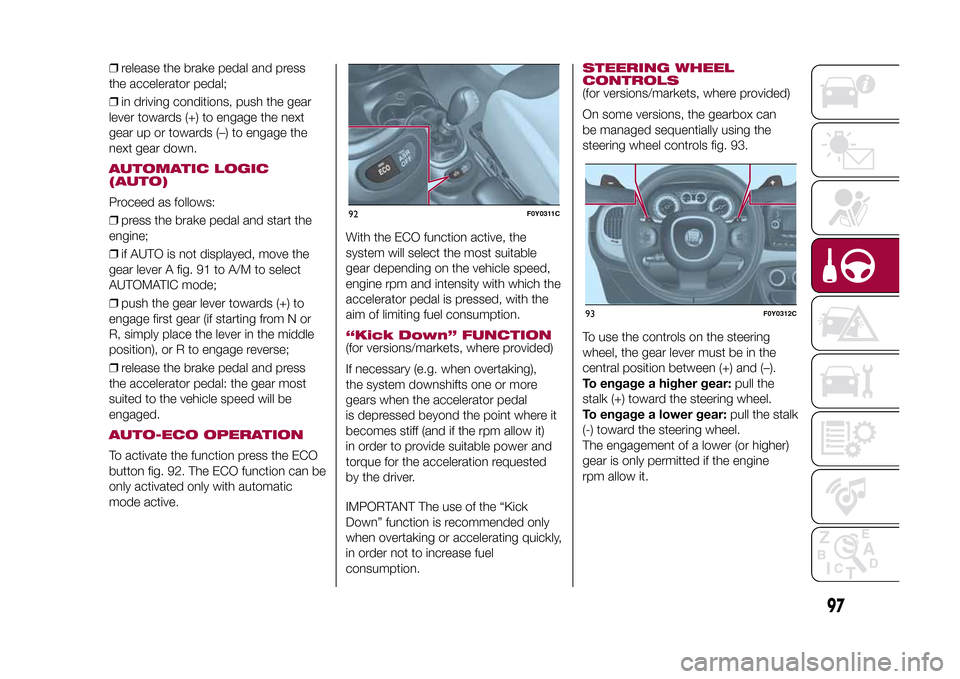
engaged.AUTO-ECO OPERATIONTo activate the function press the ECO
button fig. 92. The ECO function can be
only activated only with automatic
mode active.With the ECO function active, the
system will select the most suitable
gear depending on the vehicle speed,
engine rpm and intensity with which the
accelerator pedal is pressed, with the
aim of limiting fuel consumption.
“Kick Down” FUNCTION(for versions/markets, where provided)
If necessary (e.g. when overtaking),
the system downshifts one or more
gears when the accelerator pedal
is depressed beyond the point where it
becomes stiff (and if the rpm allow it)
in order to provide suitable power and
torque for the acceleration requested
by the driver.
IMPORTANT The use of the “Kick
Down” function is recommended only
when overtaking or accelerating quickly,
in order not to increase fuel
consumption.
STEERING WHEEL
CONTROLS(for versions/markets, where provided)
On some versions, the gearbox can
be managed sequentially using the
steering wheel controls fig. 93.
To use the controls on the steering
wheel, the gear lever must be in the
central position between (+) and (–).
To engage a higher gear:pull the
stalk (+) toward the steering wheel.
To engage a lower gear:pull the stalk
(-) toward the steering wheel.
The engagement of a lower (or higher)
gear is only permitted if the engine
rpm allow it.
92
F0Y0311C
93
F0Y0312C
97
9-1-2015 12:9 Pagina 97
Page 103 of 224
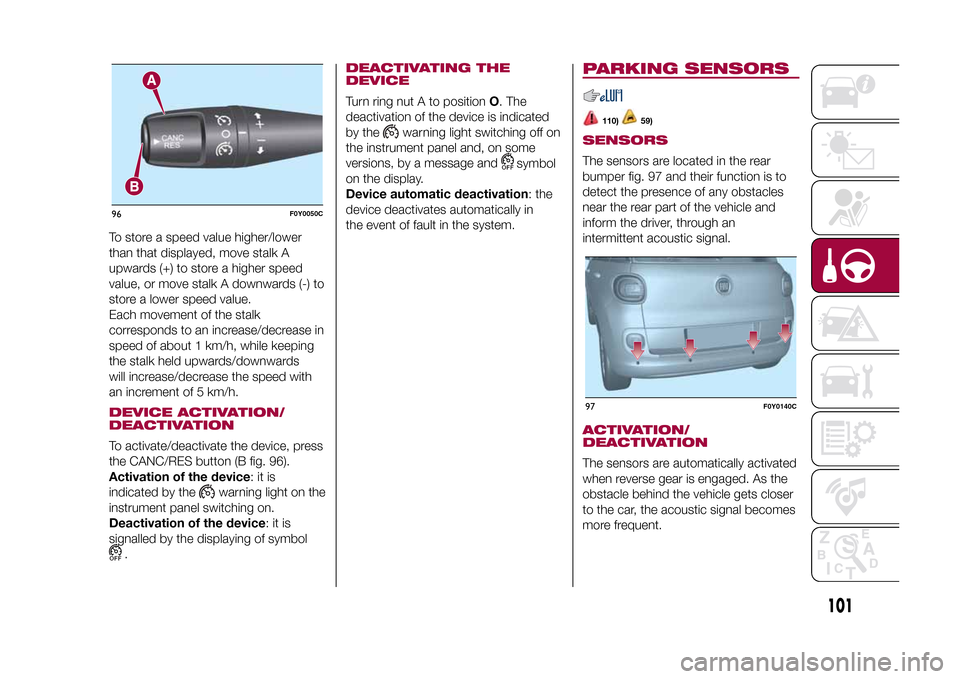
To store a speed value higher/lower
than that displayed, move stalk A
upwards (+) to store a higher speed
value, or move stalk A downwards (-) to
store a lower speed value.
Each movement of the stalk
corresponds to an increase/decrease in
speed of about 1 km/h, while keeping
the stalk held upwards/downwards
will increase/decrease the speed with
an increment of 5 km/h.DEVICE ACTIVATION/
DEACTIVATIONTo activate/deactivate the device, press
the CANC/RES button (B fig. 96).
Activation of the device:itis
indicated by the
warning light on the
instrument panel switching on.
Deactivation of the device:itis
signalled by the displaying of symbol
.
DEACTIVATING THE
DEVICETurn ring nut A to positionO. The
deactivation of the device is indicated
by the
warning light switching off on
the instrument panel and, on some
versions, by a message and
symbol
on the display.
Device automatic deactivation: the
device deactivates automatically in
the event of fault in the system.
PARKING SENSORS
110)
59)
SENSORSThe sensors are located in the rear
bumper fig. 97 and their function is to
detect the presence of any obstacles
near the rear part of the vehicle and
inform the driver, through an
intermittent acoustic signal.ACTIVATION/
DEACTIVATIONThe sensors are automatically activated
when reverse gear is engaged. As the
obstacle behind the vehicle gets closer
to the car, the acoustic signal becomes
more frequent.
96
F0Y0050C
97
F0Y0140C
101
9-1-2015 12:9 Pagina 101
Page 105 of 224
REAR VIEW CAMERA
111)
60)
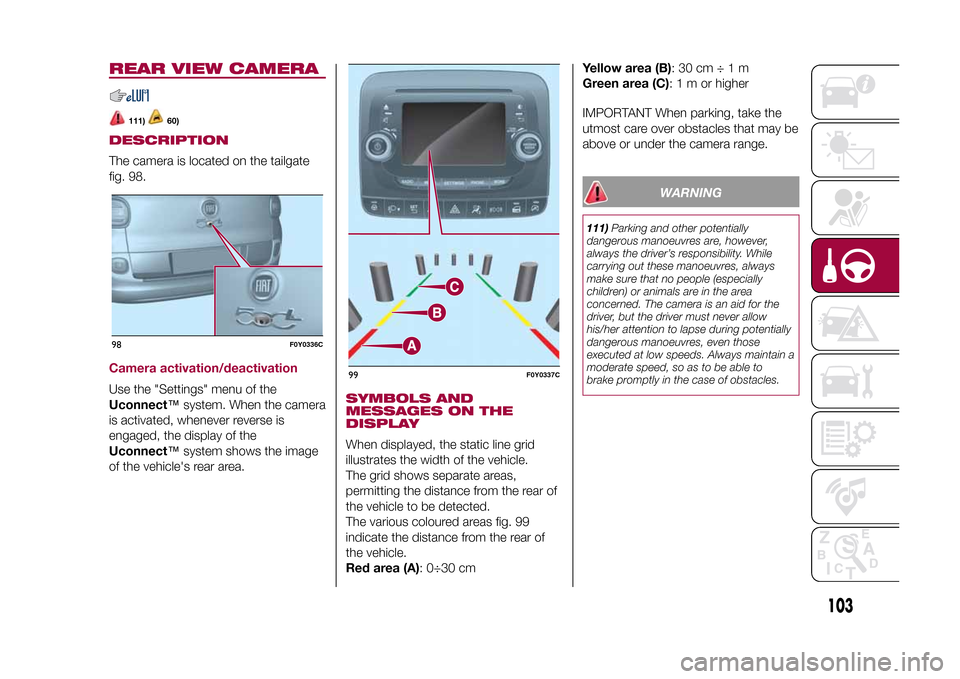
DESCRIPTIONThe camera is located on the tailgate
fig. 98.Camera activation/deactivationUse the "Settings" menu of the
Uconnect™system. When the camera
is activated, whenever reverse is
engaged, the display of the
Uconnect™system shows the image
of the vehicle's rear area.
SYMBOLS AND
MESSAGES ON THE
DISPLAYWhen displayed, the static line grid
illustrates the width of the vehicle.
The grid shows separate areas,
permitting the distance from the rear of
the vehicle to be detected.
The various coloured areas fig. 99
indicate the distance from the rear of
the vehicle.
Red area (A): 0÷30 cmYellow area (B):30cm÷1m
Green area (C):1morhigher
IMPORTANT When parking, take the
utmost care over obstacles that may be
above or under the camera range.
WARNING
111)Parking and other potentially
dangerous manoeuvres are, however,
always the driver’s responsibility. While
carrying out these manoeuvres, always
make sure that no people (especially
children) or animals are in the area
concerned. The camera is an aid for the
driver, but the driver must never allow
his/her attention to lapse during potentially
dangerous manoeuvres, even those
executed at low speeds. Always maintain a
moderate speed, so as to be able to
brake promptly in the case of obstacles.
98
F0Y0336C
99
F0Y0337C
103
9-1-2015 12:9 Pagina 103
Page 131 of 224
If it is often necessary to perform a
jump starting, have the vehicle battery
and the recharging system checked
by a Fiat Dealership.
IMPORTANT Any accessories (e.g.
mobile phones, etc.) connected to the
vehicle power sockets draw current
even if they are not used. These
devices, if left connected too much time
with engine off, may cause the battery
to drain with following reduction of
its life and/or failure to start the engine.
WARNING
140)Do not get too close to the radiator
cooling fan: the electric fan may start;
danger of injury. Scarves, ties and other
loose clothing may be pulled by moving
parts.
141)Remove any metal objects (e.g. rings,
watches, bracelets), that might cause an
accidental electrical contact and cause
serious injury.
142)Batteries contain acid which may burn
skin and eyes. Batteries produce
hydrogen, which is easily flammable and
explosive. Thus keep away flames or
devices which may cause sparks.
WARNING
68)Do not connect the cable to the
negative terminal (–) of the flat battery. The
following spark could lead to battery
explosion and cause serious harm. Only
use the specific earth point; do not use any
other exposed metallic part.
FUEL CUT-OFF
SYSTEM
143)
This intervenes in the event of an
impact causing:
❒the interruption of the fuel supply with
the engine consequently cutting out
❒the automatic unlocking of the doors
❒the automatic switching on of the
interior lights
❒the switching on of the hazard
warning lights.
On some versions, the intervention of
the system is indicated by a message
shown on the display.
IMPORTANT Carefully check the car for
fuel leaks, for instance in the engine
compartment, under the car or near the
tank area. After a collision, turn the
ignition key to STOP to prevent the
battery from running down.
To restore the correct operation of the
car, proceed as follows:
❒turn the ignition key to the MAR
position;
❒activate the right direction indicator
and then stop it;
❒activate the left direction indicator
and then stop it;
❒activate the right direction indicator
and then stop it;
129
9-1-2015 12:9 Pagina 129