Page 250 of 426

NOTE:
•Even if the power steering assistance is no longer
operational, it is still possible to steer the vehicle.
Under these conditions there will be a substantial
increase in steering effort, especially at low speeds and
during parking maneuvers.
•If the condition persists, see your authorized dealer for
service.
PARKING BRAKE
Before leaving the vehicle, make sure that the parking
brake is fully applied. Also, be certain to leave the
manual transmission in REVERSE or first gear.
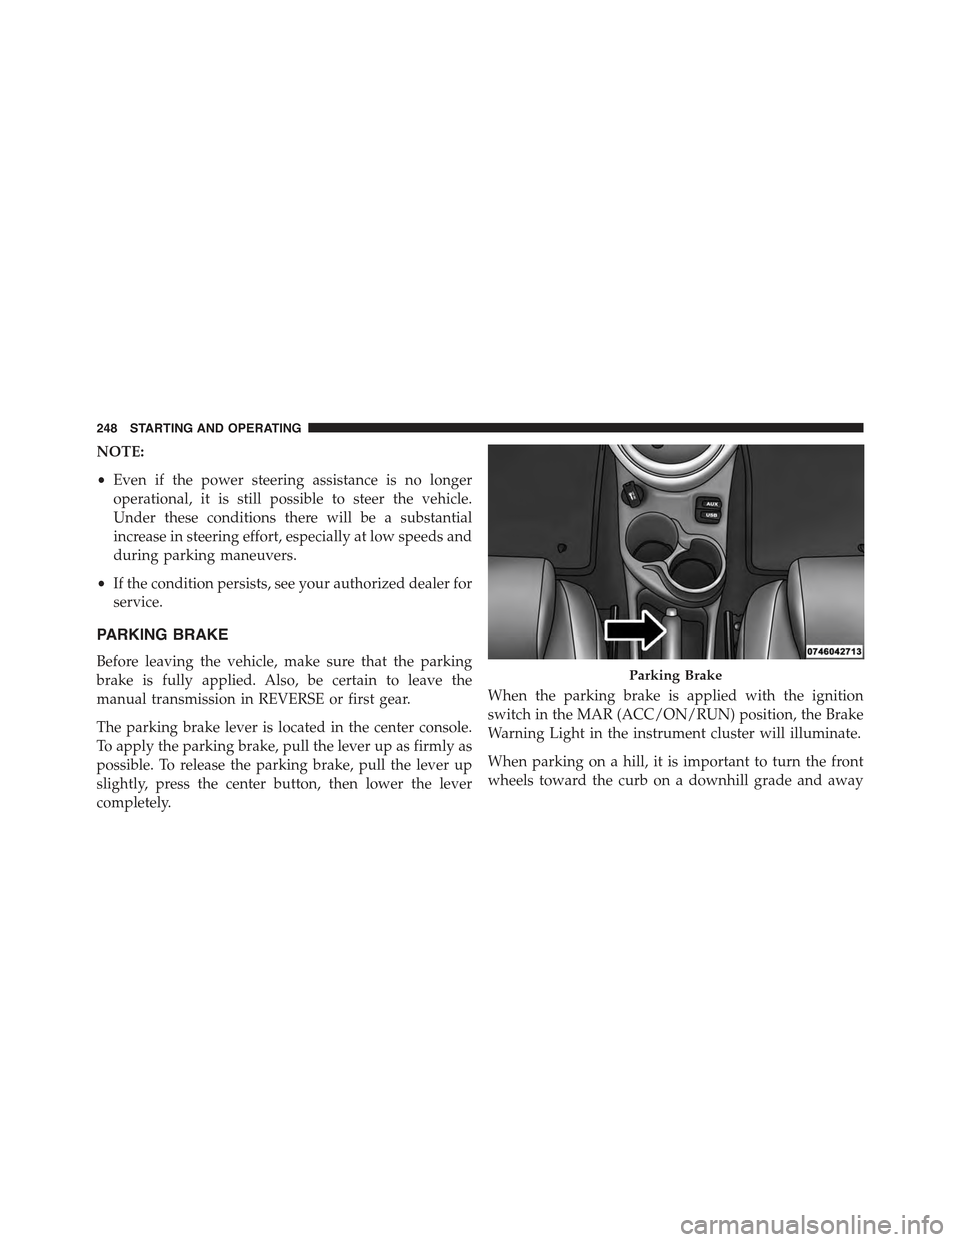
The parking brake lever is located in the center console.
To apply the parking brake, pull the lever up as firmly as
possible. To release the parking brake, pull the lever up
slightly, press the center button, then lower the lever
completely.
When the parking brake is applied with the ignition
switch in the MAR (ACC/ON/RUN) position, the Brake
Warning Light in the instrument cluster will illuminate.
When parking on a hill, it is important to turn the front
wheels toward the curb on a downhill grade and away
Parking Brake
248 STARTING AND OPERATING
Page 252 of 426
SPORT MODE
Manual Transmission — If Equipped
In Sport mode, the engine is more responsive to the
throttle pedal, and provides more maximum torque by
increasing turbo boost pressure. Steering feedback is
improved, and steering effort is slightly higher. This
driving mode is useful for spirited driving.
1. To activate the Sport mode, press the SPORT button.
Once activated, a SPORT message will be displayed in
the instrument cluster.
2. Momentarily release the accelerator pedal.
3. Press the accelerator pedal again to activate.
SPORT Button
250 STARTING AND OPERATING
Page 257 of 426

wheel(s) and engine power is reduced to provide en-
hanced acceleration and stability. A feature of the TCS
system, Brake Limited Differential (BLD), functions simi-
lar to a limited slip differential and controls the wheel
spin across a driven axle. If one wheel on a driven axle is
spinning faster than the other, the system will apply the
brake of the spinning wheel. This will allow more engine
torque to be applied to the wheel that is not spinning.
This feature remains active even if TCS and ESC are in
the Partial Off mode or Full Off mode. Refer to “Elec-
tronic Stability Control (ESC)” in this section for further
information.
Hill Start Assist (HSA)
The HSA system is designed to assist the driver when
starting a vehicle from a stop on a hill. HSA will maintain
the level of brake pressure the driver applied for a short
period of time after the driver takes his foot off the brake
pedal. If the driver does not apply the throttle during this
short period of time, the system will release brake
pressure and the vehicle will roll down the hill. The
system will release brake pressure in proportion to the
amount of throttle applied as the vehicle starts to move in
the intended direction of travel.
HSA Activation Criteria
The following criteria must be met in order for HSA to
activate:
•Vehicle must be stopped.
•Vehicle must be on a 2.5% (manual transmission) or
7% grade or greater (automatic transmission) grade
hill.
•Gear selection matches vehicle uphill direction (i.e.,
vehicle in NEUTRAL [manual transmission], vehicle
facing uphill is in forward gear; vehicle backing uphill
is in REVERSE gear).
5
STARTING AND OPERATING 255
Page 259 of 426
NOTE:The ESC Off switch is located left of the steering
column (Manual Transmission Only).
ESC Off Switch (Automatic Transmission)ESC Off Switch (Manual Transmission)
5
STARTING AND OPERATING 257
Page 304 of 426
RECREATIONAL TOWING (BEHIND MOTORHOME, ETC.)
Towing This Vehicle Behind Another Vehicle
Towing Condition Wheels OFF the Ground Manual Transmission Automatic Transmission
Flat TowNONETransmission in
NEUTRAL
NOT ALLOWED
Dolly TowFrontOKOK
RearNOT ALLOWEDNOT ALLOWED
On TrailerALLOKOK
This vehicle may be towed on a flatbed or vehicle trailer
provided all four wheels are OFF the ground.
This vehicle may also be towed using a tow dolly (with
the front wheels OFF the ground).
Vehicles equipped withmanual transmissionsmay be
flat towed (with all four wheels on the ground) at any
legal highway speed, for any distance, if the manual
transmission is in NEUTRAL.
302 STARTING AND OPERATING
Page 308 of 426
!JUMP-STARTING PROCEDURE............327
▫Preparations For Jump-Start..............328
▫Jump-Starting Procedure................330
!FREEING A STUCK VEHICLE.............331
!SHIFT LEVER OVERRIDE................333
!TOWING A DISABLED VEHICLE...........334
▫Automatic Transmission.................335
▫Manual Transmission...................336
306 WHAT TO DO IN EMERGENCIES
Page 315 of 426

WARNING!(Continued)
•Tire Service Kit Sealant solution contains latex.
In case of an allergic reaction or rash, consult a
physician immediately. Keep Tire Service Kit out
of reach of children. If swallowed, rinse mouth
immediately with plenty of water and drink plenty
of water. Do not induce vomiting! Consult a phy-
sician immediately.
Sealing A Tire With Tire Service Kit
(A) Whenever You Stop To Use Tire Service Kit:
1. Pull over to a safe location and turn on the vehicle’s
Hazard Warning flashers.
2. Verify that the valve stem (on the wheel with the
deflated tire) is in a position that is near to the ground.
This will allow the Tire Service Kit Hoses (6) and (7) to
reach the valve stem and keep the Tire Service Kit flat
on the ground. This will provide the best positioning
of the kit when injecting the sealant into the deflated
tire and running the air pump. Move the vehicle as
necessary to place the valve stem in this position
before proceeding.
3. Place the transmission in PARK (auto transmission) or
in Gear (manual transmission) and place the ignition
in the OFF position.
4. Set the parking brake.
(B) Setting Up To Use Tire Service Kit:
1. Push in the Mode Select Knob (5) and turn to the
Sealant Mode position.
2. Uncoil the Sealant Hose (6) and then remove the cap
from the fitting at the end of the hose.
3. Place the Tire Service Kit flat on the ground next to the
deflated tire.
6
WHAT TO DO IN EMERGENCIES 313
Page 316 of 426

4. Remove the cap from the valve stem and then screw
the fitting at the end of the Sealant Hose (6) onto the
valve stem.
5. Uncoil the Power Plug (8) and insert the plug into the
vehicle’s 12 Volt power outlet.
NOTE:Do not remove foreign objects (e.g., screws or
nails) from the tire.
(C) Injecting Tire Service Kit Sealant Into The
Deflated Tire:
•Always start the engine before turning ON the Tire
Service Kit.
NOTE:Manual transmission vehicles must have the
parking brake engaged and the shift lever in NEUTRAL.
•After pressing the Power Button (4), the sealant (white
fluid) will flow from the Sealant Bottle (1) through the
Sealant Hose (6) and into the tire.
NOTE:Sealant may leak out through the puncture in the
tire.
If the sealant (white fluid) does not flow within 0 –
10 seconds through the Sealant Hose (6):
1. Press the Power Button (4) to turn Off the Tire Service
Kit. Disconnect the Sealant Hose (6) from the valve
stem. Make sure the valve stem is free of debris.
Reconnect the Sealant Hose (6) to the valve stem.
Check that the Mode Select Knob (5) is in the Sealant
Mode position and not Air Mode. Press the Power
Button (4) to turn On the Tire Service Kit.
2. Connect the Power Plug (8) to a different 12 Volt
power outlet in your vehicle or another vehicle, if
available. Make sure the engine is running before
turning ON the Tire Service Kit.
3. The Sealant Bottle (1) may be empty due to previous
use. Call for assistance.
314 WHAT TO DO IN EMERGENCIES