2015 DODGE JOURNEY lock
[x] Cancel search: lockPage 36 of 140
TILT/TELESCOPING STEERING COLUMN
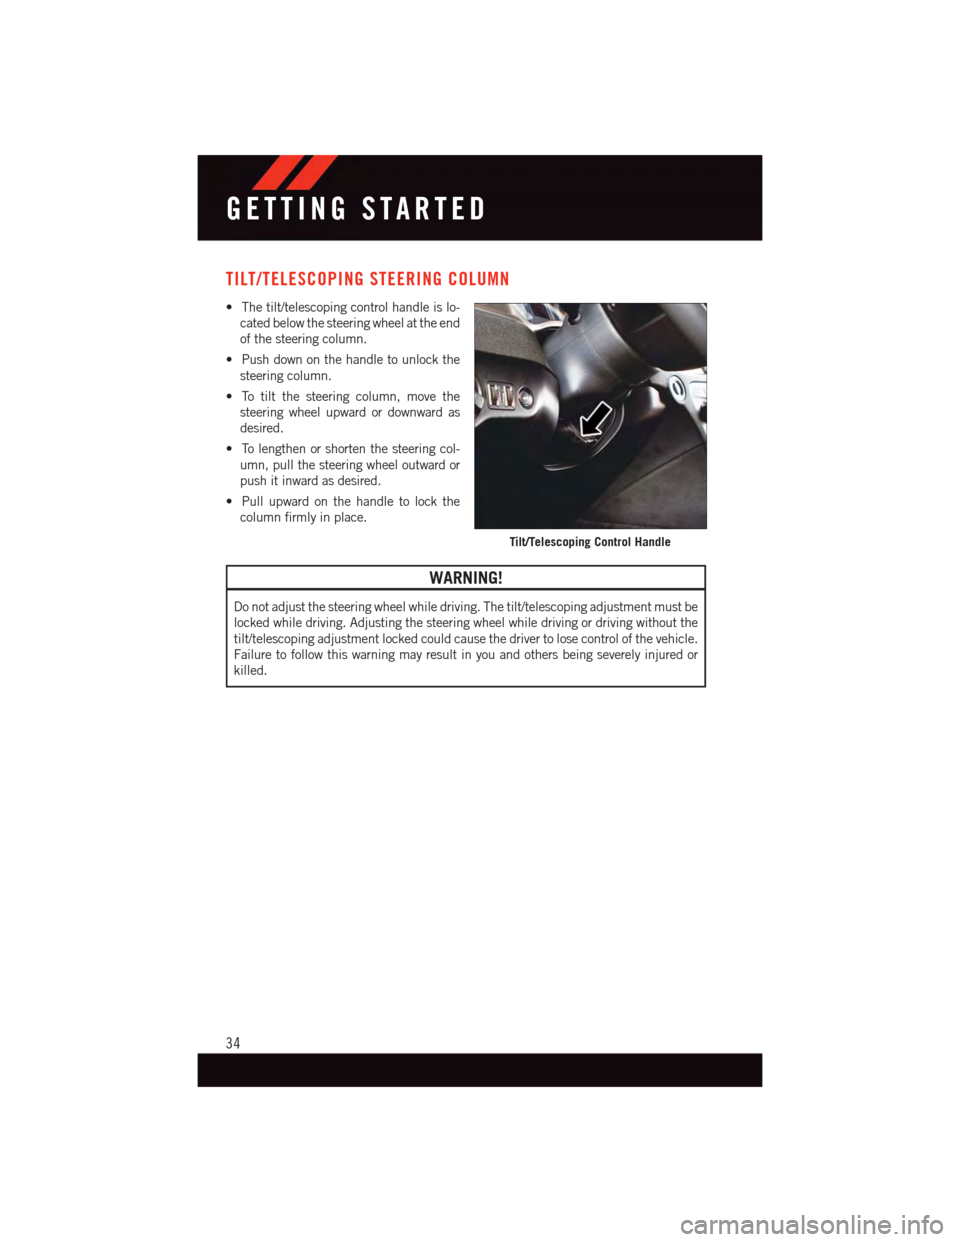
•Thetilt/telescopingcontrolhandleislo-
cated below the steering wheel at the end
of the steering column.
•Pushdownonthehandletounlockthe
steering column.
•Totiltthesteeringcolumn,movethe
steering wheel upward or downward as
desired.
•Tolengthenorshortenthesteeringcol-
umn, pull the steering wheel outward or
push it inward as desired.
•Pullupwardonthehandletolockthe
column firmly in place.
WARNING!
Do not adjust the steering wheel while driving. The tilt/telescoping adjustment must be
locked while driving. Adjusting the steering wheel while driving or driving without the
tilt/telescoping adjustment locked could cause the driver to lose control of the vehicle.
Failure to follow this warning may result in you and others being severely injured or
killed.
Tilt/Telescoping Control Handle
GETTING STARTED
34
Page 47 of 140

WARNING!
•Donotletchildrenplaywiththesunroof.Neverleavechildrenunattendedina
vehicle, or with access to an unlocked vehicle. Do not leave the Key Fob in or near
the vehicle, and do not leave the ignition of a vehicle equipped with Keyless
Enter-N-Go™ in the ACC or ON/RUN mode. Occupants, particularly unattended
children, can become entrapped by the power sunroof while operating the power
sunroof switch. Such entrapment may result in serious injury or death.
•Inacollision,thereisagreaterriskofbeingthrownfromavehiclewithanopen
sunroof. You could also be severely injured or killed. Always fasten your seat belt
properly and make sure all passengers are properly secured.
•Do not allow small children to operate the sunroof. Never allow your fingers, other body
parts, or any object to project through the sunroof opening. Injury may result.
WIND BUFFETING
Wind buffeting can be described as a helicopter-type percussion sound. If buffeting
occurs with the rear windows open, adjust the front and rear windows together.
If buffeting occurs with the sunroof open, adjust the sunroof opening, or adjust any
window. This will minimize buffeting.
OPERATING YOUR VEHICLE
45
Page 51 of 140

Uconnect® 4.3 & 4.3S AT A GLANCE
Displaying The Time
•IfthetimeisnotcurrentlydisplayedatthetopofthescreenwheninRadiomode,push
the SETTINGS button, then press “Clock.” Select “Show Time,” then press “On.”
Setting The Time
•PushtheSETTINGSbuttononthefaceplate,thenpressthe“Clock”buttononthe
touchscreen.
•Pressthe“Time”buttononthetouchscreen.
•Pressthe“UporDown”buttonsonthetouchscreentoadjustthehours,minutesor
AM/PM.
NOTE:
12hr format and 24hr format can also be set.
•Oncethetimeissetpressthe“Done”buttononthetouchscreentoexitthetime
screen.
Uconnect® 4.3 & 4.3S
1—Radio:AM/FM/SIRIUSSatelliteRadio(IfEquipped)2—STATUSBAR3—Settings:Clock,Display,etc.4—ScreenOFF/ON5—MORE:Uconnect®Phone, Compass, etc.6—Player:CD,iPod®,USBDeviceorAUXDevice
ELECTRONICS
49
Page 53 of 140

Uconnect® 8.4 & 8.4N AT A GLANCE
Displaying The Time
•Ifthetimeisnotcurrentlydisplayedontheradioorplayermainpage,pressthe“More”
button on the touchscreen and then press the “Settings” button on the touchscreen. In
the Settings list, press the “Clock” button on the touchscreen, then press the check box
next to Show Time in Status Bar.
Uconnect® 8.4N
1—STATUSBAR2—SmallNavigationMap(8.4N)3—MoreSettingsButton4—Uconnect®Phone Button5—GarminNavigationButton(8.4N)
6—ClimateControlButton7—ControlsButton8—PlayerButton9—RadioButton
ELECTRONICS
51
Page 54 of 140
Setting The Time
•Model8.4NsynchronizestimeautomaticallyviaGPS,soshouldnotrequireanytime
adjustment. If you do need to set the time manually, follow the instructions below for
Model 8.4.
•ForModel8.4,turntheuniton,thenpressthe“TimeDisplay”atthetopofthescreen.
Press “Yes”.
•Ifthetimeisnotdisplayedatthetopofthescreen,press“More”buttononthe
touchscreen and then “Settings” button on the touchscreen. In the Settings screen,
press the “Clock” button on the touchscreen, then check or uncheck this option.
•Press“+”or“–”nexttoSetTimeHoursandSetTimeMinutestoadjustthetime.
•Ifthesefeaturesarenotavailable,uncheckthe“Sync”withGPSbox.
•Press“X”tosaveyoursettingsandexitoutoftheClockSettingscreen.
Audio Settings
•Pressthe“Audio”buttononthetouchscreentoactivatetheAudiosettingsscreento
adjust Balance\Fade, Equalizer and Speed Adjusted Volume.
•YoucanreturntotheRadioscreenbypressingthe“X”locatedatthetopright.
Balance/Fade
•Pressthe“Balance/Fade”buttononthetouchscreentoBalanceaudiobetweenthe
front speakers or fade the audio between the rear and front speakers.
•Pressingthe“Front,”“Rear,””Left”or“Right”buttonsonthetouchscreenorpress
and drag the red Speaker Icon to adjust the Balance/Fade.
Equalizer
•Pressthe“Equalizer”buttononthetouchscreentoactivatetheEqualizerscreen.
•Pressthe“+”or“–”buttonsonthetouchscreen,orbypressinganddraggingoverthe
level bar for each of the equalizer bands. The level value, which spans between ±9, is
displayed at the bottom of each of the Bands.
Speed Adjusted Volume
•Pressthe“SpeedAdjustedVolume”buttononthetouchscreentoactivatetheSpeed
Adjusted Volume screen. The Speed Adjusted Volume is adjusted by pressing the “+”
and “–” buttons or by pressing and dragging over the level bar. This alters the automatic
adjustment of the audio volume with variation to vehicle speed.
ELECTRONICS
52
Page 58 of 140
Traffic & Weather (U.S. Residents/8.4 & 8.4N Only)
•AutomaticallytellsyouwhenTraffic&Weatherforafavoritecityisavailable,andgives
you the option to switch to that channel. Select Traffic & Weather then press “Jump” to
activate the feature. After listening to Traffic and Weather, press “Jump” again to return
to the previous channel.
Fav (8.4 & 8.4N Only)
•Activatesthefavoritesmenu.Youcanaddupto50favoriteartistsorsongs.Justpress
“Add Fav Artist” or “Add Fav Song” while the song is playing. You will then be alerted
any time one of these songs, or works by these artists, is playing on other SiriusXM
Satellite Radio channels.
SiriusXM Parental Controls
•Youcanskiporhidecertainchannelsfromviewifyoudonotwantaccesstothem.Push
the SETTINGS button on the faceplate (4.3S) or press the “More” button on the
touchscreen, then the “Settings” button on the touchscreen (8.4 & 8.4N), next press
the “SiriusXM Satellite Radio Setup” button on the touchscreen, then select “Channel
Skip.” Press the channel(s) to be skipped (4.3S) or press the box, check-mark, next to
the channel you want skipped (8.4 & 8.4N). They will not show up in normal usage.
•SiriusXMSatelliteRadioalsoofferstheoptiontopermanentlyblockselectedchannels.
Call 1-888-539-7474 and request the Family Package.
Browse
•LetsyoubrowsetheSiriusXMSatelliteRadiochannellisting,Favorites,Genres,Game
Zone, and Weather channels. Jump setting, and also provides the SiriusXM Satellite
Radio channel list. Browse contains many sub-menus.
BrowseSub-MenuSub-Menu Description
All Shows the channel listing.
GenreProvides a list of all genres, and lets you jump to a channel within the selectedgenre.
Presets (8.4 &8.4N Only)Lets you scroll the list of Preset satellite channels. Press the “Chan-nel”, or press “Enter” on the Tune knob, to go to that channel. Pressthe “Trash can” icon to delete a preset. Your presets are also shown atthe top of the main Satellite Radio screen.
FavoritesLets you manage artists and songs in the Favorites list and configure AlertSettings to let you know when favorite songs or artists are playing on otherchannels). Also, view a list of channels airing any of your Favorites.
Game Zone Provides alerts when your favorite sports teams are starting a gamewhich is being aired on other SiriusXM Satellite Radio channels, orwhen their game score is announced. You can select and manage yourTe a m s l i s t h e r e , a n d c o n f i g u r e a l e r t s .
Tr a f f i c / W e a t h e r(4.3S only)Lets you browse Traffic & Weather information by city.
Jump (8.4 &8.4N only)Lets you select your favorite cities for Traffic & Weather information, byselecting Traffic, then Jump feature on the main satellite radio screen.
ELECTRONICS
56
Page 79 of 140
Compass Calibration
This compass is self-calibrating, which eliminates the need to set the compass manually.
When the vehicle is new, the compass may appear erratic and the EVIC will display “CAL”
until the compass is calibrated.
Yo u m a y a l s o c a l i b r a t e t h e c o m p a s s b y c o m p l e t i n g o n e o r m o r e 3 6 0 d e g r e e t u r n s ( i n a n
area free from large metal or metallic objects) until the “CAL” message displayed in the
EVIC turns off. The compass will now function normally.
PROGRAMMABLE FEATURES
Electronic Vehicle Information Center (EVIC) — If Equipped
•TheEVICcanbeusedtovieworchangethefollowingsettings.PushtheUPor
DOWNbutton until System Setup displays, then push the SELECTbutton.
Scroll through the settings using the UP or DOWN buttons. Push the SELECT
button to change the setting. Push the BACK button to scroll back to a previous menu
or sub menu.
•Fuel Economy•Average Fuel Economy•DistanceToEmpty(DTE)•MilesPerGallon(MPG)
•Tr i p I n f o•Tr i p A•TripB•ElapsedTime
•Vehicle Speed•Ti r e P S I
•Messages•VehicleInfo(CustomerInformation
Features)
Uconnect® 4.3 Customer Programmable Features
•TheUconnect®4.3 system allows you to access Customer Programmable feature
settings such as Display, Clock, Safety/Assistance, Lights, Doors & Locks, Heated
Seats, Engine Off Operation, Compass Settings, Audio, Phone/ Bluetooth®and SIRIUS
Setup through buttons on the faceplate and buttons on the touchscreen.
•Pressthe“Settings”buttonontherightsideoftheunittoaccesstheSettingsscreen,
use the “Page Up/Down” buttons on the touchscreen to scroll through the following
settings. The following feature settings are available:
•Display•AutoOnComfort&RemoteStart
•Clock•EngineOffOptions
•Safety/Assistance•Audio
•Lights•Phone/Bluetooth®
•Doors&Locks•SIRIUSSetup
ELECTRONICS
77
Page 80 of 140
Uconnect® 8.4 Customer Programmable Features
•TheUconnect®8.4 system allows you to access Customer Programmable feature
settings such as Display, Clock, Safety/Assistance, Lights, Doors & Locks, Heated
Seats, Engine Off Operation, Compass Settings, Audio, Phone/Bluetooth®and SIRIUS
Setup through buttons on the touchscreen.
•Pressthe“More”buttononthebottomofthetouchscreen,thenpressthe“Settings”
button on the faceplate to access the Settings screen. When making a selection, scroll
up or down until the preferred setting is highlighted, then press and release the
preferred setting until a check-mark appears next to the setting, showing that setting
has been selected. The following feature settings are available:
•Display•AutoOnComfort&RemoteStart
•Clock•EngineOffOptions
•Safety/Assistance•Audio
•Lights•Phone/Bluetooth®
•Doors&Locks•SIRIUSSetup
UNIVERSAL GARAGE DOOR OPENER (HomeLink®)
•HomeLink®replaces up to three hand-held transmitters that operate devices such as
garage door openers, motorized gates, lighting or home security systems. The
HomeLink®unit is powered by your vehicles 12 Volt battery.
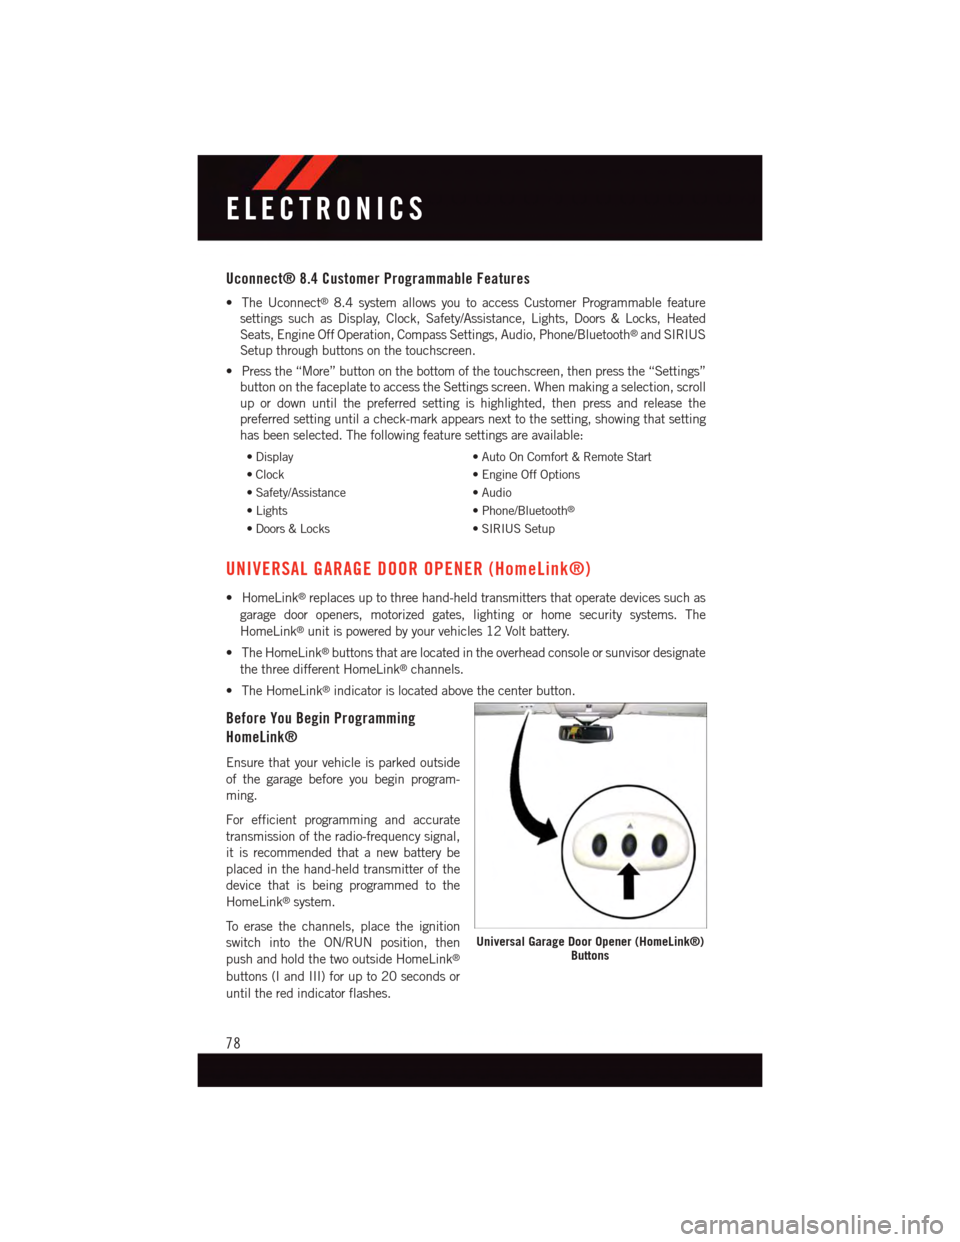
•TheHomeLink®buttons that are located in the overhead console or sunvisor designate
the three different HomeLink®channels.
•TheHomeLink®indicator is located above the center button.
Before You Begin Programming
HomeLink®
Ensure that your vehicle is parked outside
of the garage before you begin program-
ming.
For efficient programming and accurate
transmission of the radio-frequency signal,
it is recommended that a new battery be
placed in the hand-held transmitter of the
device that is being programmed to the
HomeLink®system.
To e r a s e t h e c h a n n e l s , p l a c e t h e i g n i t i o n
switch into the ON/RUN position, then
push and hold the two outside HomeLink®
buttons (I and III) for up to 20 seconds or
until the red indicator flashes.
Universal Garage Door Opener (HomeLink®)Buttons
ELECTRONICS
78