2015 DODGE GRAND CARAVAN key
[x] Cancel search: keyPage 18 of 164

VEHICLE SECURITY ALARM
This Vehicle Security Alarm monitors the doors, liftgate, and ignition switch for unauthor-
ized operation.
When the alarm is activated, the interior switches for door locks are disabled. The Vehicle
Security Alarm provides both audio and visual signals repeatedly for three minutes. If the
disturbance is still present (driver's door, passenger door, other doors, ignition) after three
minutes, the parking lights and tail lights will flash for an additional 15 minutes.
To Arm:
•Lockthedoorusingeitherthepowerdoorlockswitch(onedoormustbeopen)orthe
LOCK button on the Remote Keyless Entry (RKE) transmitter (doors can be open or
closed), and close all doors.
The Vehicle Security Light in the instrument cluster will flash for 16 seconds. This shows
that the Vehicle Security Alarm is arming. During this period, if a door is opened, the
ignition is cycled to ON/RUN, or the power door locks are unlocked in any manner, the
Vehicle Security Alarm will automatically disarm.
NOTE:
•TheVehicleSecurityAlarmwillnotarmifyoulockthedoorswiththemanualdoorlock
plungers.
•Oncearmed,theVehicleSecurityAlarmdisablestheunlockswitchonthedriverdoor
trim panel and passenger door trim panel.
To Disarm The System:
•PushtheKeyFobUNLOCKbuttonorcycletheignitiontotheON/RUNposition.
The Vehicle Security Alarm is designed to protect your vehicle; however, you can create
conditions where the Vehicle Security Alarm will give you a false alarm. If one of the
previously described arming sequences has occurred, the Vehicle Security Alarm will arm
regardless of whether you are in the vehicle or not. If you remain in the vehicle and open
adoor,thealarmwillsound.Ifthisoccurs,disarmtheVehicleSecurityAlarm.
If the Vehicle Security Alarm is armed and the battery becomes disconnected the Vehicle
Security Alarm will remain armed when the battery is reconnected. The exterior lights will
flash, and the horn will sound. If this occurs, disarm the Vehicle Security Alarm.
GETTING STARTED
16
Page 55 of 164

POWER SLIDING SIDE DOORS
Automatic/Manual Operation
•Thepowerslidingdoormaybeopenedorclosedmanuallyorbyusingthebuttonson
the Key Fob, overhead console switch, or rear door switch.
•Pullingtheinsideoroutsidepowerslid-
ing door handle will also power open the
power sliding doors.
NOTE:
When the power sliding door master lock
switch is in the OFF position, the power
sliding side door may not be opened or
closed by pressing the switch located on the
b-pillar trim panel, just in the front of the
sliding door or activating the inside power
sliding door handle.
Sliding Side Door Child Protection
Lock
•Whenthissystemisengaged,theinsidemanualdoorhandlewillnotopenthesliding
door even though the inside door lock is in the unlocked position.
•ToengagetheChildProtectionDoorLock,opentheslidingsidedoor.Slidethechild
protection door lock control, located on the rear of the sliding door, inward (toward the
vehicle) to engage.
•Repeatthesestepsontheoppositeslidingdoor.
POWER LIFTGATE
•Thepowerliftgatemaybeopenedandclosedbypressingthebuttonlocatedonthe
overhead console. Press the button once to open, and a second time to close the power
liftgate.
•ThepowerliftgatemayalsobeopenedandclosedbypressingthebuttonontheKey
Fob. Press the button twice to open, and twice to close the power liftgate.
•Thepowerliftgatemaybeclosedbythebutton,locatedintheupperlefttriminthe
liftgate opening. Pressing once will only close the liftgate. This button cannot be used
to open the liftgate.
OPERATING YOUR VEHICLE
53
Page 57 of 164

WARNING!
•Neverleavechildrenunattendedinavehicle,anddonotleavetheKeyFobinor
near the vehicle, and do not leave a vehicle equipped with Keyless Enter-N-Go™ in
the ACC or ON/RUN mode. Occupants, particularly unattended children, can
become entrapped by the power sunroof while operating the power sunroof switch.
Such entrapment may result in serious injury or death.
•Inacollision,thereisagreaterriskofbeingthrownfromavehiclewithanopen
sunroof. You could also be severely injured or killed. Always fasten your seat belt
properly and make sure all passengers are properly secured.
•Donotallowsmallchildrentooperatethesunroof.Neverallowyourfingers,other
body parts, or any object to project through the sunroof opening. Injury may result.
WIND BUFFETING
Wind buffeting can be described as a helicopter-type percussion sound. If buffeting
occurs with the rear windows open, adjust the front and rear windows together.
If buffeting occurs with the sunroof open, adjust the sunroof opening, or adjust any
window. This will minimize buffeting.
OPERATING YOUR VEHICLE
55
Page 60 of 164

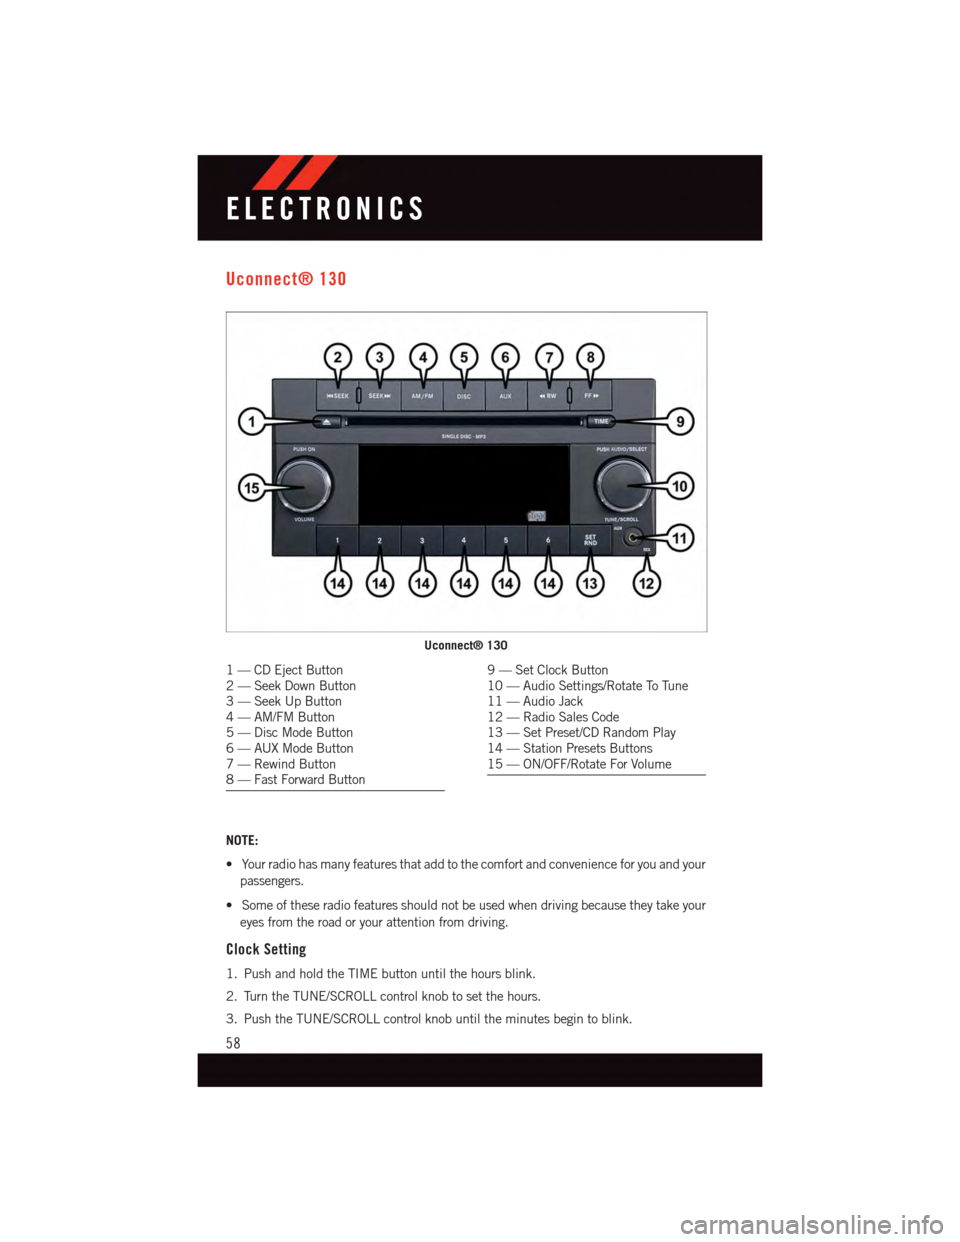
Uconnect® 130
NOTE:
•Yourradiohasmanyfeaturesthataddtothecomfortandconvenienceforyouandyour
passengers.
•Someoftheseradiofeaturesshouldnotbeusedwhendrivingbecausetheytakeyour
eyes from the road or your attention from driving.
Clock Setting
1. Push and hold the TIME button until the hours blink.
2. Turn the TUNE/SCROLL control knob to set the hours.
3. Push the TUNE/SCROLL control knob until the minutes begin to blink.
Uconnect® 130
1—CDEjectButton2—SeekDownButton3—SeekUpButton4—AM/FMButton5—DiscModeButton6—AUXModeButton7—RewindButton8—FastForwardButton
9—SetClockButton10 — Audio Settings/Rotate To Tune11 — Audio Jack12 — Radio Sales Code13 — Set Preset/CD Random Play14 — Station Presets Buttons15 — ON/OFF/Rotate For Volume
ELECTRONICS
58
Page 68 of 164

•Findthestationtostorebyeitherpressingthe“SEEKUP”or“SEEKDOWN”buttonson the touchscreen, pressing the “Scan” button on the touchscreen, or by using the“Direct Tune” button on the touchscreen.
•Oncethestationisfound,pressandholdoneofthe“PRESETS”buttonsonthetouchscreen in the list to the right, until the preset key flashes and the station text onthe button on the touchscreen changes.
NOTE:
If the Presets are not visible on the right side of the screen, press the “PRESETS” button
on the touchscreen.
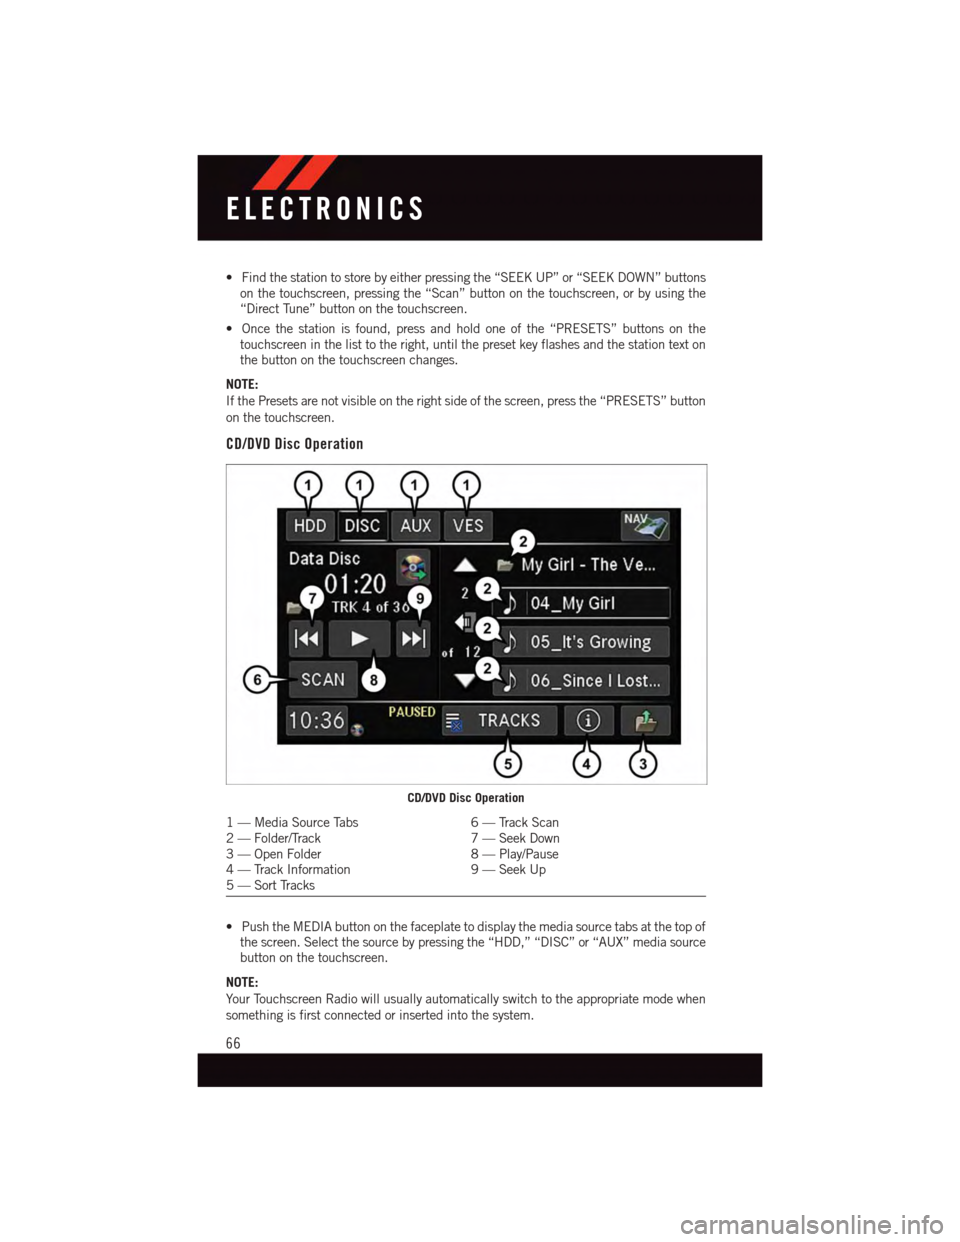
CD/DVD Disc Operation
•PushtheMEDIAbuttononthefaceplatetodisplaythemediasourcetabsatthetopofthe screen. Select the source by pressing the “HDD,” “DISC” or “AUX” media sourcebutton on the touchscreen.
NOTE:
Yo u r To u c h s c r e e n R a d i o w i l l u s u a l l y a u t o m a t i c a l l y s w i t c h t o t h e a p p r o p r i a t e m o d e w h e n
something is first connected or inserted into the system.
CD/DVD Disc Operation
1—MediaSourceTabs6—TrackScan2—Folder/Track7—SeekDown3—OpenFolder8—Play/Pause4—TrackInformation9—SeekUp5—SortTracks
ELECTRONICS
66
Page 89 of 164

PROGRAMMABLE FEATURES
Electronic Vehicle Information Center (EVIC) — If Equipped
Personal Settings allows you to set and recall features when the transmission is in PARK.
If the transmission is out of PARK or the vehicle begins moving, a warning message
SYSTEM SETUP NOT AVAILABLE VEHICLE NOT IN PARK displays when you try to select
“System Setup” from the main menu.
The EVIC can be used to program the following Personal Settings. Push the RIGHT arrow
buttonuntil Personal Settings displays, then push the DOWN buttonto scroll
through the settings. Push the RIGHT arrow buttonto change the setting.
•SelectLanguage•Key-OffPowerDelay
•Nav-TurnByTurn•IlluminatedApproach
•AutoLockDoors•HillStartAssist
•AutoUnlockDoors•FlasherswithSlidingDoor
•RemoteUnlockSequence•CalibrateCompass
•RemoteStartComfortSys.•CompassVariance
•HornwithRemoteLock•ParkAssist-IfEquipped
•FlashLampsWithLock•AutomaticHighBeams-IfEquipped
•HeadlampOffDelay•KeylessEnter-N-Go-IfEquipped
•HeadlampsWithWipers•RKELinkedToMemory-IfEquipped
Key Fob Programmable Features
The following features may also be programmed by using the Key Fob transmitter or the
ignition switch and driver's door lock switch.
NOTE:
Pushing the LOCK button while you are inside the vehicle will activate the Vehicle Security
Alarm. Opening a door with the Vehicle Security Alarm activated will cause the alarm to
sound. Push the UNLOCK button to deactivate the Vehicle Security Alarm.
Unlock On First Press
To u n l o c k e i t h e r t h e d r i v e r ' s s i d e , o r a l l d o o r s , o n t h e f i r s t p u s h o f t h e U N L O C K b u t t o n :
•PushandholdtheLOCKbuttonforatleastfourseconds,butnolongerthan10
seconds. Then, push and hold the UNLOCK button while still holding the LOCK button.
•Releasebothbuttonsatthesametime.
ELECTRONICS
87
Page 104 of 164

Unless reset, this message will continue to display each time you turn the ignition switch
to the ON/RUN position or cycle the ignition to the ON/RUN position if equipped with
Keyless Enter-N-Go™. To turn off the message temporarily, press and release the MENU
button. To reset the oil change indicator system (after performing the scheduled mainte-
nance) refer to the following procedure.
Vehicles Equipped With Keyless Enter-N-Go™
1. Without pressing the brake pedal, push the ENGINE START/STOP button and cycle
the ignition to the ON/RUN position (do not start the engine.)
2. Fully depress the accelerator pedal, slowly, three times within 10 seconds.
3. Without pressing the brake pedal, push the ENGINE START/STOP button once to
return the ignition to the OFF/LOCK position.
Vehicles Not Equipped With Keyless Enter-N-Go™
1. Turn the ignition switch to the ON/RUN position (do not start the engine.)
2. Fully depress the accelerator pedal, slowly, three times within 10 seconds.
3. Turn the ignition switch to the OFF/LOCK position.
NOTE:
If the indicator message illuminates when you start the engine, the oil change indicator
system did not reset. If necessary, repeat these steps.
Resetting The Light After Servicing
Vehicles Equipped With Keyless Enter-N-Go™
1. Without pressing the brake pedal, push the ENGINE START/STOP button and cycle
the ignition to the ON/RUN position (do not start the engine.)
2. Fully depress the accelerator pedal, slowly, three times within 10 seconds.
3. Without pressing the brake pedal, push the ENGINE START/STOP button once to
return the ignition to the OFF/LOCK position.
Vehicles Not Equipped With Keyless Enter-N-Go™
1. Turn the ignition switch to the ON/RUN position (do not start the engine.)
2. Fully depress the accelerator pedal, slowly, three times within 10 seconds.
3. Turn the ignition switch to the OFF/LOCK position.
NOTE:
If the indicator message illuminates when you start the vehicle, the oil change indicator
system did not reset. If necessary, repeat this procedure.
WHAT TO DO IN EMERGENCIES
102
Page 142 of 164

Cavity Cartridge Fuse Mini-FuseDescription
M21–20AmpYellowPowertrain
M22–10AmpRedHorn
M23–10AmpRedHorn
M24–25AmpClearRear Wiper
M25–20AmpYellowFuel Pump, Diesel Lift Pump – IfEquipped
M26–10AmpRedPower Mirror Switch, Driver Win-dow Switch
M27–10AmpRedWireless Control Module, KeylessEntry Module
M28–10AmpRedPowertrain, Transmission ControlModule
M29–10AmpRedOccupantClassificationModule
M30–15AmpBlueRear Wiper Module, Power FoldingMirror
M31–20AmpYellow Back-UpLamps
M32–10AmpRedAirbag Module, THATCHUM – IfEquipped
M33–10AmpRedPowertrain
M34–10AmpRed
Park Assist, Heater Climate Con-trol Module, Headlamp Wash,Compass, Rear Camera, DoorLamps, Flashlight, Relay DieselCabin Heater, Rad Fan Diesel – IfEquipped
M35–10AmpRedHeated Mirrors
M36–20AmpYellowPower Outlet #3 (InstrumentPanel or with Console Center)
M37–10AmpRedAntilock Brakes, Stability Control,Stop Lamp, Fuel Pump
M38–25AmpClearDoor Lock/Unlock Motors, LiftgateLock/Unlock Motors
The power windows are fused by a 25 Amp circuit breaker located in the Totally Integrated
Power Module.
MAINTAINING YOUR VEHICLE
140