Page 271 of 703

Ignition Off Operation
For Vehicles Not Equipped With The Electronic Vehicle
Information Center (EVIC)
The power sunroof switch will remain active for 45
seconds after the ignition switch is turned to the LOCK
position. Opening either front door will cancel this
feature.
For Vehicles Equipped With The EVIC
The power sunroof switch will remain active for up to
approximately ten minutes after the ignition switch is
turned to the LOCK position. Opening either front door
will cancel this feature.
ELECTRICAL POWER OUTLETS — IF EQUIPPED
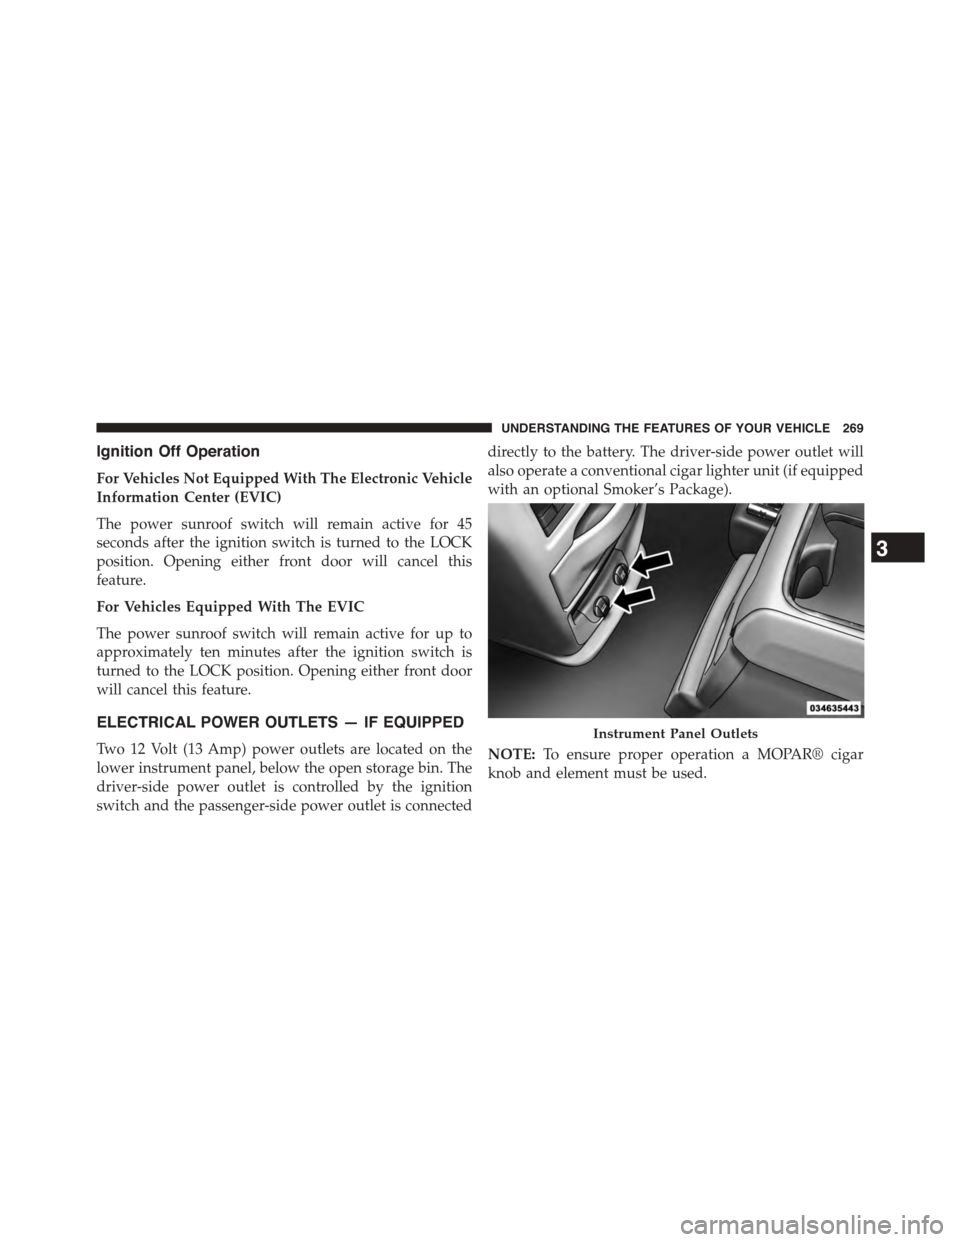
Two 12 Volt (13 Amp) power outlets are located on the
lower instrument panel, below the open storage bin. The
driver-side power outlet is controlled by the ignition
switch and the passenger-side power outlet is connected
directly to the battery. The driver-side power outlet will
also operate a conventional cigar lighter unit (if equipped
with an optional Smoker’s Package).
NOTE:To ensure proper operation a MOPAR® cigar
knob and element must be used.
Instrument Panel Outlets
3
UNDERSTANDING THE FEATURES OF YOUR VEHICLE 269
Page 282 of 703
Lower Glove Compartment
To open the lower compartment pull out on the release
handle.
NOTE:The lower compartment is equipped with a lock
that is part of the compartment handle.
Door Trim Panel Storage
Front Door Storage
Both interior front door panels have multiple pockets for
storage.
Driver Seatback Storage — If Equipped
The driver’s seatback has a primary storage pocket on all
models and an optional secondary mesh pocket.
Lower Compartment
280 UNDERSTANDING THE FEATURES OF YOUR VEHICLE
Page 346 of 703

Auto Lock Doors
When selected, all doors will lock automatically when the
vehicle reaches a speed of 15 mph (24 km/h). To make
your selection, push and release the RIGHT arrow button
until a check-mark appears.
Auto Unlock Doors
When this feature is selected, all doors will unlock when
the vehicle is stopped and the transmission is in the
PARK or NEUTRAL position and the driver’s door is
opened. To make your selection, push and release the
Right arrow button until a check-mark appears next to
the feature showing the system has been activated, or the
check-mark is removed showing the system has been
deactivated.
Remote Unlock Sequence
WhenUnlock Driver Door Only On 1st Pressis selected,
only the driver ’s door will unlock on the first push of the
Remote Keyless Entry (RKE) transmitter UNLOCK but-
ton. When Unlock Driver Door Only On 1st Press, you
must push the RKE transmitter UNLOCK button twice,
to unlock the passenger ’s doors. WhenUnlock All Doors
On 1st Pressis selected, all of the doors will unlock on
the first push of the RKE transmitter UNLOCK button. To
make your selection, push and release the RIGHT arrow
button until a check-mark appears next to the feature
showing the system has been activated or the check-mark
is removed showing the system has been deactivated.
RKE Linked To Memory- If Equipped
When this feature is selected the memory seat, mirror,
and radio settings will return to the memory set position
when the RKE transmitter UNLOCK button is pushed. If
this feature is not selected then the memory seat, mirror,
and radio settings can only return to the memory set
position using the door mounted switch. To make your
selection, push and release the SELECT button until a
344 UNDERSTANDING YOUR INSTRUMENT PANEL
Page 347 of 703

check-mark appears next to the feature showing the
system has been activated or the check-mark is removed
showing the system has been deactivated.
Remote Start Comfort Sys.
When this feature is selected and the remote start is
activated, the heated steering wheel and driver heated
seat features will automatically turn on in cold weather.
These features will stay on through the duration of
remote start or until the key is cycled to ON/RUN
position. To make your selection, push and release the
RIGHT arrow button until a check-mark appears next to
the feature showing the system has been activated or the
check-mark is removed showing the system has been
deactivated.
Horn With Remote Lock
When this feature is selected, a short horn sound will
occur when the RKE transmitter LOCK button is pushed.
To make your selection, push and release the RIGHT
arrow button until a check-mark appears next to the
feature showing the system has been activated or the
check-mark is removed showing the system has been
deactivated.
Flash Lamps With Lock
When selected, the front and rear turn signals will flash
when the doors are locked with the RKE transmitter. To
make your selection, push and release the RIGHT arrow
button until a check-mark appears next to the feature
showing the system has been activated or the check-mark
is removed showing the system has been deactivated.
Automatic High Beams — If Equipped
When this feature is selected, the high beam headlights
will deactivate automatically under certain conditions. To
make your selection, push and release the SELECT
button until a check-mark appears next to the feature
showing the system has been activated or the check-mark
4
UNDERSTANDING YOUR INSTRUMENT PANEL 345
Page 349 of 703

Key-Off Power Delay
When this feature is selected, the power window
switches, radio, Uconnect® phone (if equipped), DVD
video system (if equipped), power sunroof (if equipped),
and power outlets will remain active for up to 10 minutes
after the ignition switch is turned OFF. Opening either
front vehicle door will cancel this feature. To make your
selection, scroll up or down until the preferred setting is
highlighted, then push and release the SELECT button
until a check-mark appears next to the setting, showing
that the setting has been selected.
Illuminated Approach
When this feature is selected, the headlights will activate
and remain on for up to 90 seconds when the doors are
unlocked with the RKE transmitter. To make your selec-
tion, scroll up or down until the preferred setting is
highlighted, then push and release the SELECT button
until a check-mark appears next to the setting, showing
that the setting has been selected.
Hill Start Assist (HSA) — If Equipped
When on is selected, the HSA system is active. Refer to
“Electronic Brake Control System” in “Starting And
Operating” for system function and operating informa-
tion. To make your selection, push and release the
SELECT button until “ON” or “OFF” appears.
Flashers With Sliding Door
When this feature is selected the signal lamps activate
when power or manual sliding doors are in operation,
signaling other drivers that someone may be exiting or
entering the vehicle. To make your selection, push and
release the SELECT button until a check-mark appears
next to the feature showing the system has been activated
or the check-mark is removed showing the system has
been deactivated.
4
UNDERSTANDING YOUR INSTRUMENT PANEL 347
Page 350 of 703

Keyless Enter-N-Go™ (Passive Entry)
This feature allows you to lock and unlock the vehicle’s
door(s) without having to push the RKE transmitter lock
or unlock buttons. To make your selection, push and
release the SELECT button until a check-mark appears
next to the feature showing the system has been activated
or the check-mark is removed showing the system has
been deactivated. Refer to “Keyless Enter-N-Go™” in
“Things To Know Before Starting Your Vehicle”.
Easy Exit Seat
This feature provides automatic driver seat positioning to
enhance driver mobility when entering and exiting the
vehicle. To make your selection, push and release the
SELECT button until a check-mark appears next to the
feature showing the system has been activated or the
check-mark is removed showing the system has been
deactivated.
NOTE:The seat will return to the memorized seat
location (if Recall Memory with Remote Key Unlock is set
to ON) when the RKE transmitter is used to unlock the
door. Refer to “Driver Memory Seat” in “Understanding
The Features Of Your Vehicle” for further information.
Tilt Mirror In Reverse — If Equipped
When this feature is selected and the vehicle is placed in
a reverse gear, the driver’s side mirror will tilt downward
to allow the driver to see into the previous blind spot and
avoid objects in close proximity to the rear of the vehicle.
To make your selection, push and release the SELECT
button until a check-mark appears next to the feature
showing the system has been activated or the check-mark
is removed showing the system has been deactivated.
Blind Spot Alert — If Equipped
There are three selections when operating Blind Spot
Alert (“Blind Spot Alert Lights”, “Blind Spot Alert
Lights/CHM”, “Blind Spot Alert Off”). The Blind Spot
348 UNDERSTANDING YOUR INSTRUMENT PANEL
Page 440 of 703
Economy Mode
If ECONOMY mode is desired, press the A/C button to
turn off the indicator light and the A/C compressor.
Rotate the temperature control knob to the desired tem-
perature. Also, make sure to select only Panel, Bi-Level or
Floor modes.
Max A/C
For maximum cooling use the A/C and Recirculation
mode buttons at the same time.
Rear Manual Climate Control — If Equipped
The Rear Manual Climate Control system has floor air
outlets at the rear of the right side sliding door, and
overhead outlets at each outboard rear seating position.
The unit provides warm or cool air through the floor and
upper outlets.
The rear blower and temperature controls for the rear
seat passengers are located in the headliner, near the
center of the vehicle.
Rear Manual Climate Controls
1—RearBlower3—RearMode2 — Rear Temperature4 — Rear Climate Control Lock
438 UNDERSTANDING YOUR INSTRUMENT PANEL
Page 441 of 703

Rear Blower Control
The primary control for the rear blower is on the front
climate control unit, located on the instrument panel.
Only when the front control for the rear blower is in the
REARposition do the second row seat occupants have
control of the rear blower speed.
The rear blower control, located in the rear overhead
console, has an off position and a range of blower speeds.
This allows the second row seat occupants to control the
volume of air circulated in the rear of the vehicle.
CAUTION!
Interior air enters the Rear Manual Climate Control
system through an intake grille, located in the right
side trim panel behind the third row seats. The
heater outlets are located in the right side trim panel,
(Continued)
CAUTION!(Continued)
just behind the sliding door. Do not block or place
objects directly in front of the inlet grille or heater
outlets. The electrical system could overload, causing
damage to the blower motor.
Rear Temperature Control
The rear mode selectionREAR,allows the settings to be
controlled by the rear mode control knob.
To change the temperature in the rear of the vehicle,
rotate the temperature control knob counterclockwise for
cold air, and clockwise for heated air.
When rear controls are locked by the front system, the
lock symbol on the temperature knob is illuminated, and
the rear overhead adjustments are inoperable.
4
UNDERSTANDING YOUR INSTRUMENT PANEL 439