Page 396 of 703
Using The Remote Control
1. Press the SOURCE button on the Remote Control.
2. While looking at Screen 1 or 2, highlight VES™ DISC
by either pressing Up/Down/Left/Right buttons or
by repeatedly pressing the SOURCE button, then press
ENTER/OK on the Remote Control.
NOTE:
•Channel/Screen 1 select mode information is shown
on the left side of the screen.
•Channel/Screen 2 select mode information is shown
on the right side of the screen.
•The VES™ will retain the last setting when turned off.
Select VES™ DISC Mode On The VES™ Screen
394 UNDERSTANDING YOUR INSTRUMENT PANEL
Page 398 of 703

NOTE:
•To view a DVD on the radio press the RADIO/MEDIA
button on the radio faceplate, then press the DISC tab
button on the touchscreen and then the VIEW VIDEO
button on the touchscreen.
•Viewing a DVD on the Touchscreen radio screen is not
available in all states/provinces. If available, the ve-
hicle must be stopped and the shift lever must be in the
PARK position for vehicles with an automatic trans-
mission. In vehicles with a manual transmission the
parking brake must be engaged.
Play A Blu-ray™ Disc Using The Blu-ray™ Player
— If Equipped
1. Insert the Blu-ray™ Disc with the label facing up. The
Blu-ray™ Player automatically selects the appropriate
mode after the disc is recognized and starts playing
the Blu-ray™ Disc.
NOTE:The Blu-ray™ Player has basic control functions
such as Menu, Play, Pause, FF, RW and Stop.
2. To watch a Blu-ray™ Disc on Screen 1 for second row
passengers, ensure the Remote Control and Head-
phone switch is on Channel 1.
3. To watch a Blu-ray™ Disc on Screen 2 for third row
passengers, ensure the Remote Control and Head-
phone switch is on Channel 2.
Using The Remote Control
1. Press the SOURCE button on the Blu-ray™ Player
Remote Control.
2. While looking at Screen 1 or 2, highlight Blu-ray™ by
either pressing Up/Down/Left/Right buttons or by
repeatedly pressing the SOURCE button, then press
OK on the Remote Control.
396 UNDERSTANDING YOUR INSTRUMENT PANEL
Page 399 of 703

NOTE:
•Channel/Screen 1 select mode information is shown
on the left side of the screen.
•Channel/Screen 2 select mode information is shown
on the right side of the screen.
•The VES™ will retain the last setting when turned off.
Using The Touchscreen Radio Controls
1. Press the MENU button on the radio faceplate.
2. Press the Rear VES™ button on the touchscreen to
display the Rear VES™ Controls. If a channel list is
displayed, press the HIDE LIST button on the touch-
screen to display the Rear VES™ Controls screen.
3. Press the 1 or 2 button on the touchscreen and then the
VES™ Disc button on the touchscreen in the VES™
column. To exit press the back arrow button at the top
left of the screen.
NOTE:
•To view a Blu-ray™ Disc on the radio, press the
RADIO/MEDIA button on the radio faceplate, then
press the VES™ Disc tab button on the touchscreen
and then the VIEW VIDEO button on the touchscreen.
•Viewing a Blu-ray™ Disc on the Touchscreen radio
screen is not available in all states/provinces. If avail-
able, the vehicle must be stopped and the shift lever
must be in the PARK position for vehicles with an
automatic transmission. In vehicles with a manual
transmission the parking brake must be engaged.
Listen To An Audio Source While A Video Is
Playing
Ensure the Remote Control and Headphone switch are on
the same channel. If watching a video on Screen 1
4
UNDERSTANDING YOUR INSTRUMENT PANEL 397
Page 400 of 703
(second row), then Channel 2 could be used for audio. If
watching a video on Screen 2 (third row), then Channel 1
could be used for audio.
Using The Remote Control
1. Press the SOURCE button on the Remote Control and
the Select Mode Screen will display, unless a video is
playing then only a small banner will appear on the
bottom of the screen.
2. While looking at the video screen, either press Up/
Down/Left/Right on the Remote Control to highlight
the desired audio source or repeatedly press the
SOURCE button on the remote until the desired audio
source appears on the screen.Using The Touchscreen Radio Controls
1. Press the MENU button on the radio faceplate.
2. Press the Rear VES™ button on the touchscreen to
display the Rear VES™ Controls. If a channel list is
Select FM Mode On The VES Screen
398 UNDERSTANDING YOUR INSTRUMENT PANEL
Page 403 of 703
VES™ Remote Control — If Equipped
Controls And Indicators
1. Power — Turns the screen and wireless headphone
transmitter for the selected Channel on or off. To hear
audio while the screen is closed, push the Power
button to turn the headphone transmitter on.
2. Channel Selector Indicators — When a button is
pushed, the currently affected channel or channel
button is illuminated momentarily.
3. SOURCE — Push to enter Source Selection screen.
4. Channel/Screen Selector Switch — Indicates which
channel is being controlled by the remote control.
When the selector switch is in the Rear 1 position, the
remote controls the functionality of headphone Chan-
nel 1 (left screen). When the selector switch is in the
Rear 2 position, the remote controls the functionality
of headphone Channel 2 (right screen).
5.!— Push to navigate menus.
6. SETUP — Push to access the screen settings menu.
Remote Control
4
UNDERSTANDING YOUR INSTRUMENT PANEL 401
Page 405 of 703

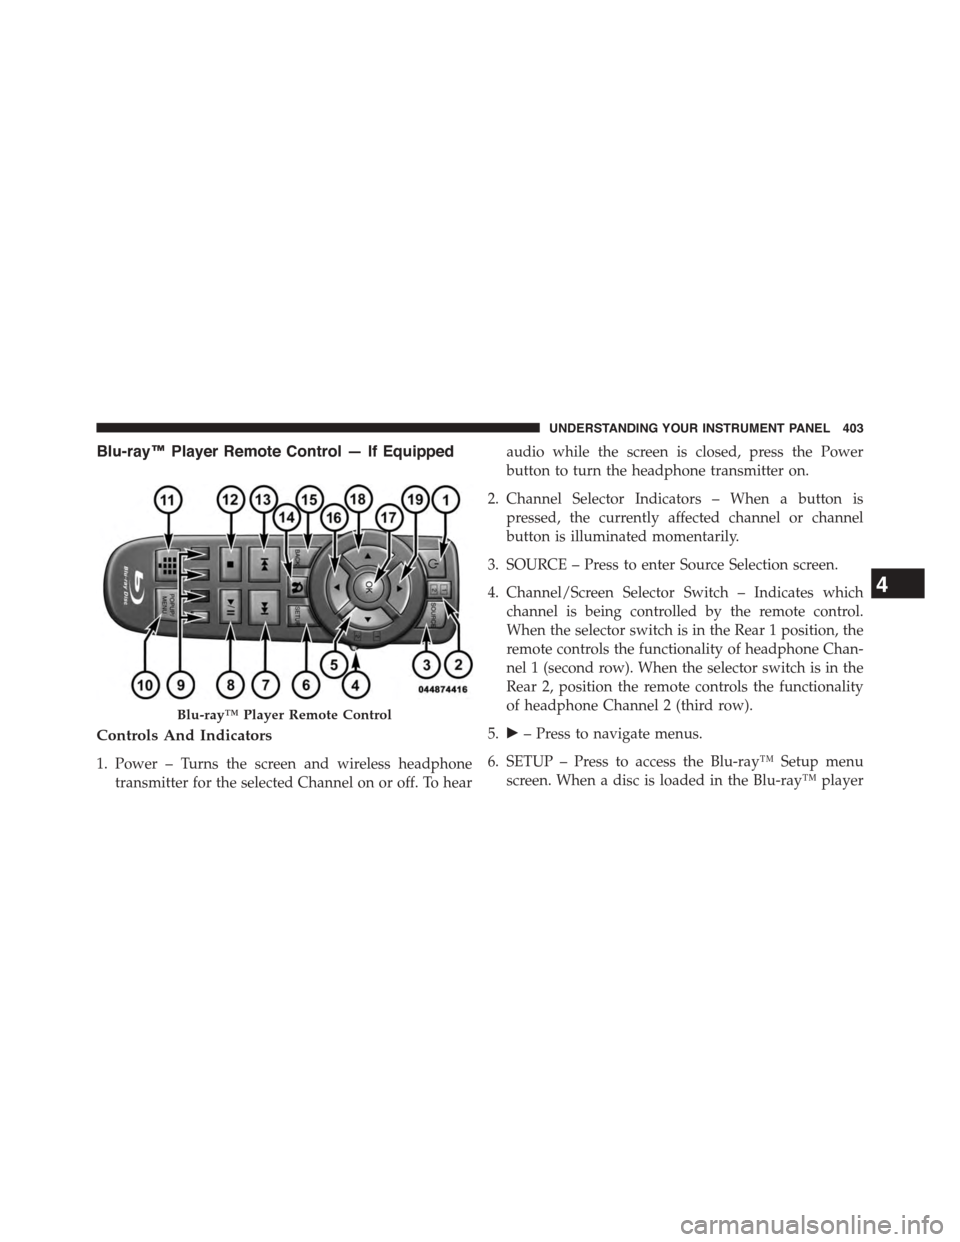
Blu-ray™ Player Remote Control — If Equipped
Controls And Indicators
1. Power – Turns the screen and wireless headphone
transmitter for the selected Channel on or off. To hear
audio while the screen is closed, press the Power
button to turn the headphone transmitter on.
2. Channel Selector Indicators – When a button is
pressed, the currently affected channel or channel
button is illuminated momentarily.
3. SOURCE – Press to enter Source Selection screen.
4. Channel/Screen Selector Switch – Indicates which
channel is being controlled by the remote control.
When the selector switch is in the Rear 1 position, the
remote controls the functionality of headphone Chan-
nel 1 (second row). When the selector switch is in the
Rear 2, position the remote controls the functionality
of headphone Channel 2 (third row).
5.!– Press to navigate menus.
6. SETUP – Press to access the Blu-ray™ Setup menu
screen. When a disc is loaded in the Blu-ray™ player
Blu-ray™ Player Remote Control
4
UNDERSTANDING YOUR INSTRUMENT PANEL 403
Page 407 of 703
Remote Control Storage
The video screen(s) come with a built in storage compart-
ment for the remote control which is accessible when the
screen is opened. To remove the remote, use your index
finger to pull and rotate the remote towards you. Do not
try to pull the remote straight down as it will be very
difficult to remove. To return the remote back into its
storage area, insert one long edge of the remote into the
two retaining clips first, and then rotate the remote back
up into the other two retaining clips until it snaps back
into position.
The Remote Control Storage
4
UNDERSTANDING YOUR INSTRUMENT PANEL 405
Page 408 of 703
Locking The Remote Control
All remote control functionality can be disabled as a
parental control feature.
•To disable the Remote Control from making any
changes, press the Video Lock button on the DVD
player (if equipped). If the vehicle is not equipped
with a DVD player, follow the radio’s instructions to
turn Video Lock on. The radio and the video screen(s)
indicate when Video Lock is active.
•Pressing the Video Lock again or turning the ignition
OFF turns Video Lock OFF and allows remote control
operation of the VES™.
Replacing The Remote Control Batteries
The remote control requires two AAA batteries for op-
eration. To replace the batteries:
•Locate the battery compartment on the back of the
remote, then slide the battery cover downward.
•Replace the batteries, making sure to orient them
according to the polarity diagram shown.
•Replace the battery compartment cover.
406 UNDERSTANDING YOUR INSTRUMENT PANEL