2015 DODGE DURANGO phone
[x] Cancel search: phonePage 149 of 236

•Verifyyouareselecting“Uconnect”inthediscoveredBluetooth®devices on your
mobile phone.
•Ifyourvehiclesystemgeneratesapincodethedefaultis0000.
Mobile Phonebook didn’t download:
•Check“Donotaskagain,”thenacceptthe“phonebookdownload”requestonyour
mobile phone.
•Upto5,000contactnameswithfournumberspercontactwilltransfertothe
Uconnect®8.4A/8.4AN system phonebook.
•Upto2,000contactnameswithsixnumberspercontactwilltransfertothe
Uconnect®5.0 system phonebook.
Te x t m e s s a g i n g w o n ’ t w o r k :
•Check“Donotaskagain,”thenacceptthe“connecttoyourmessages”requestonyour
mobile phone.
•VerifythatyourmobilephonehastheBluetooth®feature (Message Access Profile).
Can’t make a conference call:
•CDMA(Code-DivisionMultipleAccess)carriersdonotsupportconferencecalling.
Refer to your mobile phone user’s manual for further information.
Making calls while connected to AUX:
•Plugging in your mobile phone to AUX while connected to Bluetooth®will disable Hands-
Free Calling. Do not make calls while your mobile phone is plugged into the AUX jack.
STEERING WHEEL AUDIO CONTROLS
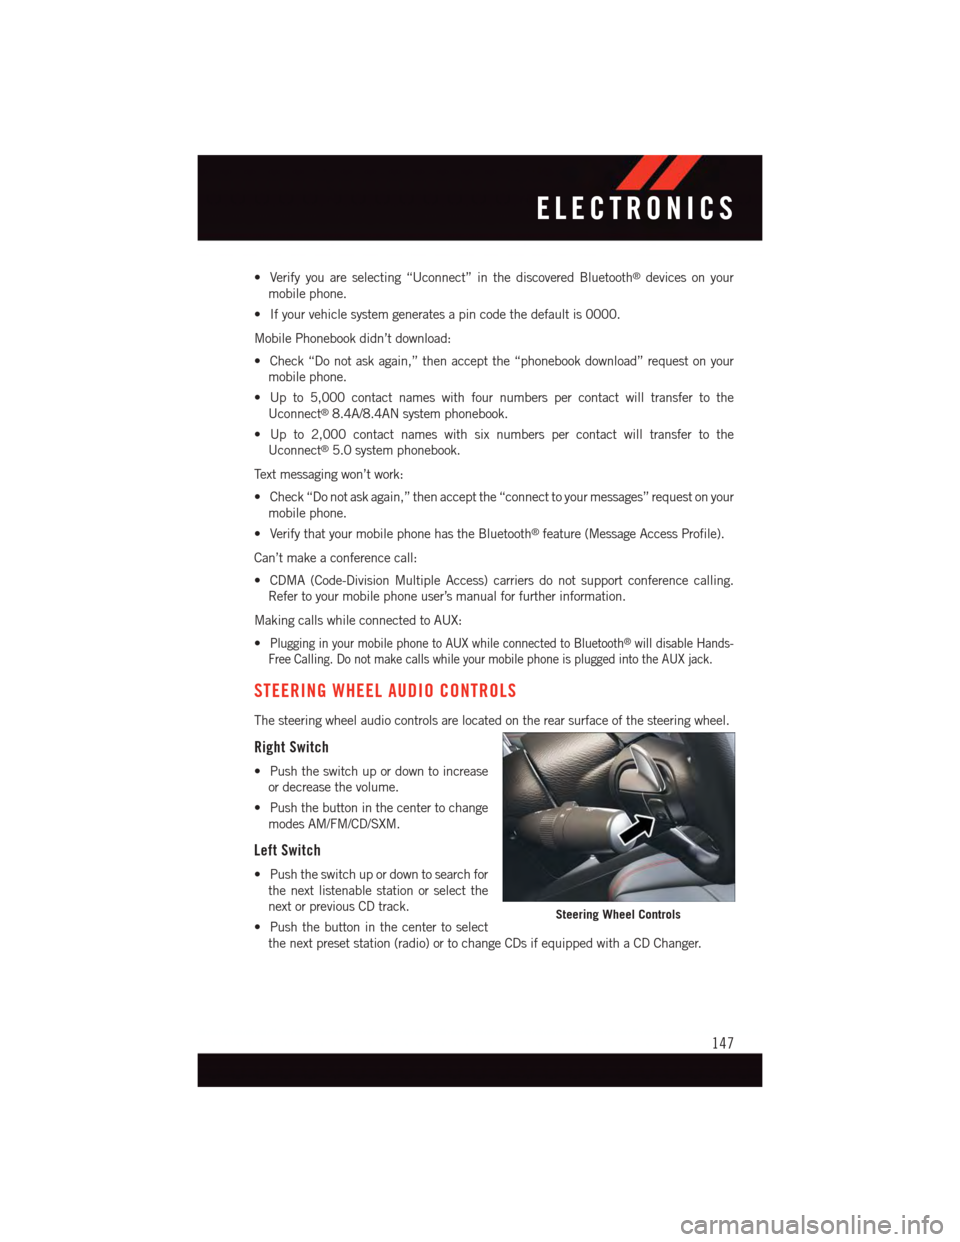
The steering wheel audio controls are located on the rear surface of the steering wheel.
Right Switch
•Pushtheswitchupordowntoincrease
or decrease the volume.
•Pushthebuttoninthecentertochange
modes AM/FM/CD/SXM.
Left Switch
•Pushtheswitchupordowntosearchfor
the next listenable station or select the
next or previous CD track.
•Pushthebuttoninthecentertoselect
the next preset station (radio) or to change CDs if equipped with a CD Changer.
Steering Wheel Controls
ELECTRONICS
147
Page 152 of 236

PROGRAMMABLE FEATURES
DID Programmable Features
The EVIC can be used to view the following main menu items:
NOTE:
Depending on the vehicles options, feature settings may vary.
•Speedometer•Trip
•MPHtokm/h•Audio
•VehicleInfo•StoredMessages
•DriverAssist•ScreenSetup
•FuelEconomy•SpeedWarning-IfEquipped
NOTE:
Refer to your Owner's Manual on the DVD for further information.
Uconnect® Customer Programmable Features
The Uconnect®system allows you to access Customer Programmable feature settings such
as Display, Voice, Clock, Safety & Driving Assistance, Lights, Doors & Locks, Auto-On Comfort
&RemoteStart,EngineOffOptions,CompassSettings,Audio,Phone/Bluetooth®,SiriusXM
Setup and System Information through buttons on the touchscreen.
•PushtheMOREorSETTINGSbutton(Uconnect®5.0), or press the “Apps” button
(Uconnect®8.4) located near the bottom of the touchscreen, then press the “Settings”
button on the touchscreen to access the Settings screen. When making a selection,
scroll up or down until the preferred setting is highlighted, then press and release the
preferred setting until a check-mark appears next to the setting, showing that setting
has been selected. The following feature settings are available:
•Display•EngineOffOptions
•Voice•Audio
•Clock•Phone/Bluetooth®
•Safety&DrivingAssistance•SiriusXMSetup
•Lights•RestoreSettings
•Compass(Uconnect®5.0)•ClearPersonalData
•Doors&Locks•SystemInformation
•Auto-OnComfort
NOTE:
Depending on the vehicles options, feature settings may vary.
ELECTRONICS
150
Page 156 of 236

Using HomeLink®
To o p e r a t e , p u s h a n d r e l e a s e t h e p r o g r a m m e d H o m e L i n k®button. Activation will now
occur for the programmed device (e.g., garage door opener, gate operator, security system,
entry door lock, home/office lighting, etc.). The hand-held transmitter of the device may
also be used at any time.
WARNING!
•Yourmotorizeddoororgatewillopenandclosewhileyouareprogrammingthe
universal transceiver. Do not program the transceiver if people or pets are in the
path of the door or gate.
•Donotrunyourvehicleinaclosedgarageorconfinedareawhileprogrammingthe
transceiver. Exhaust gas from your vehicle contains Carbon Monoxide (CO) which is
odorless and colorless. Carbon Monoxide is poisonous when inhaled and can cause
you and others to be severely injured or killed.
POWER INVERTER
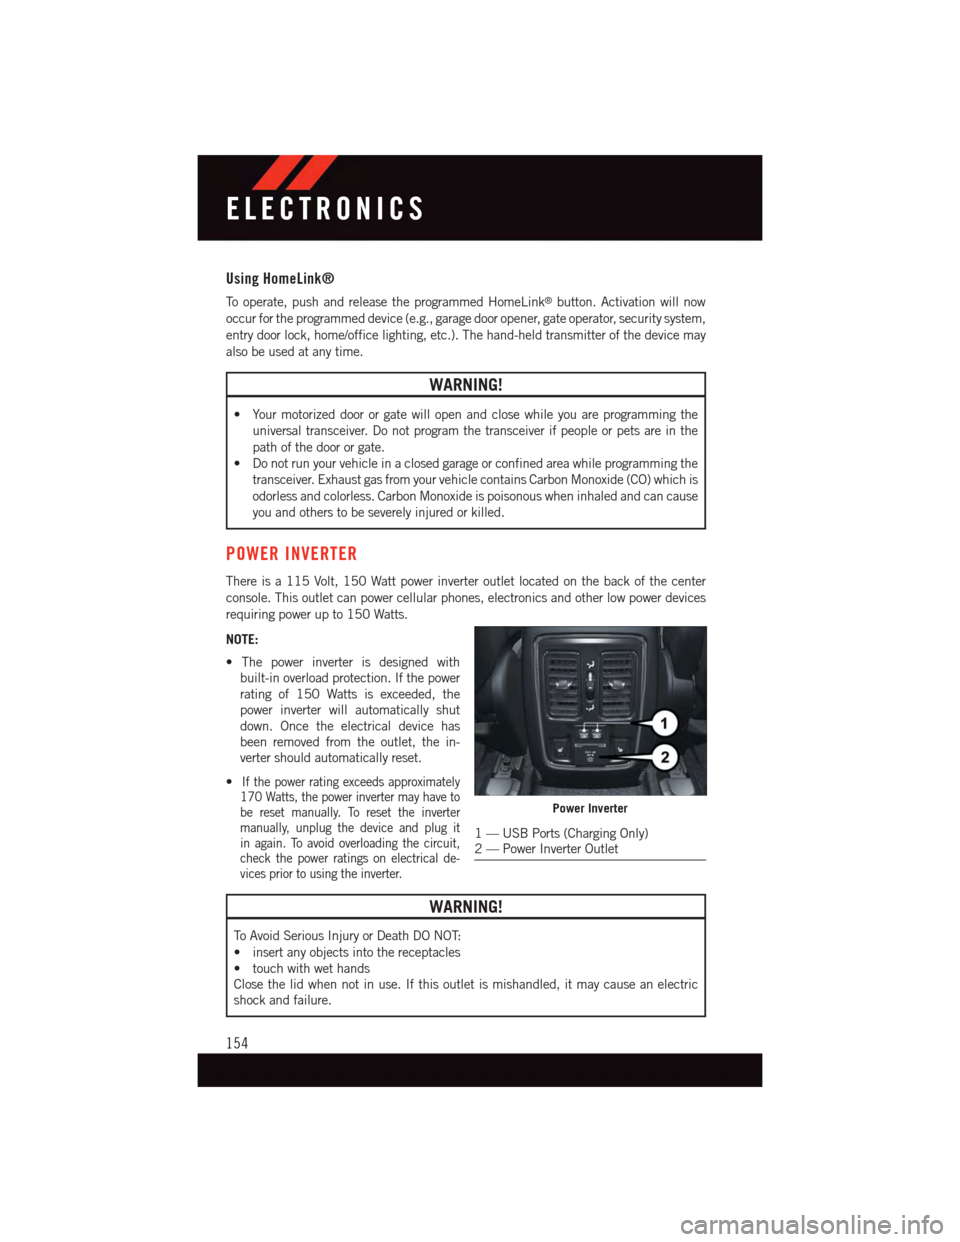
There is a 115 Volt, 150 Watt power inverter outlet located on the back of the center
console. This outlet can power cellular phones, electronics and other low power devices
requiring power up to 150 Watts.
NOTE:
•Thepowerinverterisdesignedwith
built-in overload protection. If the power
rating of 150 Watts is exceeded, the
power inverter will automatically shut
down. Once the electrical device has
been removed from the outlet, the in-
verter should automatically reset.
•If the power rating exceeds approximately170 Watts, the power inverter may have tobe reset manually. To reset the invertermanually, unplug the device and plug itin again. To avoid overloading the circuit,check the power ratings on electrical de-vices prior to using the inverter.
WARNING!
To A v o i d S e r i o u s I n j u r y o r D e a t h D O N O T:
•insertanyobjectsintothereceptacles
•touchwithwethands
Close the lid when not in use. If this outlet is mishandled, it may cause an electric
shock and failure.
Power Inverter
1—USBPorts(ChargingOnly)2—PowerInverterOutlet
ELECTRONICS
154
Page 170 of 236

ROADSIDE ASSISTANCE
Dial toll-free 1-800-521-2779 for U.S. Residents or 1-800-363-4869 for Canadian
Residents.
•Provideyourname,vehicleidentificationnumber,licenseplatenumber,andyour
location, including the telephone number from which you are calling.
•Brieflydescribethenatureoftheproblemandanswerafewsimplequestions.
•Youwillbegiventhenameoftheserviceproviderandanestimatedtimeofarrival.
If you feel you are in an “unsafe situation”, please let us know. With your consent, we
will contact local police or safety authorities.
INSTRUMENT CLUSTER WARNING LIGHTS
-TirePressureMonitoringSystem(TPMS)Light
Each tire, including the spare (if provided), should be checked monthly, when cold and
inflated to the inflation pressure recommended by the vehicle manufacturer on the
vehicle placard or tire inflation pressure label. (If your vehicle has tires of a different size
than the size indicated on the vehicle placard or tire inflation pressure label, you should
determine the proper tire inflation pressure for those tires.)
As an added safety feature, your vehicle has been equipped with a Tire Pressure
Monitoring System (TPMS) which display in the Electronic Vehicle Information Center
(EVIC) or Driver Information Display (DID) when one or more of your tires is significantly
under-inflated. Accordingly, when the low tire pressure EVIC or DID display illuminates,
you should stop and check your tires as soon as possible, and inflate them to the proper
pressure. Driving on a significantly under-inflated tire causes the tire to overheat and can
lead to tire failure. Under-inflation also reduces fuel efficiency and tire tread life, and may
affect the vehicle’s handling and stopping ability.
IF THE LIGHT STARTS FLASHING INDICATING A LOW TIRE PRESSURE, ADJUST THE AIR
PRESSURE IN THE LOW TIRE TO THE AIR PRESSURE SHOWN ON THE VEHICLE PLACARD OR
TIRE INFLATION PRESSURE LABEL LOCATED ON THE DRIVER'S DOOR.
NOTE:
After inflation, the vehicle may need to be driven for 20 minutes before the flashing light
will turn off.
Please note that the TPMS is not a substitute for proper tire maintenance, and it is the
driver’s responsibility to maintain correct tire pressure, even if under-inflation has not
reached the level to trigger illumination of the TPMS low EVIC or DID display.
Yo u r v e h i c l e h a s a l s o b e e n e q u i p p e d w i t h a T P M S m a l f u n c t i o n i n d i c a t o r t o i n d i c a t e w h e n
the system is not operating properly. The TPMS malfunction indicator is combined with
the low tire pressure telltale. When the system detects a malfunction, the telltale will flash
for approximately one minute and then remain continuously illuminated. This sequence
will continue each time the vehicle is restarted as long as the malfunction exists.
WHAT TO DO IN EMERGENCIES
168
Page 189 of 236

Jump-Starting Procedure
1. Connect the positive(+)end of the jumper cable to the remote positive(+)post of the
vehicle with discharged battery.
2. Connect the opposite end of the positive(+)jumper cable to the positive(+)post of the
booster battery.
3. Connect the negative(-)end of the jumper cable to the negative(-)post of the booster
battery.
4. Connect the opposite end of the negative(-)jumper cable to the remote negative(-)
post of the vehicle with the discharged battery.
5. Start the engine in the vehicle that has the booster battery, let the engine idle a few
minutes, and then start the engine in the vehicle with the discharged battery.
Once the engine is started, remove the jumper cables in the reverse sequence:
1. Disconnect the negative(-)end of the jumper cable from the remote negative(-)post
of the vehicle with the discharged battery.
2. Disconnect the opposite end of the negative(-)jumper cable from the negative(-)post
of the booster battery.
3. Disconnect the positive(+)end of the jumper cable from the positive(+)post of the
booster battery.
4. Disconnect the opposite end of the positive(+)jumper cable from the remote positive
(+)post of the discharged vehicle.
5. Reinstall the protective cover over the remote positive(+)post of the vehicle with the
discharged battery.
6. Reinstall the protective plug over the remote negative(-)post of the vehicle with the
discharged battery.
NOTE:
If frequent jump-starting is required to start your vehicle you should have the battery and
charging system inspected at your authorized dealer.
CAUTION!
•Donotuseaportablebatteryboosterpackoranyotherboostersourcewithasystem
voltage greater than 12 Volts or damage to the battery, starter motor, alternator or
electrical system may occur.
•Failuretofollowtheseprocedurescouldresultindamagetothechargingsystemof
the booster vehicle or the discharged vehicle.
•Accessoriesthatcanbepluggedintothevehiclepoweroutletsdrawpowerfromthe
vehicle’s battery, even when not in use (e.g., cellular phones, etc.). Eventually, if
plugged in long enough, the vehicle’s battery discharges sufficiently to degrade
battery life and/or prevent the engine from starting.
WHAT TO DO IN EMERGENCIES
187
Page 220 of 236

FREQUENTLY ASKED QUESTIONS
GETTING STARTED
How do I install my LATCH Equipped Child Seat? pg. 19
How do I program my Front Seat Memory? pg. 29
OPERATING YOUR VEHICLE
How does the Automatic Climate Control operate? pg. 55
ELECTRONICS
Which radio is in my vehicle?
•Uconnect®5.0 pg. 84
•Uconnect®8.4A pg. 96
•Uconnect®8.4AN pg. 124
How do I activate the Audio Jack?
•Uconnect®5.0 pg. 87
•Uconnect®8.4A/8.4AN pg. 103
How do I set the clock on my radio?
•Uconnect®5.0 pg. 84
•Uconnect®8.4A/8.4AN pg. 96
How do I use the Navigation feature?
•Uconnect®8.4A/8.4AN pg. 106
How do I pair my mobile phone via Bluetooth®with the UConnect®Hands-Free Voice
Activation System? pg. 139
How do I use my USB port to listen to audio through my touchscreen radio?
•Uconnect®5.0 pg. 87
•Uconnect®8.4A/8.4AN pg. 103
How do I configure my Universal Garage Door Opener (HomeLink)? pg. 152
How do I improve the Bluetooth®performance of my Uconnect®System? pg. 146
UTILITY
How do I know how much I can tow with my Dodge Durango? pg. 161
FREQUENTLY ASKED QUESTIONS
218
Page 224 of 236

Fog Lights . . . . . . . . . . . . .41, 173
Folding Front Passenger Seat......31
Folding Rear Seat..........31,33
Forward Collision Warning........49
Four Wheel Drive............157
Operation.............157
Systems . . . . . . . . . . . . . .157
Four Wheel Drive Operation......157
Freeing A Stuck Vehicle . . . . . . . .191
Frequently Asked Questions......218
FuelEconomy Mode...........54Ethanol..............200Filler Door Emergency Release . .211Requirements...........198Specifications...........199Ta n k C a p a c i t y...........198Fuel, Flexible..............200Fuses . . . . . . . . . . . . . . . . . .206
General Maintenance.........201Glass Cleaning . . . . . . . . . . . . .201
Hands-Free Phone (Uconnect®). . . .137HeadlightsAutomatic . . . . . . . . . . . . . .41Cleaning..............201Dimmer Switch...........42High Beam . . . . . . . . . . . . .41High Beam/Low Beam SelectSwitch . . . . . . . . . . . . . . . .41Heated Mirrors..............58Heated Seats..............34Heated Steering Wheel.........36High Beam Indicator..........173High Beam/Low Beam Select(Dimmer) Switch...........41HomeLink®(Garage Door Opener) . .152Hood Release . . . . . . . . . . . . .193
Identifying Your Radio..........66Instrument Cluster............8Indicators . . . . . . . . . . . . . . .8Instrument Cluster Indicator Lights . .173Instrument Panel Cover........201Instrument Panel Lens Cleaning . . .201Interior and Instrument Lights......7Interior Appearance Care.......201
Intermittent Wipers (Delay Wipers) . . .40
Introduction................2
In Vehicle Features
Uconnect®Access..........74
Inverter Outlet (115V).........154
Inverter, Power.............154
iPod®/USB/MP3 Control
Bluetooth®Streaming
Audio.......87,103, 131, 137
Jacking Instructions..........179Jack Location..............176Jack Operation..........176, 179Jump Starting.............186
Key Fob . . . . . . . . . . . . . . . . .10Arm The Alarm . . . . . . . . . . .15Disarm The Alarm . . . . . . . . . .15Lock The Doors...........10Unlock The Doors..........10Keyless Enter-N-Go...........10Lock/Unlock..........12,13Starting/Stopping..........14Keyless Enter-N-Go™..........12Passive Entry............12
Lane Change Assist...........40Lap/Shoulder Belts...........15LATCH (Lower Anchors and Tether forCHildren) . . . . . . . . . . . . . . .21Liftgate . . . . . . . . . . . . . . . . . .10Liftgate, Power..............10LightsFog . . . . . . . . . . . . . . . . .173Headlights..............41High Beam Indicator.......173Hill Descent Control Indicator . .173Low Fuel..............173Security Alarm...........173LocksLiftgate, Tailgate . . . . . . . . . .10Lubrication, Body...........201Luggage Rack (Roof Rack)......160
Maintenance Free Battery.......201Maintenance, General.........201Maintenance Procedures.......201Maintenance Record..........205
INDEX
222
Page 225 of 236

Maintenance Schedule........201Malfunction Indicator Light(Check Engine)...........170Master Cylinder (Brakes)........201Memory Seat...............29MirrorsAutomatic Dimming . . . . . . . .51Heated . . . . . . . . . . . . . . .58MOPAR®Accessories.........217
Navigation . . . . . . . . . . . .106, 133New Vehicle Break-In Period . . . . . .39
Oil Change Indicator..........174Oil Change Indicator, Reset......174Oil, Engine...............201Capacity..............198Change Interval..........201Checking..............201Disposal . . . . . . . . . . . . . .201Filter................201Filter Disposal...........201Materials Added to........201Recommendation......198, 201Viscosity...........198, 201Oil Filter, Selection...........201OutletPower...............155Overheating, Engine..........175
Paint Care . . . . . . . . . . . . . . .201Panic Alarm . . . . . . . . . . . . . . .10ParkSense®System, Rear........60Phone, Hands-Free (Uconnect®)...137Phone (Uconnect®)..........137Placard, Tire and LoadingInformation . . . . . . . . . . . . .209PowerDistribution Center (Fuses)....206Glass Sunroof............62Inverter . . . . . . . . . . . . . .154Lift Gate . . . . . . . . . . . . . . .10Outlet (Auxiliary ElectricalOutlet) . . . . . . . . . . . . . . .155Seats................28Steering . . . . . . . . . . . . . .200Preparation for Jacking........179
Pretensioners
Seat Belts..............15
Programmable Electronic Features . .150
Purchase Apps
Uconnect®Access..........71
Rain Sensitive Wiper System......40
Rear Camera...............61
Rear Cross Path.............61
Rear ParkSense System......60,61Rear Seat, Folding............31Reclining Front Seats..........30Recreational Towing..........163Shifting into Transfer CaseNeutral (N) . . . . . . . . . . . .165Shifting out of Transfer CaseNeutral (N) . . . . . . . . . . . .167Refrigerant . . . . . . . . . . . . . . .201Remote Keyless Entry (RKE)Arm The Alarm . . . . . . . . . . .15Disarm The Alarm..........15Lock The Doors...........10Remote Keyless Entry (RKE)....10Unlock The Doors..........10Remote Starting System......10,11Replacement Bulbs..........214Reporting Safety Defects.......216Roll Over Warning . . . . . . . . . . . . .4Roof Rack (Luggage Rack)......160
Schedule, Maintenance........201Seat Belt Maintenance........201Seat Belts................15Adjustable Shoulder Belt . . . . . .15Pretensioners............15Seat Belt Warning..........16Seats.................28,30Adjustment.............30Folding Front Passenger......31Heated...............34Manual................30Memory...............29Power................28Rear Folding..........31,33Security Alarm.............173Arm The System...........15Disarm The System.........15Security Alarm............15
INDEX
223