Page 134 of 236
Bluetooth® Streaming Audio
If using a Bluetooth®-equippeddevice,youmayalsobeabletostreammusictoyour
vehicle's sound system. Your connected device must be Bluetooth-compatible, and paired
with your system (see Uconnect®Phone for pairing instructions).
•YoucanaccessthemusicfromyourconnectedBluetooth®device by pressing the
“Bluetooth®”button on the touchscreen while in Media mode.
SD Card
SD Card Mode allows you to play music that has been saved to your SD Card through your
vehicle’s sound system.
•YoucanenterSDCardModeisbyeitherinsertingaSDCardintotheSDCardslotor
press the “SD Card” button on the left side of the display while media mode.
For further information refer to your Radio Supplement.
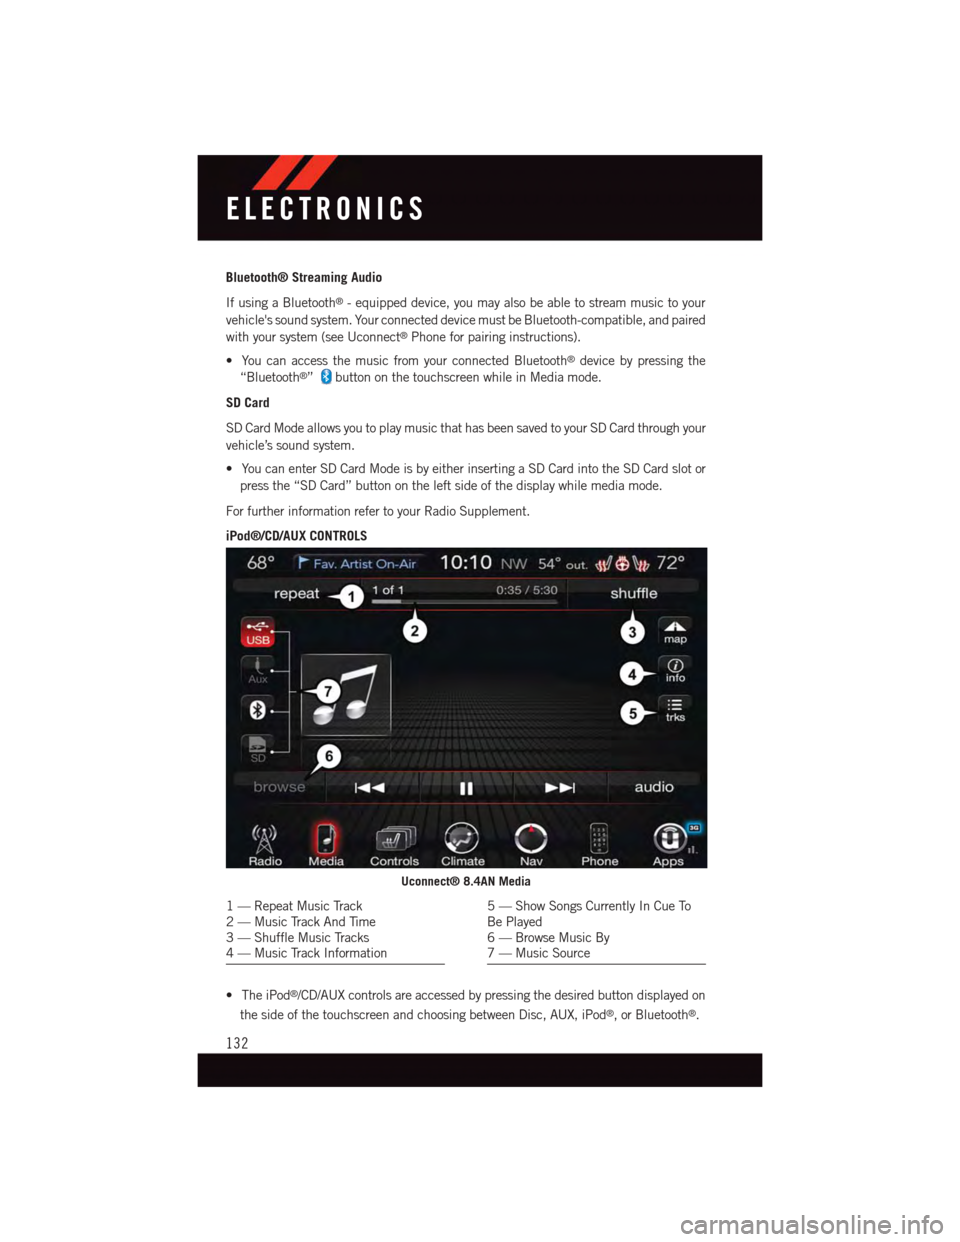
iPod®/CD/AUX CONTROLS
•TheiPod®/CD/AUX controls are accessed by pressing the desired button displayed on
the side of the touchscreen and choosing between Disc, AUX, iPod®,orBluetooth®.
Uconnect® 8.4AN Media
1—RepeatMusicTrack2—MusicTrackAndTime3—ShuffleMusicTracks4—MusicTrackInformation
5—ShowSongsCurrentlyInCueToBe Played6—BrowseMusicBy7—MusicSource
ELECTRONICS
132
Page 141 of 236
NOTE:
•TheUconnect®Phone requires a mobile phone equipped with the Bluetooth®
Hands-Free Profile, Version 1.0 or higher.
•Mostmobilephones/devicesarecompatiblewiththeUconnect®system, however
some mobile phones/devices may not be equipped with all of the required features to
utilize all of the Uconnect®system features.
•ForUconnect®Customer Care:
•U.S.residentsvisitUconnectPhone.comorcall1-877-855-8400.
•CanadianResidentsvisitUconnectPhone.comorcall,1-800-465-2001(English)or
1-800-387-9983 (French).
Pairing (Wirelessly Connecting) Your Mobile Phone To The Uconnect® System
Mobile phone pairing is the process of establishing a wireless connection between a
cellular phone and the Uconnect®system.
NOTE:
•To u s e t h e U c o n n e c t®Phone feature, you first must determine if your mobile phone and
software are compatible with the Uconnect®system. Please visitUconnectPhone.com for
complete mobile phone compatibility information.
•Mobilephonepairingisnotavailablewhilethevehicleisinmotion.
•Amaximumof10mobilephonescanbepairedtotheUconnect®system.
Start Pairing Procedure On The Radio
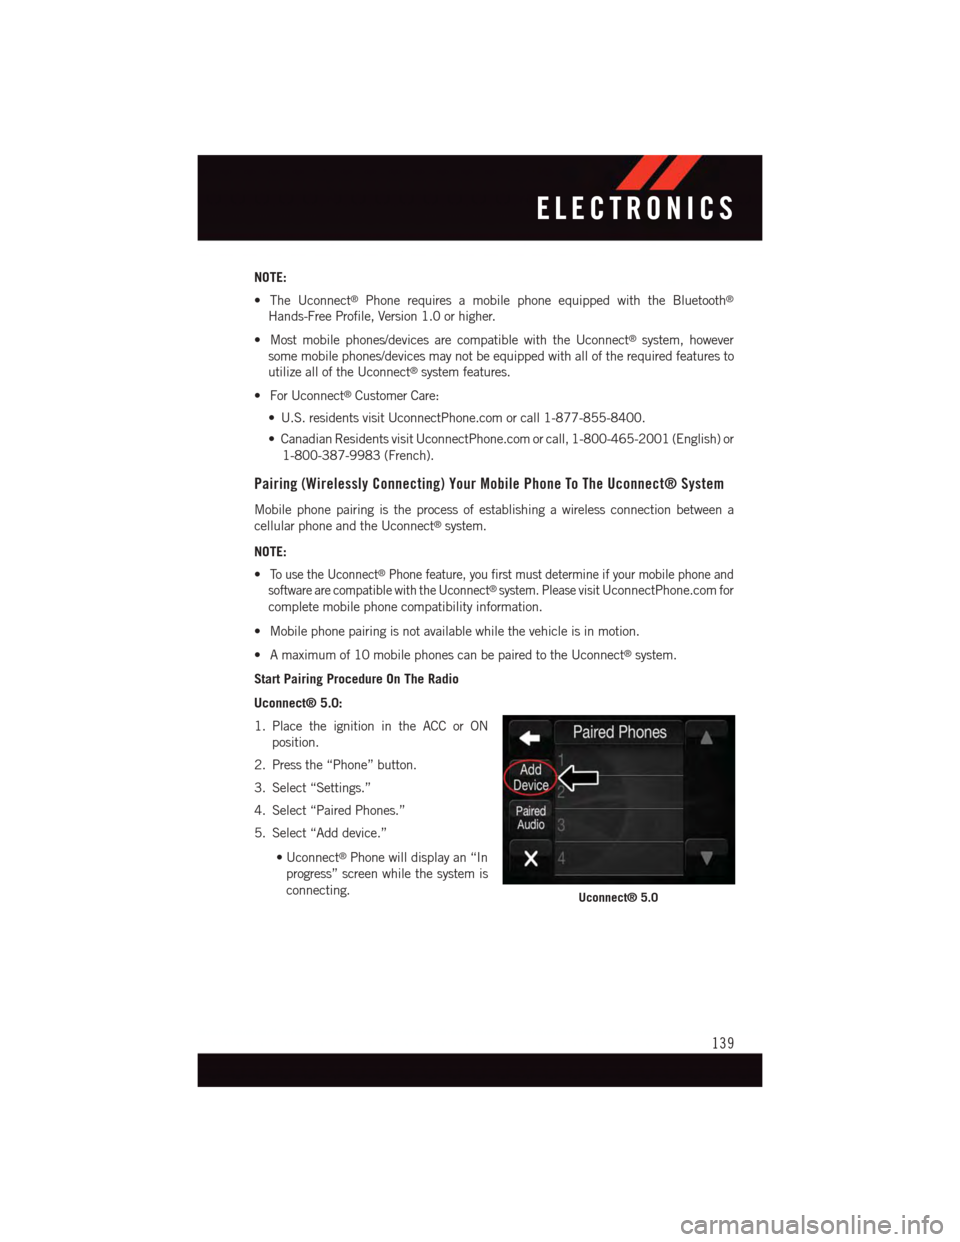
Uconnect® 5.0:
1. Place the ignition in the ACC or ON
position.
2. Press the “Phone” button.
3. Select “Settings.”
4. Select “Paired Phones.”
5. Select “Add device.”
•Uconnect®Phone will display an “In
progress” screen while the system is
connecting.Uconnect® 5.0
ELECTRONICS
139
Page 142 of 236
Uconnect® 8.4A, 8.4AN:
1. Place the ignition in the ACC or ON
position.
2. Press the “Phone” button in the Menu
Bar on the touchscreen.
3. Select “Settings.”
4. Select “Paired Phones.”
5. Select “Add device.”
•Uconnect®Phone will display an “In
progress” screen while the system is
connecting.
Pair Your iPhone®:
To s e a r c h f o r a v a i l a b l e d e v i c e s o n y o u r
Bluetooth®enabled iPhone®:
1. Press the Settings button.
2. Select Bluetooth®.
•EnsuretheBluetooth®feature is en-
abled. Once enabled, the mobile
phone will begin to search for
Bluetooth®connections.
3. When your mobile phone finds the
Uconnect®system, select “Uconnect.”
Complete The iPhone® Pairing Procedure:
1. When prompted on the mobile phone,
accept the connection request from
Uconnect®Phone.
NOTE:
Some mobile phones will require you to
enter the PIN number.
Uconnect® 8.4A & 8.4AN
Bluetooth® On/Uconnect Device
Pairing Request
ELECTRONICS
140
Page 145 of 236
Phonebook
The Uconnect®system will automatically sync your phonebook from your paired phone, if
this feature is supported by your phone. Phonebook contacts are updated each time that
the phone is connected. If your phone book entries do not appear, check the settings on
your phone. Some phones require you to enable this feature manually.
•YourphonebookcanbebrowsedontheUconnect®system touchscreen, but editing
can only be done on your phone. To browse, press the “Phone” button on the
touchscreen, then the “Phonebook” button on the touchscreen.
Favorite phonebook entries can be saved as Favorites for quicker access. Favorites are
shown at the top of the main phone screen.
Voice Command Tips
•Speakingcompletenames(i.e;CallJohnDoevs.CallJohn)willresultingreatersystem
accuracy.
•Youcan“link”commandstogetherforfasterresults.Say“CallJohnDoe,mobile,”for
example.
•Ifyouarelisteningtoavailablevoicecommandoptions,youdonothavetolistentothe
entire list. When you hear the command that you need, push thebutton on the
steering wheel, wait for the beep and say your command.
Changing The Volume
•StartadialoguebypushingthePhonebutton,thensayacommandforexample
-"Help".
•UsetheradioVOLUME/MUTErotaryknobtoadjustthevolumetoacomfortablelevel
while the Uconnect®system is speaking. Please note the volume setting for Uconnect®
is different than the audio system.
NOTE:
To a c c e s s h e l p , p u s h t h e U c o n n e c t®Phonebutton on the steering wheel and say
"help." Press the display or press either the Phoneor VRbutton and say
"cancel" to cancel the help session.
Incoming Text Messages
After pairing your Uconnect®system with a Bluetooth®enabled mobile device with the
Message Access Profile (MAP), the Uconnect®system can announce a new incoming text
message and read it to you over the vehicle’s audio system.
ELECTRONICS
143
Page 150 of 236
DRIVER INFORMATION DISPLAY (DID)
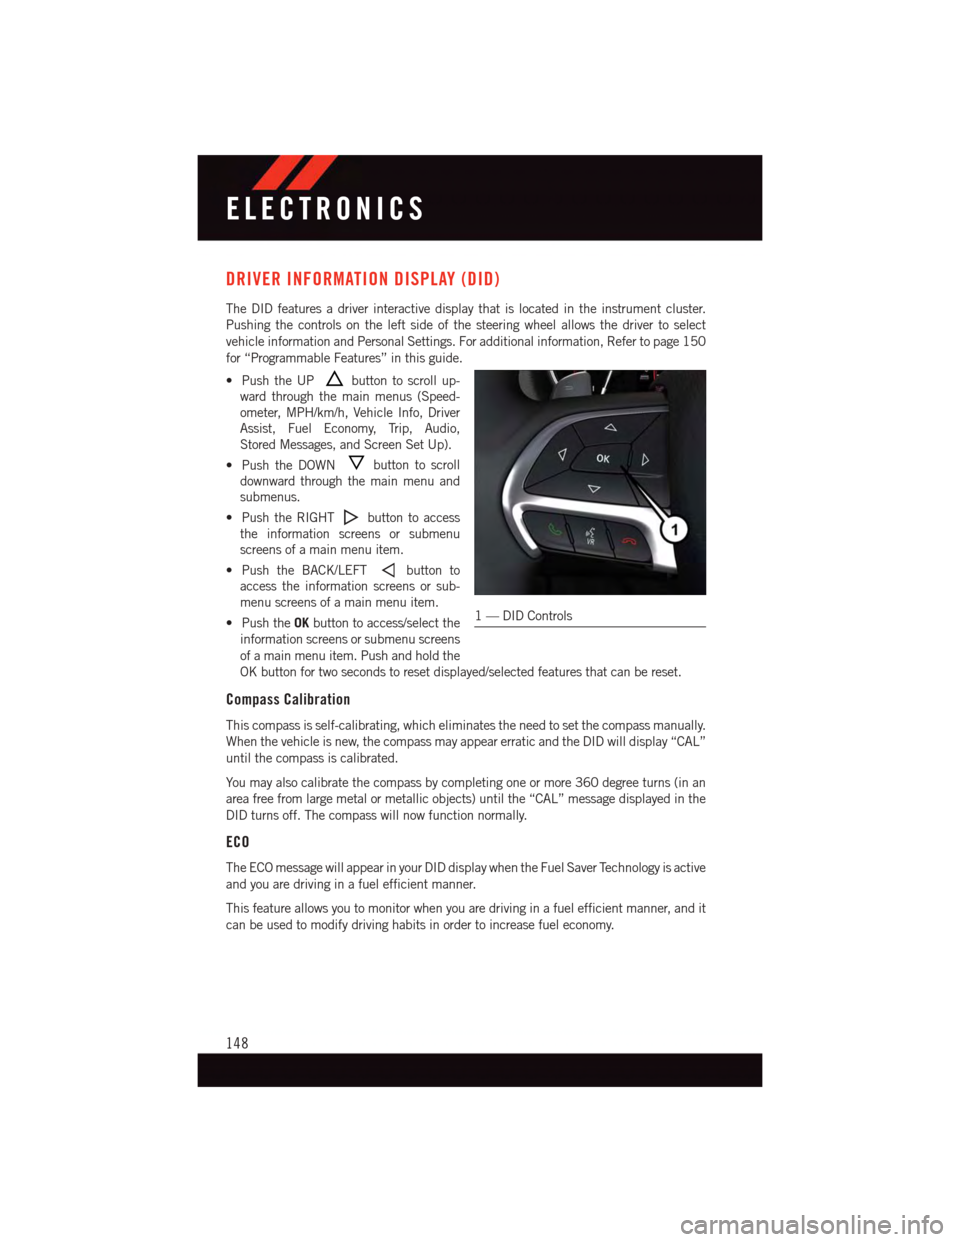
The DID features a driver interactive display that is located in the instrument cluster.
Pushing the controls on the left side of the steering wheel allows the driver to select
vehicle information and Personal Settings. For additional information, Refer to page 150
for “Programmable Features” in this guide.
•PushtheUPbutton to scroll up-
ward through the main menus (Speed-
ometer, MPH/km/h, Vehicle Info, Driver
Assist, Fuel Economy, Trip, Audio,
Stored Messages, and Screen Set Up).
•PushtheDOWNbutton to scroll
downward through the main menu and
submenus.
•PushtheRIGHTbutton to access
the information screens or submenu
screens of a main menu item.
•PushtheBACK/LEFTbutton to
access the information screens or sub-
menu screens of a main menu item.
•PushtheOKbutton to access/select the
information screens or submenu screens
of a main menu item. Push and hold the
OK button for two seconds to reset displayed/selected features that can be reset.
Compass Calibration
This compass is self-calibrating, which eliminates the need to set the compass manually.
When the vehicle is new, the compass may appear erratic and the DID will display “CAL”
until the compass is calibrated.
Yo u m a y a l s o c a l i b r a t e t h e c o m p a s s b y c o m p l e t i n g o n e o r m o r e 3 6 0 d e g r e e t u r n s ( i n a n
area free from large metal or metallic objects) until the “CAL” message displayed in the
DID turns off. The compass will now function normally.
ECO
The ECO message will appear in your DID display when the Fuel Saver Technology is active
and you are driving in a fuel efficient manner.
This feature allows you to monitor when you are driving in a fuel efficient manner, and it
can be used to modify driving habits in order to increase fuel economy.
1—DIDControls
ELECTRONICS
148
Page 151 of 236
DID Main Menu Selectable Items
The DID can be used to view the following main menu items:
•Speedometer•Stop/StartInfo—IfEquipped
•VehicleInfo•Audio
•DriverAssist•Messages
•FuelEconomy•ScreenSetup
•TripInfo
Refer to “Driver Information Display (DID)” found within “Understanding Your Instrument
Panel” located in your Owner's Manual on the DVD for further information.
DID Screen Setup
The following settings allow you to change what information is displayed in the instrument
cluster as well as the location that information is displayed:
•Compass•FuelEconomyInfo
•Date•Speed
•Time•RangetoEmpty
•OutsideTemp
Trip A
Push and release the UP or DOWN arrow button until the Trip A icon is highlighted in the
DID (Toggle left or right to select Trip A or Trip B). Push and release the OK button to
display the Trip A information.
Trip B
Push and release the UP or DOWN arrow button until the Trip B icon is highlighted in the
DID (Toggle left or right to select Trip A or Trip B). Push and release the OK button to
display the Trip B information.
Fuel Economy
Push and release theUPorDOWNarrow button until the Fuel Economy icon is highlighted.
Push theRIGHTarrow button and the next screen will display the following:
•AverageFuelEconomy/MilesPerGallon(MPGBargraph)
•RangeToEmpty(RTE)
•CurrentMilesPerGallon(MPG)
ELECTRONICS
149
Page 152 of 236
PROGRAMMABLE FEATURES
DID Programmable Features
The EVIC can be used to view the following main menu items:
NOTE:
Depending on the vehicles options, feature settings may vary.
•Speedometer•Trip
•MPHtokm/h•Audio
•VehicleInfo•StoredMessages
•DriverAssist•ScreenSetup
•FuelEconomy•SpeedWarning-IfEquipped
NOTE:
Refer to your Owner's Manual on the DVD for further information.
Uconnect® Customer Programmable Features
The Uconnect®system allows you to access Customer Programmable feature settings such
as Display, Voice, Clock, Safety & Driving Assistance, Lights, Doors & Locks, Auto-On Comfort
&RemoteStart,EngineOffOptions,CompassSettings,Audio,Phone/Bluetooth®,SiriusXM
Setup and System Information through buttons on the touchscreen.
•PushtheMOREorSETTINGSbutton(Uconnect®5.0), or press the “Apps” button
(Uconnect®8.4) located near the bottom of the touchscreen, then press the “Settings”
button on the touchscreen to access the Settings screen. When making a selection,
scroll up or down until the preferred setting is highlighted, then press and release the
preferred setting until a check-mark appears next to the setting, showing that setting
has been selected. The following feature settings are available:
•Display•EngineOffOptions
•Voice•Audio
•Clock•Phone/Bluetooth®
•Safety&DrivingAssistance•SiriusXMSetup
•Lights•RestoreSettings
•Compass(Uconnect®5.0)•ClearPersonalData
•Doors&Locks•SystemInformation
•Auto-OnComfort
NOTE:
Depending on the vehicles options, feature settings may vary.
ELECTRONICS
150
Page 153 of 236
DID Screen Setup
The following settings allow you to change what information is displayed in the instrument
cluster as well as the location that information is displayed:
•Compass•FuelEconomyInfo
•Date•Speed
•Time•RangetoEmpty
•OutsideTemp
Trip A
Push and release the UP or DOWN arrow button until the Trip A icon is highlighted in the
DID (Toggle left or right to select Trip A or Trip B). Push and release the OK button to
display the Trip A information.
Trip B
Push and release the UP or DOWN arrow button until the Trip B icon is highlighted in the
DID (Toggle left or right to select Trip A or Trip B). Push and release the OK button to
display the Trip B information.
Fuel Economy
Push and release theUPorDOWNarrow button until the Fuel Economy icon is highlighted.
Push theRIGHTarrow button and the next screen will display the following:
•AverageFuelEconomy/MilesPerGallon(MPGBargraph)
•RangeToEmpty(RTE)
•CurrentMilesPerGallon(MPG)
ELECTRONICS
151