Page 124 of 164

WARNING!
•Whentemperaturesarebelowthefreezingpoint,electrolyteinadischargedbattery
may freeze. Do not attempt jump-starting because the battery could rupture or
explode and cause personal injury. Battery temperature must be brought above the
freezing point before attempting a jump-start.
•Takecaretoavoidtheradiatorcoolingfanwheneverthehoodisraised.Itcanstart
anytime the ignition switch is on. You can be injured by moving fan blades.
•Removeanymetaljewelry,suchaswatchbandsorbracelets,thatmightmakean
inadvertent electrical contact. You could be severely injured.
•Batteriescontainsulfuricacidthatcanburnyourskinoreyesandgenerate
hydrogen gas which is flammable and explosive. Keep open flames or sparks away
from the battery.
•Donotallowvehiclestotoucheachotherasthiscouldestablishaground
connection and personal injury could result.
•Failuretofollowthisprocedurecouldresultinpersonalinjuryorpropertydamage
due to battery explosion.
•Donotconnectthecabletothenegativepost(-)ofthedischargedbattery.The
resulting electrical spark could cause the battery to explode and could result in
personal injury.
SHIFT LEVER OVERRIDE
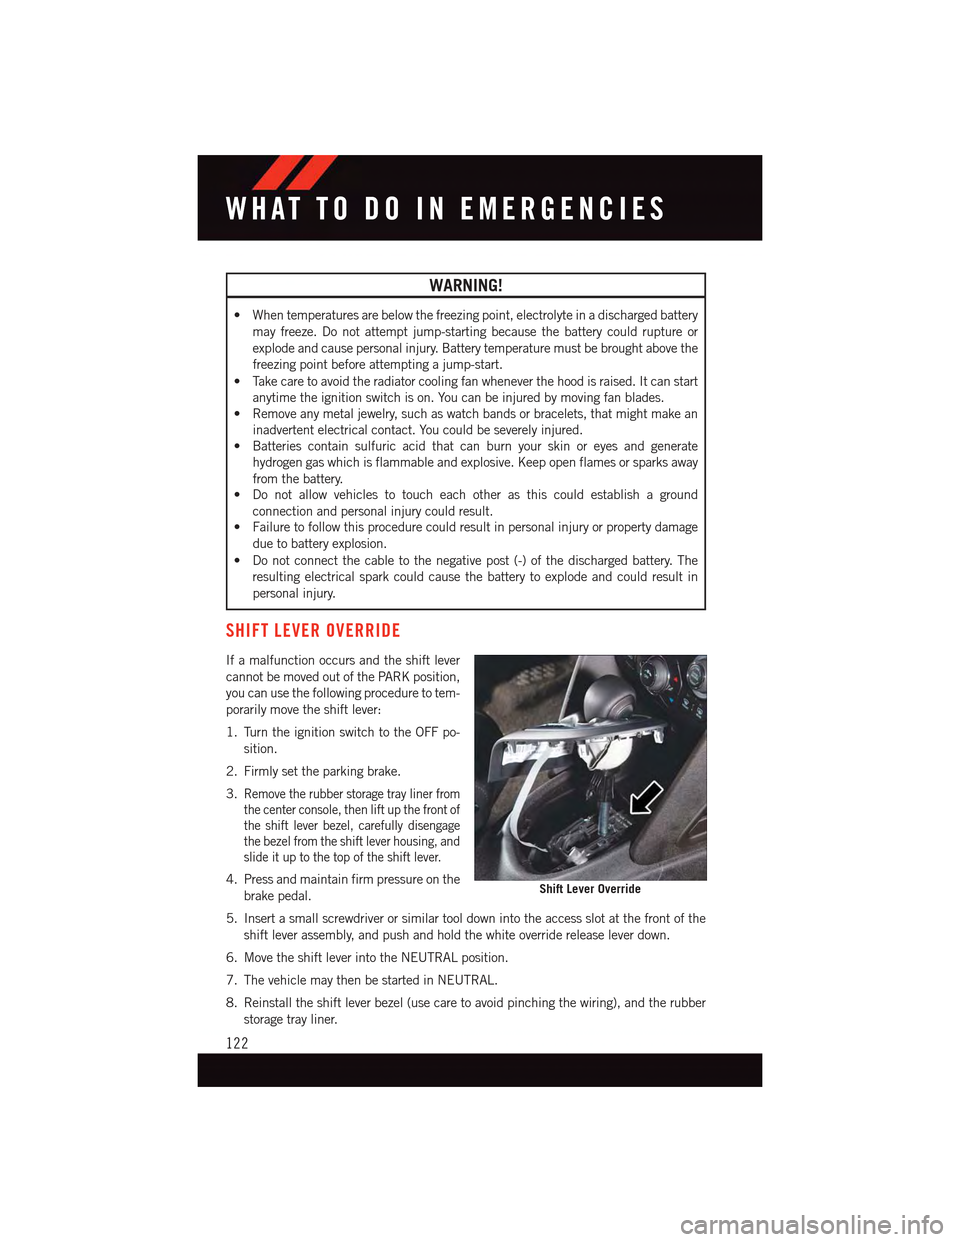
If a malfunction occurs and the shift lever
cannot be moved out of the PARK position,
you can use the following procedure to tem-
porarily move the shift lever:
1. Turn the ignition switch to the OFF po-
sition.
2. Firmly set the parking brake.
3.Remove the rubber storage tray liner from
the center console, then lift up the front of
the shift lever bezel, carefully disengage
the bezel from the shift lever housing, and
slide it up to the top of the shift lever.
4. Press and maintain firm pressure on the
brake pedal.
5. Insert a small screwdriver or similar tool down into the access slot at the front of the
shift lever assembly, and push and hold the white override release lever down.
6. Move the shift lever into the NEUTRAL position.
7. The vehicle may then be started in NEUTRAL.
8. Reinstall the shift lever bezel (use care to avoid pinching the wiring), and the rubber
storage tray liner.
Shift Lever Override
WHAT TO DO IN EMERGENCIES
122
Page 127 of 164
OPENING THE HOOD
1. Pull the hood release lever located on
the instrument panel, below the steering
column.
2. Raise the hood and locate the safety
catch lever, in the middle of the hood
opening.
3. Move the safety latch while lifting the
hood at the same time.
4. Lift upward on the hood prop rod insu-
lator to release the hood prop rod from
the stowage retainer.
5. Insert the hood prop rod into the slot on
the hood.
6. To close the hood, remove the support
rod and place it in the retaining clip, then lower the hood slowly.
WARNING!
Be sure the hood is fully latched before driving your vehicle. If the hood is not fully
latched, it could open when the vehicle is in motion and block your vision. Failure to
follow this warning could result in serious injury or death.
Hood Release Lever Location
MAINTAINING YOUR VEHICLE
125
Page 155 of 164

Inspection . . . . . . . . . . . . .133
Points to Remember.......133
Pressure Cap . . . . . . . . . . .133
Selection of Coolant (Antifreeze)..133
Corrosion Protection..........133
Cruise Light . . . . . . . . . . . . . . .36
Customer Assistance.......146, 147
Customer Programmable Features . . .94
Defects, Reporting...........148Dimmer Control.............35Dimmer Switch, Headlight.......35Disabled Vehicle Towing . . . . . . . .100DisposalAntifreeze (Engine Coolant)....133Door Locks.................8Driver Cockpit...............4
ElectronicsYo u r Ve h i c l e ' s S o u n dSystem.............50,51Electronic Stability Control (ESC) . . .100Electronic Stability Control (ESC) OFFIndicator . . . . . . . . . . . . . .103Electronic Throttle Control WarningLight . . . . . . . . . . . . . . . . .104Emergency, In Case ofFreeing Vehicle When Stuck . . .123Jacking . . . . . . . . . . . . . .108Overheating . . . . . . . . . . . .107To w i n g . . . . . . . . . . . . . . . 1 0 0EngineAir Cleaner.............133Break-In Recommendations....32Checking Oil Level.........133Cooling . . . . . . . . . . . . . . .133Oil . . . . . . . . . . . . . .132, 133Oil Filler Cap...........133Oil Selection . . . . . . . . .132, 133Overheating . . . . . . . . . . . .107Starting...............12Stopping..............12Te m p e r a t u r e W a r n i n g L i g h t....102Event Data Recorder..........124Exhaust System............133
FiltersAir Cleaner.............133
Engine Oil.............133
Engine Oil Disposal........133
Flashers
Tu r n S i g n a l............106
Flat Tire Changing...........108
Fluid, Brake . . . . . . . . . . . . . .133
Fluid Capacities............132
Fluids . . . . . . . . . . . . . . .132, 133
Fluids, Lubricants and Genuine
Parts . . . . . . . . . . . . . . . . .132Fog Lights . . . . . . . . . . . . .35, 106Folding Rear Seat............29Freeing A Stuck Vehicle . . . . . . . .123Front Heated Seats...........29FuelCapacity..............132Filler Cap (Gas Cap)........104Specifications...........132Ta n k C a p a c i t y...........132Fuse . . . . . . . . . . . . . . . . . .139Fuses . . . . . . . . . . . . . . . . . .139
Garage Door Opener (HomeLink®)...94Gasoline (Fuel).............132General Maintenance.........133Glass Cleaning.............133
HeadlightsAutomatic . . . . . . . . . . . . . .35Cleaning..............133Dimmer Switch...........35High Beam.............34Head Restraints.............26Heated Seats..............29Heated Steering Wheel.........30High Beam Indicator..........106High Beam/Low Beam Select (Dimmer)Switch . . . . . . . . . . . . . . . .34HomeLink®(Garage Door Opener) . . .94Hood Release.............125
Instrument Cluster............6Instrument Cluster Indicator Lights . .106Instrument Cluster Warning Lights . .100Instrument Panel Cover........133Instrument Panel Lens Cleaning . . .133Interior Appearance Care.......133Intermittent Wipers (Delay Wipers) . . .33
INDEX
153