Page 88 of 164

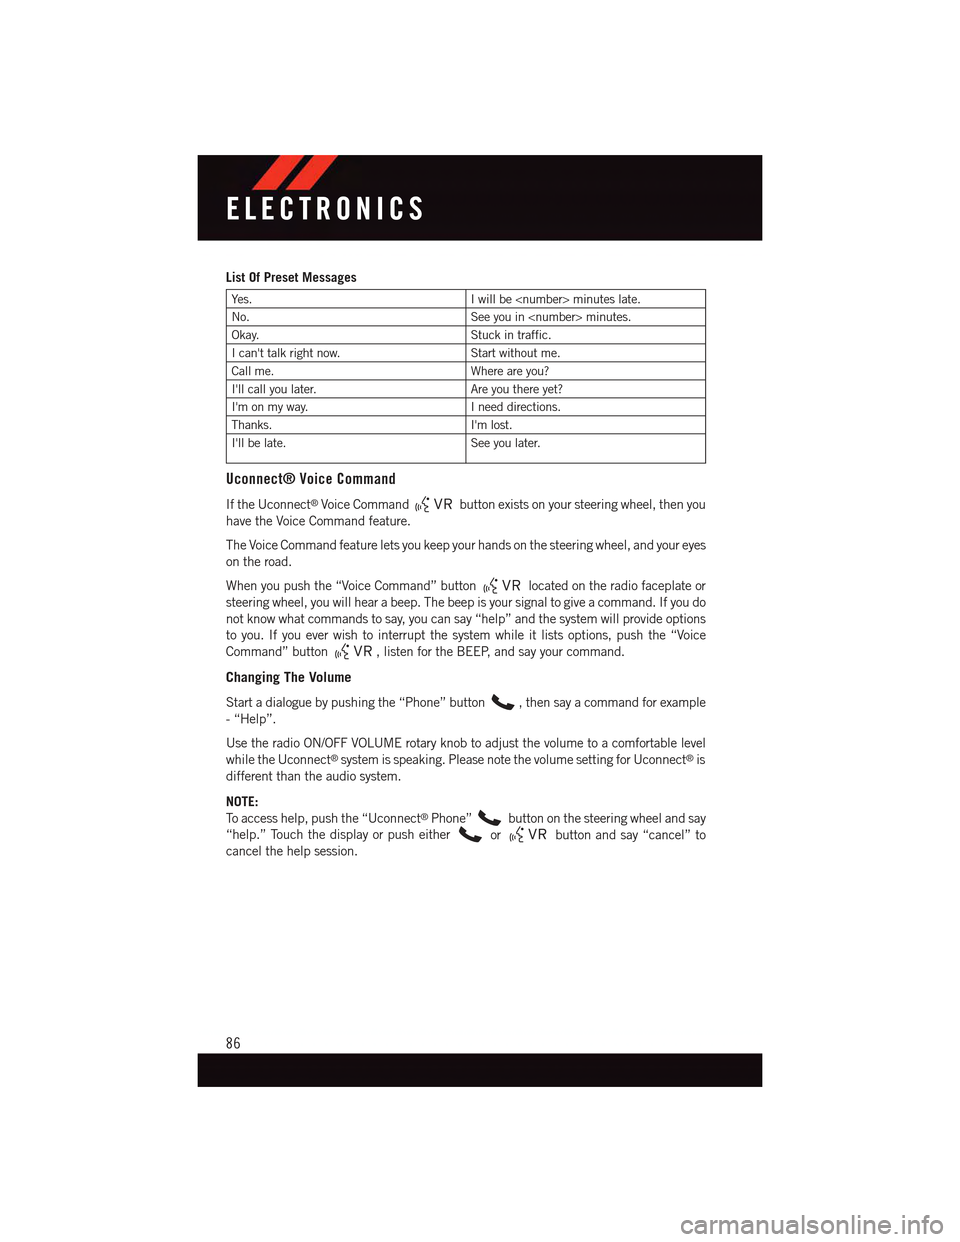
List Of Preset Messages
Ye s .Iwillbeminuteslate.
No.See you in minutes.
Okay.Stuck in traffic.
Ican'ttalkrightnow.Start without me.
Call me.Where are you?
I'll call you later.Are you there yet?
I'm on my way.Ineeddirections.
Thanks.I'm lost.
I'll be late.See you later.
Uconnect® Voice Command
If the Uconnect®Voice Commandbutton exists on your steering wheel, then you
have the Voice Command feature.
The Voice Command feature lets you keep your hands on the steering wheel, and your eyes
on the road.
When you push the “Voice Command” buttonlocated on the radio faceplate or
steering wheel, you will hear a beep. The beep is your signal to give a command. If you do
not know what commands to say, you can say “help” and the system will provide options
to you. If you ever wish to interrupt the system while it lists options, push the “Voice
Command” button,listenfortheBEEP,andsayyourcommand.
Changing The Volume
Start a dialogue by pushing the “Phone” button,thensayacommandforexample
-“Help”.
Use the radio ON/OFF VOLUME rotary knob to adjust the volume to a comfortable level
while the Uconnect®system is speaking. Please note the volume setting for Uconnect®is
different than the audio system.
NOTE:
To a c c e s s h e l p , p u s h t h e “ U c o n n e c t®Phone”button on the steering wheel and say
“help.” Touch the display or push eitherorbutton and say “cancel” to
cancel the help session.
ELECTRONICS
86
Page 90 of 164

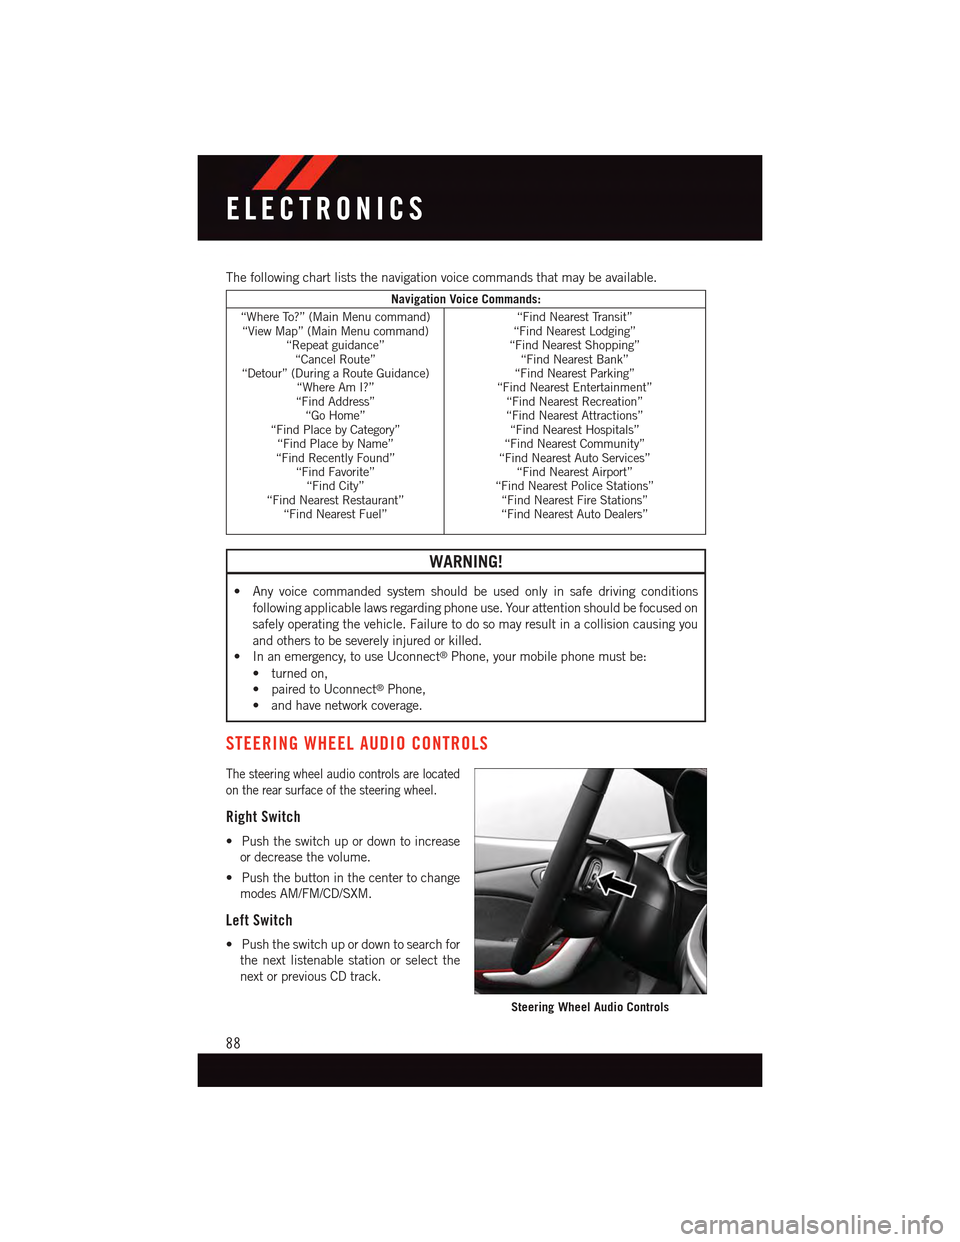
The following chart lists the navigation voice commands that may be available.
Navigation Voice Commands:
“Where To?” (Main Menu command)“View Map” (Main Menu command)“Repeat guidance”“Cancel Route”“Detour” (During a Route Guidance)“Where Am I?”“Find Address”“Go Home”“Find Place by Category”“Find Place by Name”“Find Recently Found”“Find Favorite”“Find City”“Find Nearest Restaurant”“Find Nearest Fuel”
“Find Nearest Transit”“Find Nearest Lodging”“Find Nearest Shopping”“Find Nearest Bank”“Find Nearest Parking”“Find Nearest Entertainment”“Find Nearest Recreation”“Find Nearest Attractions”“Find Nearest Hospitals”“Find Nearest Community”“Find Nearest Auto Services”“Find Nearest Airport”“Find Nearest Police Stations”“Find Nearest Fire Stations”“Find Nearest Auto Dealers”
WARNING!
•Anyvoicecommandedsystemshouldbeusedonlyinsafedrivingconditions
following applicable laws regarding phone use. Your attention should be focused on
safely operating the vehicle. Failure to do so may result in a collision causing you
and others to be severely injured or killed.
•Inanemergency,touseUconnect®Phone, your mobile phone must be:
•turnedon,
•pairedtoUconnect®Phone,
•andhavenetworkcoverage.
STEERING WHEEL AUDIO CONTROLS
The steering wheel audio controls are located
on the rear surface of the steering wheel.
Right Switch
•Pushtheswitchupordowntoincrease
or decrease the volume.
•Pushthebuttoninthecentertochange
modes AM/FM/CD/SXM.
Left Switch
•Pushtheswitchupordowntosearchfor
the next listenable station or select the
next or previous CD track.
Steering Wheel Audio Controls
ELECTRONICS
88
Page 91 of 164

•Pushthebuttoninthecentertoselectthenextpresetstation(radio)ortochangeCDs
if equipped with a CD Changer.
ELECTRONIC VEHICLE INFORMATION CENTER (EVIC) —
STANDARD (2 BUTTON)
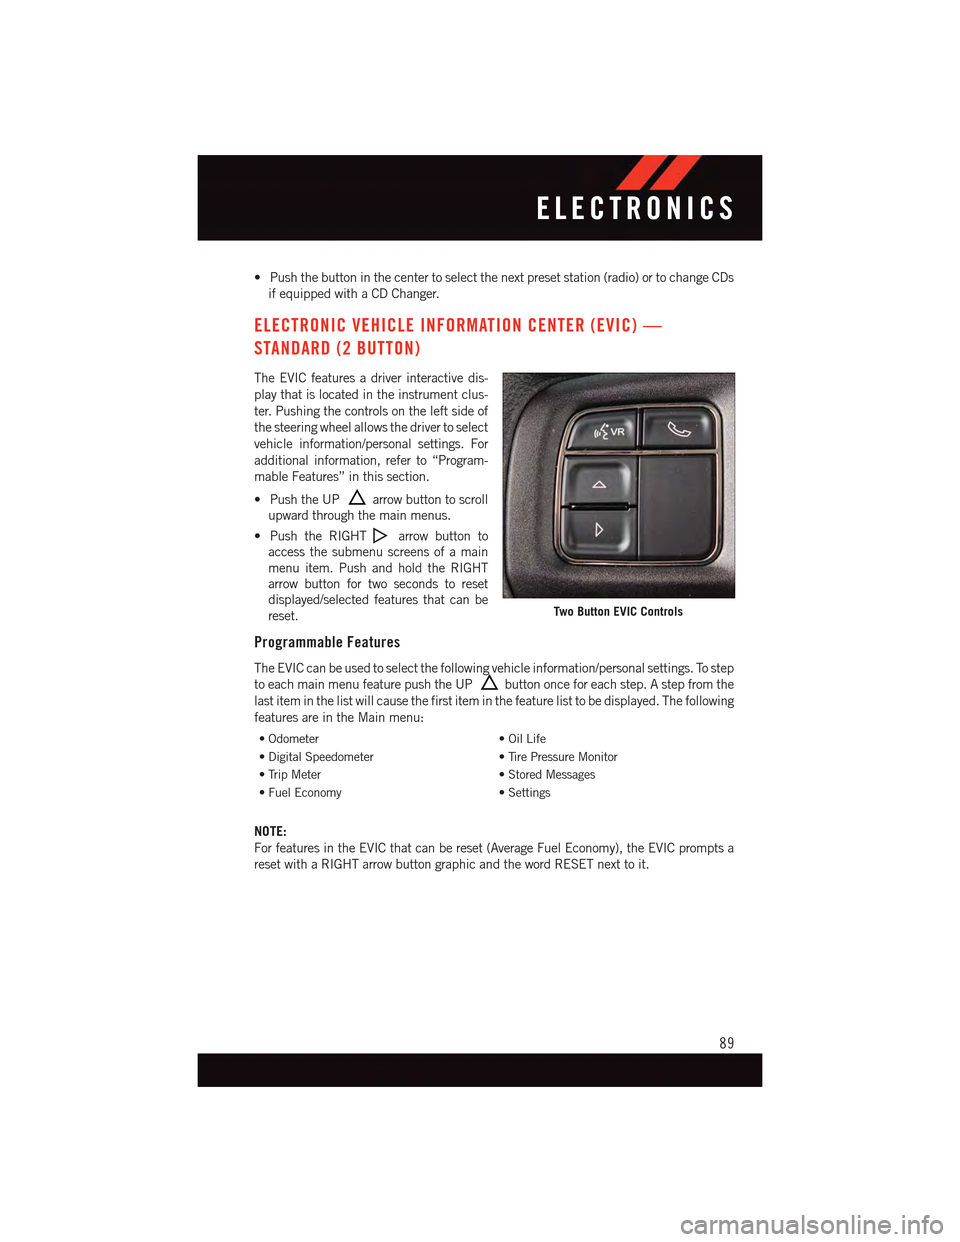
The EVIC features a driver interactive dis-
play that is located in the instrument clus-
ter. Pushing the controls on the left side of
the steering wheel allows the driver to select
vehicle information/personal settings. For
additional information, refer to “Program-
mable Features” in this section.
•PushtheUParrow button to scroll
upward through the main menus.
•PushtheRIGHTarrow button to
access the submenu screens of a main
menu item. Push and hold the RIGHT
arrow button for two seconds to reset
displayed/selected features that can be
reset.
Programmable Features
The EVIC can be used to select the following vehicle information/personal settings. To step
to each main menu feature push the UPbutton once for each step. A step from the
last item in the list will cause the first item in the feature list to be displayed. The following
features are in the Main menu:
•Odometer•OilLife
•DigitalSpeedometer•TirePressureMonitor
•TripMeter•StoredMessages
•FuelEconomy•Settings
NOTE:
For features in the EVIC that can be reset (Average Fuel Economy), the EVIC prompts a
reset with a RIGHT arrow button graphic and the word RESET next to it.
Two Button EVIC Controls
ELECTRONICS
89
Page 92 of 164

DRIVER INFORMATION DISPLAY (DID) — PREMIUM (4 BUTTON)
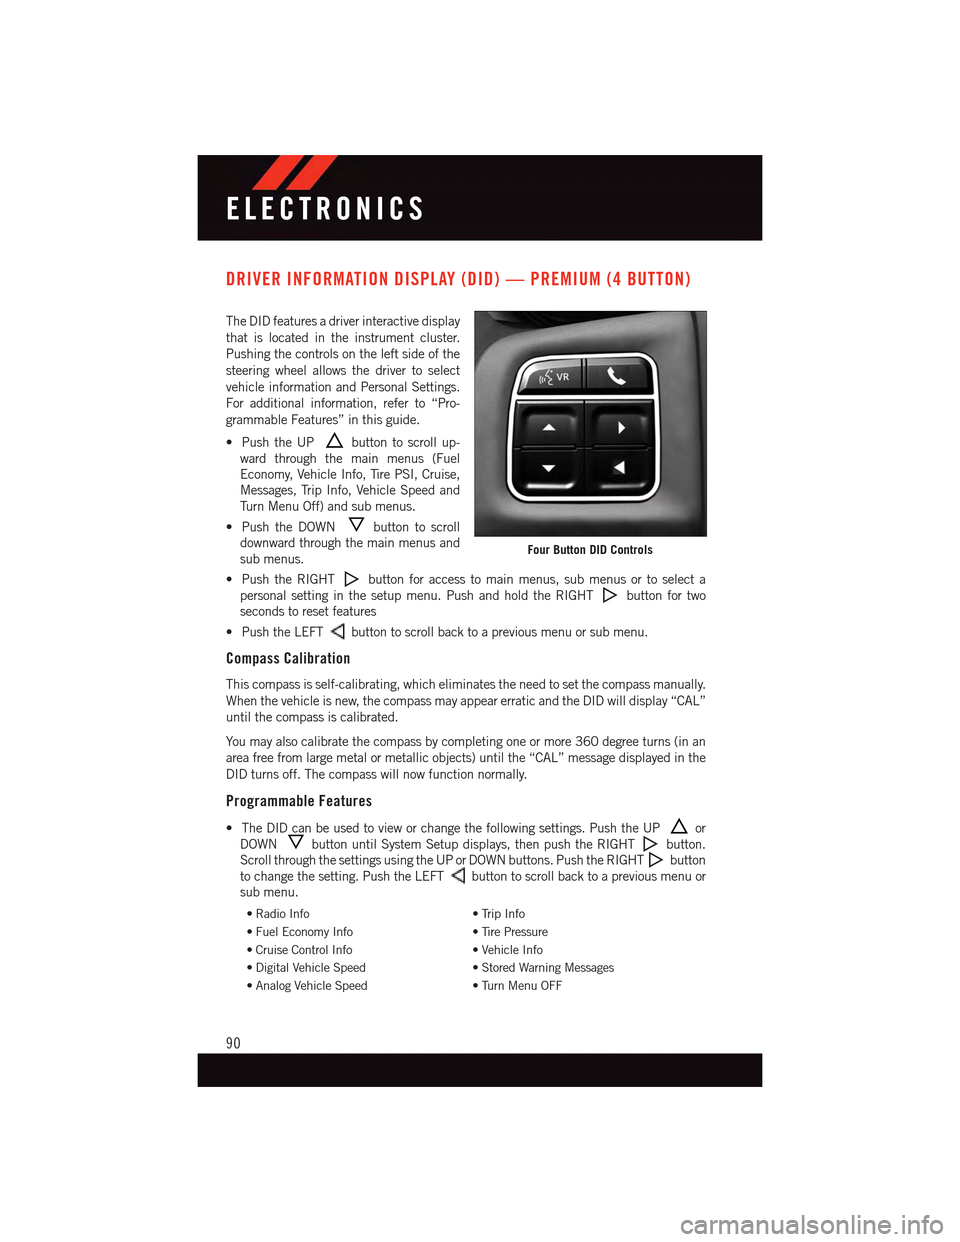
The DID features a driver interactive display
that is located in the instrument cluster.
Pushing the controls on the left side of the
steering wheel allows the driver to select
vehicle information and Personal Settings.
For additional information, refer to “Pro-
grammable Features” in this guide.
•PushtheUPbutton to scroll up-
ward through the main menus (Fuel
Economy, Vehicle Info, Tire PSI, Cruise,
Messages, Trip Info, Vehicle Speed and
Tu r n M e n u O f f ) a n d s u b m e n u s .
•PushtheDOWNbutton to scroll
downward through the main menus and
sub menus.
•PushtheRIGHTbutton for access to main menus, sub menus or to select a
personal setting in the setup menu. Push and hold the RIGHTbutton for two
seconds to reset features
•PushtheLEFTbutton to scroll back to a previous menu or sub menu.
Compass Calibration
This compass is self-calibrating, which eliminates the need to set the compass manually.
When the vehicle is new, the compass may appear erratic and the DID will display “CAL”
until the compass is calibrated.
Yo u m a y a l s o c a l i b r a t e t h e c o m p a s s b y c o m p l e t i n g o n e o r m o r e 3 6 0 d e g r e e t u r n s ( i n a n
area free from large metal or metallic objects) until the “CAL” message displayed in the
DID turns off. The compass will now function normally.
Programmable Features
•TheDIDcanbeusedtovieworchangethefollowingsettings.PushtheUPor
DOWNbutton until System Setup displays, then push the RIGHTbutton.
Scroll through the settings using the UP or DOWN buttons. Push the RIGHTbutton
to change the setting. Push the LEFTbutton to scroll back to a previous menu or
sub menu.
•RadioInfo•TripInfo
•FuelEconomyInfo•TirePressure
•CruiseControlInfo•VehicleInfo
•DigitalVehicleSpeed•StoredWarningMessages
•AnalogVehicleSpeed•TurnMenuOFF
Four Button DID Controls
ELECTRONICS
90
Page 125 of 164

TOWING A DISABLED VEHICLE
Towing ConditionWheels OFF TheGroundAUTOMATICTRANSMISSIONMANUALTRANSMISSION
Flat TowNONE NOT ALLOWEDTr a n s m i s s i o n i nNEUTRAL
Wheel Lift or DollyTo w
Rear NOT ALLOWED NOT ALLOWED
Front NOT ALLOWED NOT ALLOWED
FlatbedALLBEST METHOD BEST METHOD
FREEING A STUCK VEHICLE
If your manual transmission vehicle becomes stuck in mud, sand, or snow, it can often be
moved by a rocking motion. Turn your steering wheel right and left to clear the area around
the front wheels. Then shift back and forth between DRIVE/1st Gear and REVERSE. Using
minimal accelerator pedal pressure to maintain the rocking motion, without spinning the
wheels, is most effective.
NOTE:
•Automatictransmissionvehiclescannotberockedinthismanner,becausethe
transmission will not allow shifts between DRIVE and REVERSE while the wheels are
turning.
•IfyourvehicleisequippedwithElectronicStabilityControl(ESC)orTraction
Control,turnthesystemoffbeforeattemptingto“rock”thevehicle.
CAUTION!
•Racingtheengineorspinningthewheelsmayleadtotransmissionoverheatingand
failure. Allow the engine to idle with the shift lever in NEUTRAL for at least one
minute after every five rocking-motion cycles. This will minimize overheating and
reduce the risk of transmission failure during prolonged efforts to free a stuck
vehicle.
•When“rocking”astuckvehiclebymovingbetweenDRIVE/1stgearandREVERSE,
do not spin the wheels faster than 15 mph (24 km/h), or drivetrain damage may
result.
•Revvingtheengineorspinningthewheelstoofastmayleadtotransmission
overheating and failure. It can also damage the tires. Do not spin the wheels above
30 mph (48 km/h) while in gear (no transmission shifting occurring).
WHAT TO DO IN EMERGENCIES
123
Page 127 of 164
OPENING THE HOOD
1. Pull the hood release lever located on
the instrument panel, below the steering
column.
2. Raise the hood and locate the safety
catch lever, in the middle of the hood
opening.
3. Move the safety latch while lifting the
hood at the same time.
4. Lift upward on the hood prop rod insu-
lator to release the hood prop rod from
the stowage retainer.
5. Insert the hood prop rod into the slot on
the hood.
6. To close the hood, remove the support
rod and place it in the retaining clip, then lower the hood slowly.
WARNING!
Be sure the hood is fully latched before driving your vehicle. If the hood is not fully
latched, it could open when the vehicle is in motion and block your vision. Failure to
follow this warning could result in serious injury or death.
Hood Release Lever Location
MAINTAINING YOUR VEHICLE
125
Page 141 of 164
FUSES
Interior Fuses
The interior fuses are located on the drivers side under the instrument panel.
Cavity Cartridge Fuse Mini FuseDescription
F1–20AmpYellowFrontHeatedSeats–IfEquipped
F2–20AmpYellowRear Heated Seats, Heated Steer-ing Wheel – If Equipped
F3–10AmpRedPark Assist Module, Rear Camera,Left and Right Blind Spot Sensor,Compass – If Equipped
F4–15AmpBlueInstrumentCluster
F5–10AmpRedHVAC, Humidity Sensor, In-CarTe m p e r a t u r e S e n s o r, I n s i d e M i r r o rAssembly
F18–15AmpBlueRadio
F20–10AmpRedSteering Column Control Module,Switch Bank
F21–10AmpRedDiagnosticPort
F22–10AmpRedUniversal Garage Door Opener,EOM
F23–20AmpYellowSunroof
F24–5AmpTan Run/AccessoryRelay
F25–5AmpTan TransmissionControlModule#4
F26–5AmpTan StopLampSwitch
F27–10AmpRedPneumaticLumbarSupport
MAINTAINING YOUR VEHICLE
139
Page 144 of 164

TIRE PRESSURES
Check the inflation pressure of each tire, including the spare tire, at least monthly and
inflate to the recommended pressure for your vehicle.
The tire pressures recommended for your vehicle are found on the “Tire and Loading
Information” label located on the driver’s side door opening.
NOTE:
Refer to the Owner's Manual on the DVD for
more information regarding tire warnings
and instructions.
WARNING!
•Overloadingofyourtiresisdangerous.Overloadingcancausetirefailure,affect
vehicle handling, and increase your stopping distance. Use tires of the recom-
mended load capacity for your vehicle. Never overload them.
•Improperlyinflatedtiresaredangerousandcancausecollisions.Under-inflation
increases tire flexing and can result in over-heating and tire failure. Over-inflation
reduces a tire’s ability to cushion shock. Objects on the road and chuck holes can
cause damage that results in tire failure. Unequal tire pressures can cause steering
problems. You could lose control of your vehicle. Over-inflated or under-inflated
tires can affect vehicle handling and can fail suddenly, resulting in loss of vehicle
control. Always drive with each tire inflated to the recommended cold tire inflation
pressure.
Tire And Loading Information Location(Example)
MAINTAINING YOUR VEHICLE
142