2015 DODGE DART ad blue
[x] Cancel search: ad bluePage 82 of 164
Uconnect® Phone (Bluetooth® HANDS FREE CALLING)
If the Uconnect®PhoneButton exists on your steering wheel, then you have the
Uconnect®Phone features.
The Uconnect®Phone is a voice-activated, hands-free, in-vehicle communications
system with Voice Command Capability (see Voice Command section).
The Uconnect®Phone allows you to dial a phone number stored in your mobile phone by
using simple voice commands or using buttons on the touchscreen.
Refer to the “Understand The Features Of Your Vehicle” section of your vehicle's Owner's
Manual on the DVD for further details.
NOTE:
The Uconnect®Phone requires a mobile phone equipped with the Bluetooth®Hands-
Free Profile, Version 1.0 or higher. For Uconnect®customer support, call
1-877-855-8400 or visit UconnectPhone.com. Canadian Residents: call
1-800-465-2001 (English) or 1-800-387-9983 (French) or visit UconnectPhone.com.
Pairing A Phone
To u s e t h e U c o n n e c t®Phone feature, you must first pair your Bluetooth®phone with the
Uconnect®system.
NOTE:
For Voice Command enabled phone pairing, refer to your vehicles Owner's Manual for
details.
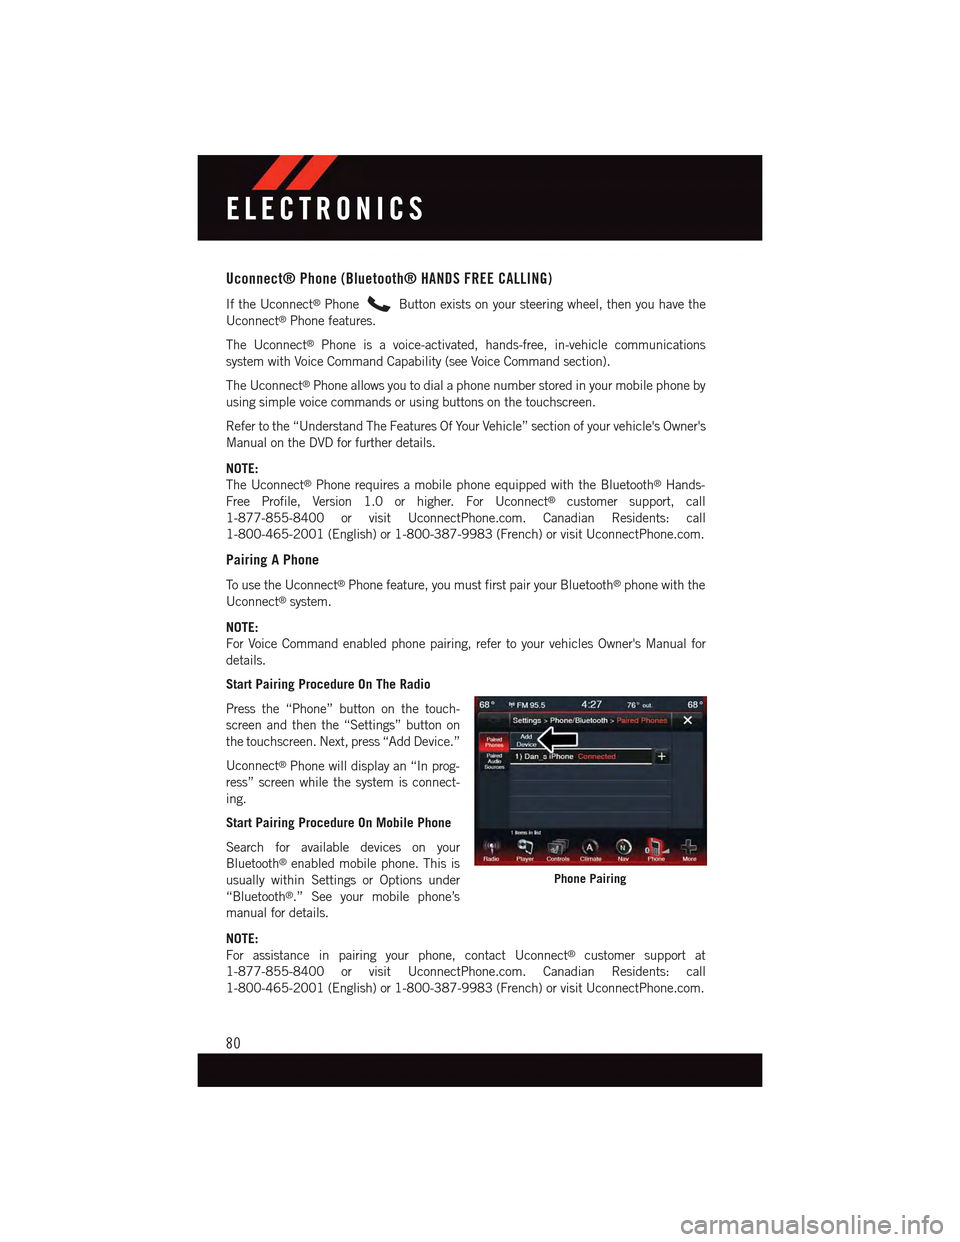
Start Pairing Procedure On The Radio
Press the “Phone” button on the touch-
screen and then the “Settings” button on
the touchscreen. Next, press “Add Device.”
Uconnect®Phone will display an “In prog-
ress” screen while the system is connect-
ing.
Start Pairing Procedure On Mobile Phone
Search for available devices on your
Bluetooth®enabled mobile phone. This is
usually within Settings or Options under
“Bluetooth®.” See your mobile phone’s
manual for details.
NOTE:
For assistance in pairing your phone, contact Uconnect®customer support at
1-877-855-8400 or visit UconnectPhone.com. Canadian Residents: call
1-800-465-2001 (English) or 1-800-387-9983 (French) or visit UconnectPhone.com.
Phone Pairing
ELECTRONICS
80
Page 83 of 164

Complete The Pairing Procedure
When prompted on the phone, enter the
4-digit PIN number shown on the
Uconnect®Screen.
If your phone asks you to accept a connec-
tion request from Uconnect®,select“Yes.”
If available, check the box telling it not to
ask again – that way your phone will auto-
matically connect each time you start the
vehicle.
Select The Mobile Phone's Priority Level
When the pairing process has successfully
completed, the system will prompt you to
choose whether or not this is your favorite
phone. Selecting “Yes” will make this
phone the highest priority. This phone will
take precedence over other paired phones
within range. Only one phone can be connected at a time.
Yo u a r e n o w r e a d y t o m a k e h a n d s - f r e e c a l l s . P r e s s t h e “ U c o n n e c t®Phone” button on your
steering wheel to begin.
Bluetooth® Pairing Device Name And PIN
1—VehicleDeviceName—Uconnect®
2—Uconnect®Bluetooth®Pairing PINNumber
ELECTRONICS
81
Page 87 of 164
Voice Text Reply
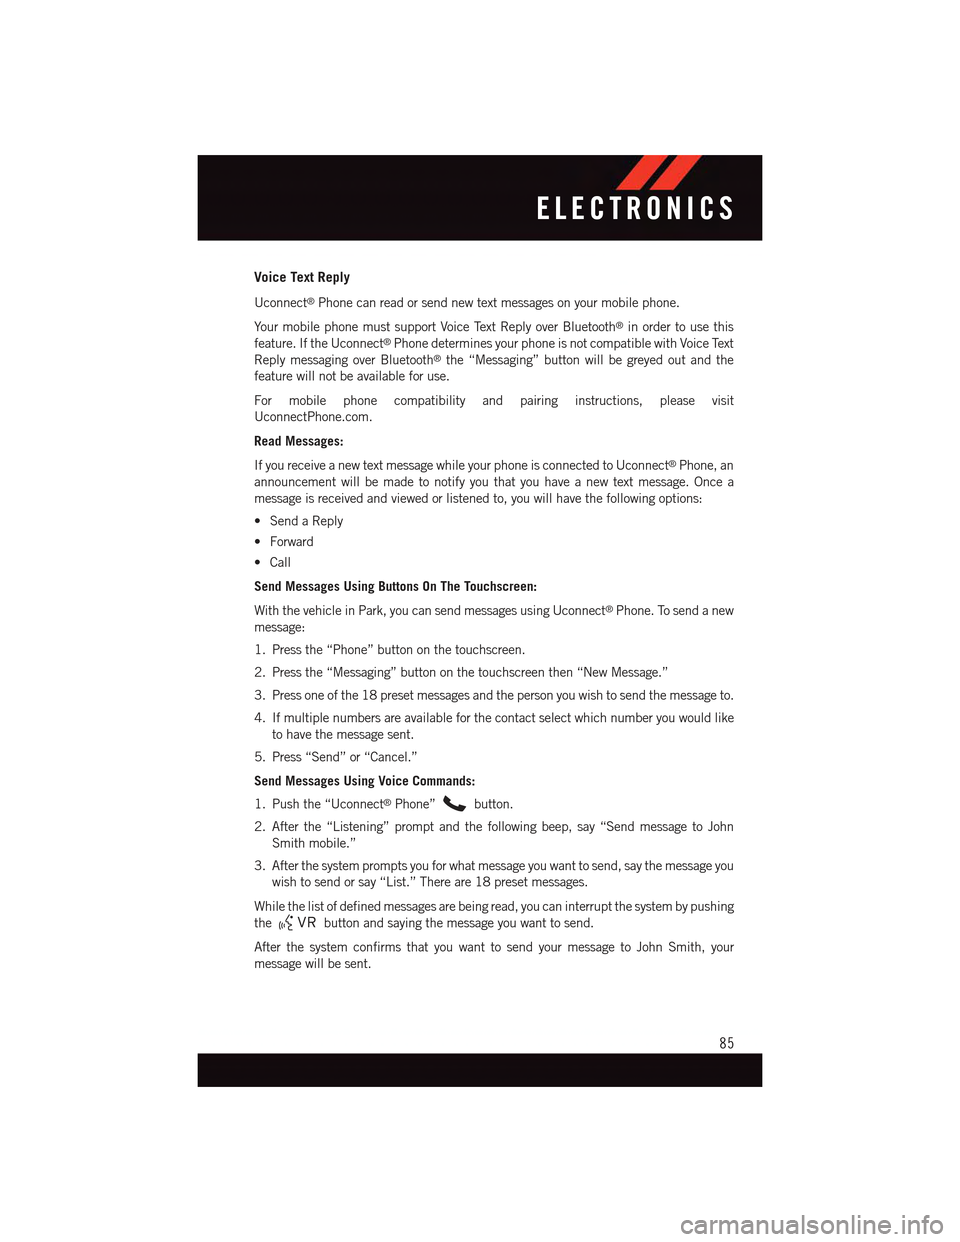
Uconnect®Phone can read or send new text messages on your mobile phone.
Yo u r m o b i l e p h o n e m u s t s u p p o r t Vo i c e Te x t R e p l y o v e r B l u e t o o t h®in order to use this
feature. If the Uconnect®Phone determines your phone is not compatible with Voice Text
Reply messaging over Bluetooth®the “Messaging” button will be greyed out and the
feature will not be available for use.
For mobile phone compatibility and pairing instructions, please visit
UconnectPhone.com.
Read Messages:
If you receive a new text message while your phone is connected to Uconnect®Phone, an
announcement will be made to notify you that you have a new text message. Once a
message is received and viewed or listened to, you will have the following options:
•SendaReply
•Forward
•Call
Send Messages Using Buttons On The Touchscreen:
With the vehicle in Park, you can send messages using Uconnect®Phone. To send a new
message:
1. Press the “Phone” button on the touchscreen.
2. Press the “Messaging” button on the touchscreen then “New Message.”
3. Press one of the 18 preset messages and the person you wish to send the message to.
4. If multiple numbers are available for the contact select which number you would like
to have the message sent.
5. Press “Send” or “Cancel.”
Send Messages Using Voice Commands:
1. Push the “Uconnect®Phone”button.
2. After the “Listening” prompt and the following beep, say “Send message to John
Smith mobile.”
3. After the system prompts you for what message you want to send, say the message you
wish to send or say “List.” There are 18 preset messages.
While the list of defined messages are being read, you can interrupt the system by pushing
thebutton and saying the message you want to send.
After the system confirms that you want to send your message to John Smith, your
message will be sent.
ELECTRONICS
85
Page 96 of 164
Uconnect® 8.4 CUSTOMER PROGRAMMABLE FEATURES
The Uconnect®8.4 system allows you to access Customer Programmable feature settings
such as Display, Clock, Safety/Assistance, Lights, Doors & Locks, Heated Seats, Engine
Off Operation, Compass Settings, Audio, Phone/Bluetooth®and SiriusXM Setup through
buttons on the touchscreen.
Press the “More” button on the touchscreen on the bottom of the screen, then press the
“Settings” button on the touchscreen to access the Settings screen. When making a
selection, scroll up or down until the preferred setting is highlighted, then press and
release the preferred setting until a check-mark appears next to the setting, showing that
setting has been selected. The following feature settings are available:
•Display•Clock
•Safety/Assistance•Lights
•Doors&Locks•Auto-OnComfort&RemoteStart
•EngineOffOptions•CompassSettings
•Audio•Phone/Bluetooth®
•SiriusXMSetup
UNIVERSAL GARAGE DOOR OPENER (HomeLink®)
HomeLink®replaces up to three hand-held transmitters that operate devices such as
garage door openers, motorized gates, lighting or home security systems. The HomeLink®
unit is powered by your vehicles 12 Volt battery.
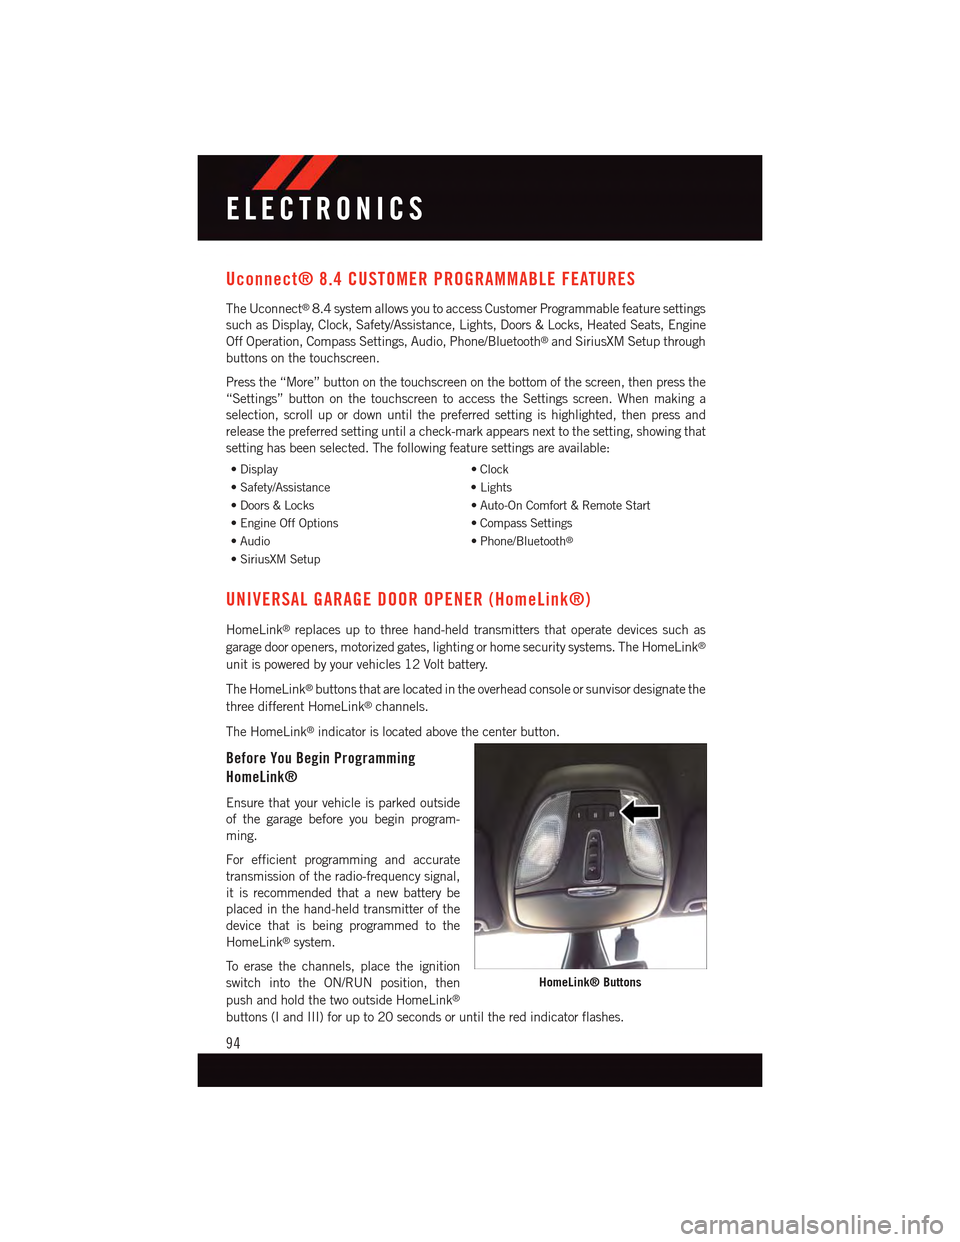
The HomeLink®buttons that are located in the overhead console or sunvisor designate the
three different HomeLink®channels.
The HomeLink®indicator is located above the center button.
Before You Begin Programming
HomeLink®
Ensure that your vehicle is parked outside
of the garage before you begin program-
ming.
For efficient programming and accurate
transmission of the radio-frequency signal,
it is recommended that a new battery be
placed in the hand-held transmitter of the
device that is being programmed to the
HomeLink®system.
To e r a s e t h e c h a n n e l s , p l a c e t h e i g n i t i o n
switch into the ON/RUN position, then
push and hold the two outside HomeLink®
buttons (I and III) for up to 20 seconds or until the red indicator flashes.
HomeLink® Buttons
ELECTRONICS
94
Page 141 of 164

FUSES
Interior Fuses
The interior fuses are located on the drivers side under the instrument panel.
Cavity Cartridge Fuse Mini FuseDescription
F1–20AmpYellowFrontHeatedSeats–IfEquipped
F2–20AmpYellowRear Heated Seats, Heated Steer-ing Wheel – If Equipped
F3–10AmpRedPark Assist Module, Rear Camera,Left and Right Blind Spot Sensor,Compass – If Equipped
F4–15AmpBlueInstrumentCluster
F5–10AmpRedHVAC, Humidity Sensor, In-CarTe m p e r a t u r e S e n s o r, I n s i d e M i r r o rAssembly
F18–15AmpBlueRadio
F20–10AmpRedSteering Column Control Module,Switch Bank
F21–10AmpRedDiagnosticPort
F22–10AmpRedUniversal Garage Door Opener,EOM
F23–20AmpYellowSunroof
F24–5AmpTan Run/AccessoryRelay
F25–5AmpTan TransmissionControlModule#4
F26–5AmpTan StopLampSwitch
F27–10AmpRedPneumaticLumbarSupport
MAINTAINING YOUR VEHICLE
139
Page 142 of 164
Underhood Fuses
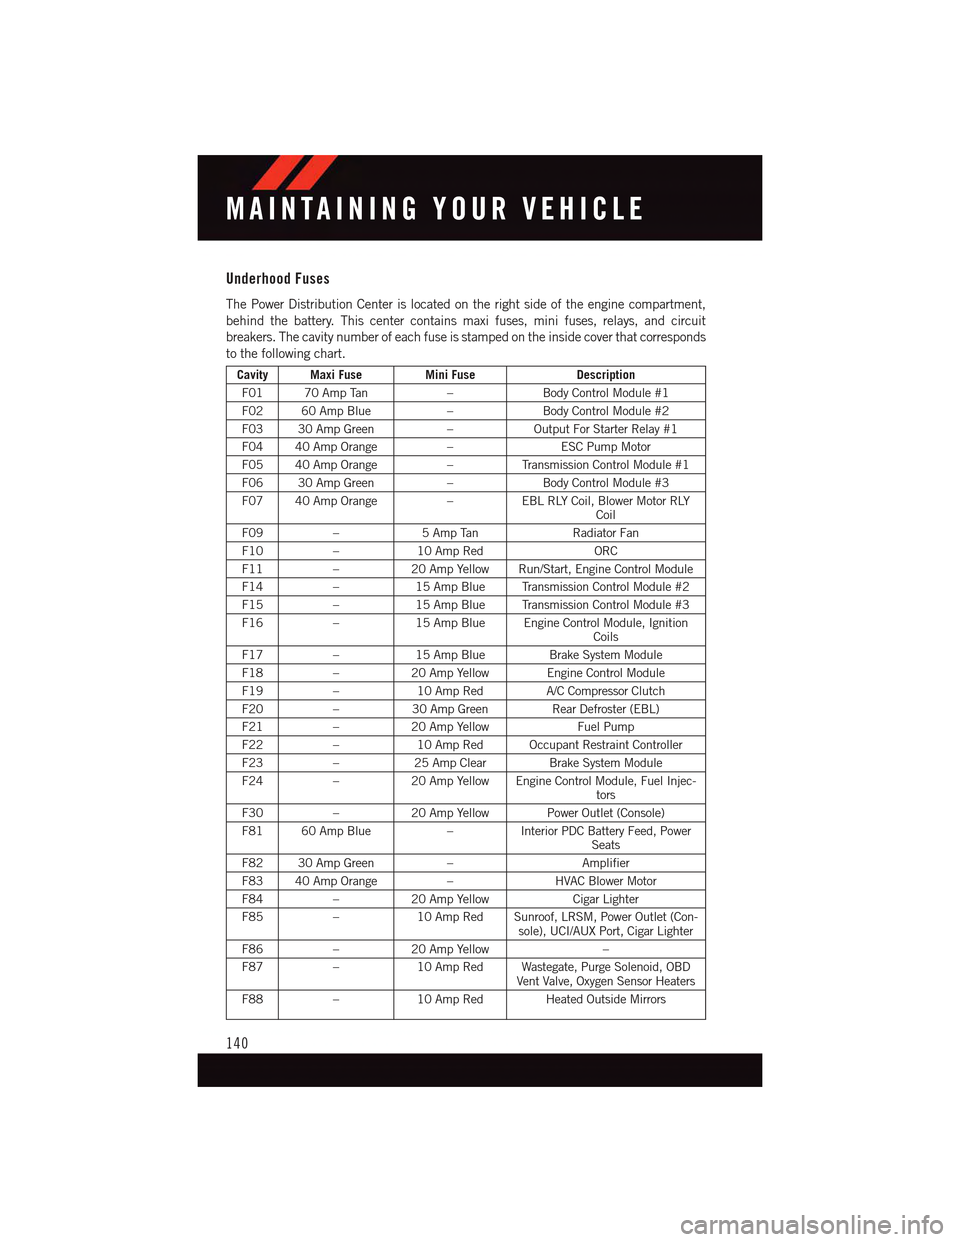
The Power Distribution Center is located on the right side of the engine compartment,
behind the battery. This center contains maxi fuses, mini fuses, relays, and circuit
breakers. The cavity number of each fuse is stamped on the inside cover that corresponds
to the following chart.
Cavity Maxi FuseMini FuseDescription
F01 70 Amp Tan–Body Control Module #1
F02 60 Amp Blue–Body Control Module #2
F03 30 Amp Green–Output For Starter Relay #1
F04 40 Amp Orange–ESC Pump Motor
F05 40 Amp Orange–Tr a n s m i s s i o n C o n t r o l M o d u l e # 1
F06 30 Amp Green–Body Control Module #3
F07 40 Amp Orange–EBL RLY Coil, Blower Motor RLYCoil
F09–5AmpTanRadiator Fan
F10–10 Amp RedORC
F11–20 Amp Yellow Run/Start, Engine Control Module
F14–15 Amp Blue Transmission Control Module #2
F15–15 Amp Blue Transmission Control Module #3
F16–15 Amp Blue Engine Control Module, IgnitionCoils
F17–15 Amp BlueBrake System Module
F18–20 Amp Yellow Engine Control Module
F19–10 Amp RedA/C Compressor Clutch
F20–30 Amp GreenRear Defroster (EBL)
F21–20 Amp YellowFuel Pump
F22–10 Amp Red Occupant Restraint Controller
F23–25 Amp ClearBrake System Module
F24–20 Amp Yellow Engine Control Module, Fuel Injec-tors
F30–20 Amp Yellow Power Outlet (Console)
F81 60 Amp Blue–Interior PDC Battery Feed, PowerSeats
F82 30 Amp Green–Amplifier
F83 40 Amp Orange–HVAC Blower Motor
F84–20 Amp YellowCigar Lighter
F85–10 Amp Red Sunroof, LRSM, Power Outlet (Con-sole), UCI/AUX Port, Cigar Lighter
F86–20 Amp Yellow–
F87–10 Amp Red Wastegate, Purge Solenoid, OBDVent Valve, Oxygen Sensor Heaters
F88–10 Amp Red Heated Outside Mirrors
MAINTAINING YOUR VEHICLE
140
Page 143 of 164
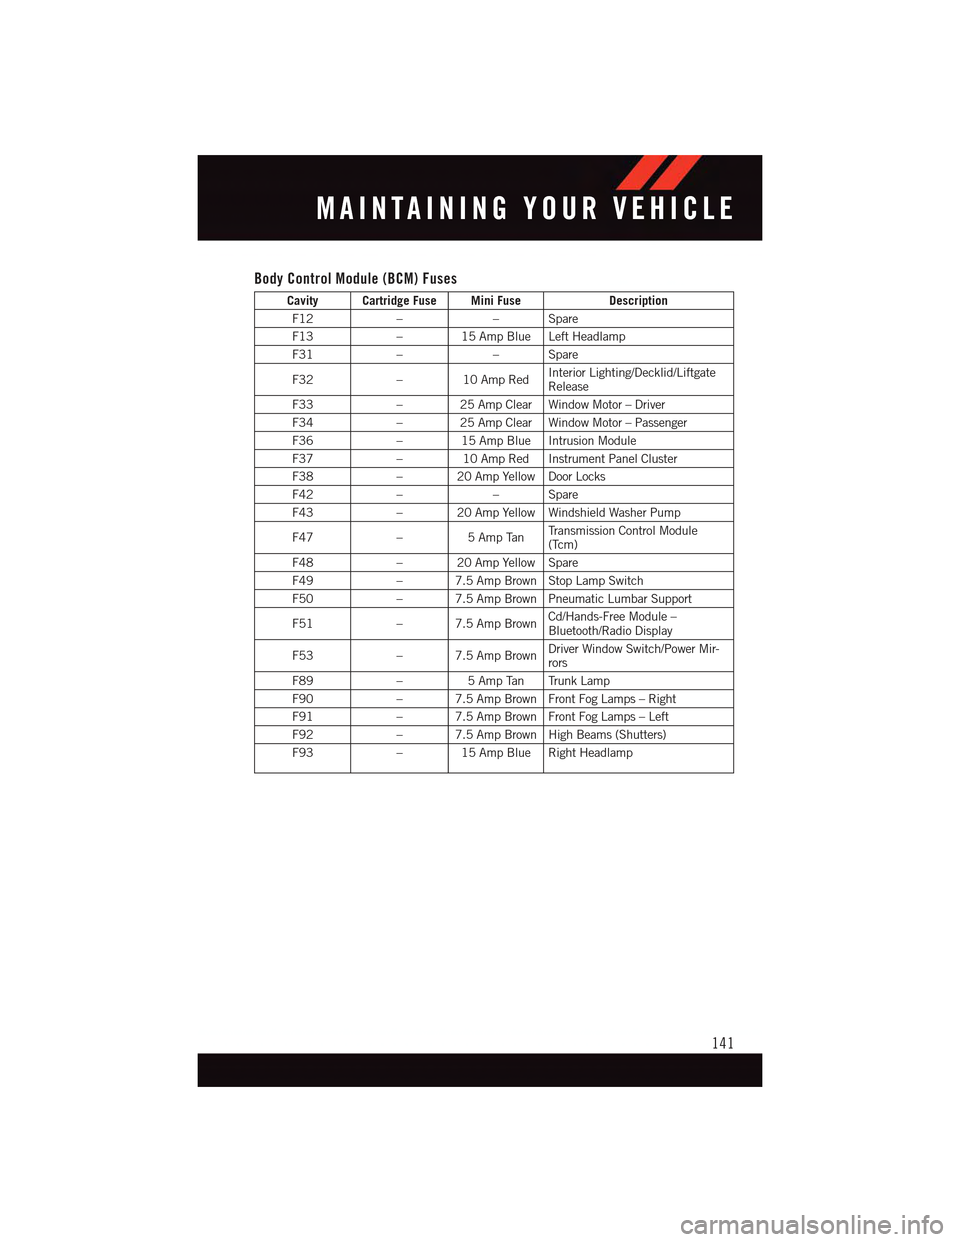
Body Control Module (BCM) Fuses
Cavity Cartridge Fuse Mini FuseDescription
F12––Spare
F13–15AmpBlueLeftHeadlamp
F31––Spare
F32–10AmpRedInterior Lighting/Decklid/LiftgateRelease
F33–25AmpClearWindowMotor–Driver
F34–25AmpClearWindowMotor–Passenger
F36–15AmpBlueIntrusionModule
F37–10AmpRedInstrumentPanelCluster
F38–20AmpYellowDoorLocks
F42––Spare
F43–20AmpYellowWindshieldWasherPump
F47–5AmpTanTr a n s m i s s i o n C o n t r o l M o d u l e(Tcm)
F48–20AmpYellowSpare
F49–7.5AmpBrownStopLampSwitch
F50–7.5AmpBrownPneumaticLumbarSupport
F51–7.5AmpBrownCd/Hands-Free Module –Bluetooth/Radio Display
F53–7.5AmpBrownDriver Window Switch/Power Mir-rors
F89–5AmpTan TrunkLamp
F90–7.5AmpBrownFrontFogLamps–Right
F91–7.5AmpBrownFrontFogLamps–Left
F92–7.5AmpBrownHighBeams(Shutters)
F93–15AmpBlueRightHeadlamp
MAINTAINING YOUR VEHICLE
141
Page 152 of 164

FREQUENTLY ASKED QUESTIONS
GETTING STARTED
•HowdoIinstallmyLATCHEquippedChildSeat?pg.24
•HowdoIfolddownmyrearseat?pg.29
ELECTRONICS
•Whichradioisinmyvehicle?
•Uconnect®200 pg. 52
•Uconnect®8.4 & 8.4N pg. 62
•HowdoIoperatetheAudioJack?
•Uconnect®200 pg. 56
•Uconnect®8.4 & 8.4N pg. 71
•HowdoIsettheclockonmyradio?
•Uconnect®200 pg. 53
•Uconnect®8.4 & 8.4N pg. 63
•HowdoIsetthepresetsonmyradio?
•Uconnect®200 pg. 54
•Uconnect®8.4 & 8.4N pg. 70
•HowdoIconnectmyportablemediaplayer/iPod/MP3?
•Uconnect®200 pg. 55
•Uconnect®8.4 & 8.4N pg. 70
•HowdoIusemyUSBporttolistentoaudiothroughmyradio?
•Uconnect®200 pg. 56
•Uconnect®8.4 & 8.4N pg. 70
•WhatfeaturesdoIhaveonmySiriusXM™SatelliteRadio?
•Uconnect®200 pg. 55
•Uconnect®8.4 & 8.4N pg. 79
•HowdoIpairmycellphoneviaBluetooth®with the Uconnect®Phone Hands-Free
Voice Activation System?
•Uconnect®200 pg. 57
•Uconnect®8.4 & 8.4N pg. 80
FAQ
150