2015 DODGE DART radio controls
[x] Cancel search: radio controlsPage 58 of 164

Audio Jack Operation
The Audio Jack allows a portable device,
such as an MP3 player or an iPod®to be
plugged into the center console and utilize
the vehicle’s audio system, using a 3.5 mm
stereo audio cable, to amplify the source
and play through the vehicle speakers.
Pushing the PLAYER button will change the
mode to auxiliary device if the Audio Jack is
connected, allowing the music from your
portable device to play through the vehicle's
speakers.
The functions of the portable device are
controlled using the device buttons. The
volume may be controlled using the radio or
portable device.
USB Port
Connect your iPod®/MP3 or compatible de-
vice using a USB cable into the USB Port.
USB Memory sticks with audio files can also be used. Then, audio from the device can be
played on the vehicles sound system while providing metadata (artist, track title, album,
etc.) information on the radio display.
Pushing the PLAYER button will change the device mode between connected auxiliary
devices.
When connected, the MP3 Player/compatible USB device can be controlled using the
radio or Steering Wheel Audio Controls or Voice Commands to play, skip to the next or
previous track, browse, and list the contents.
The MP3/WMA Player battery charges when plugged into the USB port (if supported by
the specific device).
To r o u t e t h e a u d i o c a b l e o u t o f t h e c e n t e r c o n s o l e , u s e t h e a c c e s s c u t o u t o n t h e r i g h t s i d e
of the console.
NOTE:
•YourvehiclecannotbeequippedwiththeUSBPortwithouthavingtheavailable
Uconnect®Voice Command feature.
•WhenconnectingyourMP3/WMAPlayerdeviceforthefirsttime,thesystemmaytake
several minutes to read your music, depending on the number of files. For example, the
system will take approximately five minutes for every 1,000 songs loaded on the
device. However, music on the device will play while reading continues in the
background. Also during the reading process, the Shuffle and Browse functions will be
USB/Audio Jack
1—USB/AUXJack2—AudioCableAccess
ELECTRONICS
56
Page 65 of 164

Uconnect® 8.4 & 8.4N AT A GLANCE
Anti-Theft Protection
This radio will not operate in any vehicle other than the vehicle in which it was delivered.
The radio display will prompt you to enter an anti-theft code and the radio will not
function, if this radio is transferred to another vehicle. You must contact your authorized
dealer to get the anti-theft code to unlock the radio.
Displaying The Time
If the time is not currently displayed on the radio or player main page, press the “More”
button on the touchscreen and then press the “Settings” button on the touchscreen. In
the Settings list, press the “Clock” button on the touchscreen then press the check box
next to Show Time in Status Bar.
Uconnect® 8.4N
1—STATUSBAR2—SmallNavigationMap(8.4N)3—MoreSettingsButton4—Uconnect®Phone Button5—GarminNavigationButton(8.4N)
6—ClimateControlButton7—ControlsButton8—PlayerButton9—RadioButton
ELECTRONICS
63
Page 70 of 164

Fav
Activates the favorites menu. You can add up to 50 favorite artists or songs. Just press
“Add Fav Artist” or “Add Fav Song” while the song is playing. You will then be alerted any
time one of these songs, or works by these artists, is playing on other SiriusXM channels.
SiriusXM Parental Controls
Yo u c a n s k i p o r h i d e c e r t a i n c h a n n e l s f r o m v i e w i f y o u d o n o t w a n t a c c e s s t o t h e m . P r e s s
the “More” button on the touchscreen, then the “Settings” button on the touchscreen,
next press the “SIRIUS Setup” button on the touchscreen, then select “Channel Skip.”
Press the box, check-mark, next to the channel you want skipped. They will not show up
in normal usage.
SiriusXM also offers the option to permanently block selected channels. Call
(1-888-601-6297 for U.S. customers, 1-877-438-9677 for Canadian customers) and
request the Family Package.
Browse
Lets you browse the SiriusXM channel listing, Favorites, Genres, Game Zone, and Weather
channels. Jump setting, and also provides the SiriusXM channel list. Browse contains
many sub-menus.
BrowseSub-MenuSub-Menu Description
AllShows the channel listing.
Genre Provides a list of all genres, and lets you jump to a channel within theselected genre.
Presets Lets you scroll the list of Preset satellite channels. Touch the channel, orpress Enter on the Tune knob, to go to that channel. Touch the trash can iconto delete a preset. Your presets are also shown at the top of the main SatelliteRadio screen.
Favorites Lets you manage artists and songs in the Favorites list and configure AlertSettings to let you know when favorite songs or artists are playing on otherchannels). Also, view a list of channels airing any of your Favorites.
Game ZoneProvides alerts when your favorite sports teams are starting a game which is beingaired on other SiriusXM channels, or when their game score is announced. Youcan select and manage your Teams list here, and configure alerts.
Jump Lets you select your favorite cities for Traffic & Weather information, which isused by the Jump feature on the main satellite radio screen.
Replay
Lets you replay up to 44 minutes of the content on the current SiriusXM channel.
NOTE:
•Youmustbeactivelylisteningtothesamestationconsistentlyfor44minuteswithout
changing stations.
•Ifyouchangetoadifferentchannel,youwilllosethesavedcontent.
ELECTRONICS
68
Page 72 of 164

Selecting The Source
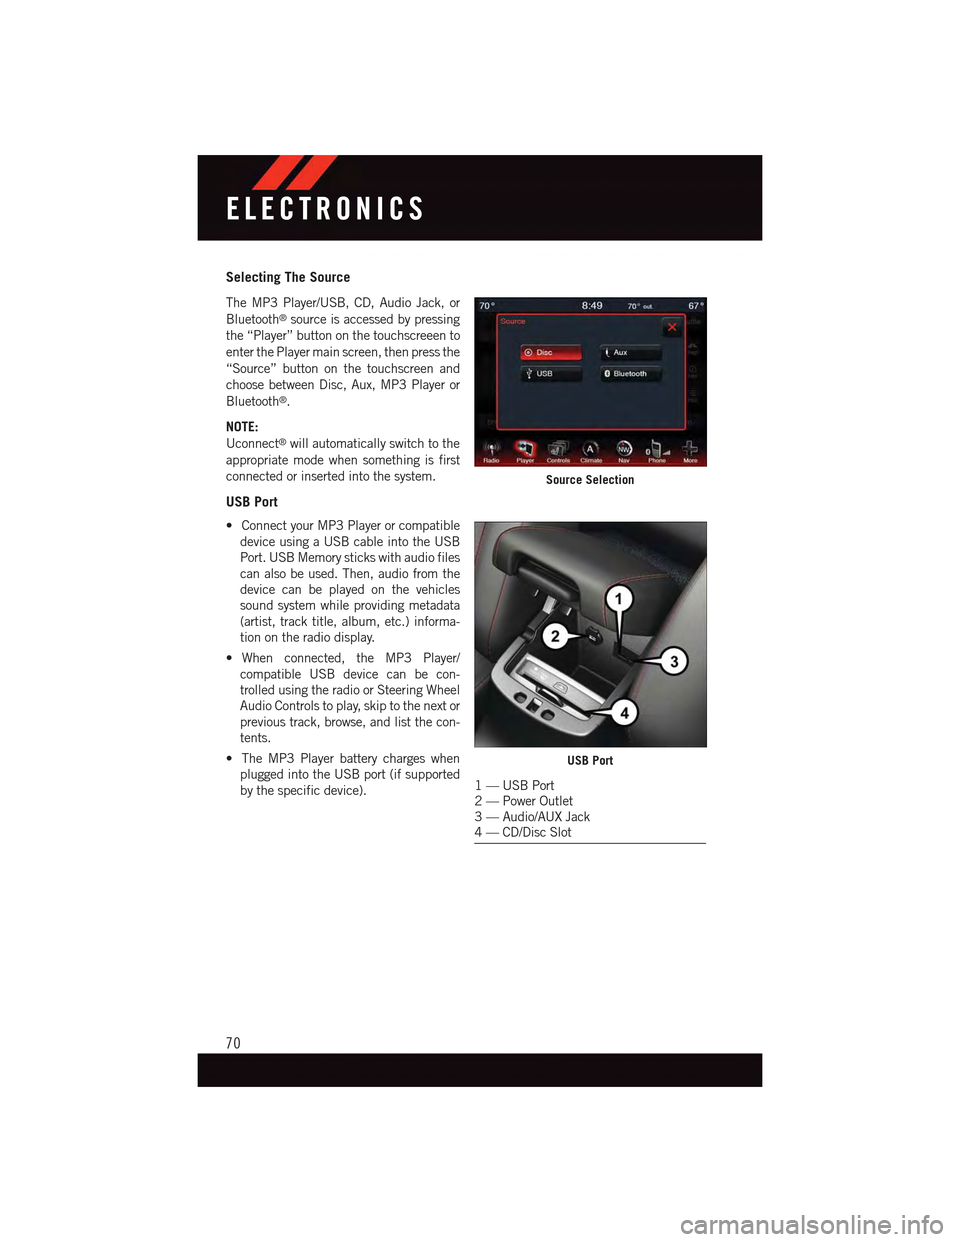
The MP3 Player/USB, CD, Audio Jack, or
Bluetooth®source is accessed by pressing
the “Player” button on the touchscreeen to
enter the Player main screen, then press the
“Source” button on the touchscreen and
choose between Disc, Aux, MP3 Player or
Bluetooth®.
NOTE:
Uconnect®will automatically switch to the
appropriate mode when something is first
connected or inserted into the system.
USB Port
•ConnectyourMP3Playerorcompatible
device using a USB cable into the USB
Port. USB Memory sticks with audio files
can also be used. Then, audio from the
device can be played on the vehicles
sound system while providing metadata
(artist, track title, album, etc.) informa-
tion on the radio display.
•When connected, the MP3 Player/
compatible USB device can be con-
trolled using the radio or Steering Wheel
Audio Controls to play, skip to the next or
previous track, browse, and list the con-
tents.
•TheMP3Playerbatterychargeswhen
plugged into the USB port (if supported
by the specific device).
Source Selection
USB Port
1—USBPort2—PowerOutlet3—Audio/AUXJack4—CD/DiscSlot
ELECTRONICS
70
Page 73 of 164

•Toroutetheaudiocableoutofthecenterconsole,usetheaccesscutoutontheright
side of the console.
NOTE:
When connecting your MP3 Player device
for the first time, the system may take
several minutes to read your music, de-
pending on the number of files. For ex-
ample, the system will take approximately
five minutes for every 1000 songs loaded
on the device. Also during the reading pro-
cess, the Shuffle and Browse functions will
be disabled. This process is needed to en-
sure the full use of your MP3 Player fea-
tures and only happens the first time it is
connected. After the first time, the reading
process of your MP3 Player will take con-
siderably less time unless changes are
made or new songs are added to the play-
list.
•TheUSBportsupportscertainMini,Classic,Nano,Touch,andiPhone®devices. The
USB port also supports playing music from compatible external USB Mass Storage
Class memory devices. Some iPod®software versions may not fully support the USB
port features. Please visit Apple’s website for iPod®software updates.
Audio Jack
The Audio Jack allows a portable device, such as an MP3 player or an iPod®to be plugged
into the radio and utilize the vehicle’s sound system, using a standard 3.5 mm audio
cable, to amplify the source and play through the vehicle speakers.
Press the “Player” button on the touchscreen on the then choose AUX source will change
the mode to auxiliary device if the Audio Jack is connected, allowing the music from your
portable device to be heard through the vehicle's speakers.
The functions of the portable device are controlled using the device controls. The volume
may be controlled using the radio or portable device.
To r o u t e t h e a u d i o c a b l e o u t o f t h e c e n t e r c o n s o l e , u s e t h e a c c e s s c u t o u t o n t h e r i g h t s i d e
of the console.
USB/MP3/Audio Cable Access
ELECTRONICS
71
Page 86 of 164

Phonebook
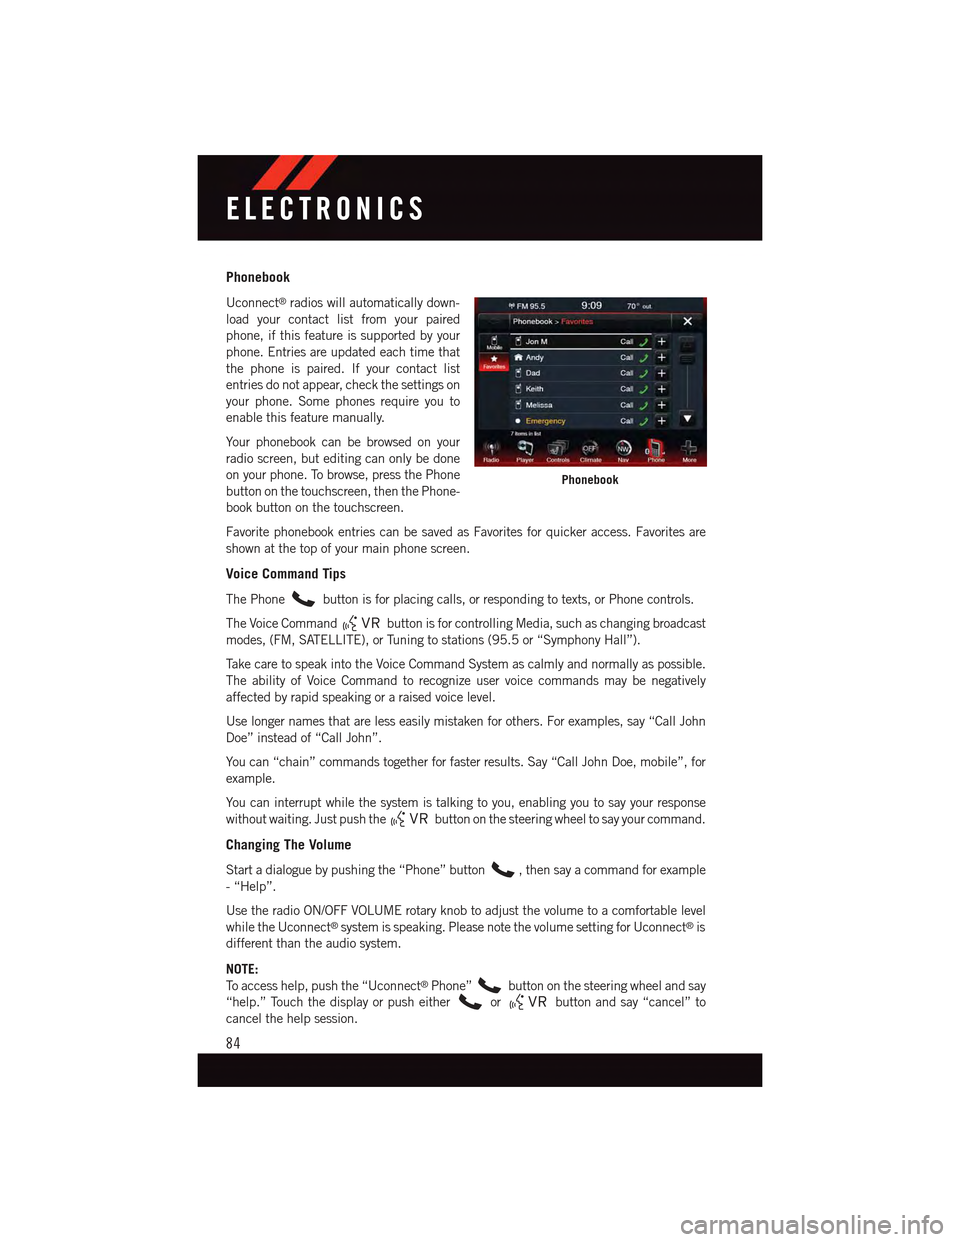
Uconnect®radios will automatically down-
load your contact list from your paired
phone, if this feature is supported by your
phone. Entries are updated each time that
the phone is paired. If your contact list
entries do not appear, check the settings on
your phone. Some phones require you to
enable this feature manually.
Yo u r p h o n e b o o k c a n b e b r o w s e d o n y o u r
radio screen, but editing can only be done
on your phone. To browse, press the Phone
button on the touchscreen, then the Phone-
book button on the touchscreen.
Favorite phonebook entries can be saved as Favorites for quicker access. Favorites are
shown at the top of your main phone screen.
Voice Command Tips
The Phonebutton is for placing calls, or responding to texts, or Phone controls.
The Voice Commandbutton is for controlling Media, such as changing broadcast
modes, (FM, SATELLITE), or Tuning to stations (95.5 or “Symphony Hall”).
Ta k e c a r e t o s p e a k i n t o t h e V o i c e C o m m a n d S y s t e m a s c a l m l y a n d n o r m a l l y a s p o s s i b l e .
The ability of Voice Command to recognize user voice commands may be negatively
affected by rapid speaking or a raised voice level.
Use longer names that are less easily mistaken for others. For examples, say “Call John
Doe” instead of “Call John”.
Yo u c a n “ c h a i n ” c o m m a n d s t o g e t h e r f o r f a s t e r r e s u l t s . S a y “ C a l l J o h n D o e , m o b i l e ” , f o r
example.
Yo u c a n i n t e r r u p t w h i l e t h e s y s t e m i s t a l k i n g t o y o u , e n a b l i n g y o u t o s a y y o u r r e s p o n s e
without waiting. Just push thebutton on the steering wheel to say your command.
Changing The Volume
Start a dialogue by pushing the “Phone” button,thensayacommandforexample
-“Help”.
Use the radio ON/OFF VOLUME rotary knob to adjust the volume to a comfortable level
while the Uconnect®system is speaking. Please note the volume setting for Uconnect®is
different than the audio system.
NOTE:
To a c c e s s h e l p , p u s h t h e “ U c o n n e c t®Phone”button on the steering wheel and say
“help.” Touch the display or push eitherorbutton and say “cancel” to
cancel the help session.
Phonebook
ELECTRONICS
84
Page 91 of 164

•Pushthebuttoninthecentertoselectthenextpresetstation(radio)ortochangeCDs
if equipped with a CD Changer.
ELECTRONIC VEHICLE INFORMATION CENTER (EVIC) —
STANDARD (2 BUTTON)
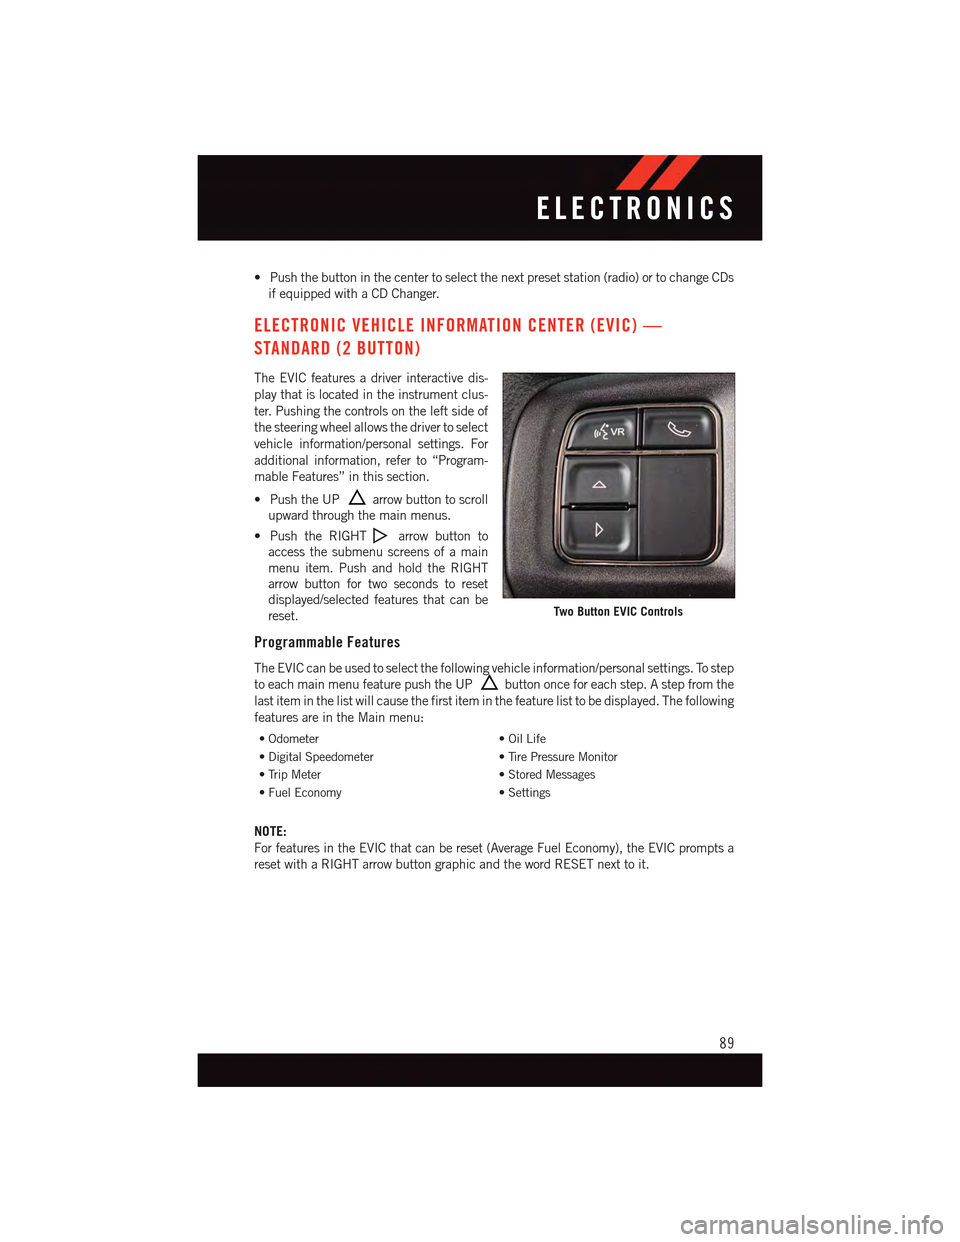
The EVIC features a driver interactive dis-
play that is located in the instrument clus-
ter. Pushing the controls on the left side of
the steering wheel allows the driver to select
vehicle information/personal settings. For
additional information, refer to “Program-
mable Features” in this section.
•PushtheUParrow button to scroll
upward through the main menus.
•PushtheRIGHTarrow button to
access the submenu screens of a main
menu item. Push and hold the RIGHT
arrow button for two seconds to reset
displayed/selected features that can be
reset.
Programmable Features
The EVIC can be used to select the following vehicle information/personal settings. To step
to each main menu feature push the UPbutton once for each step. A step from the
last item in the list will cause the first item in the feature list to be displayed. The following
features are in the Main menu:
•Odometer•OilLife
•DigitalSpeedometer•TirePressureMonitor
•TripMeter•StoredMessages
•FuelEconomy•Settings
NOTE:
For features in the EVIC that can be reset (Average Fuel Economy), the EVIC prompts a
reset with a RIGHT arrow button graphic and the word RESET next to it.
Two Button EVIC Controls
ELECTRONICS
89
Page 92 of 164

DRIVER INFORMATION DISPLAY (DID) — PREMIUM (4 BUTTON)
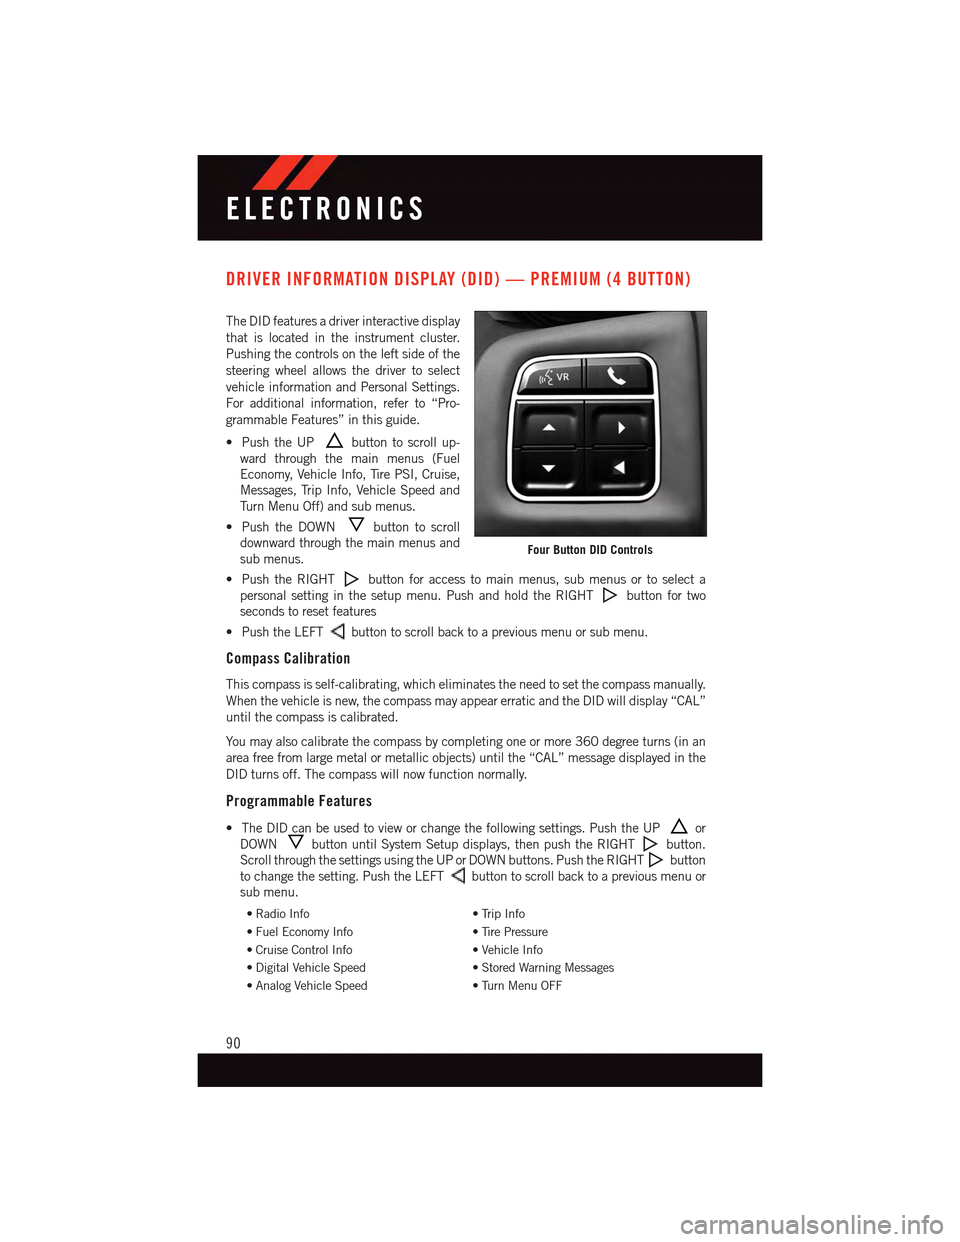
The DID features a driver interactive display
that is located in the instrument cluster.
Pushing the controls on the left side of the
steering wheel allows the driver to select
vehicle information and Personal Settings.
For additional information, refer to “Pro-
grammable Features” in this guide.
•PushtheUPbutton to scroll up-
ward through the main menus (Fuel
Economy, Vehicle Info, Tire PSI, Cruise,
Messages, Trip Info, Vehicle Speed and
Tu r n M e n u O f f ) a n d s u b m e n u s .
•PushtheDOWNbutton to scroll
downward through the main menus and
sub menus.
•PushtheRIGHTbutton for access to main menus, sub menus or to select a
personal setting in the setup menu. Push and hold the RIGHTbutton for two
seconds to reset features
•PushtheLEFTbutton to scroll back to a previous menu or sub menu.
Compass Calibration
This compass is self-calibrating, which eliminates the need to set the compass manually.
When the vehicle is new, the compass may appear erratic and the DID will display “CAL”
until the compass is calibrated.
Yo u m a y a l s o c a l i b r a t e t h e c o m p a s s b y c o m p l e t i n g o n e o r m o r e 3 6 0 d e g r e e t u r n s ( i n a n
area free from large metal or metallic objects) until the “CAL” message displayed in the
DID turns off. The compass will now function normally.
Programmable Features
•TheDIDcanbeusedtovieworchangethefollowingsettings.PushtheUPor
DOWNbutton until System Setup displays, then push the RIGHTbutton.
Scroll through the settings using the UP or DOWN buttons. Push the RIGHTbutton
to change the setting. Push the LEFTbutton to scroll back to a previous menu or
sub menu.
•RadioInfo•TripInfo
•FuelEconomyInfo•TirePressure
•CruiseControlInfo•VehicleInfo
•DigitalVehicleSpeed•StoredWarningMessages
•AnalogVehicleSpeed•TurnMenuOFF
Four Button DID Controls
ELECTRONICS
90